linux在做NIS服务器时启动 chkconfig time on时显示在 time 服务中读取信息时出错:没有那个文件或目录
Posted
tags:
篇首语:本文由小常识网(cha138.com)小编为大家整理,主要介绍了linux在做NIS服务器时启动 chkconfig time on时显示在 time 服务中读取信息时出错:没有那个文件或目录相关的知识,希望对你有一定的参考价值。
必须条件:a) 服务器端和客户端要安装运行支持服务pormap
b) c/s两端要分别安装nis软件包,并配置正确
c) 服务端要输出NFS共享目录,客户端要挂载SERVER端的共享目录
d) 客户端须修改用户帐号信息查询方式为NIS
e) 服务端本地信息更改,须重建NIS数据库
服务
协议
软件包
进程
NIS
(Network Information Service)
由portmap服务支持
Tcp & Udp 111
服务端:ypserv-*.rpm
客户端:ypbind-*.rpm
yp-tools-*.rpm
服务端:ypserv 和
Yppasswdd
客户端:ypbind 和 ypxfrd
服务器配置:
一. 支持服务安装
a). 确认服务portmap安装并运行。
rpm –qa | grep portmap 确定服务是否已安装;
service portmap status 确定服务是否正常运行;
b). 启动time和time-udp服务
chkconfig time on
chkconfig time-udp on
service xinetd restart
二. 安装NIS服务端软件包
a) 挂载光驱,找到安装包ypserv-*.rpm并安装
rpm –ivh ypserv-*.rpm
b) 设置开机启动NIS服务
chkconfig - - level 35 ypserv on
chkconfig - - level 35 yppasswdd on
c) 建立NIS域名:nisdomainname nistest
将命令写入开机自动执行档,开机时自动建立NIS域名:echo ‘nisdomainname nistest’ >> /etc/rc.d/rc.local
三. (可选)配置NIS服务的配置文件:vi /etc/ypserv.conf
设置允许或拒绝指定的主机(网段)使用NIS服务。格式如下:
主机(网段)地址 : 网络域名 : 映射数据库类型 : 安全等级
ip/主机名/网段 * * none/port/deny
例: 127.0.0.0/255.255.255.0 : * : * : none
192.168.1.0/255.255.255.0 : * : * : none
四. (可选)配置安全配置文件 vi /var/yp/securenets
比ypserv.conf具有更高的访问控制的级别与效率
例: host 127.0.0.1
255.255.255.0 192.168.1.0
五. 启动NIS服务,在启动NIS服务前,须确定支持服务已启动。
service ypserv start
service yppasswdd start
六. 构建NIS数据库,在NIS服务务主机中对本地系统用户帐号、组帐号等信息(文件)更改后都需要使用ypinit命令重新构建数据库文件的内容,否则NIS客户端主机获得的信息不会自动更新。
/usr/lib/yp/ypinit –m 建立主数据库
/usr/lib/yp/ypinit –s master 建立从数据库,master必存在。
建立成功后数据库文件何存在 /var/yp/ 下的与NIS域名同名的子目录中。
客户端配置:
一. 安装客户端软件包 rpm –ivh ypbind-*.rpm
二. 安装客户端测试工具 rpm –ivh yp-tools-*.rpm
三. 设置hosts文件 vi /etc/hosts 以便客户机可以通过主机名访问NIS服务器
四. 建立NIS域名: nisdomainname nisserver
设定开机自动设置NIS域名
方法一:vi /etc/rc.d/rc.local
增加一行:/bin/nisdomainname nisserver
方法二:echo ‘/bin/nisdomainname nisserver’ >> /etc/rc.d/rc.local
五. 设置ypbind服务程序的配置文件yp.conf
a) echo ‘domain nistest server nisserver’ >> /etc/yp.conf
b) vi /etc/yp.conf
添加:domain nistest server nisserver
六. 设置 /etc/nsswitch.conf ,用于设置系统中信息的查询方式
files表示本地 nis表示从NIS服务器
l passwd表示用户帐户信息查询
l shadow表示用户口令信息查询
l group表示用户组帐户信息查询
l hosts表示主机名信息查询
七. 启动ypbind服务
a) 查看支持服务portmap是否安装并运行正确
rpm –qa | grep pormap
service portmap status
b) 启动ypbind
service ypbind start
c) 设定ypbind运行级别
chkconfig –level 35 ypbind on
共享目录的应用
server端输出NFS共享目录:
1. 编辑 vi /etc/exports ,添加共享目录(例:/home)
/home *(rw,sync)
2. 启动NSF服务器程序
service nfs start
Client端挂载共享目录:
1. 添加自动挂载设置
vi /etc/fstab
192.168.1.10:/home /home nfs defaults 0 0
2. 使用mount命令挂载目录
例:mount /home
以下进行客户端上的配置:
1.确认安装以下包: ypbind、yp-tools默认安装了的
2.设置hosts文件
[root@localhost ~]# cat /etc/hosts
# Do not remove the following line, or various programs
# that require network functionality will fail.
127.0.0.1 localhost.localdomain localhost
192.168.1.10 crazylinux NIS服务器的主机名
3.建立NIS域名
[root@crazylinux /]# nisdomainname nistest
[root@crazylinux /]# cat /etc/rc.d/rc.local
#!/bin/sh
#
# This script will be executed *after* all the other init scripts.
# You can put your own initialization stuff in here if you don't
# want to do the full Sys V style init stuff.
touch /var/lock/subsys/local
/bin/nisdomainname nistest 添加这行使之开机运行
修改/etc/sysconfig/network文件,增加此行:NISDOMAIN=nistest
4.设置yp.conf
[root@localhost ~]# cat /etc/yp.conf
# generated by /sbin/dhclient-script
domain domain.org broadcast
domain nistest 添加这句
ypserver crazylinux.nistest
在/etc/passwd最下面添加
+::::::
5.设置nsswitch.conf
vi /etc/nsswitch.conf 修改为这样
passwd: files nis nisplus
shadow: files nis nisplus
group: files nis nisplus
#hosts: db files nisplus nis dns
hosts: files nis dns
6.启动ypbind服务程序
[root@localhost ~]# service portmap status
portmap (pid 1683) is running...
[root@localhost ~]# service ypbind start
Binding to the NIS domain: [ OK ]
Listening for an NIS domain server..
在NIS服务器中输出NFS共享目录
在nis服务器上
[root@localhost ~]# vi /etc/exports 添加
/home 192.168.1.0/24(rw,async,np_root_squash)
[root@localhost ~]#service nfs start
在NIS客户机上
[root@localhost ~]#vi /etc/fstab
Crazylinux.nistest:/home/ /home nfs defaults 0 0 参考技术A 要解决的问题是什么?虽然有点小明白,就是出错了,要解决掉这个错误,但不明白具体是什么。
CentOS-7.6 下搭建 NIS 服务器
服务端配置:
Server: 192.168.0.178(CentOS 7.6)
# systemctl stop firewalld
# systemctl disable firewalld
# sed -i 's/=enforcing/=disable/' /etc/selinux/config
安装 NIS 服务端
# yum install -y ypserv rpcbind yp-tools设置 NIS 域名
# nisdomainname nis.local
# echo "nisdomainname nis.local" >> /etc/rc.d/rc.local
# chmod +x /etc/rc.local
# echo "NISDOMAIN=nis.local" >> /etc/sysconfig/network
# echo "192.168.0.178 nis.local" >> /etc/hosts
编辑 /etc/sysconfig/network 文件,设置 NIS 服务端口为 1011
# sed -i 's/YPSERVER_ARGS=/YPSERVER_ARGS="-p 1011"/' /etc/sysconfig/network编辑 /etc/sysconfig/yppasswdd 文件,设置访问密码端口为 1012
# sed -i 's/YPPASSWDD_ARGS=/YPPASSWDD_ARGS="--port 1012"/' /etc/sysconfig/yppasswdd设置允许内网全网段均可访问:
# echo "192.168.0.0/24:*:*:none" >> /etc/ypserv.conf重新启动服务
# systemctl restart rpcbind
# systemctl restart ypserv
# systemctl restart yppasswdd
将服务设为开机自启
# systemctl enable rpcbind
# systemctl enable ypserv
# systemctl enable yppasswdd
检查服务是否启动:
# rpcinfo -p localhost
# rpcinfo -u localhost ypserv
创建生成 NIS 用户数据库
# /usr/lib64/yp/ypinit -m每次修改用户后,执行下面命令来生效,不用重启服务
# make -C /var/yp客户端配置:
Client: 192.168.0.154(RedHat 6.9),192.168.0.155(RedHat 6.7)
# yum install -y rpcbind yp-tools ypbind
# nisdomainname xynis.local
# echo "nisdomainname xynis.local" >> /etc/rc.local
# echo "NISDOMAIN=xynis.local" >> /etc/sysconfig/network
# echo "192.168.0.178 xynis.local" >> /etc/hosts
修改 /etc/nsswitch.conf,添加 NIS 服务认证
在 passwd,shadow,group 以及 hosts 行的 files 后面都添加上 nis。

修改 /etc/sysconfig/authconfig 文件,将 USENIS=no 改为 USENIS=yes
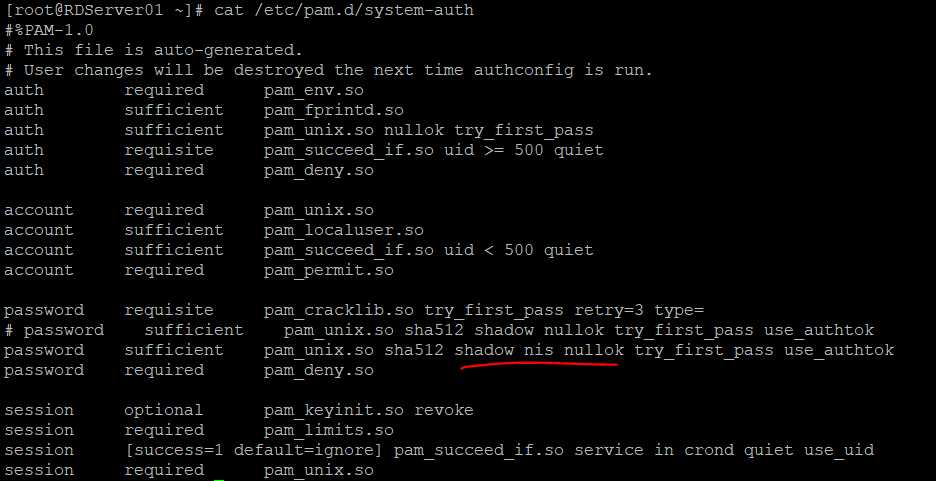
# sed -i 's/USENIS=no/USENIS=yes/' /etc/sysconfig/authconfig修改 /etc/pam.d/system-auth 文件,在password sufficient 一行中,在 shadow 后面插入 nis

配置 NIS 服务器 IP 地址
# echo "domain nis.local server 192.168.0.178" >> /etc/yp.conf重启服务
# service rpcbind restart
# service ypbind restart
注:若 ypbind 启动失败的话,需要设置下 NIS 服务器上的防火墙(iptables 或 firewall-cmd)
设置开机自启
# chkconfig rpcbind on
# chkconfig ypbind on
以上是关于linux在做NIS服务器时启动 chkconfig time on时显示在 time 服务中读取信息时出错:没有那个文件或目录的主要内容,如果未能解决你的问题,请参考以下文章