Python采集游记攻略,为十月假期做准备
Posted python可乐编程
tags:
篇首语:本文由小常识网(cha138.com)小编为大家整理,主要介绍了Python采集游记攻略,为十月假期做准备相关的知识,希望对你有一定的参考价值。
用python爬取去哪儿游记攻略为十月假期做准备。。。爬虫之路,永无止境!
热热闹闹的开学季又来了,小伙伴们又可以在一起玩耍了,不对是在一起学习了,哈哈。

再过几周就是国庆假期,想想还是很激动的,我决定给大家做个游记爬虫,大家早做准备。。嘿嘿
很多人学习python,不知道从何学起。
很多人学习python,掌握了基本语法过后,不知道在哪里寻找案例上手。
很多已经做案例的人,却不知道如何去学习更加高深的知识。
那么针对这三类人,我给大家提供一个好的学习平台,免费领取视频教程,电子书籍,以及课程的源代码!
QQ群:701698587
欢迎加入,一起讨论 一起学习!

代码操作展示:
今天目标地址:
https://travel.qunar.com/place/
开发环境:
windows10
python3.6
开发工具:
pycharm
库:
tkinter、re、os、lxml、threading、xlwt、xlrd
1.首先先将全国所有的城市名称和id拿到
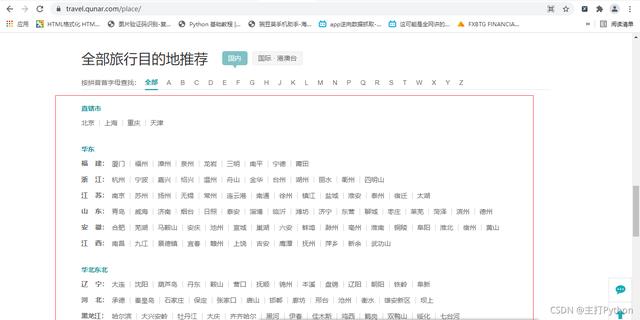
2.右击检查,进行抓包,找到数据所在的包
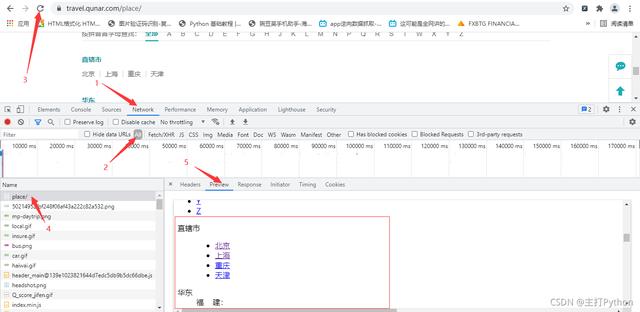
3.发送请求,获取响应,解析响应
# 发送请求,获取响应,解析响应
        response = session.get(self.start_url, headers=self.headers).html
        # 提取所有目的地(城市)的url
        city_url_list = response.xpath(
            \'//*[@id="js_destination_recommend"]/div[2]/div[1]/div[2]/dl/dd/div/ul/li/a/@href\')
        city_id_list = [\'\'.join(re.findall(r\'-cs(.*?)-\', i)) for i in city_url_list]
        # 提取所有的城市名称
        city_name_list = response.xpath(
            \'//*[@id="js_destination_recommend"]/div[2]/div[1]/div[2]/dl/dd/div/ul/li/a/text()\')
4.随机点一个城市,进入该城市,查看游记攻略,本文选的是上海

5.进行抓包,查找需要的信息
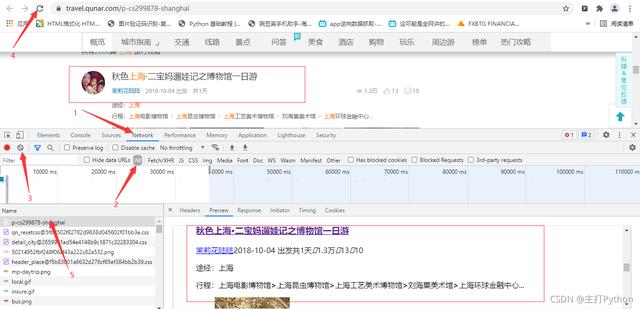
                 # 提取游记作者
                author_list = html.xpath(\'//span[@class="user_name"]/a/text()\')
                # 出发时间
                date_list = html.xpath(\'//span[@class="date"]/text()\')
                # 游玩时间
                days_list = html.xpath(\'//span[@class="days"]/text()\')
                # 阅读量
                read_list = html.xpath(\'//span[@class="icon_view"]/span/text()\')
                # 点赞量
                like_count_list = html.xpath(\'//span[@class="icon_love"]/span/text()\')
                # 评论量
                icon_list = html.xpath(\'//span[@class="icon_comment"]/span/text()\')
                # 游记地址
                text_url_list = html.xpath(\'//h3[@class="tit"]/a/@href\')
6.进行翻页抓包,第二页为异步加载


7.在上一张图中点击Headers,获取游记攻略的请求地址
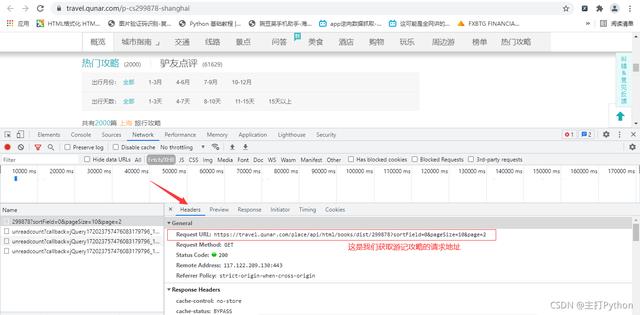
这样思路是不是清晰一点,来观察一下请求地址
https://travel.qunar.com/place/api/html/books/dist/299878?sortField=0&pageSize=10&page=2
其中299878是上海城市的id page是页数
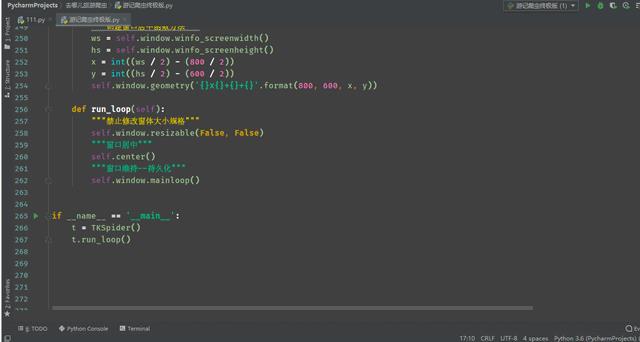
源码展示:
# !/usr/bin/nev python
# -*-coding:utf8-*-
import tkinter as tk
import re
from lxml import etree
import tkinter.messagebox as msgbox
from requests_html import HTMLSession
from threading import Thread
import os, xlwt, xlrd
from xlutils.copy import copy
session = HTMLSession()

class TKSpider(object):

    def __init__(self):
        # 定义循环条件
        self.is_running = True
        # 定义起始的页码
        self.start_page = 1
        """定义可视化窗口,并设置窗口和主题大小布局"""
        self.window = tk.Tk()
        self.window.title(\'爬虫数据采集\')
        self.window.geometry(\'1000x800\')

        """创建label_user按钮,与说明书"""
        self.label_user = tk.Label(self.window, text=\'请选择城市输入序号:\', font=(\'Arial\', 12), width=30, height=2)
        self.label_user.pack()
        """创建label_user关联输入"""
        self.entry_user = tk.Entry(self.window, show=None, font=(\'Arial\', 14))
        self.entry_user.pack(after=self.label_user)

        """创建Text富文本框,用于按钮操作结果的展示"""
        # 定义富文本框滑动条
        scroll = tk.Scrollbar()
        # 放到窗口的右侧, 填充Y竖直方向
        scroll.pack(side=tk.RIGHT, fill=tk.Y)
        self.text1 = tk.Text(self.window, font=(\'Arial\', 12), width=75, height=20)
        self.text1.pack()
        # 两个控件关联
        scroll.config(command=self.text1.yview)
        self.text1.config(yscrollcommand=scroll.set)

        """定义按钮1,绑定触发事件方法"""
        self.button_1 = tk.Button(self.window, text=\'下载游记\', font=(\'Arial\', 12), width=10, height=1, command=self.parse_hit_click_1)
        self.button_1.pack(before=self.text1)

        """定义按钮2,绑定触发事件方法"""
        self.button_2 = tk.Button(self.window, text=\'清除\', font=(\'Arial\', 12), width=10, height=1, command=self.parse_hit_click_2)
        self.button_2.pack(anchor="e")

        """定义富文本文字的显示"""
        self.start_url = \'https://travel.qunar.com/place/\'
        self.headers = {
            \'user-agent\': \'Mozilla/5.0 (Windows NT 10.0; Win64; x64) AppleWebKit/537.36 (KHTML, like Gecko) Chrome/92.0.4515.159 Safari/537.36\'
        }
        # 发送请求,获取响应,解析响应
        response = session.get(self.start_url, headers=self.headers).html
        # 提取所有目的地(城市)的url
        city_url_list = response.xpath(
            \'//*[@id="js_destination_recommend"]/div[2]/div[1]/div[2]/dl/dd/div/ul/li/a/@href\')
        city_id_list = [\'\'.join(re.findall(r\'-cs(.*?)-\', i)) for i in city_url_list]
        # 提取所有的城市名称
        city_name_list = response.xpath(
            \'//*[@id="js_destination_recommend"]/div[2]/div[1]/div[2]/dl/dd/div/ul/li/a/text()\')
        self.dict_data = dict(zip(city_id_list, city_name_list))
        text_info = \'\'
        for city_id, city_name in zip(city_id_list, city_name_list):
            text_info += city_id + ":" + city_name + \'\\t\\t\'
        self.text1.insert("insert", text_info)

    def parse_hit_click_1(self):
        """线程关联:定义触发事件1, 将执行结果显示在文本框中"""
        Thread(target=self.parse_start_url_job).start()

    def parse_city_id_name_info(self):
        """
        富文本内容展示:
        :return:
        """
        # 发送请求,获取响应,解析响应
        response = session.get(self.start_url, headers=self.headers).html
        # 提取所有目的地(城市)的url
        city_url_list = response.xpath(
            \'//*[@id="js_destination_recommend"]/div[2]/div[1]/div[2]/dl/dd/div/ul/li/a/@href\')
        city_id_list = [\'\'.join(re.findall(r\'-cs(.*?)-\', i)) for i in city_url_list]
        # 提取所有的城市名称
        city_name_list = response.xpath(
            \'//*[@id="js_destination_recommend"]/div[2]/div[1]/div[2]/dl/dd/div/ul/li/a/text()\')
        self.dict_data = dict(zip(city_id_list, city_name_list))
        text_info = \'\'
        for city_id, city_name in zip(city_id_list, city_name_list):
            text_info += city_id + ":" + city_name + \'\\t\\t****\'
        self.text1.insert("insert", text_info)


    def parse_start_url_job(self):
        # 从输入窗口获取输入
        city_id = self.entry_user.get()
        self.text1.delete("1.0", "end")
        # 异常捕捉,是否存在key值
        try:
            city_name = self.dict_data[city_id]
            self.parse_request_yj(city_id, city_name)
        except:
            # 报错提示
            msgbox.showerror(title=\'错误\', message=\'检测到瞎搞,请重新输入!\')

    def parse_request_yj(self, city_id, city_name):
        """
        拼接游记地址,进行翻页
        :param city_id: 城市的id
        :param city_name: 城市的名称
        :return:
        """
        while self.is_running:
            yj_url = f\'https://travel.qunar.com/place/api/html/books/dist/{city_id}?sortField=0&pageSize=10&page={self.start_page}\'
            response = session.get(yj_url, headers=self.headers).json()[\'data\'].replace(\'\\\\\', \'\')
            html = etree.HTML(response)
            # 提取游记的标题:
            title_list = html.xpath(\'//h3[@class="tit"]/a/text()\')
            # 死循环的终止条件
            if not title_list:
                print("该城市已经采集到最后一页----------城市切换中---------logging!!!")
                break
            else:
                # 提取游记作者
                author_list = html.xpath(\'//span[@class="user_name"]/a/text()\')
                # 出发时间
                date_list = html.xpath(\'//span[@class="date"]/text()\')
                # 游玩时间
                days_list = html.xpath(\'//span[@class="days"]/text()\')
                # 阅读量
                read_list = html.xpath(\'//span[@class="icon_view"]/span/text()\')
                # 点赞量
                like_count_list = html.xpath(\'//span[@class="icon_love"]/span/text()\')
                # 评论量
                icon_list = html.xpath(\'//span[@class="icon_comment"]/span/text()\')
                # 游记地址
                text_url_list = html.xpath(\'//h3[@class="tit"]/a/@href\')
                """构造保存数据格式字典"""
                for a, b, c, d, e, f, g, h in zip(title_list, author_list, date_list, days_list, read_list, like_count_list, icon_list, text_url_list):
                    dict_dd = {
                        city_name: [a, b, c, d, e, f, g, h]
                    }
                    self.text1.insert("insert", f"{a}-----------采集完成!!!" + \'\\n\')
                    self.SaveExcels(dict_dd)
            self.start_page += 1

    def SaveExcels(self, data):
        # 获取表的名称
        sheet_name = [i for i in data.keys()][0]
        # 创建保存excel表格的文件夹
        # os.getcwd() 获取当前文件路径
        os_mkdir_path = os.getcwd() + \'/数据/\'
        # 判断这个路径是否存在,不存在就创建
        if not os.path.exists(os_mkdir_path):
            os.mkdir(os_mkdir_path)
        # 判断excel表格是否存在           工作簿文件名称
        os_excel_path = os_mkdir_path + \'数据.xls\'
        if not os.path.exists(os_excel_path):
            # 不存在,创建工作簿(也就是创建excel表格)
            workbook = xlwt.Workbook(encoding=\'utf-8\')
            """工作簿中创建新的sheet表"""  # 设置表名
            worksheet1 = workbook.add_sheet(sheet_name, cell_overwrite_ok=True)
            """设置sheet表的表头"""
            sheet1_headers = (\'游记标题\', \'发布游记的作者名称\', \'出发时间\', \'游玩时间\', \'阅读量\', \'点赞量\', \'评论量\', \'游记地址\')
            # 将表头写入工作簿
            for header_num in range(0, len(sheet1_headers)):
                # 设置表格长度
                worksheet1.col(header_num).width = 2560 * 3
                # 写入表头        行,    列,           内容
                worksheet1.write(0, header_num, sheet1_headers[header_num])
            # 循环结束,代表表头写入完成,保存工作簿
            workbook.save(os_excel_path)
        """=============================已有工作簿添加新表==============================================="""
        # 打开工作薄
        workbook = xlrd.open_workbook(os_excel_path)
        # 获取工作薄中所有表的名称
        sheets_list = workbook.sheet_names()
        # 如果表名称:字典的key值不在工作簿的表名列表中
        if sheet_name not in sheets_list:
            # 复制先有工作簿对象
            work = copy(workbook)
            # 通过复制过来的工作簿对象,创建新表  -- 保留原有表结构
            sh = work.add_sheet(sheet_name)
            # 给新表设置表头
            excel_headers_tuple = (\'游记标题\', \'发布游记的作者名称\', \'出发时间\', \'游玩时间\', \'阅读量\', \'点赞量\', \'评论量\', \'游记地址\')
            for head_num in range(0, len(excel_headers_tuple)):
                sh.col(head_num).width = 2560 * 3
                #               行,列,  内容,            样式
                sh.write(0, head_num, excel_headers_tuple[head_num])
            work.save(os_excel_path)
        """========================================================================================="""
        # 判断工作簿是否存在
        if os.path.exists(os_excel_path):
            # 打开工作簿
            workbook = xlrd.open_workbook(os_excel_path)
            # 获取工作薄中所有表的个数
            sheets = workbook.sheet_names()
            for i in range(len(sheets)):
                for name in data.keys():
                    worksheet = workbook.sheet_by_name(sheets[i])
                    # 获取工作薄中所有表中的表名与数据名对比
                    if worksheet.name == name:
                        # 获取表中已存在的行数
                        rows_old = worksheet.nrows
                        # 将xlrd对象拷贝转化为xlwt对象
                        new_workbook = copy(workbook)
                        # 获取转化后的工作薄中的第i张表
                        new_worksheet = new_workbook.get_sheet(i)
                        for num in range(0, len(data[name])):
                            new_worksheet.write(rows_old, num, data[name][num])
                        new_workbook.save(os_excel_path)

    def parse_hit_click_2(self):
        """定义触发事件2,删除文本框中内容"""
        self.entry_user.delete(0, "end")
        # self.entry_passwd.delete(0, "end")
        self.text1.delete("1.0", "end")
        self.parse_city_id_name_info()

    def center(self):
        """创建窗口居中函数方法"""
        ws = self.window.winfo_screenwidth()
        hs = self.window.winfo_screenheight()
        x = int((ws / 2) - (800 / 2))
        y = int((hs / 2) - (600 / 2))
        self.window.geometry(\'{}x{}+{}+{}\'.format(800, 600, x, y))

    def run_loop(self):
        """禁止修改窗体大小规格"""
        self.window.resizable(False, False)
        """窗口居中"""
        self.center()
        """窗口维持--持久化"""
        self.window.mainloop()


if __name__ == \'__main__\':
    t = TKSpider()
    t.run_loop()
以上是关于Python采集游记攻略,为十月假期做准备的主要内容,如果未能解决你的问题,请参考以下文章