七从GitHub浏览Prism示例代码的方式入门WPF下的Prism之RegionContext
Posted 杜文龙
tags:
篇首语:本文由小常识网(cha138.com)小编为大家整理,主要介绍了七从GitHub浏览Prism示例代码的方式入门WPF下的Prism之RegionContext相关的知识,希望对你有一定的参考价值。
从16示例继续学习Prism;
分析16示例RegionContext
1、引用关系
这个示例包含2个工程ModuleA工程和RegionContext主工程
ModuleA工程引用了Prism.Wpf;RegionContext工程引用了Prism.Unity和ModuleA
2、分析ModuleA工程
ModuleA工程引用了Prism.Wpf;
2.1、ModuleAModule.cs
ModuleAModule继承自Prism.Modularity.IModule;
实现了OnInitialized()方法,在方法中关联ContentRegion和PersonList、PersonDetailsRegion和PersonDetail;
  public void OnInitialized(IContainerProvider containerProvider)
        {
            var regionManager = containerProvider.Resolve<IRegionManager>();
            regionManager.RegisterViewWithRegion("ContentRegion", typeof(PersonList));
            regionManager.RegisterViewWithRegion("PersonDetailsRegion", typeof(PersonDetail));
        }
2.2、Views下的PersonDetail.xaml
PersonDetail.xaml中添加prism="http://prismlibrary.com/"
添加了附加依赖项属性prism:ViewModelLocator.AutoWireViewModel=true用于关联ViewModel
Grid被分为三行两列,分别放入了用于显示姓、名、年龄的TextBlock控件,并绑定到了SelectedPerson对象的FirstName、LastName、Age属性上。
  <Grid x:Name="LayoutRoot" Background="White">
        <Grid.ColumnDefinitions>
            <ColumnDefinition Width="Auto"/>
            <ColumnDefinition />
        </Grid.ColumnDefinitions>
        <Grid.RowDefinitions>
            <RowDefinition Height="Auto"/>
            <RowDefinition Height="Auto"/>
            <RowDefinition Height="Auto"/>
        </Grid.RowDefinitions>

        <!-- First Name -->
        <TextBlock Text="First Name:" Margin="5" />
        <TextBlock Grid.Column="1" Margin="5" Text="{Binding SelectedPerson.FirstName}" />

        <!-- Last Name -->
        <TextBlock Grid.Row="1" Text="Last Name:" Margin="5" />
        <TextBlock Grid.Row="1" Grid.Column="1"  Margin="5" Text="{Binding SelectedPerson.LastName}" />

        <!-- Age -->
        <TextBlock Grid.Row="2" Text="Age:" Margin="5"/>
        <TextBlock Grid.Row="2" Grid.Column="1"  Margin="5" Text="{Binding SelectedPerson.Age}"/>
    </Grid>
2.3、Personetail.cs
在构造函数中使用RegionContext.GetObervableContext下的PropertyChanged注册事件处理函数来接收处理内容,这里怎么触发的我们还看不到。只看处理函数,接收了sender并转换为ObservableObject类型,然后取出了value转化为Person,然后赋值了ViewModel下的SelectedPerson。ViewModel和View下是通过这些属性绑定的,ViewModel更新了,View也更新了显示的属性。
  public PersonDetail()
        {
            InitializeComponent();
            RegionContext.GetObservableContext(this).PropertyChanged += PersonDetail_PropertyChanged;
        }

        private void PersonDetail_PropertyChanged(object sender, System.ComponentModel.PropertyChangedEventArgs e)
        {
            var context = (ObservableObject<object>)sender;
            var selectedPerson = (Person)context.Value;
            (DataContext as PersonDetailViewModel).SelectedPerson = selectedPerson;
        }
2.4、ViewModel下的PersonDetailViewModel.cs
PersonDetailViewModel继承自Prism.Mvvm.BindableBase.
创建Person类型的SelectedPerson属性用于关联View下的显示内容。
2.5、Business下的Person.cs
Person继承自INotifyPropertyChanged,用于实现属性通知。
包含依赖项属性FirstName、LastName、Age、LastUpdated;
包含一个Event PropertyChanged,当属性值变更时触发OnPropertyChanged()方法。
2.5、PersonList.xaml
PersonList.xaml下添加命名空间 prism="http://prismlibrary.com/"
设置附加依赖项属性prism:ViewModelLocator.AutoWireViewModel=true用于自动关联View和ViewModel。
界面被分为了2行,上半部分高100单位,下半部分自适应。
ListBox绑定People。高度100
ContentControl 设置区域RegionName名字为PersonDetailsRegion
设置了prism:RegionManager.RegionContext="{Binding SelectedItem, ElementName=_listOfPeople}", 我们看到RegionContext是一个object类型,传入的参数为DependencyObject类型,我们知道使用DependencyObject的话,支持依赖项属性。
也就是说这里设置了一个附加依赖项属性RegionContext,内容为ListBox中选中的元素对象。cs文件中无额外代码。
2.6、ViewModels下的PersonListViewModel.cs
创建一个ObservableCollection类型用于接收一组Person对象的属性;
在构造函数中初始化People,添加10个Person对象。和View下的PersonList.xaml中的ListBox绑定;
3、分析RegionContext工程
RegionContext工程引用了Prism.Unity、ModuleA;
3.1、App.xaml
添加命名空间prism="http://prismlibrary.com/"
移除StartUpUri属性
修改Application为prism:PrismApplication
3.2、App.cs
修改App继承自PrismApplication;
重写CreateShell()设置启动窗体为MainWindow;
重写ConfigureModuleCatalog()添加ModuleAModule;
3.3、Views下的MainWindow.xaml
添加命名空间prism="http://prismlibrary.com/"
设置附加依赖项属性prism:ViewModelLocator.AutoWireViewModel=true关联ViewModel
在界面添加ConentControl 显示控件,并设置附加依赖项属性RegionName,用于关联View,cs文件中无额外代码。
3.4、ViewModels下的MainWindowViewModel.cs
MainWindowViewModel继承自Prism.Mvvm.BindableBase;
添加属性Title用于显示View;
运行代码
我们看到,点击LIstBox中的内容,下面会显示详情。切换时详情也会跟着变化。
通过前面的分析,我们发现主要的代码在Views下的PersonList.xaml中,在ContenControl上添加了prism:RegionManager.RegionContext的附加依赖项属性,我们前面分析了这个属性是object,传入的类型是DependencyObject类型,支持所有的依赖项属性。这里传入了在ListBox中选中的Item对象,详情信息的View中使用RegionContext.GetObservableContext注册PropertyChanged事件。
cs代码中,通过获取ViewModel来修改SelectedPerson对象,SelectedPerson是Person类型,继承自INotifyPropertyChanged。
主要是需要传入的地方设置prism:RegionManager.RegionContext和需要使用的地方注册RegionContext.GetObservableContext(this).PropertyChanged += PersonDetail_PropertyChanged;我们写个DEMO,验证一下。
4、创建WPFRegionContextNote解决方案,尝试自己写一遍这个项目
4.1、一步一步完成项目的创建
4.1.1、添加ModuleAModule工程,添加ModuleAModule中对Prism.wpf引用;
4.1.2、添加ModuleAModule.cs;并继承自Prism.Modularity.IModule;实现OnInitialized()但先什么也不写;
using Prism.Ioc;
using Prism.Modularity;

namespace ModuleAModule
{
    public class ModuleAModule : IModule
    {
        public void OnInitialized(IContainerProvider containerProvider)
        {

        }

        public void RegisterTypes(IContainerRegistry containerRegistry)
        {

        }
    }
}
4.1.3、创建Views文件夹,并创建ProsonList.xaml自定义控件
ProsonList自定义控件中,包含一个ListBox用于显示列表,包含一个ContentControl显示控件,用于关联详情页。布局为Grid,上下布局,上面高度为100,下面为自适应。
<UserControl x:Class="ModuleAModule.Views.PersonList"
             xmlns="http://schemas.microsoft.com/winfx/2006/xaml/presentation"
             xmlns:x="http://schemas.microsoft.com/winfx/2006/xaml"
             xmlns:mc="http://schemas.openxmlformats.org/markup-compatibility/2006"
             xmlns:d="http://schemas.microsoft.com/expression/blend/2008"
             xmlns:local="clr-namespace:ModuleAModule.Views"
             xmlns:prism="http://prismlibrary.com/"
             prism:ViewModelLocator.AutoWireViewModel="True"
             mc:Ignorable="d"
             d:DesignHeight="450" d:DesignWidth="800">
      <Grid>
        <Grid.RowDefinitions>
            <RowDefinition Height="100"/>
            <RowDefinition Height="Auto"/>
        </Grid.RowDefinitions>
        <ListBox x:Name="PeoplesListBox" />
        <ContentControl Grid.Row="1"/>
    </Grid>
</UserControl>
4.1.4、在Views下创建PersonDetail.xaml自定义控件
PersonDetail自定义控件包含3组显示文本,用于显示姓、名称和年龄。
<UserControl x:Class="ModuleAModule.Views.PersonDetail"
             xmlns="http://schemas.microsoft.com/winfx/2006/xaml/presentation"
             xmlns:x="http://schemas.microsoft.com/winfx/2006/xaml"
             xmlns:mc="http://schemas.openxmlformats.org/markup-compatibility/2006"
             xmlns:d="http://schemas.microsoft.com/expression/blend/2008"
             xmlns:local="clr-namespace:ModuleAModule.Views"
             xmlns:prism="http://prismlibrary.com/"
             prism:ViewModelLocator.AutoWireViewModel="True"
             d:DesignHeight="450" d:DesignWidth="800">
    <Grid>
        <Grid.RowDefinitions>
            <RowDefinition />
            <RowDefinition/>
            <RowDefinition/>
        </Grid.RowDefinitions>
        <Grid.ColumnDefinitions>
            <ColumnDefinition/>
            <ColumnDefinition/>
        </Grid.ColumnDefinitions>
        <TextBlock Text="First Name:" Margin="5"/>
        <TextBlock Grid.Column="1" Margin="5" />

        <TextBlock Text="Last Name" Grid.Row="1" Margin="5"/>
        <TextBlock Grid.Row="1" Grid.Column="1" Margin="5"/>

        <TextBlock Text="Age" Grid.Row="2" Margin="5"/>
        <TextBlock Grid.Row="2" Grid.Column="1" Margin="5"/>
    </Grid>
</UserControl>
这样的话,整体的显示就差不多了,我们现在开始关联数据
4.1.5、创建Business文件夹,添加Person.cs类
实现属性通知,person继承自INotifyPropertyChanged;
创建First Name、Last Name、Age属性,并在Set中触发通知
using System.ComponentModel;
using System.Runtime.CompilerServices;

namespace ModuleAModule.Business
{
    public class Person : INotifyPropertyChanged
    {
        private string _firstName = string.Empty;
        public string FirstName
        {
            get { return _firstName; }
            set
            {
                _firstName = value;
                OnPropertyChanged();
            }
        }

        private string _lastName = string.Empty;
        public string LastName
        {

            get { return _lastName; }
            set
            {
                _lastName = value;
                OnPropertyChanged();
            }
        }

        private int _age;

        public int Age
        {
            get
            {
                return _age;
            }

            set
            {
                _age = value;
                OnPropertyChanged();
            }
        }

        protected void OnPropertyChanged([CallerMemberName] string propertyname = null)
        {
            PropertyChanged?.Invoke(this, new PropertyChangedEventArgs(propertyname));
        }
        public event PropertyChangedEventHandler PropertyChanged;

        /// <summary>
        /// 如果代码是你手敲的,你就会注意这个注释,这个tostring 你写和不写是2个效果。可以再最后写完代码是时候,,试验一下。
        /// </summary>
        /// <returns></returns>
        public override string ToString()
        {
            return string.Format("{0}, {1}", LastName, FirstName);
        }
    }
}
4.1.6、创建ViewModel文件夹并添加PersonListViewModel.cs
主要是创建PersonList.xaml下需要使用的数据,比如用于显示在ListBox里的数据源。数据源是一个Person类型的数据集合,代码如下:
using ModuleAModule.Business;
using Prism.Mvvm;
using System.Collections.ObjectModel;

namespace ModuleAModule.ViewModels
{
    public class PersonListViewModel : BindableBase
    {
        ObservableCollection<Person> _people;
        public ObservableCollection<Person> People
        {
            get { return _people; }

            set { SetProperty(ref _people, value); }
        }
        public PersonListViewModel()
        {
            CreatePeple();
        }

        private void CreatePeple()
        {
            var people = new ObservableCollection<Person>();

            for (int i = 0; i < 10; i++)
            {
                people.Add(new Person()
                {
                    FirstName = $"First {i}",
                    LastName = $"Last {i}",
                    Age = i,
                });
            }
            People = people;
        }
    }
}
4.1.7、创建完PersonListViewModel.cs回到Views下的PersonList.xaml绑定VM。
<ListBox x:Name="PeoplesListBox" ItemsSource="{Binding People}"/>
4.1.8、添加WPFRegionContext的exe主工程用于显示List
添加WPF程序,设置名字为WPFRegionContext,添加Prism.Unity包引用、添加ModuleAModule工程的引用;
打开App.xaml,添加命名空间xmlns:prism="http://prismlibrary.com/"; 移除StartUpUri属性;修改Application继承自PrismApplication;
打开App.cs,修改App继承自PrismApplication;
重写CreateShell()方法,(这里我默认打完override没有智能提示,我从新生成一次工程后,提示有了,手动using Prism.Ioc解决返回window报错为object问题),设置默认启动页;
重写RegisterTypes()不重写报错;
重写ConfigureModuleCatalog()添加对ModuleAModule的引用,代码如下:
using Prism.Unity;
using Prism.Ioc;
using System.Windows;
using Prism.Modularity;

namespace WPFRegionContext
{
    /// <summary>
    /// App.xaml 的交互逻辑
    /// </summary>
    public partial class App : PrismApplication
    {
        protected override Window CreateShell()
        {
            return Container.Resolve<MainWindow>();
        }
        protected override void RegisterTypes(IContainerRegistry containerRegistry)
        {

        }
        protected override void ConfigureModuleCatalog(IModuleCatalog moduleCatalog)
        {
            base.ConfigureModuleCatalog(moduleCatalog);
            moduleCatalog.AddModule<ModuleAModule.ModuleAModule>();
        }
    }
}
4.1.9、打开MainWindow.xaml添加用于显示ListBox的ContentControl
添加命名空间、设置自动关联ViewModel、添加显示控件,设置RegionName;代码如下
<Window x:Class="WPFRegionContext.MainWindow"
        xmlns="http://schemas.microsoft.com/winfx/2006/xaml/presentation"
        xmlns:x="http://schemas.microsoft.com/winfx/2006/xaml"
        xmlns:d="http://schemas.microsoft.com/expression/blend/2008"
        xmlns:mc="http://schemas.openxmlformats.org/markup-compatibility/2006"
        xmlns:local="clr-namespace:WPFRegionContext"
        xmlns:prism="http://prismlibrary.com/"
        prism:ViewModelLocator.AutoWireViewModel="True"
        mc:Ignorable="d"
        Title="MainWindow" Height="450" Width="800">
    <Grid>
        <ContentControl prism:RegionManager.RegionName="ContentRegion"/>
    </Grid>
</Window>
4.1.10、打开ModuleAModule工程下的ModuleAModule.cs
再OnInitialized()方法中关联Region和PersonList
 public void OnInitialized(IContainerProvider containerProvider)
        {
            var regionManager = containerProvider.Resolve<IRegionManager>();
            regionManager.RegisterViewWithRegion("ContentRegion", typeof(PersonList));
        }
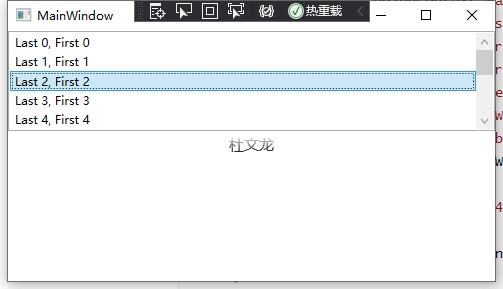
注意这里是RegisterViewWithRegion。这样就关联了起来,我们先跑起来看看,能否正确显示ListBox的内容;如下图。尝试修改Person.cs下的tostring()方法,或去掉该方法,看一下效果。这里也可以用控件模板,再修改。

我们继续往下,这里就是该示例最关键的RegionContext了。
4.1.11、打开Views下的PersonList.xaml,找到我们添加的ContentControl显示对象,用于显示选中的listbox对象,先绑定,然后设置RegionContext。RegionContext是object类型,传入的是DependencyObject。主要是添加了ContentControl显示控件的2个附加依赖项属性。整体代码如下:
<UserControl x:Class="ModuleAModule.Views.PersonList"
             xmlns="http://schemas.microsoft.com/winfx/2006/xaml/presentation"
             xmlns:x="http://schemas.microsoft.com/winfx/2006/xaml"
             xmlns:mc="http://schemas.openxmlformats.org/markup-compatibility/2006"
             xmlns:d="http://schemas.microsoft.com/expression/blend/2008"
             xmlns:local="clr-namespace:ModuleAModule.Views"
             xmlns:prism="http://prismlibrary.com/"
             prism:ViewModelLocator.AutoWireViewModel="True"
             mc:Ignorable="d"
             d:DesignHeight="450" d:DesignWidth="800" >
      <Grid>
        <Grid.RowDefinitions>
            <RowDefinition Height="100"/>
            <RowDefinition Height="Auto"/>
        </Grid.RowDefinitions>
        <ListBox x:Name="PeoplesListBox" ItemsSource="{Binding People}"/>
        <ContentControl
            Grid.Row="1"
            prism:RegionManager.RegionName="PersonDetailRegion"
            prism:RegionManager.RegionContext="{Binding ElementName=PeoplesListBox,Path=SelectedItem}"/>
    </Grid>
</UserControl>
4.1.12、添加完了RegionName 和RegionContext,我们去关联区域和显示的视图,打开ModuleAModule.cs文件修改代码如下:
 public void OnInitialized(IContainerProvider containerProvider)
        {
            var regionManager = containerProvider.Resolve<IRegionManager>();
            regionManager.RegisterViewWithRegion("ContentRegion", typeof(PersonList));
            regionManager.RegisterViewWithRegion("PersonDetailRegion", typeof(PersonDetail));
        }
4.1.13、添加ViewModels下的PersonDetailViewModel.cs用于关联View下的显示内容
using ModuleAModule.Business;
using Prism.Mvvm;

namespace ModuleAModule.ViewModels
{
    public class PersonDetailViewModel : BindableBase
    {
        private Person _selectPerson;
        public Person SelectPerson
        {
            get { return _selectPerson; }
            set {
                SetProperty(ref _selectPerson, value);
            }
        }
        public PersonDetailViewModel()
        {

        }
    }
}
4.1.14、回到Views下的PersonDetail.xaml文件夹,绑定显示控件和ViewModel下元素的显示关系;这里请注意,我们的绑定关系是再SelectPerson的对象下的属性,所以View中要写全SelectPerson,整体代码如下:
<UserControl x:Class="ModuleAModule.Views.PersonDetail"
             xmlns="http://schemas.microsoft.com/winfx/2006/xaml/presentation"
             xmlns:x="http://schemas.microsoft.com/winfx/2006/xaml"
             xmlns:mc="http://schemas.openxmlformats.org/markup-compatibility/2006"
             xmlns:d="http://schemas.microsoft.com/expression/blend/2008"
             xmlns:local="clr-namespace:ModuleAModule.Views"
             xmlns:prism="http://prismlibrary.com/"
             prism:ViewModelLocator.AutoWireViewModel="True" >
    <Grid>
        <Grid.RowDefinitions>
            <RowDefinition />
            <RowDefinition/>
            <RowDefinition/>
        </Grid.RowDefinitions>
        <Grid.ColumnDefinitions>
            <ColumnDefinition/>
            <ColumnDefinition/>
        </Grid.ColumnDefinitions>
        <TextBlock Text="First Name:" Margin="5"/>
        <TextBlock Grid.Column="1" Margin="5" Text="{Binding SelectPerson.FirstName}" />

        <TextBlock Text="Last Name" Grid.Row="1" Margin="5"/>
        <TextBlock Grid.Row="1" Grid.Column="1" Margin="5" Text="{Binding SelectPerson.LastName}"/>

        <TextBlock Text="Age" Grid.Row="2" Margin="5"/>
        <TextBlock Grid.Row="2" Grid.Column="1" Margin="5" Text="{Binding SelectPerson.Age}"/>
    </Grid>
</UserControl>
运行代码,就可以看到啦。这篇就写这么多啦,这里可以尝试以下为什么RegionContext的对象需要和PersonList放一起,拿出去放在MainWindow下可以吗。Region多次重叠之后,这个RegionContext是什么样的啊。都可以实验一下。
我创建了一个C#相关的交流群。用于分享学习资料和讨论问题。欢迎有兴趣的小伙伴:QQ群:542633085
以上是关于七从GitHub浏览Prism示例代码的方式入门WPF下的Prism之RegionContext的主要内容,如果未能解决你的问题,请参考以下文章