REDISredisson源码分析
Posted xuanxuan96
tags:
篇首语:本文由小常识网(cha138.com)小编为大家整理,主要介绍了REDISredisson源码分析相关的知识,希望对你有一定的参考价值。
之前《》说到redis的看门狗机制,其中有redisson实现可重入锁,今天趁着没空就来简单分下一下redisson的源码。
首先就是简单建一个springboot项目,这个就不啰嗦。
主要就是引入redisson的jar进pom.xml文件。

mvn上,有普通的,也有springboot starter的,都可以,这里用普通的演示。
<!-- https://mvnrepository.com/artifact/org.redisson/redisson --><dependency><groupId>org.redisson</groupId><artifactId>redisson</artifactId><version>3.15.0</version></dependency>
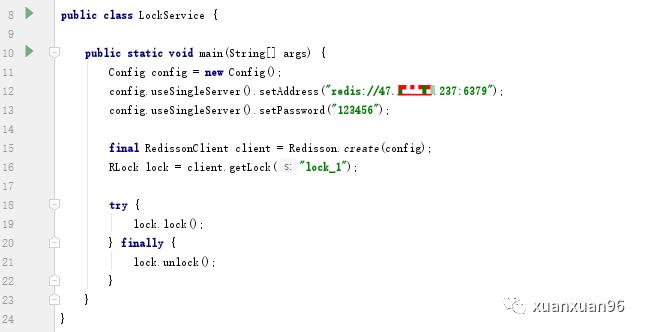
然后就是写一个测试类,主要是用redisson建立连接并完成加锁、解锁操作。

连接的服务器是阿里云的服务器。
代码分析:
1、Config
public Config() {// 传送方式:默认NIOthis.transportMode = TransportMode.NIO;// 看门狗时间:默认30秒this.lockWatchdogTimeout = 30000L;// 看门狗超时时间:默认10分钟this.reliableTopicWatchdogTimeout = TimeUnit.MINUTES.toMillis(10L);// 保持发布订阅this.keepPubSubOrder = true;// 是否使用脚本缓存this.useScriptCache = false;// 最小清理延迟this.minCleanUpDelay = 5;// 最大清理延迟this.maxCleanUpDelay = 1800;// 清理key数量this.cleanUpKeysAmount = 100;// nettyHookthis.nettyHook = new DefaultNettyHook();// 是否使用线程类加载器this.useThreadClassLoader = true;// 地址解析器组工厂this.addressResolverGroupFactory = new DnsAddressResolverGroupFactory();}
Config类主要是一些redisson配置,大多数都有默认值,我们主要看的是看门狗机制
lockWatchdogTimeout ,默认时间是30S,也就是如果在redis的一个分布式锁时间内没有执行完任务,redisson会再次延长30s时间,给当前拥有锁的线程执行代码。
reliableTopicWatchdogTimeout,也就是如果在这个时间范围内,拥有锁线程就算没有执行完逻辑代码,也不会再去加时,当然就很可能失去了锁的控制权。
2、RLOCK
看看获取锁对象方法getLock,返回的是一个new的RedissonLock对象的。
public RLock getLock(String name) {return new RedissonLock(this.connectionManager.getCommandExecutor(), name);}
RedissonLock对象的构造方法除了自定义的name属性外,还有一些其他的配置属性,都有默认值。
public RedissonLock(CommandAsyncExecutor commandExecutor, String name) {super(commandExecutor, name);// 命令执行器this.commandExecutor = commandExecutor;// 内部锁过期时间this.internalLockLeaseTime = commandExecutor.getConnectionManager().getCfg().getLockWatchdogTimeout();this.pubSub = commandExecutor.getConnectionManager().getSubscribeService().getLockPubSub();}
3.lock方法
public void lock() {try {this.lock(-1L, (TimeUnit)null, false);} catch (InterruptedException var2) {throw new IllegalStateException();}}
加锁方法调用的是无参数方法,但后面都是调用有参数的lock方法。
private void lock(long leaseTime, TimeUnit unit, boolean interruptibly)throws InterruptedException {// 线程IDlong threadId = Thread.currentThread().getId();// 尝试获取锁Long ttl = this.tryAcquire(-1L, leaseTime, unit, threadId);// 获取失败if (ttl != null) {// 订阅锁的channelRFuture<RedissonLockEntry> future = this.subscribe(threadId);if (interruptibly) {this.commandExecutor.syncSubscriptionInterrupted(future);} else {this.commandExecutor.syncSubscription(future);}try {// 不断尝试获取锁while(true) {ttl = this.tryAcquire(-1L, leaseTime, unit, threadId);// tt为空,获取成功if (ttl == null) {return;}// 获取失败if (ttl >= 0L) {try {// 等待ttl时间后再次尝试((RedissonLockEntry)future.getNow()).getLatch().tryAcquire(ttl, TimeUnit.MILLISECONDS);} catch (InterruptedException var13) {if (interruptibly) {throw var13;}// 等待ttl时间后再次尝试((RedissonLockEntry)future.getNow()).getLatch().tryAcquire(ttl, TimeUnit.MILLISECONDS);}} else if (interruptibly) {((RedissonLockEntry)future.getNow()).getLatch().acquire();} else {((RedissonLockEntry)future.getNow()).getLatch().acquireUninterruptibly();}}} finally {//取消对channel的订阅this.unsubscribe(future, threadId);}}}
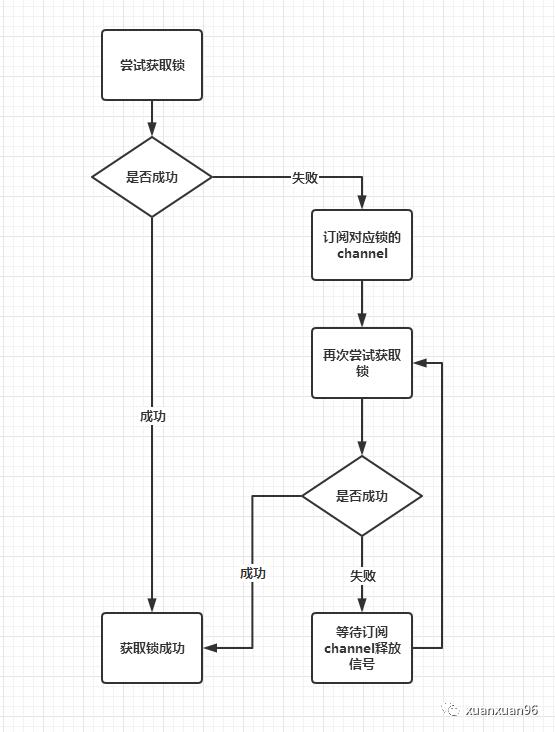
主要是调用tryAcquire来获取锁。
如果返回值ttl为空,则证明加锁成功,返回。
如果不为空,则证明加锁失败。这时候,它会订阅这个锁的Channel,等待锁释放的消息,然后重新尝试获取锁。
流程图

再看回上面的tryAcquire获取锁方法。
private Long tryAcquire(long waitTime, long leaseTime, TimeUnit unit, long threadId) {return (Long)this.get(this.tryAcquireAsync(waitTime, leaseTime, unit, threadId));}
调用的是tryAcquireAsync方法
private <T> RFuture<Long> tryAcquireAsync(long waitTime, long leaseTime, TimeUnit unit, long threadId) {if (leaseTime != -1L) {return this.tryLockInnerAsync(waitTime, leaseTime, unit, threadId, RedisCommands.EVAL_LONG);} else {RFuture<Long> ttlRemainingFuture =this.tryLockInnerAsync(waitTime, this.internalLockLeaseTime,TimeUnit.MILLISECONDS, threadId,RedisCommands.EVAL_LONG);ttlRemainingFuture.onComplete((ttlRemaining, e) -> {if (e == null) {if (ttlRemaining == null) {this.scheduleExpirationRenewal(threadId);}}});return ttlRemainingFuture;}}
最终实现加锁的是tryLockInnerAsync方法实现。
<T> RFuture<T> tryLockInnerAsync(long waitTime, long leaseTime, TimeUnit unit, long threadId, RedisStrictCommand<T> command) {this.internalLockLeaseTime = unit.toMillis(leaseTime);return this.evalWriteAsync(this.getName(),LongCodec.INSTANCE,command,//如果锁不存在,则通过hincrby设置它的值,并设置过期时间"if (redis.call('exists', KEYS[1]) == 0)then redis.call('hincrby', KEYS[1], ARGV[2], 1);redis.call('pexpire', KEYS[1], ARGV[1]);return nil;end;// 如果锁已存在,并且锁的是当前线程,则通过hincrby给数值递增1if (redis.call('hexists', KEYS[1], ARGV[2]) == 1)then redis.call('hincrby', KEYS[1], ARGV[2], 1);redis.call('pexpire', KEYS[1], ARGV[1]);return nil;end;// 如果锁已存在,但并非本线程,则返回过期时间ttlreturn redis.call('pttl', KEYS[1]);",Collections.singletonList(this.getName()),new Object[]{this.internalLockLeaseTime,this.getLockName(threadId)});}
上面这个格式看起来有点怪,注释的都是字符串,都是lua语言这平台bug是有点多的。
也不要因为看不懂lua而慌张,其实语法也挺简单的。
主要是用了exists和hexists。
关于hexists和exists
hexists只用来判断是否存在参数所指定的hash字段,只可以带一个参数,返回值只有1(存在)和0(不存在)两种情况。
exists用来判断key是否存在,只有1组参数时用法和hexists一样,时间复杂度也一样,所以效率没区别。Redis3.0.3之后支持多组参数,返回存在的key的数量。
主要就是三个步骤
首先是exists判断,如果锁不存在,则设置值和过期时间,加锁成功
然后是hexists判断,如果锁已存在,并且锁的是当前线程,则证明是重入锁,加锁成功
如果锁已存在,但锁的不是当前线程,则证明有其他线程持有锁。返回当前锁的过期时间,加锁失败
通过上面的代码可以看出,最终加锁的是还是lua脚本实现。
流程图
4、unlock方法
public void unlock() {try {// 解锁this.get(this.unlockAsync(Thread.currentThread().getId()));} catch (RedisException var2) {if (var2.getCause() instanceof IllegalMonitorStateException) {throw (IllegalMonitorStateException)var2.getCause();} else {throw var2;}}}
实现解锁主要是在unlockAsync方法
public RFuture<Void> unlockAsync(long threadId) {RPromise<Void> result = new RedissonPromise();// 真正的解锁方法RFuture<Boolean> future = this.unlockInnerAsync(threadId);future.onComplete((opStatus, e) -> {// 取消刷新过期时间的那个定时任务this.cancelExpirationRenewal(threadId);if (e != null) {result.tryFailure(e);//如果返回空,则证明解锁的线程和当前锁不是同一个线程,抛出异常} else if (opStatus == null) {IllegalMonitorStateException cause =new IllegalMonitorStateException("attempt to unlock lock, not locked by current thread by node id: " + this.id + " thread-id: " + threadId);result.tryFailure(cause);} else {//解锁成功result.trySuccess((Object)null);}});return result;}
最后解锁的还是lua脚本。
protected RFuture<Boolean> unlockInnerAsync(long threadId) {return this.evalWriteAsync(this.getName(),LongCodec.INSTANCE,RedisCommands.EVAL_BOOLEAN,//如果释放锁的线程和已存在锁的线程不是同一个线程,返回null"if (redis.call('hexists', KEYS[1], ARGV[3]) == 0)then return nil;end;// 通过hincrby递减1的方式,释放一次锁// 若剩余次数大于0 ,则刷新过期时间local counter = redis.call('hincrby', KEYS[1], ARGV[3], -1);if (counter > 0)then redis.call('pexpire', KEYS[1], ARGV[2]);return 0;else// 否则证明锁已经释放,删除key并发布锁释放的消息redis.call('del', KEYS[1]);redis.call('publish', KEYS[2], ARGV[1]);return 1;end;return nil;",Arrays.asList(this.getName(), this.getChannelName()),new Object[]{LockPubSub.UNLOCK_MESSAGE,this.internalLockLeaseTime,this.getLockName(threadId)});}
看到上面的代码,也可以看出,解锁也是通过lua脚本实现,因为lua脚本可以原子性地运行,加锁解锁一气呵成,就像复制粘贴一样。
主要也是通过判断来执行解锁:
如果锁已经不存在,通过publish发布锁释放的消息,解锁成功
如果解锁的线程和当前锁的线程不是同一个,解锁失败,抛出异常
通过hincrby递减1,先释放一次锁。若剩余次数还大于0,则证明当前锁是重入锁,刷新过期时间;若剩余次数小于0,删除key并发布锁释放的消息,解锁成功
流程图
大概就是这个样子了
快乐是什么
以上是关于REDISredisson源码分析的主要内容,如果未能解决你的问题,请参考以下文章