第十七天python3 文件IO
Posted 潇湘神剑
tags:
篇首语:本文由小常识网(cha138.com)小编为大家整理,主要介绍了第十七天python3 文件IO相关的知识,希望对你有一定的参考价值。
CSV文件
csv是一个被行分隔符、列分隔符化分成行和列的文本文件;
csv不指定字符编码;
行分隔符为\\r\\n,最后一行可以没有换行符;
列分隔符常为逗号或者制表符;
每一行称为一条记录record
字段可以使用双引号括起来,也可以不使用;如果字段中出现了双引号、逗号、换行符必须使用双引号括起来。如果字段的值是双引号,使用两个双引号表示一个转义,表头可选,和字段列对齐即可;
from pathlib import Path
csv_body = """\\
id,name,age,comment
1,zhang,18,"I`m 18"
2,wang,20,"Hello BeiJing"
3,li,23,"你好,计算机"
"""
p = Path(\'C:/Users/Sunjingxue/Downloads/test.csv\')
p.parent.mkdir(parents=True,exist_ok=True)
p.write_text(csv_body)

reader() 读取csv文件内容
import csv
csvname = "C:/Users/Sunjingxue/Downloads/test.csv"
with open(csvname) as f:
    red = csv.reader(f)
    print(red)  #返回一个csv对象
    for row in red:
        #print(row)  返回一个列表
        print(\', \'.join(row))

#返回结果
<_csv.reader object at 0x0000000001E2BC40>
id, name, age, comment
1, zhang, 18, I`m 18
2, wang, 20, Hello BeiJing
3, li, 23, 你好,计算机
#在python3.5.2环境下
In [1]: from pathlib import Path

In [2]: import csv

In [3]: p = Path(\'/root/test.csv\')

In [4]: with open(p) as f:      #此时如果不将p转换成字符串类型,运行时会报错;
   ...:     red = csv.reader(f)
   ...:     for i in red:
   ...:         print(i)
   ...:
---------------------------------------------------------------------------
TypeError                                 Traceback (most recent call last)
<ipython-input-4-5e013681f47a> in <module>
----> 1 with open(p) as f:
      2     red = csv.reader(f)
      3     for i in red:
      4         print(i)
      5

TypeError: invalid file: PosixPath(\'/root/test.csv\')

In [5]: with open(str(p)) as f:
   ...:     red = csv.reader(f)
   ...:     for i in red:
   ...:         print(i)
   ...:
[\'1\', \'zhang\', \'18\']
[\'2\', \'wang\', \'19\']
[\'3\', \'li\', \'20\']
#在python3.8.6环境下
from pathlib import Path
import csv
p = Path("C:/Users/Sunjingxue/Downloads/test.csv")
print(type(p))
with open(p) as f:     #在3.8.6环境下则不需要将p转换成字符串类型;
    re = csv.reader(f)
    for i in re:
        print(\', \'.join(i))

#并且re还是个生成器;可以用next()读取;print(next(re))
writer(csvfile,dialect=\'execl\',**fmtparams) 返回DictWriter的实例
主要的方法有:
writerow() 读取1行
writerows() 读取多行
from pathlib import Path
import csv

rows = [[4,\'tom\',22,\'banana\'],
        (5,\'jerry\',24,\'apple\'),
        (6,\'lilei\',25,\'just\\t"in\'),
        \'abcdefg\',
        ((\'one\',\'two\'),(\'three\',\'four\'))
        ]

row = [\'序号\',\'姓名\',\'年龄\',\'别名\']

p = Path(\'C:/Users/Sunjingxue/Downloads/test.csv\')
with open(p,\'w\',newline=\'\') as f:
    wr = csv.writer(f)
    wr.writerow(row)
    wr.writerows(rows)

从上面的例子可以看出,写入csv文件列表中的元素可以是列表,元组,字符串;在open()的时候,newline=‘ ’,如果不对换行符做处理,则每写一行就会加一行空白行(windows默认是\\r\\n),非常的影响观感;
ini文件处理
中括号里面的部分程为section,译作节、区、段;
每个section内,都是key=value形成的键值对,key称为option选项;
注意:这里的DEFAULT是缺省section的名字,必须大写;
#示例ini文件
[DEFAULT]
def = test

[mysql]
my = True

[mysqld]
datadir = /dbserver/data
port = 3306
character-set-server = urf8
sql_mode = NO_ENGINE_SUBSTITUTION,STRICT_TRANS_TABLES
configparser模块
可以将section当做key,section存储这键值对组成的字典,可以把ini配置文件当做一个嵌套的字典,默认使用的是有序字典;
read(filenames,encoding=None) 读取ini文件,可以是单个文件,也可以是文件列表,可以指定文件编码;
sections() 返回section列表,缺省section不包括在内;
options(section) 返回section的所有option,会追加缺省的section的option;
has_option(section,options) 判断section是否存在这个option;
get(section,option,*,raw=False,vars=None[,fallback]) 从指定的段的选项上取值,如果找到返回,如果没有找到就去找DEFAULT端有没有;
getint(section,option,*,raw=False,vars=None[,fallback])
getfloat(section,option,*,raw=False,vars=None[,fallback])
getboolean(section,option,*,raw=False,vars=None[,fallback])
上面3个方法和get一样,返回指定类型数据;
from configparser import ConfigParser

filename = \'C:/Users/Sunjingxue/Downloads/test.ini\'
cfg = ConfigParser()
cfg.read(filename)
#打印所有section,不包括默认section;
print(cfg.sections())
#打印section的所有options,并且会追加默认section的option;
print(cfg.options(\'mysqld\'))
#判断指定section中的指定option是否存在
print(cfg.has_option(\'mysqld\',\'port\'))
#判断section是否存在;
print(cfg.has_section(\'client\'))
#从指定的section中取指定的option的值,如果不存在则去DEFAULT找,如果DEFAULT中没有则报错
print(cfg.get(\'mysqld\',\'port\'))
print(cfg.get(\'mysqld\',\'def\'))
#返回int类型的数值
print(cfg.getint(\'mysqld\',\'port\'))
#返回float类型的数值
print(cfg.getfloat(\'mysqld\',\'port\'))
#返回布尔值类型的数值
print(cfg.getboolean(\'mysql\',\'my\'))
#如果指定了section,则返回该section名和option,组成二元组;如果不指定seciton,则返回所有section的类;
#######################
返回结果:
[\'mysql\', \'mysqld\', \'China\']
[\'datadir\', \'port\', \'character-set-server\', \'sql_mode\', \'def\']
True
False
3306
test
3306
3306.0
True
items(raw=False,vars=None)
items(section,raw=False,vars=None)
没有section,则返回所有section名字及其对象,如果指定section,则返回这个指定的section的键值对组成二元组;
#如果指定了section,则返回该section名和option,组成二元组;如果不指定seciton,则返回所有section的类;
print(cfg.items(\'mysql\'))
print(cfg.items())
for k,v in cfg.items():
    print(k,type(v))
    print(k,cfg.items(k))

#执行结果
[(\'def\', \'test\'), (\'my\', \'True\')]
ItemsView(<configparser.ConfigParser object at 0x0000000001DF8FD0>)
DEFAULT <class \'configparser.SectionProxy\'>
DEFAULT [(\'def\', \'test\')]
mysql <class \'configparser.SectionProxy\'>
mysql [(\'def\', \'test\'), (\'my\', \'True\')]
mysqld <class \'configparser.SectionProxy\'>
mysqld [(\'def\', \'test\'), (\'datadir\', \'/dbserver/data\'), (\'port\', \'3306\'), (\'character-set-server\', \'urf8\'), (\'sql_mode\', \'NO_ENGINE_SUBSTITUTION,STRICT_TRANS_TABLES\')]
China <class \'configparser.SectionProxy\'>
China [(\'def\', \'test\'), (\'gansu\', \'lanzhou\'), (\'shanxi\', \'changan\')]
add_section(section_name) 增加一个section;
set(section,option,value)
section存在的情况下,写入option=value,要求option、value必须是字符串;
remove_section(section) 移除section及其所有option;
remove_section(section,option) 移除section下的option;
write(fileobject,spece_around_delimiters=True) 将当前config的所有内容写入fileobject中,一般open函数使用w模式;
if cfg.has_section(\'China\') == True:
    pass
else:
    cfg.add_section(\'China\')
with open(filename,\'w\') as f:
    cfg.set(\'China\', \'gansu\', \'lanzhou\')
    cfg.set(\'China\', \'shanxi\', \'changan\')
    cfg.write(f)
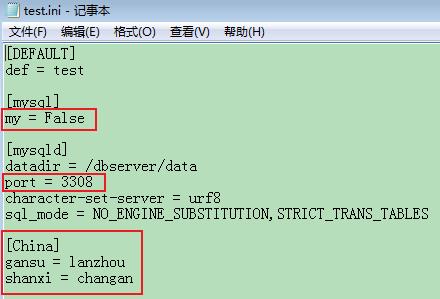
#通过字典操作修改ini文件中的值;
#cfg[\'section\'][\'option\'] = \'value\'
#cfg[\'section\'] = {\'option\' = \'value\'}
cfg[\'mysqld\'][\'port\'] = \'3308\'
cfg[\'mysql\'] = {\'my\':\'False\'}
#修改完成之后写入文件
with open(filename,\'w\') as f:
    cfg.write(f)
执行结果:

以上是关于第十七天python3 文件IO的主要内容,如果未能解决你的问题,请参考以下文章