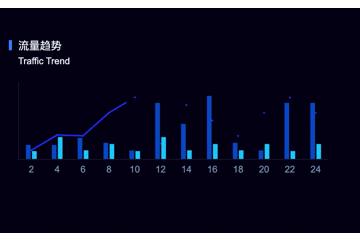
Echarts 双柱状图+折线图合并---实现效果详解(vue+Echarts实现)
Posted 黑木令
tags:
篇首语:本文由小常识网(cha138.com)小编为大家整理,主要介绍了Echarts 双柱状图+折线图合并---实现效果详解(vue+Echarts实现)相关的知识,希望对你有一定的参考价值。
此文章讲解 Echarts 在 vue 开发中的使用方式以及实现效果的 demo 示例展示; 如有疑问或者不清楚的欢迎随时提问 。
废话不多说, 直接上代码以及图例 (为了让大家方便阅读, 都有自己验证过程的一些图片作为分享) 。
1. 使用 echarts 版本: “echarts”: “^4.3.0”
2. 安装方式: cnpm install echarts --save 或者 cnpm install echarts -S
3. 在 main.js 入口文件中全局引入:
1. import* Vue *from* 'vue'

2. import* Echarts *from* 'echarts' *// 引入Echarts*

3. Vue.prototype.$echarts = Echarts
4. echarts 配置文件( 文件名 echartsMould.js )
1. 我这边的处理方式是将 echarts 的配置内容抽取为单独的 JS 文件,这样我维护起来会非常的方便舒服。

2. 另外这样的处理方式也会减少 .vue 文件的大小,代码看起来也会非常方便整洁。

3. 这样的处理方式也方便组件化的实现。
5. 封装 Echarts 文件 echartsMould.js 具体配置代码
import echarts from 'echarts'
/**
 * 1. 流量趋势--carFlow.vue
 */
var option_carFlow = {
  tooltip: {  //提示框设置
    trigger: 'axis',
    axisPointer: {    //设置横线的样式
      type: 'cross',
      crossStyle: {
        color: 'red'
      }
    },
    textStyle: {      //设置提示框的对齐方式
      align: 'left'
    }
  },
  grid: {   //设置内容区域距离周边的距离
    left: '3%',
    right: '0',
    top: '10px',
    bottom: '0px',
    containLabel: true
  },
  toolbox: {
    show: false
  },
  legend: {
    show: false
  },
  xAxis: [
    {
      type: 'category',
      data: ['2', '4', '6', '8', '10', '12', '14', '16', '18', '20', '22', '24'],
      axisPointer: {
        type: 'shadow'
      },
      axisTick: {           //刻度
        show: false //不显示刻度线
      },
      axisLine: {
        lineStyle: {
          color: '#1E2240'  //轴线的颜色
        }
      },
      axisLabel: {          //轴线字体样式设置
        textStyle: {
          fontFamily: 'ArialMT',
          fontSize: '12',
          color: '#86A5C3',
        }
      }
    }
  ],
  yAxis: [
    {
      type: 'value',
      min: 0,
      max: 0,
      interval: 0,
      axisLabel: {
        formatter: '{value}',
        textStyle: {
          fontFamily: 'ArialMT',
          fontSize: '12',
          color: '#86A5C3',
        }
      },
      splitLine: {          //去除背景网格线
        show: false
      },
      axisTick: {   //刻度
        show: false         //不显示刻度线
      },
      axisLine: {
        lineStyle: {
          color: '#1E2240'  //轴线的颜色
        }
      }
    },
    {
      type: 'value',
      min: 0,
      max: 0,
      interval: 0,
      axisLabel: {
        formatter: '{value}',
        textStyle: {
          fontFamily: 'ArialMT',
          fontSize: '12',
          color: '#86A5C3',
        }
      },
      splitLine: {      //去除背景网格线
        show: false
      },
      axisTick: {       //刻度
        show: false     //不显示刻度线
      },
      axisLine: {
        lineStyle: {
          color: '#1E2240'  //轴线的颜色
        }
      }
    }
  ],
  series: [
    { //柱状(左边数据)
      name: '卡口进',
      type: 'bar',
      data: [0.2,0.2,0.3,0.23,0.12,0.8,0.5,0.9,0.23,0.12,0.8,0.8],
      itemStyle: {    //柱状图的背景色
        normal: {
          color: '#0060D1'
        }
      },
      barWidth: 6
    },
    { //柱状(左边数据)
      name: '卡口出',
      type: 'bar',
      data: [0.112,0.312,0.123,0.213,0.112,0.312,0.123,0.213,0.123,0.213,0.112,0.213],
      itemStyle: {    //柱状图的背景色
        normal: {
          color: '#00D2FF'
        }
      },
      barWidth: 6
    },
    { //折线(右边数据)
      name: '总量',
      type: 'line',
      yAxisIndex: 1,
      data: [0.112,0.312,0.3,0.6,0.8,0.2,0.7,0.5,0.3,0.6,0.8,0.6],
      itemStyle: {    //折线颜色
        normal: {
          color: '#2A47F8'
        }
      }
    }
  ]
}
6. 调用 Echarts 封装内容 .vue 文件具体配置代码
<template>
  <!-- 流量趋势 -->
  <div class="flow-shel" ref="carflow" id="main" style="width:100%; height:calc(100% - 48px)"></div>
</template>

<script>
/**
 * 引入 echarts 模板
 */
import { option_carFlow } from './echartsMould.js'
/**
 * 引入时间封装文件
 */

export default {
  data () {
    return {
      resizeTimer: null,
      option: option_carFlow,
      timerSetInterval: null,
    }
  },
  mounted () {
    let _this = this
    _this.getType()
    window.addEventListener('resize', function () {   //实现 echarts 图表, 随页面宽高变化, 而变化 。
      if (_this.resizeTimer) {
        clearTimeout(_this.resizeTimer)
      }
      if (_this.carflow) {
        _this.resizeTimer = setTimeout(function () {
          _this.carflow.resize()
        }, 100)
      }
    }),
    this.timerSetInterval = setInterval(() => {
      //当num等于100时清除定时器
      _this.getType()
    }, 5 * 60 * 1000);
    _this.destroyed()
  },
  // 清除定时器
  beforeDestroy() {
    //清除定时器
    clearInterval(this.timerSetInterval);
  },
  methods: {
    async getType () {
      let _this = this
      /**
       * 此处的处理方式当时项目数据格式问题,需要处理的内容比较多;大家可以根据自己的业务需求以及后台返回的数据格式自己进行处理
       */

      // let flowIn = []
      // let flowOut = []
      // let vehicleCnt = []
      // let arrayId = 0
      // let oddId
      // let evenId
      // /**
      //  * URL
      //  */
      // const urlSum = {
      //   urlFlow: '/flowTrend/KeyAreaFlowTrendAnalysisByType.htm?areaId=' + _this.areaId + '&type=' + _this.type + '&startDay=' + _this.startDay + '&endDay=' + _this.endDay
      // }
      // /**
      //  * 数据请求
      //  */
      // let resFlow = await _this.$axios.getEig(urlSum.urlFlow)
      // /**
      //  * 数据处理
      //  */
      // if (resFlow.resultList.length % 2 == 1) {
      //   resFlow.resultList.length = resFlow.resultList.length -1
      // }
      // for (let i = 0; i< resFlow.resultList.length; i++) {
      //   if(resFlow.resultList.length < arrayId) {
      //     return false
      //   }
      //   arrayId = arrayId + 1
      //   arrayId++
      //   oddId = i++
      //   evenId = arrayId-1
      //   flowIn.push(resFlow.resultList[oddId].flowIn + resFlow.resultList[evenId].flowIn)
      //   flowOut.push(resFlow.resultList[oddId].flowOut + resFlow.resultList[evenId].flowOut)
      //   vehicleCnt.push(resFlow.resultList[oddId].vehicleCnt + resFlow.resultList[evenId].vehicleCnt)

      // }
      // /**
      //  * 获取各条数据的最大值
      //  */
      // let maxFlowIn = flowIn[0]
      // let maxFlowOut = flowOut[0]
      // let maxFlowOutNumFir = vehicleCnt[0]
      // for (let k = 0; k < flowIn.length - 1; k++) {
      //   maxFlowIn = maxFlowIn < flowIn[k + 1] ? flowIn[k + 1] : maxFlowIn
      //   maxFlowOut = maxFlowOut < flowOut[k + 1] ? flowOut[k + 1] : maxFlowOut
      //   maxFlowOutNumFir = maxFlowOutNumFir < vehicleCnt[k + 1] ? vehicleCnt[k + 1] : maxFlowOutNumFir
      // }
      // if (maxFlowIn > maxFlowOut) {
      //   _this.option.yAxis[0].max = maxFlowIn
      // } else {
      //   _this.option.yAxis[0].max = maxFlowOut
      // }

      /**
       * 具体的赋值方式在这里,大家可以根据得到的数据格式来赋值。
       */
      // _this.option.yAxis[1].max = maxFlowOutNumFir
      // _this.option.yAxis[0].interval = Math.ceil((_this.option.yAxis[0].max / 5) / 10) * 10
      // _this.option.yAxis[1].interval = Math.ceil((_this.option.yAxis[1].max / 5) / 10) * 10

      // /**
      //  * 赋值
      //  */
      // _this.option.series[0].data = flowIn
      // _this.option.series[1].data = flowOut
      // _this.option.series[2].data = vehicleCnt
      /**
       * 初始化 echarts
       */
      let carflow = this.$echarts.init(this.$refs.carflow) // 初始化一个 echarts
      _this.carflow = carflow
      carflow.setOption(this.option) // setOption 用 this.option 中的数据开始作图
    },
    destroyed () {
      window.removeEventListener('resize', this.carflow, 100)
    }
  }
}
</script>

<style scoped>

</style>
7. echarts 调用成功 gif 图片展示

之前有整理过部分知识点, 现在将整理的相关内容, 验证之后慢慢分享给大家; 这个专题 就是 “Echarts 图表” 的相关专栏; 不积跬步,无以至千里, 戒焦戒躁 。
如果对你有所帮助,喜欢的可以点个关注, 必然回关; 文章会一直持续打磨 。
有什么想要了解的前端知识吗? 可以评论区留言, 会及时跟进分享所提内容 。
整理知识点不易, 每次都是在工作繁忙之余夜深人静之时整理, 无论知识点是大是小, 都会验证后再分享, 以防自己发表的文章给大家造成误导 。如有问题还望不吝赐教,本人会及时更改 (本文原创, 如需转载,请注明出处)
以上是关于Echarts 双柱状图+折线图合并---实现效果详解(vue+Echarts实现)的主要内容,如果未能解决你的问题,请参考以下文章