JDBC从零开始的保姆级教程!!!
Posted 大忽悠爱忽悠
tags:
篇首语:本文由小常识网(cha138.com)小编为大家整理,主要介绍了JDBC从零开始的保姆级教程!!!相关的知识,希望对你有一定的参考价值。
JDBC从零开始的保姆级教程!!!
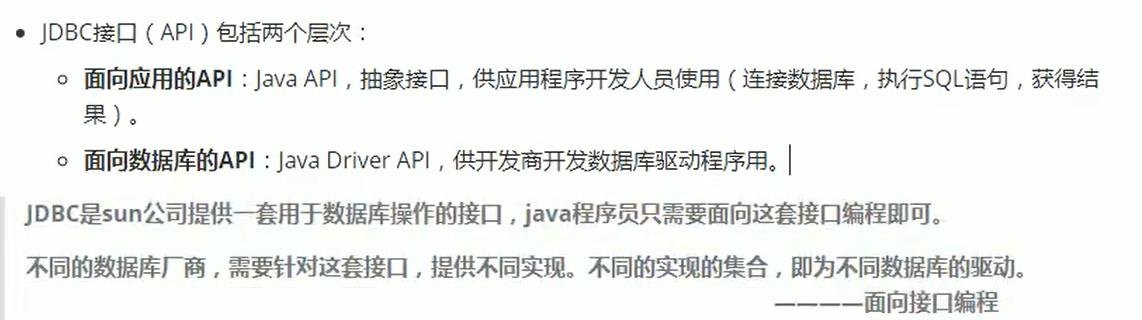
JAVA与数据库的连接方式
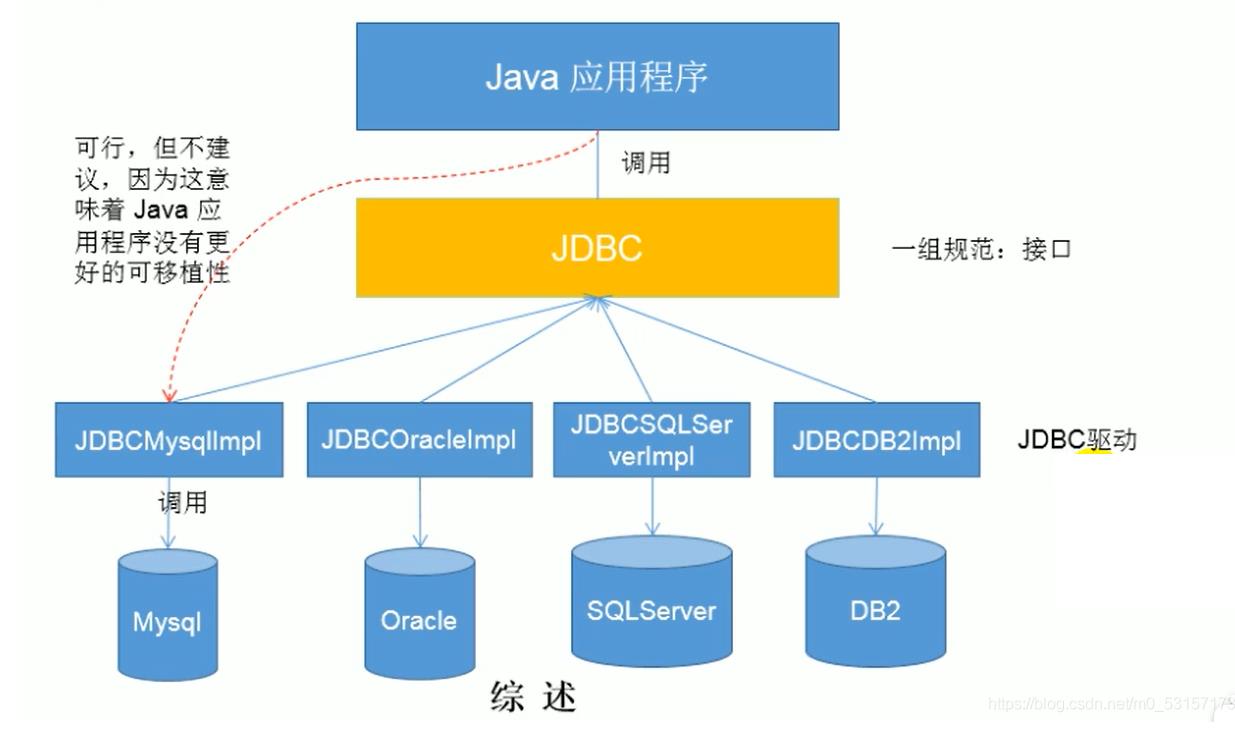
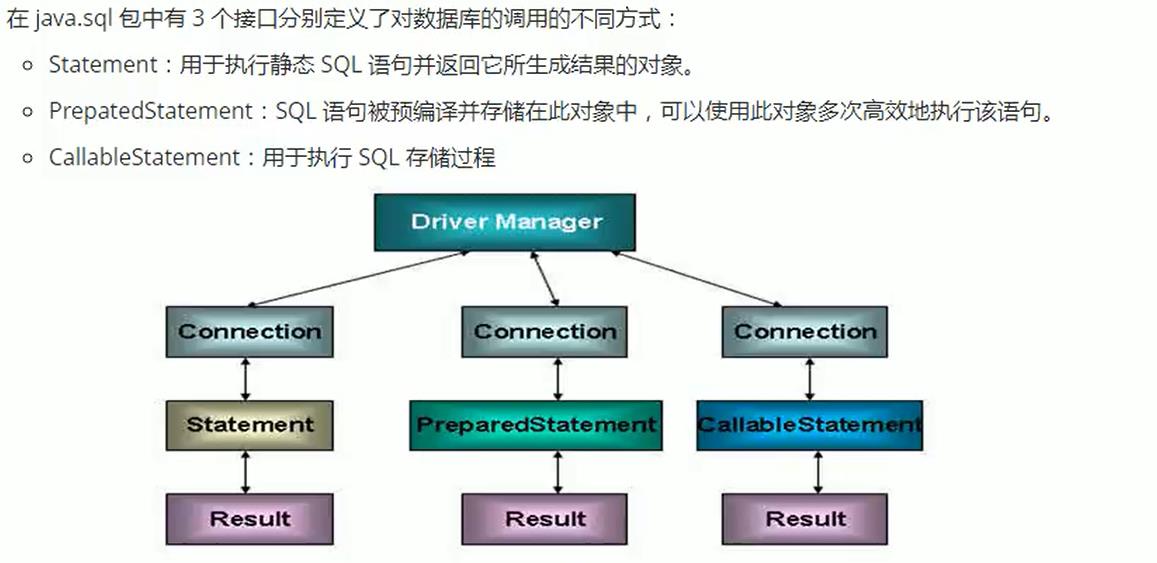
JDBC体系结构
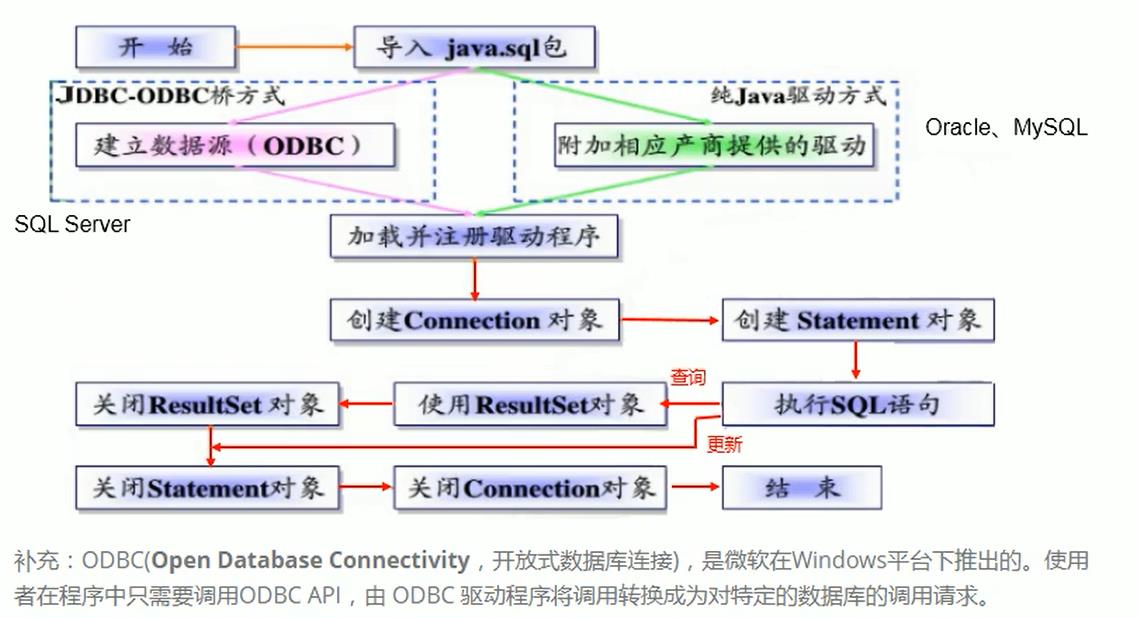
JDBC程序编写步骤
获取数据库连接方式一
import java.sql.*;
import java.util.Properties;

public class MAIN
{
    public static void main(String[] args) throws ClassNotFoundException, SQLException
    {
    //获取driver的实现类对象
   Driver driver=new com.mysql.jdbc.Driver();
   //jbdc:mysql :协议
   //localhost: ip地址
   // 3306: 默认mysql的端口号
   //test1: test1数据库
   String url="jdbc:mysql://localhost:3306/test1";
   //将用户名和密码封装在properties中
        Properties   info=new Properties();
        info.setProperty("user","root");
        info.setProperty("password","126433");

        Connection conn=driver.connect(url,info);
        System.out.println(conn);
    }
}
数据库连接方式二
对方式一的迭代,避免第三方的api,使得程序有更好的可移植性
import java.sql.*;
import java.util.Properties;

public class MAIN
{
    public static void main(String[] args) throws ClassNotFoundException, SQLException, InstantiationException, IllegalAccessException {
        //1.获取Driver实现类对象,使用反射
       Class clazz=Class.forName("com.mysql.jdbc.Driver");
       Driver driver=(Driver)clazz.newInstance();

   String url="jdbc:mysql://localhost:3306/test1";

        Properties   info=new Properties();
        info.setProperty("user","root");
        info.setProperty("password","126433");

        Connection conn=driver.connect(url,info);
        System.out.println(conn);
    }
}
数据库连接的方式三
使用DriverManger替换Driver
import java.sql.*;
import java.util.Properties;

public class MAIN
{
    public static void main(String[] args) throws ClassNotFoundException, SQLException, InstantiationException, IllegalAccessException {
          //1.提供另外三个连接的基本信息
        String url="jdbc:mysql://localhost:3306/test1";
        String user="root";
        String password="126433";

        //2.获取Driver实现类对象,使用反射
       Class clazz=Class.forName("com.mysql.jdbc.Driver");
       Driver driver=(Driver)clazz.newInstance();
        //注册驱动
        DriverManager.registerDriver(driver);

        //获取连接
        Connection conn=DriverManager.getConnection(url,user,password);
        System.out.println(conn);
    }
}
数据库连接方式四
可以只是加载驱动,而非显示的注册驱动了
import java.sql.*;
import java.util.Properties;

public class MAIN
{
    public static void main(String[] args) throws ClassNotFoundException, SQLException, InstantiationException, IllegalAccessException {
        //1.提供另外三个连接的基本信息
        String url="jdbc:mysql://localhost:3306/test1";
        String user="root";
        String password="126433";

        //2.加载Driver
       Class clazz=Class.forName("com.mysql.jdbc.Driver");
      //相较于方式三,可以省略如下的操作:
      /* Driver driver=(Driver)clazz.newInstance();
        //注册驱动
        DriverManager.registerDriver(driver);*/

        //获取连接
        Connection conn=DriverManager.getConnection(url,user,password);
        System.out.println(conn);
    }
}
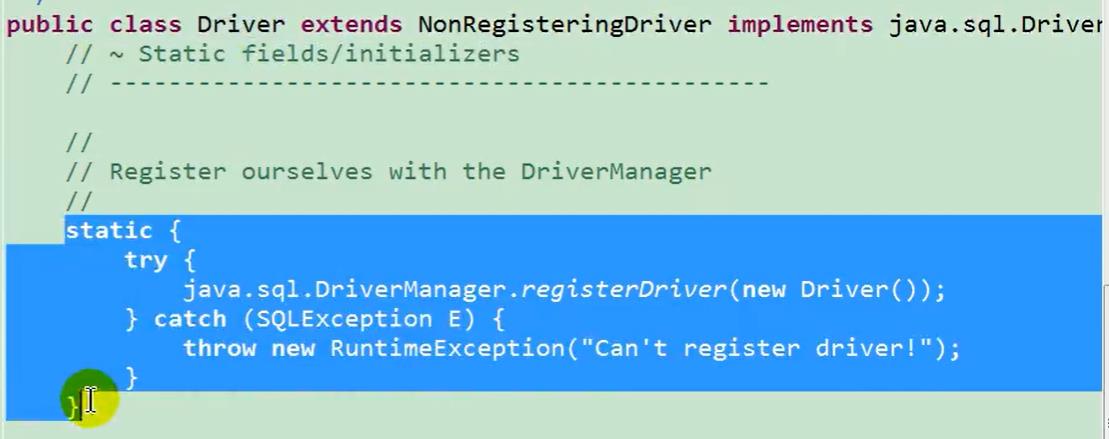
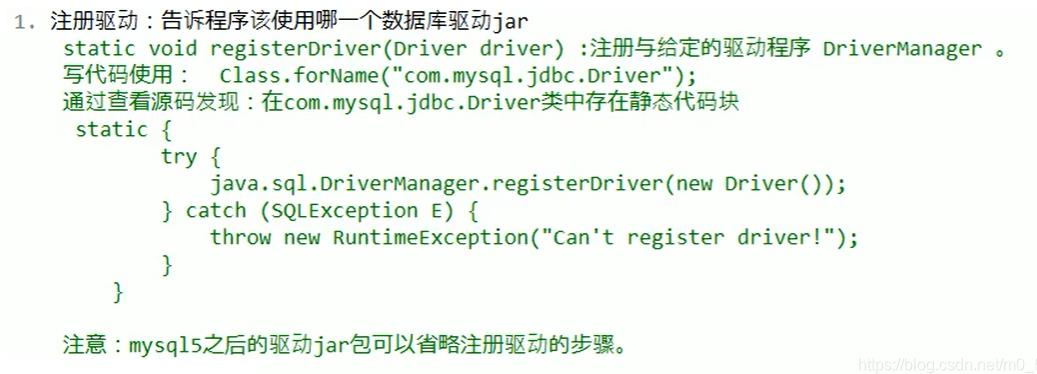
为什么可以省略呢?
因为在mysql的Driver实现类中,静态代码块声明了如下的操作:
数据库连接方式五—final版本
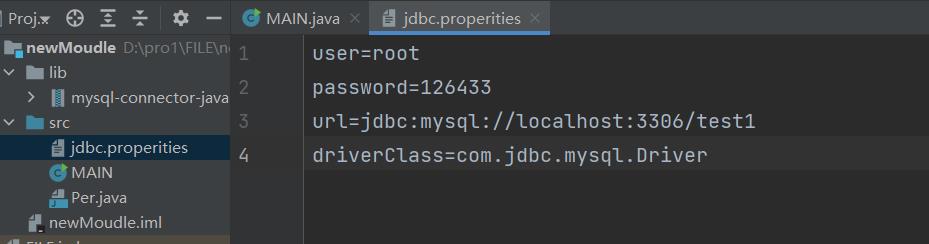
将数据库连接需要的四个基本信息声明在配置文件中,通过读取配置文件的方式,获取连接
配置文件:
user=root
password=126433
url=jdbc:mysql://localhost:3306/test1
driverClass=com.jdbc.mysql.Driver
import java.io.InputStream;
import java.sql.*;
import java.util.Properties;
public class MAIN
{
    public static void main(String[] args) throws Exception{
          //MAIN是当前的类
        InputStream is=MAIN.class.getClassLoader().getResourceAsStream("jdbc.properities");
        Properties pros=new Properties();
        pros.load(is);

        String user=pros.getProperty("user");
        String password=pros.getProperty("password");
        String url=pros.getProperty("url");
        String driverClass=pros.getProperty("driverClass");

        //加载驱动
        Class.forName(driverClass);

        //获取连接
        Connection conn=DriverManager.getConnection(url,user,password);
        System.out.println(conn);
    }
}
final版的好处
实现了数据和代码的分离,实现了解耦
如果需要修改配置文件信息,可以避免程序重新打包
操作和访问数据库

DriverManger : 驱动管理对象
功能1:
功能2:

演示:
    public static void main(String[] args) throws Exception {
      //1.导入驱动jar包
        //2.注册驱动
        //java5版本后可以省略下面这行代码
        Class.forName("com.mysql.jdbc.Driver");
        //3.获取数据库连接对象
        //Connection conn= DriverManager.getConnection("jdbc:mysql://localhost:3306/test1","root","126433");
        Connection conn= DriverManager.getConnection("jdbc:mysql:///test1","root","126433");
        //4.定义sql语句
        //注意: 嵌套字符串,外双里单
        //这里被双引号包裹的sql语句结尾不用加分号
        String sql="update depart set  name='大忽悠总裁办' where wID=105";
        //5.获取执行sql的对象       Statement
        Statement stmt=conn.createStatement();
        //6.执行sql
        int count=stmt.executeUpdate(sql);
        //7.处理结果
        System.out.println(count);
        //8.释放资源
        stmt.close();
        conn.close();
    }
Connection :数据库连接对象

Statement : 执行sql的对象

DDL语句默认返回0
insert语句练习:
public class newMain {
    public static void main(String[] args)
    {
        Connection conn=null;
        Statement stmt=null;
          //1.注册驱动
        try {
            Class.forName("com.mysql.jdbc.Driver");
        } catch (ClassNotFoundException e) {
            e.printStackTrace();
        }
        //2.定义sql语句
        String sql="INSERT INTO depart VALUES(110,'小朋友副总裁办')";
        try {
            //3.获取connection对象
            conn= DriverManager.getConnection("jdbc:mysql:///test1","root","126433");
            //4.获取sql对象,执行Statement
             stmt=conn.createStatement();
            //5.执行sql
            int count=stmt.executeUpdate(sql);
            if(count>0)
                System.out.println("添加成功!!");
            else
                System.out.println("添加失败");
        } catch (SQLException throwables) {
            throwables.printStackTrace();
        }finally {
            //7.释放资源
            //避免空指针异常
            if(stmt!=null) {
                try {
                    stmt.close();
                } catch (SQLException throwables) {
                    throwables.printStackTrace();
                }
            }

            if(conn!=null) {
                try {
                    conn.close();
                } catch (SQLException throwables) {
                    throwables.printStackTrace();
                }
            }
        }
    }
}

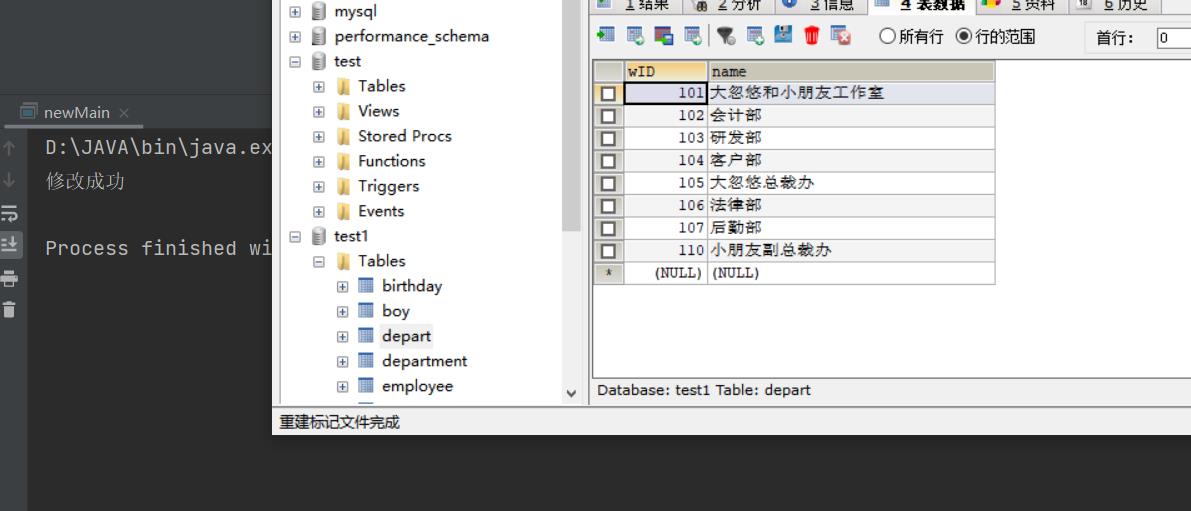
update语句练习:
public class newMain {
    public static void main(String[] args)
    {
        Connection conn=null;
        Statement stmt=null;
         //1.注册驱动
        try {
            Class.forName("com.mysql.jdbc.Driver");
            //2.获取connection对象
             conn= DriverManager.getConnection("jdbc:mysql:///test1","root","126433");
             //3.定义sql语句
            String sql="update depart set name='大忽悠和小朋友工作室' where wID=101";
            //4.获取sql对象
            stmt=conn.createStatement();
            //5.执行sql语句
            int count=stmt.executeUpdate(sql);
            if(count>0)
                System.out.println("修改成功");
            else
                System.out.println("修改失败");
        } catch (ClassNotFoundException e) {
            e.printStackTrace();
        } catch (SQLException throwables) {
            throwables.printStackTrace();
        }finally {
            //7.释放资源
            if(stmt!=null)
            {
                try {
                    stmt.close();
                } catch (SQLException throwables) {
                    throwables.printStackTrace();
                }
            }
            if(conn!=null)
            {
                try {
                    conn.close();
                } catch (SQLException throwables) {
                    throwables.printStackTrace();
                }
            }
        }
    }
}
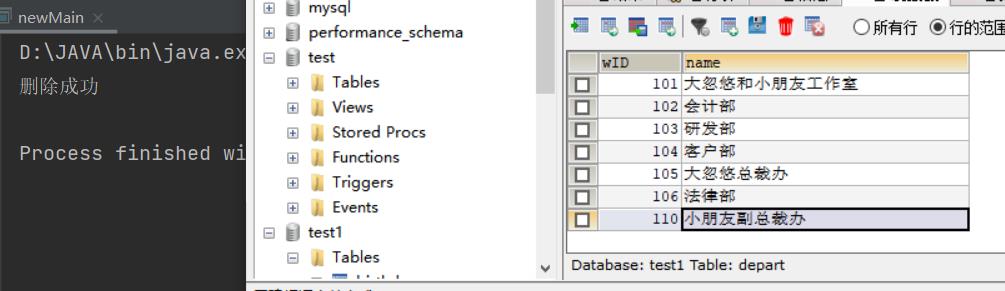
delete语句练习:
public class newMain {
    public static void main(String[] args)
    {
        Connection conn=null;
        Statement stmt=null;
         //1.注册驱动
        try {
            Class.forName("com.mysql.jdbc.Driver");
            //2.获取connection对象
             conn= DriverManager.getConnection("jdbc:mysql:///test1","root","126433");
             //3.定义sql语句
            String sql="delete from depart where name like '%后%'";
            //4.获取sql对象
            stmt=conn.createStatement();
            //5.执行sql语句
            int count=stmt.executeUpdate(sql);
            if(count>0)
                System.out.println("删除成功");
            else
                System.out.println("删除失败");
        } catch (ClassNotFoundException e) {
            e.printStackTrace();
        } catch (SQLException throwables) {
            throwables.printStackTrace();
        }finally {
            //7.释放资源
            if(stmt!=null)
            {
                try {
                    stmt.close();
                } catch (SQLException throwables) {
                    throwables.printStackTrace();
                }
            }
            if(conn!=null)
            {
                try {
                    conn.close();
                } catch (SQLException throwables) {
                    throwables.printStackTrace();
                }
            }
        }

    }
}
DDL语句之建表练习:
public class newMain {
    public static void main(String[] args)
    {
        Connection conn=null;
        Statement stmt=null;
         //1.注册驱动
        try {
            Class.forName("com.mysql.jdbc.Driver");
            //2.获取connection对象
             conn= DriverManager.getConnection("jdbc:mysql:///test1","root","126433");
             //3.定义sql语句
            String sql="create table newDepart(newWID int primary key,newDepartName varchar(20))";
            //4.获取sql对象
            stmt=conn.createStatement();
            //5.执行sql语句
            int count=stmt.executeUpdate(sql);
            System.out.println("DDL语句默认返回: "+count);
        } catch (ClassNotFoundException e) {
            e.printStackTrace();
        } catch (SQLException throwables) {
            throwables.printStackTrace();
        }finally {
            //7.释放资源
            if(stmt!=null)
            {
                try {
                    stmt.close();
                } catch (SQLException throwables) {
                    throwables.printStackTrace();
                }
            }
            if(conn!=null)
            {
                try {
                    conn.close();
                } catch (SQLException throwables) {
                    throwables.printStackTrace();
                }
            }
        }
    }
}

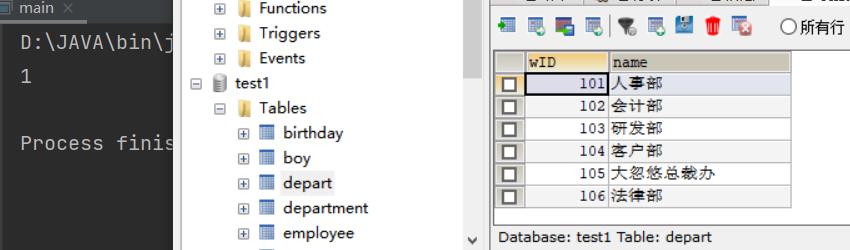
ResultSet: 结果集对象,封装查询结果

演示:
public class newMain {
    public static void main(String[] args)
    {
        Connection conn=null;
        Statement stmt=null;
        ResultSet rs=null;
        //1.注册驱动
        try {
            Class.forName("com.mysql.jdbc.Driver");
            //2.获取conncetion对象
            conn= DriverManager.getConnection("jdbc:mysql:///test1","root","126433");
            //3.定义sql语句---查询语句
            String sql="select *from depart";
            //4.获取执行sql的对象
            stmt=conn.createStatement();
            //5.执行sql语句---返回一个查询到的结果集
            rs=stmt.executeQuery(sql);
            //6.处理结果
            //6.1让游标向下移动一行
            rs.next();
            //6.2获取资源
            int wID=rs.getInt(1);
            String name=rs.getString("name");
            System.out.println("查询到的部门编号:"+wID+"     查询到部门名称:"+name);
        } catch (ClassNotFoundException e) {
            e.printStackTrace();
     以上是关于JDBC从零开始的保姆级教程!!!的主要内容,如果未能解决你的问题,请参考以下文章