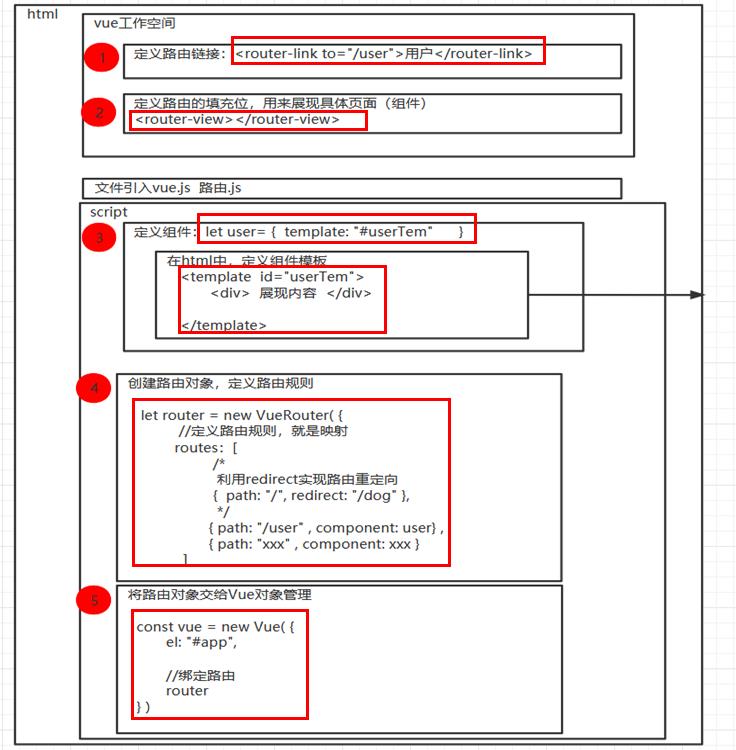
vue路由步骤
Posted 江西昊仔
tags:
篇首语:本文由小常识网(cha138.com)小编为大家整理,主要介绍了vue路由步骤相关的知识,希望对你有一定的参考价值。
路由简单的理解就是—映射
1.步骤

2.原始代码
<!DOCTYPE html>
<html>
	<head>
		<meta charset="utf-8">
		<title>Vue路由机制</title>
	<body>
		<div id="app">
			<!-- 2.定义路由链接
				router-link 解析之后,变为a标签.
				to 解析之后, 变为href属性
			 -->
			<router-link to="/user">用户</router-link>
			<router-link to="/dog">狗狗</router-link>

			<!-- 3.定义路由填充位 该位置用来展现具体页面(组件) -->
			<router-view></router-view>


		</div>

		<!-- 4.2 定义组件模版 -->
		<template id="userTem">
			<div>
				<h1>我是组件的内容!!!!!</h1>
			</div>
		</template>

		<template id="dogTem">
			<div>
				<h1>养只宠物狗</h1>
			</div>
		</template>


		<!-- 1.引入vue.js -->
		<script src="https://cdn.jsdelivr.net/npm/vue@2"></script>
		<!-- 1.导入路由JS 注意顺序-->
		<script src="../js/vue-router.js"></script>
		<script>
			//4.定义组件
			let user = {
				//4.1定义页面
				template: "#userTem"
			}

			let dog = {
				template: "#dogTem"
			}


			//5.创建路由对象,定义路由规则
			let router = new VueRouter({
				//定义路由规则
				routes: [
						/*
							利用redirect实现路由重定向
						 */
						{path: "/", redirect: "/dog"},
						{path: "/user", component: user},
						{path: "/dog", component: dog}
				]
			})

			//6.将路由对象交给Vue对象管理
			const vue = new Vue({
				el: "#app",
				//绑定路由
				//router: router  名称一致时,可以简化
				router
			})

		</script>
	</body>
</html>
3.路由嵌代码
要点:映射中的children属性,写嵌套的映射。
{path: “/dog”, component: dog, children: [
{path: “/dog/samo”, component: samo},
{path: “/dog/hsq”, component: hsq}
]}
<!DOCTYPE html>
<html>
	<head>
		<meta charset="utf-8">
		<title>Vue路由机制</title>
	<body>
		<div id="app">
			<!-- 2.定义路由链接
				router-link 解析之后,变为a标签.
				to 解析之后, 变为href属性
			 -->
			<router-link to="/user">用户</router-link>
			<router-link to="/dog">狗狗</router-link>

			<!-- 3.定义路由填充位 该位置用来展现具体页面(组件) -->
			<router-view></router-view>


		</div>

		<!-- 4.2 定义组件模版 -->
		<template id="userTem">
			<div>
				<h1>我是组件的内容!!!!!</h1>
			</div>
		</template>

		<template id="dogTem">
			<div>
				<h1>养只宠物狗</h1>
				<!-- 定义子组件路由 -->
				<router-link to="/dog/samo">萨摩耶</router-link>
				<router-link to="/dog/hsq">哈士奇</router-link>
				<!-- 定义子组件占位符 -->
				<router-view></router-view>
			</div>
		</template>

		<!-- 1.引入vue.js -->
		<script src="https://cdn.jsdelivr.net/npm/vue@2"></script>
		<!-- 1.导入路由JS 注意顺序-->
		<script src="../js/vue-router.js"></script>
		<script>
			//4.定义组件
			let user = {
				//4.1定义页面
				template: "#userTem"
			}

			let dog = {
				template: "#dogTem"
			}

			let samo = {
				template: `<h1>通体雪白的神兽</h1>`
			}

			let hsq = {
				template: `<h1>拆家狂魔</h1>`
			}


			//5.创建路由对象,定义路由规则
			let router = new VueRouter({
				//定义路由规则
				routes: [
						/*
							利用redirect实现路由重定向
						 */
						{path: "/", redirect: "/dog"},
						{path: "/user", component: user},
						{path: "/dog", component: dog, children: [
							{path: "/dog/samo", component: samo},
							{path: "/dog/hsq", component: hsq}
						]},
						/*该请求是/目录下的请求,所以组件渲染也在根组件 */
						/* {path: "/dog/samo", component: samo},
						{path: "/dog/hsq", component: hsq}, */

				]
			})

			//6.将路由对象交给Vue对象管理
			const vue = new Vue({
				el: "#app",
				//绑定路由
				//router: router  名称一致时,可以简化
				router
			})

		</script>
	</body>
</html>
以上是关于vue路由步骤的主要内容,如果未能解决你的问题,请参考以下文章