03布局原理与XML原理分析二
Posted 清风百草
tags:
篇首语:本文由小常识网(cha138.com)小编为大家整理,主要介绍了03布局原理与XML原理分析二相关的知识,希望对你有一定的参考价值。
(1)使用插件化的方案为App换肤
(2)不需要重启App就能够换肤
(3)市场上所有的APP都可以当成自己的皮肤包来用。
(4)无闪烁
(5)便于扩展与维护,入侵性很小。
(6)只需要在Application初始化一次即可使用
(7)喜欢什么样的皮肤包,就可以将它的apk包拿过来就可以了。
【03】布局原理与XML原理分析二
文章目录
1.资源的加载流程
(1)使用插件化方式实现换肤,需要了解资源的加载流程。
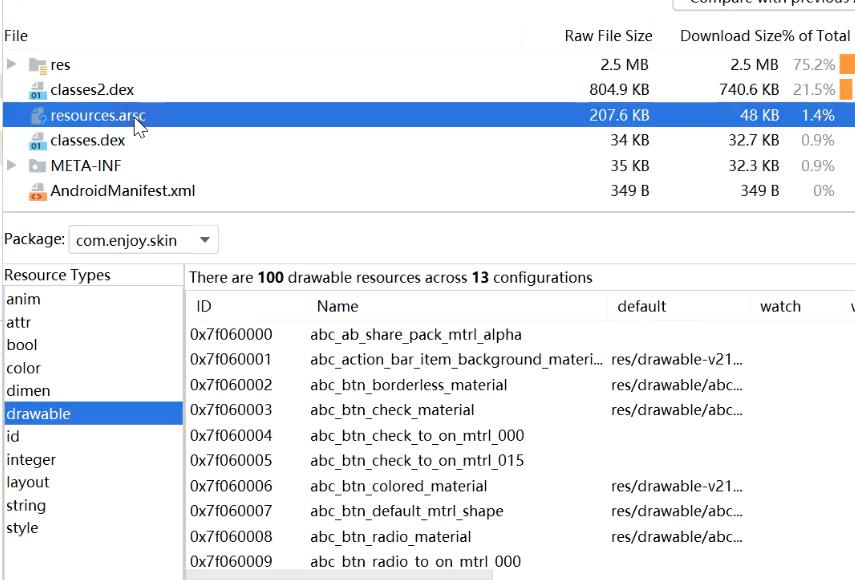
(2)app打包以后,apk中会生成一个resource.arsc文件,这个文件类似于一个数据库文件。整个文件是一个二进制的文件。这个文件里面标识了res目录里面每一个文件的信息。

(3)当加载一个APK包以后,会有一个类去负责读这个文件里面的信息。
1.1ActicityThread.java
(1)android.app.ActivityThread#handleBindApplication
- application的初始化
app = data.info.makeApplication(data.restrictedBackupMode, null);

mInstrumentation.callApplicationOnCreate(app);
(2)android.app.LoadedApk#makeApplication
- 创建上下文及从包里面获取资源
ContextImpl appContext = ContextImpl.createAppContext(mActivityThread, this);
- android.app.ContextImpl#createAppContext(ActivityThread, LoadedApk, java.lang.String)
    static ContextImpl createAppContext(ActivityThread mainThread, LoadedApk packageInfo,
            String opPackageName) {
        if (packageInfo == null) throw new IllegalArgumentException("packageInfo");
        ContextImpl context = new ContextImpl(null, mainThread, packageInfo, null, null, null, null,
                0, null, opPackageName);
        context.setResources(packageInfo.getResources());
        context.mIsSystemOrSystemUiContext = isSystemOrSystemUI(context);
        return context;
    }
(3)从包里面获取资源
android.app.LoadedApk#getResources
public Resources getResources() {
        if (mResources == null) {
            final String[] splitPaths;
            try {
                splitPaths = getSplitPaths(null);
            } catch (NameNotFoundException e) {
                // This should never fail.
                throw new AssertionError("null split not found");
            }

            mResources = ResourcesManager.getInstance().getResources(null, mResDir,
                    splitPaths, mOverlayDirs, mApplicationInfo.sharedLibraryFiles,
                    Display.DEFAULT_DISPLAY, null, getCompatibilityInfo(),
                    getClassLoader(), null);
        }
        return mResources;
    }
(4)android.app.ResourcesManager#getResources
(5)android.app.ResourcesManager#createResources
(6)android.app.ResourcesManager#createResourcesForActivityLocked
(7)android.app.ResourcesManager#createResourcesImpl
(8)android.app.ResourcesManager#createAssetManager
(9)android.content.res.AssetManager.Builder#addApkAssets
(10)android.content.res.AssetManager#nativeSetApkAssets
private static native void nativeSetApkAssets(long ptr, @NonNull ApkAssets[] apkAssets,
            boolean invalidateCaches);
1.2APP资源管理相关类
(1)项目的APK相当于一个宿主APK
(2)皮肤APK相当于一个插件APK
(3)如果它们之间需要调用
assets.addAssetPath(key.mResDir)将插件塞到宿主APK中去。

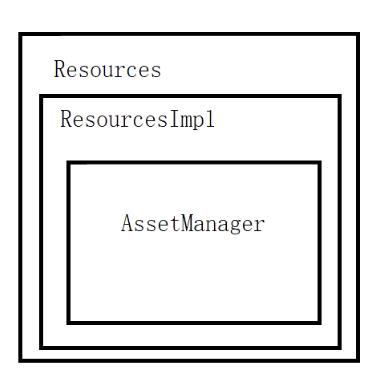
- Resources
- ResourcesImpl
- AssetManager
android.content.res.Resources#getText(int)
android.content.res.Resources#getColor(int, android.content.res.Resources.Theme)
android.content.res.Resources#getDrawableForDensity(int, int, android.content.res.Resources.Theme)
(4)AssetManager就是APK资源都是通过表格找到,并读取出来。
-
外面的两个类只是包装了一些信息而已。
-
android.content.res.AssetManager#addAssetPath
-
通过addAssetPath就可以将某一个路径里面的资源信息加载进来。
(5)在宿主APK里面有一个资源id在插件apk里面也有一个同样的资源id与之对应。

(1)换肤的目的就是将插件的值填充到宿主里面即可。
(2)可以在宿主APP里面根据资源id拿到宿主APP资源的名字,再到插件里面根据资源名字获取资源值,得到资源值之后再重新设置回主APP资源值即可。
1.3换肤的流程
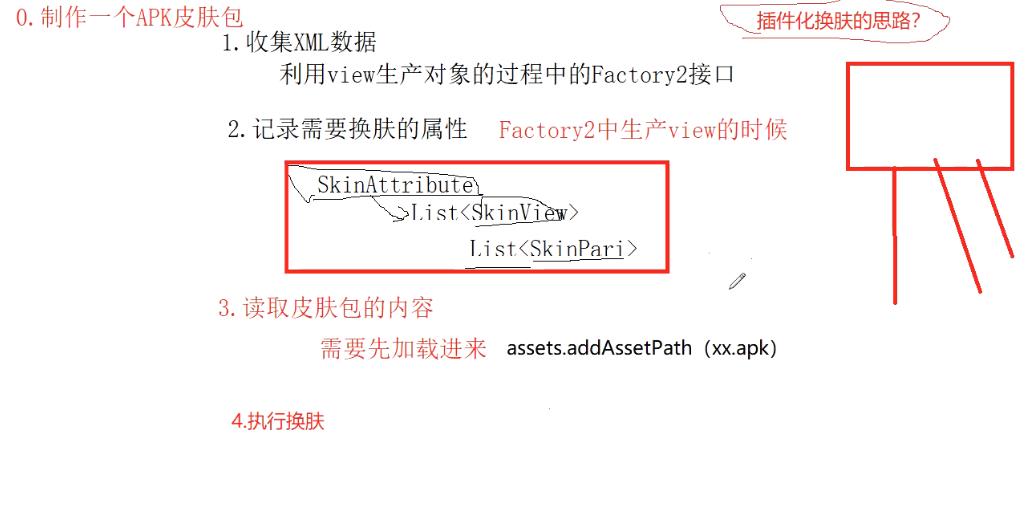
1.3.1制作一个APK的皮肤包
1.3.2收集XML中的数据
(1)利用View生产对象的过程中的Factory2接口
- 可以修改View相关的信息
(2)com.enjoy.skin.lib.SkinLayoutInflaterFactory实现了Factory2
- 记录对应VIEW的构造函数
    //记录对应VIEW的构造函数
    private static final Class<?>[] mConstructorSignature = new Class[] {
            Context.class, AttributeSet.class};

    private static final HashMap<String, Constructor<? extends View>> mConstructorMap =
            new HashMap<String, Constructor<? extends View>>();
- 以以下开头的包就对其进行换肤
    private static final String[] mClassPrefixList = {
            "android.widget.",
            "android.webkit.",
            "android.app.",
            "android.view."
    };
- 重写onCreateView
com.enjoy.skin.lib.SkinLayoutInflaterFactory#onCreateView(android.view.View, java.lang.String, android.content.Context, android.util.AttributeSet)
这个工厂的实现全部和源码是相同的。
- 创建View成功了,就记录这个View需要的属性。
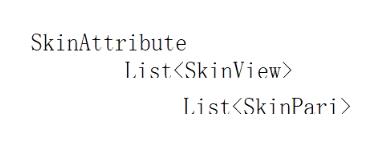
SkinAttribute封装
- 一个布局文件有多个View
List<SkinView>封装
- 每一个View有很多属性
List<SkinPari>封装
(3)类结构

- 所有要换肤的内容SkinAttribute是由多个SkinView来组成的
- 所有要换肤的SkinView中间又是由多个属性SkinPari组成的。
com.enjoy.skin.lib.SkinAttribute
com.enjoy.skin.lib.SkinAttribute.SkinView
com.enjoy.skin.lib.SkinAttribute.SkinPair
1.3.3记录需要换肤的属性
(1)com.enjoy.skin.lib.SkinLayoutInflaterFactory#onCreateView(android.view.View, java.lang.String, android.content.Context, android.util.AttributeSet)
//这就是我们加入的逻辑
        if (null != view) {
            //加载属性
            skinAttribute.look(view, attrs);
        }
(2)com.enjoy.skin.lib.SkinAttribute#look
- 去循环里面的每一个属性。
- 只要是其属性包含如下属性的就是换肤的属性,就需要将其保留下来。
    static {
        mAttributes.add("background");
        mAttributes.add("src");
        mAttributes.add("textColor");
        mAttributes.add("drawableLeft");
        mAttributes.add("drawableTop");
        mAttributes.add("drawableRight");
        mAttributes.add("drawableBottom");
    }
- 有些是用#号写死的属性,就没有换肤的可能性了。因为id是没有记录的。
- 注册过id的就将其提取出来,提取出来之后找的是皮肤包里面的id.
1.3.4读取皮肤包的内容
(1)android.view.LayoutInflater#inflate(org.xmlpull.v1.XmlPullParser, android.view.ViewGroup, boolean)
(2)android.view.LayoutInflater#createViewFromTag(android.view.View, java.lang.String, android.content.Context, android.util.AttributeSet, boolean)
(3)android.view.LayoutInflater#setFactory2
- 可以通过setFactory将factory设置进去。
- mFactorySet属性限定了设置factory只能设置一次,那就会存在换不了肤的情况。因此需要通过反射将该值进行修改。然后再去设置工厂,由此实现换肤。
(4)加载过程
com.enjoy.skin.lib.SkinManager#loadSkin
	/**
     * 记载皮肤并应用
     *
     * @param skinPath 皮肤路径 如果为空则使用默认皮肤
     */
    public void loadSkin(String skinPath) {
        if (TextUtils.isEmpty(skinPath)) {
            //还原默认皮肤
            SkinPreference.getInstance().reset();
            SkinResources.getInstance().reset();
        } else {
            try {
                //宿主app的 resources;
                Resources appResource = mContext.getResources();
//
                //反射创建AssetManager 与 Resource
                AssetManager assetManager = AssetManager.class.newInstance();
                //资源路径设置 目录或压缩包
                Method addAssetPath = assetManager.getClass().getMethod("addAssetPath",
                        String.class);
                addAssetPath.invoke(assetManager, skinPath);

                //根据当前的设备显示器信息 与 配置(横竖屏、语言等) 创建Resources
                Resources skinResource = new Resources(assetManager, appResource.getDisplayMetrics
                        (), appResource.getConfiguration());

                //获取外部Apk(皮肤包) 包名
                PackageManager mPm = mContext.getPackageManager();
                PackageInfo info = mPm.getPackageArchiveInfo(skinPath, PackageManager
                        .GET_ACTIVITIES);
                String packageName = info.packageName;
                SkinResources.getInstance().applySkin(skinResource, packageName);

                //记录
                SkinPreference.getInstance().setSkin(skinPath);


            } catch (Exception e) {
                e.printStackTrace();
            }
        }
        //通知采集的View 更新皮肤
        //被观察者改变 通知所有观察者
        setChanged();
        notifyObservers(null);
    }
(1)拿到宿主APP的Resources
(2)再拿到换肤插件的Resources
(3)拿到应用包插件资源信息与包名进行记录。便于将来APP退出之后,还可以记录使用的是哪一个皮肤资源。
需要先加载进来,assets.addAssetPath(xx.apk)
1.3.5执行换肤
com.enjoy.skin.lib.SkinLayoutInflaterFactory#update
    @Override
    public void update(Observable o, Object arg) {
        SkinThemeUtils.updateStatusBarColor(activity);
        skinAttribute.applySkin();
    }
com.enjoy.skin.lib.SkinAttribute#applySkin
com.enjoy.skin.lib.SkinAttribute.SkinView#applySkin
将所有记录的属性依次进行设置 。
例如从皮肤中拿到background,然后再将其设置进view的setBackground.
2.插件化换肤思路总结

(1)如果到皮肤包中根据宿主名没有找到资源id的时候就使用宿主自己的资源id
    /**
     * 1.通过原始app中的resId(R.color.XX)获取到自己的 名字
     * 2.根据名字和类型获取皮肤包中的ID
     */
    public int getIdentifier(int resId){
        if(isDefaultSkin){
            return resId;
        }
        String resName=mAppResources.getResourceEntryName(resId);
        String resType=mAppResources.getResourceTypeName(resId);
        int skinId=mSkinResources.getIdentifier(resName,resType,mSkinPkgName);
        return skinId;
    }
(2)输入主APP的ID,到皮肤APK文件中去找到对应ID的颜色值
    /**
     * 输入主APP的ID,到皮肤APK文件中去找到对应ID的颜色值
     * @param resId
     * @return
     */
    public int getColor(int resId){
        if(isDefaultSkin){
            return mAppResources.getColor(resId);
        }
        int skinId=getIdentifier(resId);
        if(skinId==0){
            return mAppResources.getColor(resId);
        }
        return mSkinResources.getColor(skinId);
    }
如果是颜色的话,不要用#将颜色写死。
如果是自定义控件,需要带换肤功能的,需要附带实现一个接口
3.打赏鼓励
感谢您的细心阅读,您的鼓励是我写作的不竭动力!!!
3.1微信打赏

3.2支付宝打赏

以上是关于03布局原理与XML原理分析二的主要内容,如果未能解决你的问题,请参考以下文章