华南农业大学Linux课程实验七——Linux下C编程
Posted 夜中听雪
tags:
篇首语:本文由小常识网(cha138.com)小编为大家整理,主要介绍了华南农业大学Linux课程实验七——Linux下C编程相关的知识,希望对你有一定的参考价值。
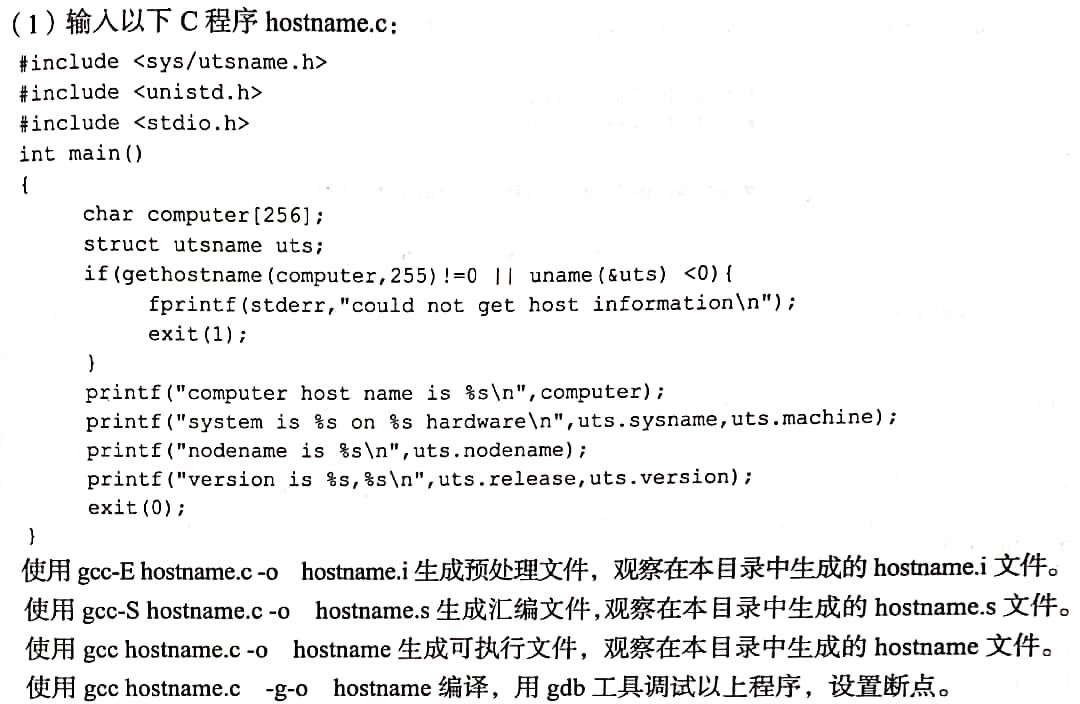
题目一:gcc命令编译C程序生成可执行文件,gdb工具调试程序

解答
1、输入程序hostname.c。
#include <stdlib.h>//加上这个,避免在gcc -S时报错“warning: incompatible implicit declaration of built-in function ‘exit’”。
#include <sys/utsname.h>
#include <unistd.h>
#include <stdio.h>
int main()
{
        char computer[256];
        struct utsname uts;
        if(gethostname(computer,255)!=0 || uname(&uts) < 0){
                fprintf(stderr,"could not get host information\\n");
                exit(1);
        }
        printf("computer host name is %s\\n",computer);
        printf("system is %s on %s hardware\\n",uts.sysname,uts.machine);
        printf("nodename is %s\\n",uts.nodename);
        printf("version is %s,%s\\n",uts.release,uts.version);
        exit(0);
}
2、生成可以用gdb调试的可执行文件hostname。
[root@wu1 test6]# ll
total 4
-rw-r--r-- 1 root root 484 May 14 11:20 hostname.c
[root@wu1 test6]# gcc -E hostname.c -o hostname.i
[root@wu1 test6]# gcc -S hostname.c -o hostname.s
[root@wu1 test6]# gcc hostname.c -o hostname
[root@wu1 test6]# ll
total 84
-rwxr-xr-x 1 root root  8616 May 14 11:26 hostname
-rw-r--r-- 1 root root   484 May 14 11:20 hostname.c
-rw-r--r-- 1 root root 62199 May 14 11:25 hostname.i
-rw-r--r-- 1 root root  1395 May 14 11:25 hostname.s

[root@wu1 test6]# gcc hostname.c -g -o hostname 	# 加上"-g"参数生成的可执行文件才能通过gdb调试
[root@wu1 test6]# ll
total 84
-rwxr-xr-x 1 root root 11144 May 15 13:36 hostname	# 文件变大了。
-rw-r--r-- 1 root root   484 May 14 11:20 hostname.c
-rw-r--r-- 1 root root 62199 May 14 11:25 hostname.i
-rw-r--r-- 1 root root  1395 May 14 11:25 hostname.s

[root@wu1 test6]# ./hostname	# 执行
computer host name is wu1
system is Linux on x86_64 hardware
nodename is wu1
version is 3.10.0-1062.18.1.el7.x86_64,#1 SMP Tue Mar 17 23:49:17 UTC 2020
下面这一小段不需要,只是记录下。
[root@wu1 test6]# file hostname
hostname: ELF 64-bit LSB executable, x86-64, version 1 (SYSV), dynamically linked (uses shared libs), for GNU/Linux 2.6.32, BuildID[sha1]=fa7c2a21544f44dba439c788457f2736fdd49aa0, not stripped
[root@wu1 test6]# yum install -y redhat-lsb
[root@wu1 test6]# lsb_release -a
3、gdb调试。
[root@wu1 test6]# yum -y install gdb
[root@wu1 test6]# gdb
GNU gdb (GDB) Red Hat Enterprise Linux 7.6.1-120.el7
Copyright (C) 2013 Free Software Foundation, Inc.
License GPLv3+: GNU GPL version 3 or later <http://gnu.org/licenses/gpl.html>
This is free software: you are free to change and redistribute it.
There is NO WARRANTY, to the extent permitted by law.  Type "show copying"
and "show warranty" for details.
This GDB was configured as "x86_64-redhat-linux-gnu".
For bug reporting instructions, please see:
<http://www.gnu.org/software/gdb/bugs/>.
(gdb) file hostname		# 指定需要进行调试的程序
Reading symbols from /root/test/test6/hostname...done.
(gdb) list	# 查看指定文件或者函数的源代码,并标出行号
1	#include <stdlib.h>
2	#include <sys/utsname.h>
3	#include <unistd.h>
4	#include <stdio.h>
5	int main()
6	{
7		char computer[256];
8		struct utsname uts;
9		if(gethostname(computer,255)!=0 || uname(&uts) < 0){
10			fprintf(stderr,"could not get host information\\n");
(gdb) list
11			exit(1);
12		}
13		printf("computer host name is %s\\n",computer);
14		printf("system is %s on %s hardware\\n",uts.sysname,uts.machine);
15		printf("nodename is %s\\n",uts.nodename);
16		printf("version is %s,%s\\n",uts.release,uts.version);
17		exit(0);
18	}
(gdb) break 13	# 设置断点,程序执行到断点就会暂停起来
Breakpoint 1 at 0x4006fb: file hostname.c, line 13.
(gdb) break 16
Breakpoint 2 at 0x400758: file hostname.c, line 16.
(gdb) run	# 启动被执行的程序
Starting program: /root/test/test6/hostname

Breakpoint 1, main () at hostname.c:13
13		printf("computer host name is %s\\n",computer);
Missing separate debuginfos, use: debuginfo-install glibc-2.17-323.el7_9.x86_64
(gdb) next	# next/n单步(行)执行,如果遇到函数不会进入函数内部
computer host name is wu1
14		printf("system is %s on %s hardware\\n",uts.sysname,uts.machine);
(gdb) continue	# 从一个断点继续执行到下一个断点
Continuing.
system is Linux on x86_64 hardware
nodename is wu1

Breakpoint 2, main () at hostname.c:16
16		printf("version is %s,%s\\n",uts.release,uts.version);
(gdb) n
version is 3.10.0-1062.18.1.el7.x86_64,#1 SMP Tue Mar 17 23:49:17 UTC 2020
17		exit(0);
(gdb) n
[Inferior 1 (process 17363) exited normally]
(gdb) n
The program is not being run.
(gdb) q	# quit/q退出gdb调试环境
知识点
gdb常用的调试命令
| 命令 | 含义 |
|---|---|
| file | 指定需要进行调试的程序 |
| list | 查看指定文件或者函数的源代码,并标出行号 |
| break | 设置断点,程序执行到断点就会暂停起来 |
| run | 启动被执行的程序 |
| continue | 从一个断点继续执行到下一个断点 |
| step | 单步(行)执行,如果遇到函数会进入函数内部 |
| next/n | 单步(行)执行,如果遇到函数不会进入函数内部 |
| 查看变量或者表达式的值 | |
| shell | 执行其后的shell命令 |
| quit/q | 退出gdb调试环境 |
gdb一般的调试流程和例子
gdb一般的调试流程:file ->list ->break ->run ->step/next ->print ->quit
例子:
gcc -g sum.c -o sum-g	# 加了-g参数(gcc旁的那个)才可以调试
file sum-g
list
break 8		# 断点一
list
break 20	# 断点二
run
print result	# 目前在断点处停下了,看一下result这个变量的值
step	# 向下一步
next
n	# next命令的缩写
print sum		# 再看一下sum的值
n	# 这时因为代码已经结束了,所以输入next会报错
q	# 退出gdb
遇见的错误
1、
hostname.c:10:3: warning: incompatible implicit declaration of built-in function ‘exit’ [enabled by default]
   exit(1);
   ^
hostname.c:16:2: warning: incompatible implicit declaration of built-in function ‘exit’ [enabled by default]
  exit(0);
解决:warning: incompatible implicit declaration of built-in function ‘exit’_攻城狮的物联网基地-CSDN博客
题目二:make和makefile
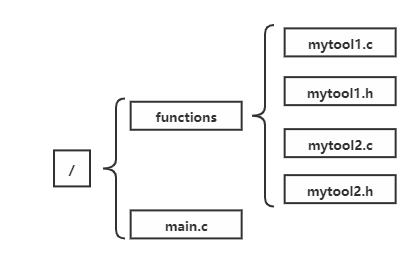
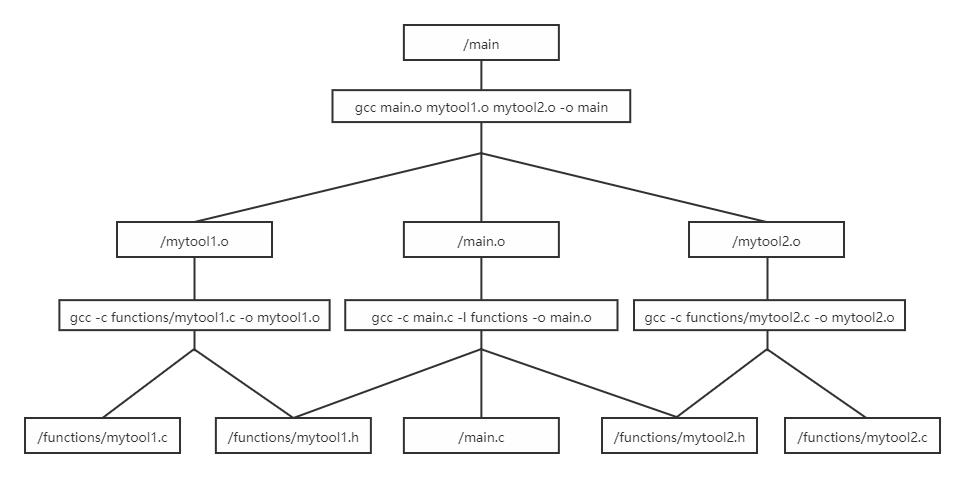
按照以下目录结构存放程序,然后制作makefile文件,请写出makefile文件内容并且画出依赖关系图。

现有一个程序由5个文件组成。
文件1:/main.c
#include "mytool1.h"
#include "mytool2.h"
int main()
{
	mytool1_print("hello mytool1!");
	mytool2_print("hello mytool2!");
	return 0;
}
文件2:/functions/mytool1.c
#include "mytool1.h"
#include <stdio.h>
void mytool1_print(char *print_str)
{
	printf("This is mytool1 print : %s ",print_str);
}
文件3:/functions/mytool1.h
#ifndef _MYTOOL_1_H
#define _MYTOOL_1_H
void mytool1_print(char *print_str);
#endif
文件4:/functions/mytool2.c
#include "mytool2.h"
#include <stdio.h>
void mytool2_print(char *print_str)
{
	printf("This is mytool2 print : %s ",print_str);
}
文件5:/functions/mytool2.h
#ifndef _MYTOOL_2_H
#define _MYTOOL_2_H
void mytool2_print(char *print_str);
#endif
解答
1、写出makefile文件并测试。
makefile文件
main : main.o mytool1.o mytool2.o
        gcc main.o mytool1.o mytool2.o -o main
main.o : main.c functions/mytool1.h functions/mytool2.h
        gcc -c main.c -I functions -o main.o
mytool1.o : functions/mytool1.c functions/mytool1.h
        gcc -c functions/mytool1.c -o mytool1.o
mytool2.o : functions/mytool2.c functions/mytool2.h
        gcc -c functions/mytool2.c -o mytool2.o
clean:
        rm -f *.o
        rm -f main
注意:gcc前面是tab键,而不是八个空格,如果用8个空格,输入make命令时,会报错:makefile:2: *** missing separator (did you mean TAB instead of 8 spaces?). Stop.。
测试
# 测试前,/functions目录下有4个文件:mytool1.h、mytool1.c、mytool2.h、mytool2.c。/目录下有文件:main.c。
[root@wu1 ~]# cd /
[root@wu1 /]# vim makefile
[root@wu1 /]# make
gcc -c main.c -I functions -o main.o
gcc -c functions/mytool1.c -o mytool1.o
gcc -c functions/mytool2.c -o mytool2.o
gcc main.o mytool1.o mytool2.o -o main
# 此时,/functions目录下的4个文件不变。/目录下有文件:main.c、makefile、main.o、mytool1.o、mytool2.o、main。
[root@wu1 /]# make clean
rm -f *.o
rm -f main
# 此时,/functions目录下的4个文件不变。/目录下有文件:main.c、makefile。
2、画出依赖关系图。

以上是关于华南农业大学Linux课程实验七——Linux下C编程的主要内容,如果未能解决你的问题,请参考以下文章