Nginx服务基本配置!
Posted handsomeboy-东
tags:
篇首语:本文由小常识网(cha138.com)小编为大家整理,主要介绍了Nginx服务基本配置!相关的知识,希望对你有一定的参考价值。
nginx服务
Nginx服务
Nginx是一款高性能、轻量级Web服务软件,其稳定性高,对系统资源消耗第,对HTTP并发连接的处理能力高
Nginx与Apache的区别
- Nginx作为轻型Web服务器,相比于Apache使用更少的资源,支持更多的并发量
- Apache相比于Nginx模块更多,少BUG,更为稳定
Nginx编译安装
- Nginx安装
[root@handsomeboy1 opt]# tar xzf nginx-1.12.2.tar.gz          //在网上下载好安装包解压
[root@handsomeboy1 opt]# yum install -y pcre-devel zlib-devel    //Nginx运行需要pcre、zlib等软件的支持
[root@handsomeboy1 opt]# cd nginx-1.12.2/
[root@handsomeboy1 nginx-1.12.2]# useradd -M -s /sbin/nologin nginx     //创建运行nginx用户、组
[root@handsomeboy1 nginx-1.12.2]# ./configure --prefix=/usr/local/nginx \\
> --user=nginx \\
> --group=nginx \\
> --with-http_stub_status_module                 #开启状态统计模块
[root@handsomeboy1 nginx-1.12.2]# make && make install
…………………………
[root@handsomeboy1 nginx-1.12.2]# ln -s /usr/local/nginx/sbin/nginx /usr/local/sbin/
- Nginx运行控制
[root@handsomeboy1 nginx-1.12.2]# nginx -t          #检测nginx的配置文件
nginx: the configuration file /usr/local/nginx/conf/nginx.conf syntax is ok
nginx: configuration file /usr/local/nginx/conf/nginx.conf test is successful
[root@handsomeboy1 nginx-1.12.2]# nginx            #开启nginx
[root@handsomeboy1 nginx-1.12.2]# netstat -antp | grep nginx
tcp        0      0 0.0.0.0:80              0.0.0.0:*               LISTEN      76811/nginx: master
- 添加nginx服务为系统控制(systemctl和service)
方法一:编译脚本设置nginx服务
[root@nginx conf]# vim /etc/init.d/nginx
#!/bin/bash
#chkconfig: - 99 20
#这是一个控制nginx服务运行的脚本
NGINX="/usr/local/nginx/sbin/nginx"             #nginx开启命令位置
PID="/usr/local/nginx/logs/nginx.pid"			#nginx服务进程PID位置
case "$1" in
start)
        $NGINX;;                             	#开启nginx
stop)
        kill -s QUIT $(cat $PID);;				#杀死nginx进程号,停止服务
restart)
        $0 stop && $0 start;;					#重启服务
reload)
        kill -s HUP $(cat $PID);;				#重载服务
*)
        echo "正确输入:$0 {start|stop|restart|reload}"
        exit 1
esac
exit 0
[root@nginx conf]# chmod +x /etc/init.d/nginx
[root@handsomeboy1 ~]# chkconfig --add nginx
[root@handsomeboy1 ~]# chkconfig --level 35 nginx on
[root@handsomeboy1 ~]# /etc/init.d/nginx stop
[root@handsomeboy1 ~]# netstat -antp | grep nginx
[root@handsomeboy1 ~]# /etc/init.d/nginx start
[root@handsomeboy1 ~]# netstat -antp | grep nginx
tcp        0      0 0.0.0.0:80              0.0.0.0:*               LISTEN      77182/nginx: master
方法二:将nginx服务添加到systemd中
[root@nginx nginx-1.12.2]# vim /usr/lib/systemd/system/nginx.service
[unit]
Description=nginx
After=network.target
[Service]
Type=forking                            		  #后台运行类型
PIDFile=/usr/local/nginx/logs/nginx.pid
ExecStart=/usr/local/nginx/sbin/nginx             #启动服务
ExecrSTOP=/bin/kill -s QUIT $MAINPID              #停止服务
ExecrReload=/bin/kill -s HUP $MAINPID             #重载服务
PrivateTmp=true
[Install]
wantedBy=multi-user.target                       #启动级别
[root@handsomeboy1 ~]# chmod 754 /usr/lib/systemd/system/nginx.service
[root@handsomeboy1 ~]# /etc/init.d/nginx stop
[root@nginx conf]# systemctl start nginx.service
[root@nginx conf]# systemctl status nginx.service
● nginx.service
   Loaded: loaded (/usr/lib/systemd/system/nginx.service; static; vendor preset: disabled)
   Active: active (running) since 一 2021-06-21 23:09:58 CST; 7s ago
  Process: 80120 ExecStart=/usr/local/nginx/sbin/nginx (code=exited, status=0/SUCCESS)
 Main PID: 80121 (nginx)
    Tasks: 2
   CGroup: /system.slice/nginx.service
           ├─80121 nginx: master process /usr/local/nginx/sbin/nginx
           └─80122 nginx: worker process

6月 21 23:09:58 nginx systemd[1]: Starting nginx.service...
6月 21 23:09:58 nginx systemd[1]: Started nginx.service.
此时可以在浏览器上测试查看

Nginx配置
[root@handsomeboy1 ~]# vim /usr/local/nginx/conf/nginx.conf
#查看nginx服务配文件


ulimit -a :查看进程的最大连接数数
ulimit -n :临时调整进程最大连接数
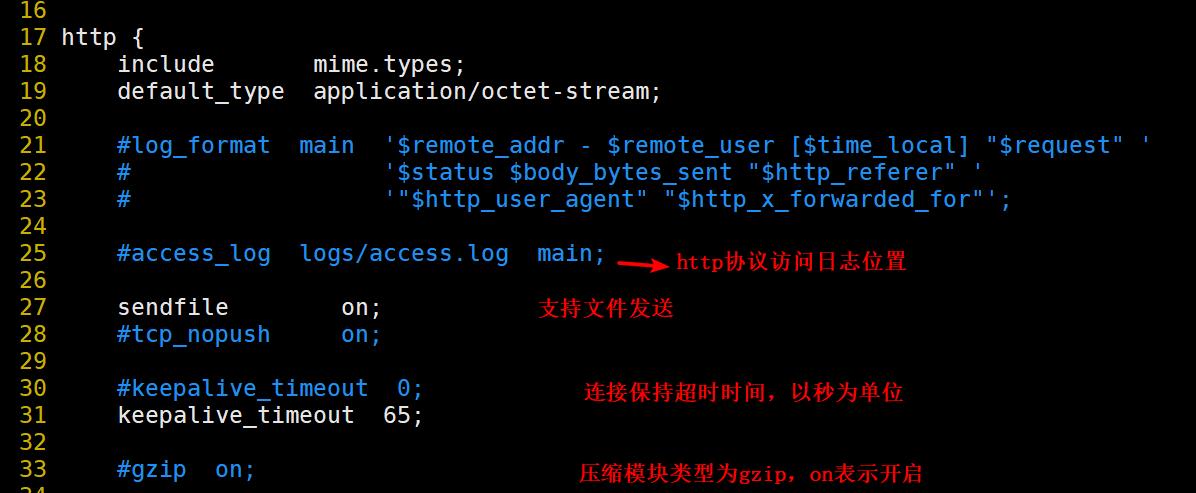
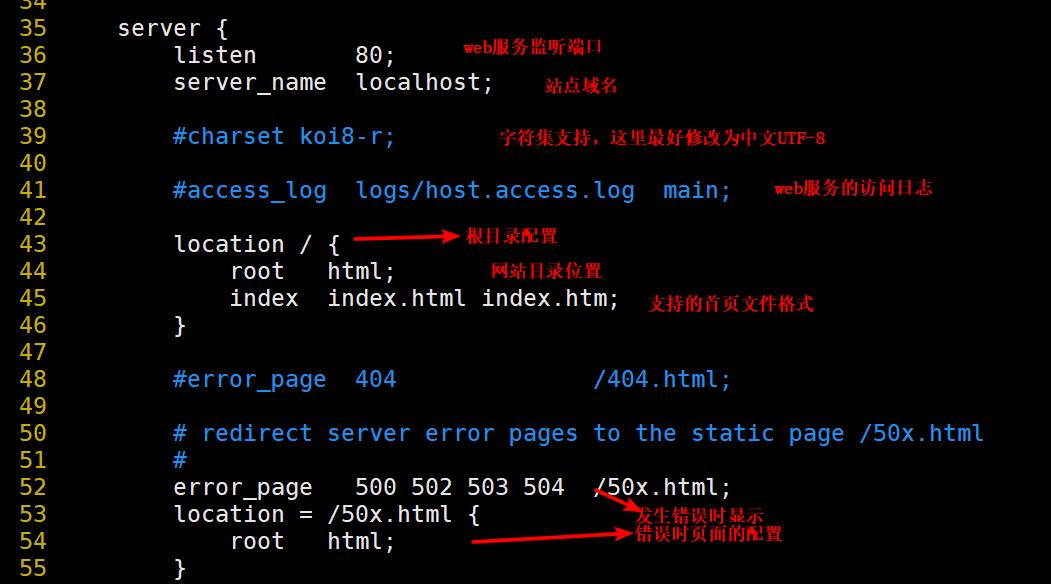
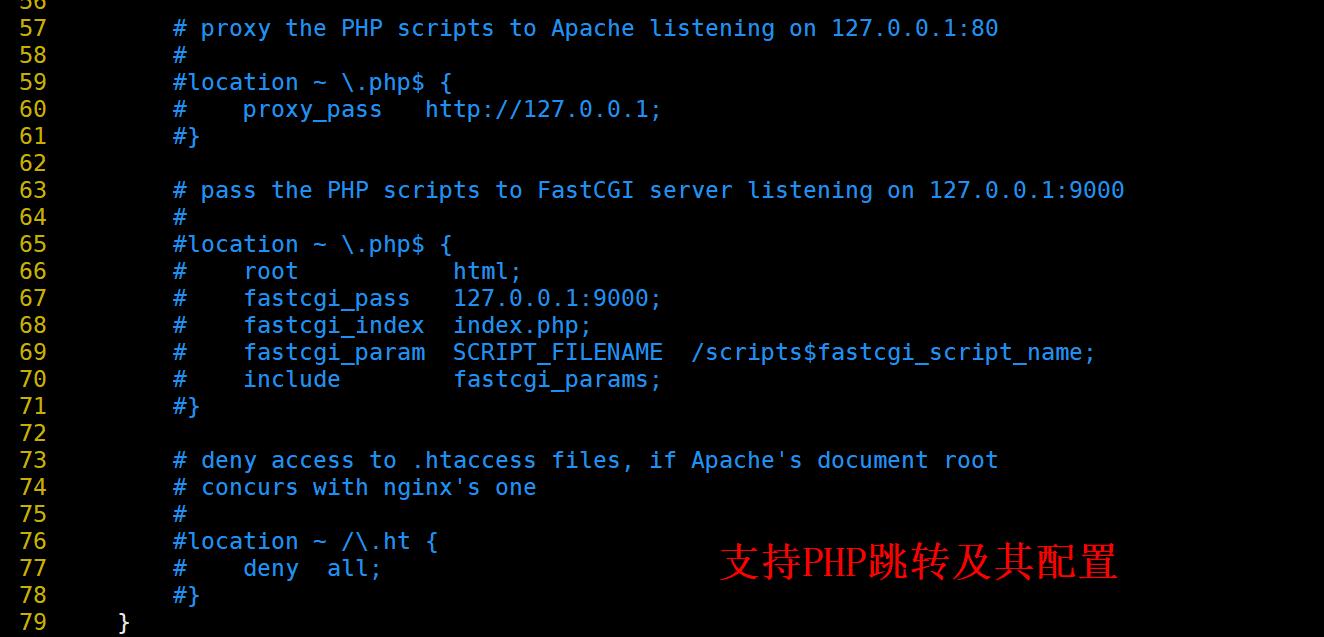

访问状态统计
[root@nginx conf]# vim nginx.conf

[root@nginx conf]# echo "192.168.43.66 www.whd.com" >> /etc/hosts #配置本地域名映射

[root@nginx conf]# nginx -V     #查看nginx是否包含http_stub_status_module模块
nginx version: nginx/1.12.2
built by gcc 4.8.5 20150623 (Red Hat 4.8.5-44) (GCC)
configure arguments: --prefix=/usr/local/nginx --user=nginx --group=nginx --with-http_stub_status_module
[root@nginx conf]# vim nginx.conf

[root@nginx conf]# systemctl restart nginx.service
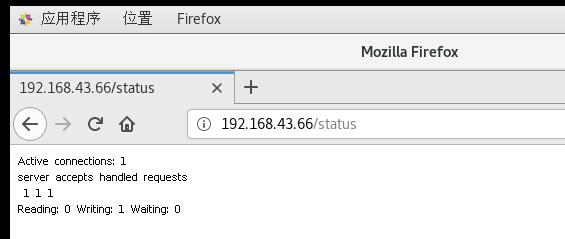
- Active connections :表示当前的活动连接数
- service accepts handled requests :表示已经处理的连接信息,三个数字依次表示已经处理的连接数、成功的TCP握手次数、以处理的请求数
Nginx访问控制
基于授权的访问控制
- 使用htpasswd生成用户密码认证文件
[root@nginx conf]# yum install -y httpd-tools     #htpasswd命令需要下载httpd-tools软件包
[root@nginx conf]# htpasswd -c /usr/local/nginx/passwd.db lisi
####  生成用户密码认证文件,该用户可以是非系统用户
New password: 					#输入密码
Re-type new password:			#再次输入密码
Adding password for user lisi
[root@nginx extra]# cat /usr/local/nginx/passwd.db
lisi:$apr1$uFJxf0wG$/DXLbXqhv98xj0dyiwkFh0
[root@nginx conf]# chown nginx /usr/local/nginx/passwd.db        #将认证文件添加属主nginx管理
[root@nginx conf]# chmod 400 /usr/local/nginx/passwd.db			#修改认证文件权限为只有属主有可读权限
[root@nginx conf]# vim nginx.conf                     #设置主配值文件,添加认证配置项

[root@nginx ~]# systemctl restart nginx.service      #重启服务
[root@nginx ~]# systemctl status nginx.service
[root@nginx ~]# watch -n 1 systemctl status nginx.service     #每隔一秒查看服务状态
在浏览器上测试
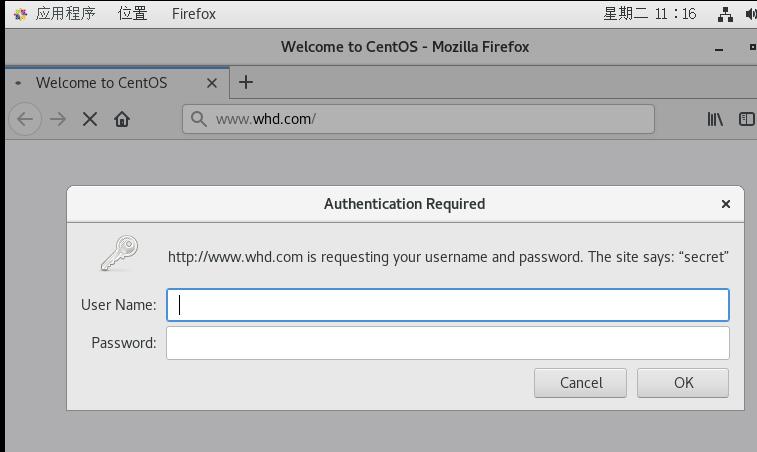
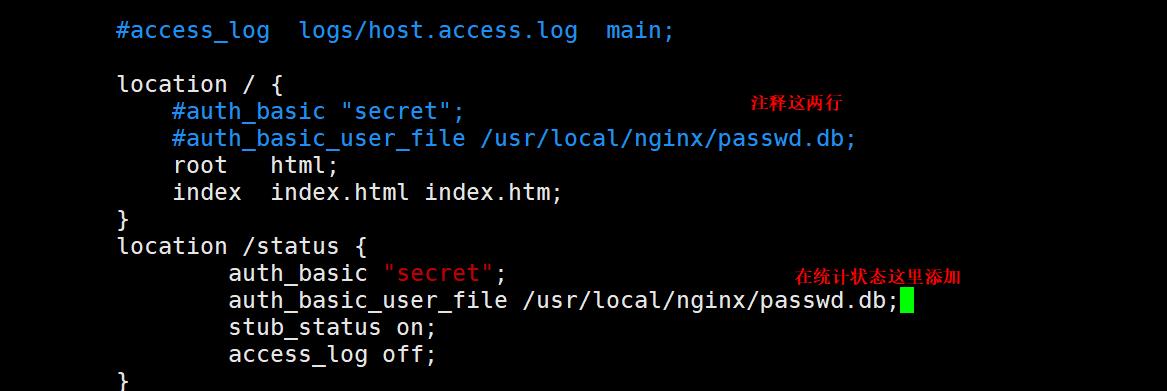
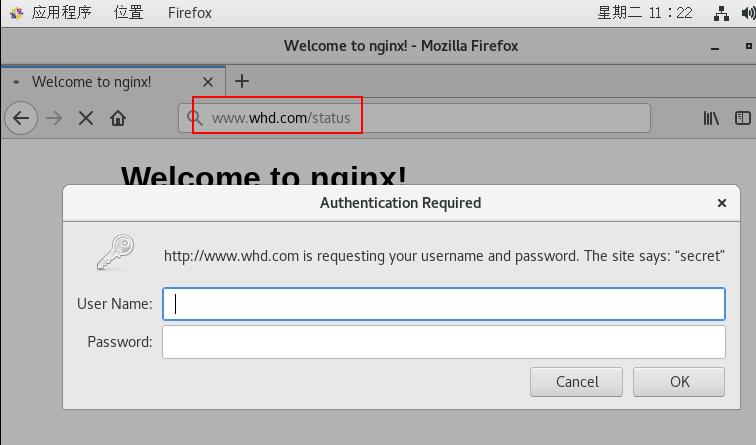
- 我们也可以在统计状态添加密码访问
[root@nginx conf]# vim nginx.conf
[root@nginx ~]# systemctl restart nginx.service      #重启服务
[root@nginx ~]# systemctl status nginx.service
基于客户端的访问控制
查看本机的IP地址

[root@nginx conf]# vim nginx.conf

[root@nginx ~]# systemctl restart nginx.service

Nginx虚拟主机
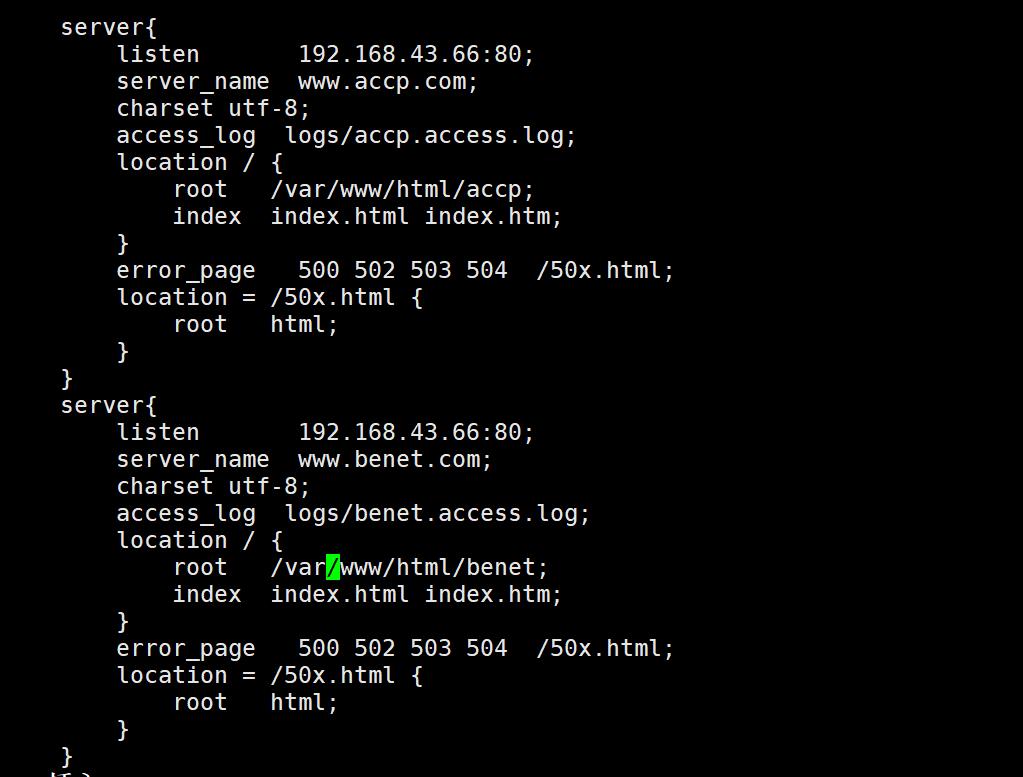
基于域名虚拟主机
[root@nginx ~]# vim /etc/hosts #添加本地域名

[root@nginx ~]# mkdir -p /var/www/html/benet       #添加www.benet.com的网页存放的目录
[root@nginx ~]# mkdir -p /var/www/html/accp
[root@nginx ~]# echo "www.accp.com" >> /var/www/html/accp/index.html
[root@nginx ~]# echo "www.benet.com" >> /var/www/html/benet/index.html
#### 编辑两个域名的网页内容
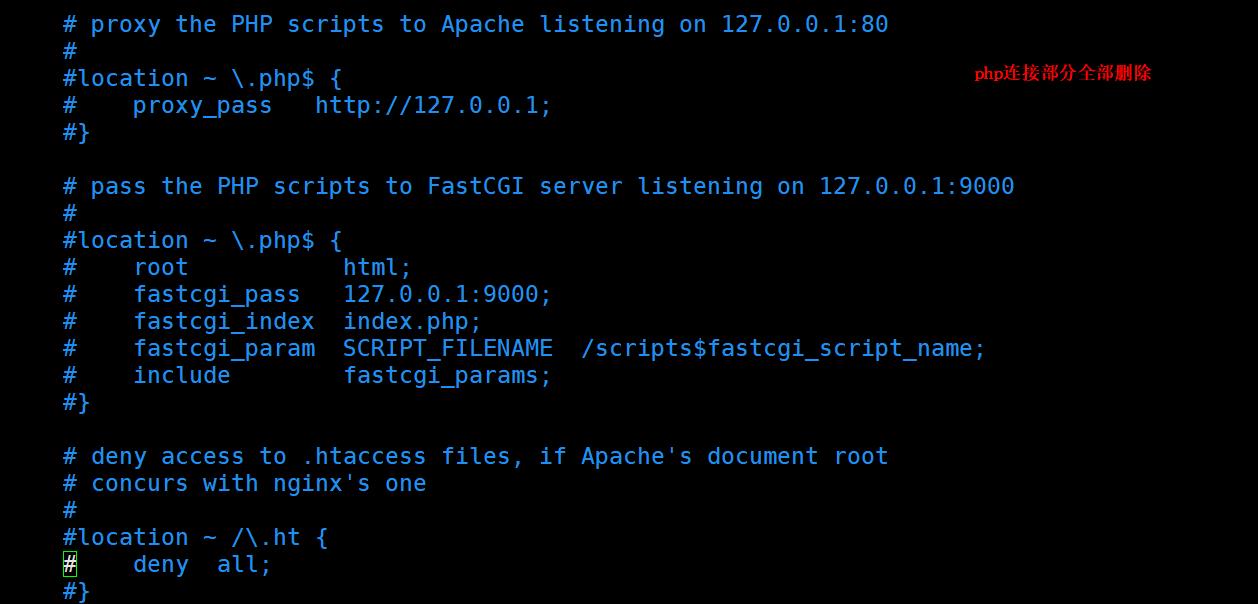
[root@nginx ~]# vim /usr/local/nginx/conf/nginx.conf       #修改配置文件内容
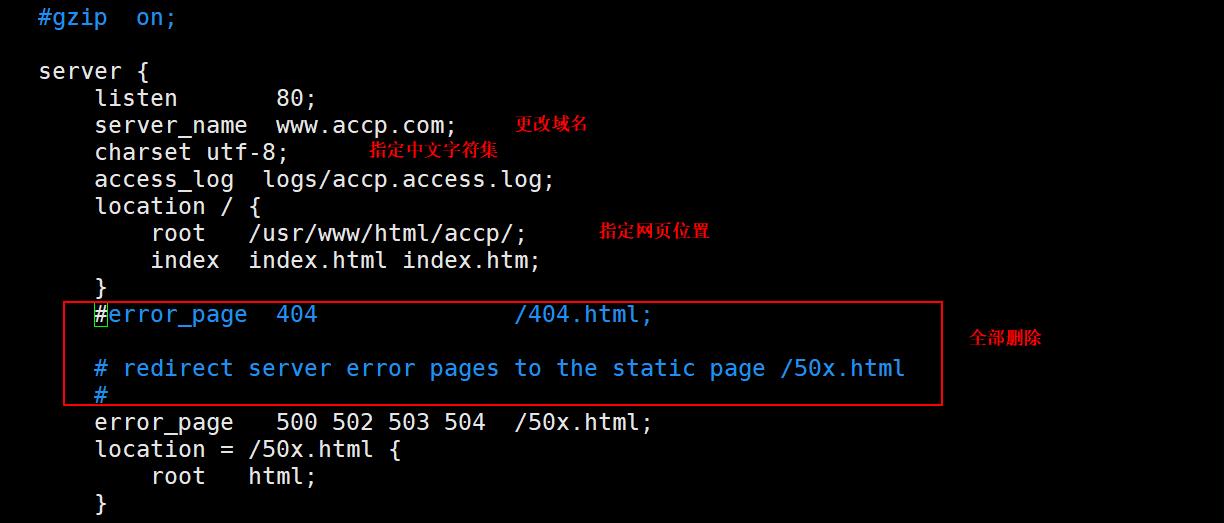
[root@nginx ~]# cd /usr/local/nginx/logs/
[root@nginx logs]# ls
access.log  accp.access.log  benet.access.log  error.log  nginx.pid
[root@nginx logs]# rm -rf accp.access.log    #删除日志
[root@nginx logs]# rm -rf benet.access.log
[root@nginx logs]# systemctl restart nginx.service
[root@nginx logs]# ls
access.log  accp.access.log  benet.access.log  error.log  nginx.pid
###重启服务后


基于IP地址虚拟主机
[root@nginx logs]# ifconfig ens33:0 192.168.43.22 netmask 255.255.255.0
[root@nginx logs]# ifconfig ens33:0
ens33:0: flags=4163<UP,BROADCAST,RUNNING,MULTICAST>  mtu 1500
        inet 192.168.43.22  netmask 255.255.255.0  broadcast 192.168.43.255
        ether 00:0c:29:39:c8:59  txqueuelen 1000  (Ethernet)
[root@nginx logs]# mkdir /var/www/html/benet22
[root@nginx logs]# echo "www.benet22.com" > /var/www/html/benet22/index.html
[root@nginx logs]# vim /etc/hosts

[root@nginx logs]# vim /usr/local/nginx/conf/nginx.conf

[root@nginx logs]# systemctl restart nginx.service

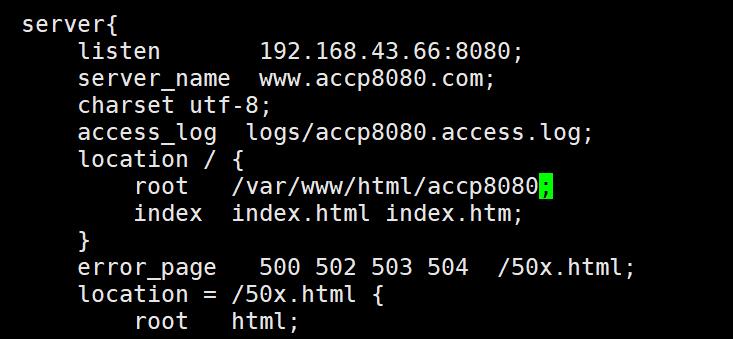
基于端口虚拟主机
[root@nginx logs]# mkdir /var/www/html/accp8080
[root@nginx logs]# echo "www.accp8080.com" >> /var/www/html/accp8080/index.html
[root@nginx logs]# vim /usr/local/nginx/conf/nginx.conf
[root@nginx logs]# nginx -t
nginx: the configuration file /usr/local/nginx/conf/nginx.conf syntax is ok
nginx: configuration file /usr/local/nginx/conf/nginx.conf test is successful
[root@nginx logs]# systemctl stop nginx.service
[root@nginx logs]# systemctl start nginx.service
[root@nginx logs]# netstat -antp | grep nginx
tcp        0      0 192.168.43.66:80        0.0.0.0:*               LISTEN      88536/nginx: master
tcp        0      0 192.168.43.66:8080      0.0.0.0:*               LISTEN      88536/nginx: master

总结
- Nginx建立访问统计功能需要在安装时启用–with-http_stub_status_module选项
- Nginx虚拟主机可基于IP、端口、域名
- Nginx页面访问控制有基于授权和基于客户端两种
以上是关于Nginx服务基本配置!的主要内容,如果未能解决你的问题,请参考以下文章