ArduinoSTM32 RTC clock
Posted perseverance52
tags:
篇首语:本文由小常识网(cha138.com)小编为大家整理,主要介绍了ArduinoSTM32 RTC clock相关的知识,希望对你有一定的参考价值。
ArduinoSTM32 RTC clock
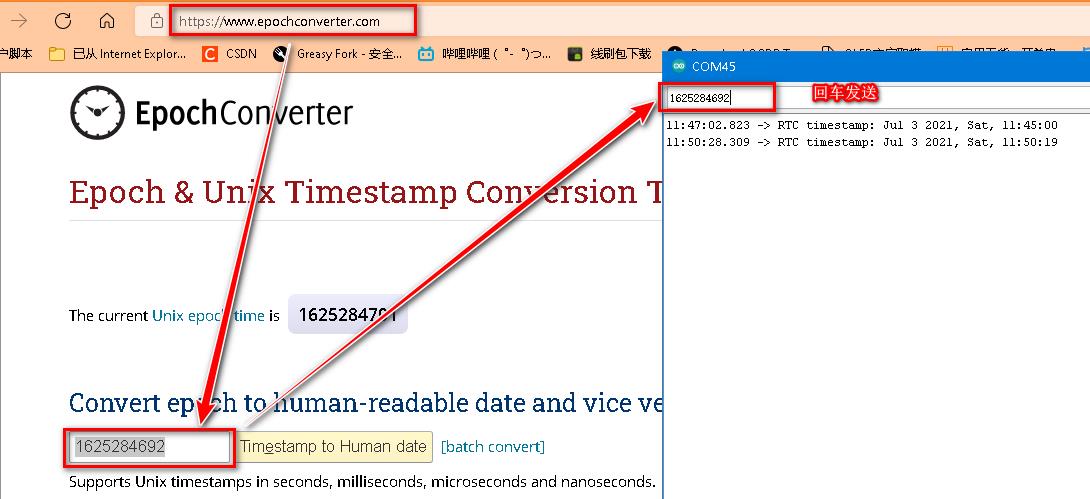
- 时间戳获取:Epoch & Unix Timestamp Conversion Tools
- https://www.epochconverter.com/

- 开发板STM32F103C8
/*   STM32F103C8 Blue Pill ( PC13)

  Serialport set and display RTC clock , Write by CSNOL https://github.com/csnol/STM32-Examples
  based on https://github.com/rogerclarkmelbourne/Arduino_STM32

  1. Blink on PC13 per 4s or 7s by attachAlarmInterrupt for 10 times
  2. Second counter by attachSecondsInterrupt
  3. Serial output on(41s) or off(21s) by creatAlarm
  4. change to your timezone in the sketch;
  3. get Unix epoch time from https://www.epochconverter.com/ ;
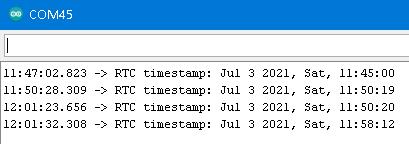
  4. last step input the 10 digit number( example: 1503945555) to Serialport ;
  5. the clock will be reset to you wanted.

  ##  Why the 10 digit Unix epoch time be used?
****Because I wanna connect to NTP server by ESP-8266.
****in the <NTPClient.h> library. getNtpTime() will return this 10 digit Unix epoch time.
*
*  嗨!朋友们, 这是一个STM32F10x系列的RTC应用的例子,希望对你的编码有所帮助
*  这个程序基于https://github.com/rogerclarkmelbourne/Arduino_STM32 , 感谢所有贡献者的付出。
*  程序测试了 F10x系列RTC 的 几种中断, 并通过LED和串口进行表达。
*  RTClock 使用 UTC 作为时间标准, 你可以从https://www.epochconverter.com/ 获得 Unix epoch time数值
*  并通过串口进行设置, 当然你也可以略微修改一下串口接收处理方法,直接从串口接收日期形式。如 2017-9-13-10:30:00,
*  另外一个方法是通过ESP8266获取NTP网络时间,并定期发送给F10x进行更新。
*/


#include <RTClock.h>

RTClock rtclock (RTCSEL_LSE); // initialise
int timezone = 8;      // change to your timezone
time_t tt, tt1;
tm_t mtt;
uint8_t dateread[11];
int globAlmCount = 0;
int lastGlobAlmCount;
int SPECAlmCount = 0;
int lastSPECAlmCount;
int alarmcount = 3;
uint8_t AlarmExchange = 0;
bool dispflag = true;

//-----------------------------------------------------------------------------
const char * weekdays[] = {"Mon", "Tue", "Wed", "Thu", "Fri", "Sat", "Sun"};
const char * months[] = {"Dummy", "Jan", "Feb", "Mar", "Apr", "May", "Jun", "Jul", "Aug", "Sep", "Oct", "Nov", "Dec" };
//-----------------------------------------------------------------------------
uint8_t str2month(const char * d)
{
    uint8_t i = 13;
    while ( (--i) && strcmp(months[i], d)!=0 );
    return i;
}
//-----------------------------------------------------------------------------
const char * delim = " :";
char s[128]; // for sprintf
//-----------------------------------------------------------------------------
void ParseBuildTimestamp(tm_t & mt)
{
    // Timestamp format: "Dec  8 2017, 22:57:54"
    sprintf(s, "Timestamp: %s, %s\\n", __DATE__, __TIME__);
    //Serial.print(s);
    char * token = strtok(s, delim); // get first token
    // walk through tokens
    while( token != NULL ) {
        uint8_t m = str2month((const char*)token);
        if ( m>0 ) {
            mt.month = m;
            //Serial.print(" month: "); Serial.println(mt.month);
            token = strtok(NULL, delim); // get next token
            mt.day = atoi(token);
            //Serial.print(" day: "); Serial.println(mt.day);
            token = strtok(NULL, delim); // get next token
            mt.year = atoi(token) - 1970;
            //Serial.print(" year: "); Serial.println(mt.year);
            token = strtok(NULL, delim); // get next token
            mt.hour = atoi(token);
            //Serial.print(" hour: "); Serial.println(mt.hour);
            token = strtok(NULL, delim); // get next token
            mt.minute = atoi(token);
            //Serial.print(" minute: "); Serial.println(mt.minute);
            token = strtok(NULL, delim); // get next token
            mt.second = atoi(token);
            //Serial.print(" second: "); Serial.println(mt.second);
        }
        token = strtok(NULL, delim);
    }
}
//-----------------------------------------------------------------------------
// This function is called in the attachSecondsInterrupt
//-----------------------------------------------------------------------------
void SecondCount ()
{
  tt++;
}
//-----------------------------------------------------------------------------
// This function is called in the attachAlarmInterrupt
//-----------------------------------------------------------------------------
void blink ()
{
  digitalWrite(LED_BUILTIN, !digitalRead(LED_BUILTIN));
  globAlmCount++;
}
//-----------------------------------------------------------------------------
void OnOffSerial ()
{
  dispflag = !dispflag;
  SPECAlmCount++;
}
//-----------------------------------------------------------------------------
void setup()
{
  lastGlobAlmCount = ~globAlmCount;
  lastSPECAlmCount = ~SPECAlmCount;
  Serial.begin(115200);
  pinMode(LED_BUILTIN, OUTPUT);
  //while (!Serial); delay(1000);
  ParseBuildTimestamp(mtt);  // get the Unix epoch Time counted from 00:00:00 1 Jan 1970
  tt = rtclock.makeTime(mtt) + 25; // additional seconds to compensate build and upload delay
  rtclock.setTime(tt);
  tt1 = tt;
  rtclock.attachAlarmInterrupt(blink);// Call blink
  rtclock.attachSecondsInterrupt(SecondCount);// Call SecondCount
}
//-----------------------------------------------------------------------------
void loop()
{
  if ( Serial.available()>10 ) {
    for (uint8_t i = 0; i<11; i++) {
	    dateread[i] = Serial.read();
    }
    Serial.flush();
    tt = atol((char*)dateread);
    rtclock.setTime(rtclock.TimeZone(tt, timezone)); //adjust to your local date
  }
  if (lastGlobAlmCount != globAlmCount || lastSPECAlmCount != SPECAlmCount ) {
    if (globAlmCount == 10) {        // to detachAlarmInterrupt and start creatAlarm after 10 times about 110s
      rtclock.detachAlarmInterrupt();
      globAlmCount = 0;
      rtclock.createAlarm(OnOffSerial, (rtclock.getTime() + 20));   // call OnOffSerial stop output date from Serial after 2 mins
      alarmcount = 20;   //change to creatAlarm  21S close Serial output and 41s open Serial output.
    }
    else {
      lastGlobAlmCount = globAlmCount;
      lastSPECAlmCount = SPECAlmCount;
      Serial.println(" Say hello to every guys ");
      if(dispflag == false)
      Serial.println(" SPECAlarm turn Display Off ");
      switch (AlarmExchange)  {
        case 0:
          rtclock.setAlarmTime(rtclock.getTime() + alarmcount);  // reset alarm = current time + 4s for attachAlarmInterrupt,  21s for creatAlarm
          AlarmExchange = 1;
          break;
        case 1:
          rtclock.breakTime(rtclock.getTime() + alarmcount * 2, mtt);  reset alarm = current time + 7s for attachAlarmInterrupt,  41s for creatAlarm
          rtclock.setAlarmTime(mtt);
          AlarmExchange = 0;
          break;
      }
    }
  }
  if (tt1 != tt && dispflag == true )
  {
    tt1 = tt;
    // get and print actual RTC timestamp
    rtclock.breakTime(rtclock.now(), mtt);
    sprintf(s, "RTC timestamp: %s %u %u, %s, %02u:%02u:%02u\\n",
      months[mtt.month], mtt.day, mtt.year+1970, weekdays[mtt.weekday], mtt.hour, mtt.minute, mtt.second);
    Serial.print(s);
  }
}

以上是关于ArduinoSTM32 RTC clock的主要内容,如果未能解决你的问题,请参考以下文章