从零开始学习Vert.x
Posted 超超学堂
tags:
篇首语:本文由小常识网(cha138.com)小编为大家整理,主要介绍了从零开始学习Vert.x相关的知识,希望对你有一定的参考价值。
只需要指定版本并选择所需要的依赖就可以了,然后下载,解压,导入到idea就可以了,当然也完全可以自己新建项目然后自己添加依赖。因为是第一个vert项目,所以我选择了第一种方式!另外因为需要对数据库访问,所以添加了mysql的jar包,整个项目的pom文件:
<?xml version="1.0" encoding="UTF-8"?>
<project xmlns="http://maven.apache.org/POM/4.0.0"
     xmlns:xsi="http://www.w3.org/2001/XMLSchema-instance"
     xsi:schemaLocation="http://maven.apache.org/POM/4.0.0 http://maven.apache.org/xsd/maven-4.0.0.xsd">
<modelVersion>4.0.0</modelVersion>

<groupId>com.ypc</groupId>
<artifactId>firstVert</artifactId>
<version>1.0.0-SNAPSHOT</version>
<properties>
    <java.version>1.8</java.version>
    <vertx.version>3.5.3</vertx.version>
</properties>

<build>
    <plugins>
        <plugin>
            <groupId>org.apache.maven.plugins</groupId>
            <artifactId>maven-compiler-plugin</artifactId>
            <version>3.5.1</version>
            <configuration>
                <source>${java.version}</source>
                <target>${java.version}</target>
            </configuration>
        </plugin>

        <plugin>
            <groupId>org.apache.maven.plugins</groupId>
            <artifactId>maven-shade-plugin</artifactId>
            <version>2.4.3</version>
            <executions>
                <execution>
                    <phase>package</phase>
                    <goals>
                        <goal>shade</goal>
                    </goals>
                    <configuration>
                      <transformers>
                          <transformer implementation="org.apache.maven.plugins.shade.resource.ManifestResourceTransformer">
                              <manifestEntries>
                                  <Main-Class>io.vertx.core.Launcher</Main-Class>
                                  <Main-Verticle>com.ypc.firstVert.MainVerticle</Main-Verticle>
                              </manifestEntries>
                          </transformer>
                          <transformer implementation="org.apache.maven.plugins.shade.resource.AppendingTransformer">
                              <resource>META-INF/services/io.vertx.core.spi.VerticleFactory</resource>
                              <resource>META-INF/services/io.vertx.core.spi.launcher.CommandFactory</resource>
                          </transformer>
                      </transformers>
                      <artifactSet>
                      </artifactSet>                         <outputFile>${project.build.directory}/${project.artifactId}-${project.version}-fat.jar</outputFile>
                  </configuration>
                </execution>
            </executions>
        </plugin>
        <plugin>
            <groupId>org.codehaus.mojo</groupId>
            <artifactId>exec-maven-plugin</artifactId>
            <version>1.5.0</version>
            <configuration>
                <mainClass>io.vertx.core.Launcher</mainClass>
                <arguments>
                    <argument>run</argument>
                    <argument>com.ypc.firstVert.MainVerticle</argument>
                </arguments>
            </configuration>
        </plugin>
    </plugins>
</build>
<dependencies>
        <dependency>
            <groupId>io.vertx</groupId>
            <artifactId>vertx-mysql-postgresql-client</artifactId>
            <version>${vertx.version}</version>
        </dependency>
        <dependency>
            <groupId>io.vertx</groupId>
            <artifactId>vertx-jdbc-client</artifactId>
            <version>${vertx.version}</version>
        </dependency>
        <dependency>
            <groupId>io.vertx</groupId>
            <artifactId>vertx-unit</artifactId>
            <version>${vertx.version}</version>
        </dependency>
        <dependency>
            <groupId>io.vertx</groupId>
            <artifactId>vertx-core</artifactId>
            <version>${vertx.version}</version>
        </dependency>
        <dependency>
            <groupId>io.vertx</groupId>
            <artifactId>vertx-web</artifactId>
            <version>${vertx.version}</version>
        </dependency>
        <dependency>
            <groupId>mysql</groupId>
            <artifactId>mysql-connector-java</artifactId>
            <version>8.0.12</version>
        </dependency>
    </dependencies>
</project>
打开我们的项目我们发现在项目目录下已经给我们生成了一个MainVerticle.java类,这一点和springboot为我们生成Application.java很相似。但是不同的是这个MainVerticle.java并不是我们程序启动的入口,这一点看我们的pom文件也可以看出来,我们想输出是一个fat.jar。下面我们先看下vert.x自动创建项目生成的代码。
public class MainVerticle extends AbstractVerticle {

    @Override
    public void start() throws Exception {
        vertx.createHttpServer().requestHandler(req -> {
              req.response()
                 .putHeader("content-type", "text/plain")
                 .end("Hello from Vert.x!");
            }).listen(8080);
        System.out.println("HTTP server started on port 8080");
    }
}
MainVerticle继承了AbstractVerticle类,并重写了start()方法,只看逻辑的话应该是没问题的,就是由vertx创建一个http服务,用来响应用户的请求,响应头设置的content_type为“text/plain”,即纯文本形式,响应的内容就是“Hello from Vert.x!”,监听的端口号是8080。当然看到代码确实可以理解,但是真要自己写还是感觉有点难,代码写好了,那么我们应该怎么启动呢?上面说了这个项目输出会是一个fat.jar,这样就可以和当初学springboot一样通过命令行启动。先使用maven打成fat.jar
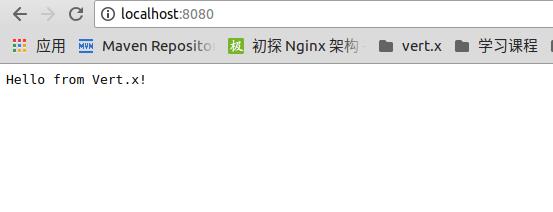
通过控制台终端,输入:java -jar firstVert-1.0.0-SNAPSHOT-fat.jar启动,看到命令行输出后,我们到浏览器输入localhost:8080


还有一种方式就是通过java的main函数启动,在项目下新建一个Main.java
public class Main {

    public static void main(String[] args) {

        Vertx vertx = Vertx.vertx();

        vertx.deployVerticle(MainVerticle.class.getName());
    }

}
然后启动main,这时候访问浏览器和上面那种方式的结果是一样的。
上面的代码中MainVerticle继承了AbstractVerticle,并重写了无入参的start()方法,现在我们使用另一种方式,重写有入参的start()方法。通常我们访问页面的时候是先查询数据库,然后将数据传递给前台页面,进行渲染展示的。
所以这次我们先获取数据库连接,连接成功后再创建httpServer。带入参的start方法携带的参数为Future
public class MainVerticle extends AbstractVerticle {


    private static final Logger LOGGER = LoggerFactory.getLogger(MainVerticle.class);
    private JDBCClient jdbcClient;
    private static final String QUERY_SQL = "select * from t_user";
    @Override
    public void start(Future<Void> startFuture) throws Exception {
        Future<Void> steps = getConnection().compose(v -> startHttpServer());
        steps.setHandler(ar -> {
           if (ar.succeeded()){
               System.out.println(">>>> success <<<<<");
               startFuture.complete();
           } else {
               LOGGER.error(ar.cause().getMessage());
               startFuture.fail(ar.cause());
          }

        });
    }

    private Future<Void> getConnection(){
        Future<Void> future = Future.future();
        System.out.println(">>>> data base connection <<<<");
        jdbcClient = JDBCClient.createShared(vertx,new JsonObject()
            .put("url","jdbc:mysql://127.0.0.1:3306/springboot?useSSL=false&characterEncoding=utf8")
            .put("driver_class","com.mysql.cj.jdbc.Driver")
            .put("user","root")
            .put("password","123")
            .put("max_pool_size",30)
        );

        jdbcClient.getConnection(ar -> {
            if (ar.failed()){
                LOGGER.error(">>>> get connection to mysql failed <<<<");
                future.fail(ar.cause());
            } else {
                SQLConnection sqlConnection = ar.result();
                sqlConnection.execute(QUERY_SQL, creat -> {
                    sqlConnection.close();
                    if (creat.failed()){
                        LOGGER.error(">>>> execute query failed <<<<");
                        future.fail(creat.cause());
                    } else {
                        System.out.prinln(">>>> success <<<<")
                        future.complete();
                    }
                });
            }
        });
        return future;
}

    private Future<Void> startHttpServer(){
        Future<Void> future = Future.future();
        System.out.println(">>>> http server start <<<<");
        HttpServer httpServer = vertx.createHttpServer();
        Router router = Router.router(vertx);
        router.route("/index").handler(routingContext -> {
            routingContext.response()
                .putHeader("content-type","text/plain")
                .end("http server start: vert.x web");
            System.out.println(">>>> index handler <<<<");
        });
        httpServer.requestHandler(router::accept).listen(8080);
        return future;
    }
}

然后我们浏览器访问一下:localhost:8080未找到资源,说明我们的访问路径有问题,再次访问localhost:8080/index:
说明我们的路由设置也是成功的。
如果我将数据库的密码改一下,也就是我不能连接数据库的话,我们看看startHttpServer()方法还会不会执行。
可以看出startHttpServer()没有执行,且抛出了异常信息,用户访问需要密码,因为密码是错的。
通过这个很小的项目来看,感觉vert.x还是比较难的,和以往的web有很大的不同,而且很多基础的概念都还需要理解,只能后面慢慢学习,因为自己水平有限,如果有错误的地方,请大家指正!!!谢谢~~~~~
以上是关于从零开始学习Vert.x的主要内容,如果未能解决你的问题,请参考以下文章