面试官:谈谈你对IOC和AOP的理解
Posted 小样5411
tags:
篇首语:本文由小常识网(cha138.com)小编为大家整理,主要介绍了面试官:谈谈你对IOC和AOP的理解相关的知识,希望对你有一定的参考价值。
一、IOC与AOP介绍
IOC
控制反转(IOC)是一种设计思想,就是将原本在程序中需要手动创建对象,现在交由Spring管理创建。举个例子,原本我们要在A类中调用B类的方法,就要直接在A中new出B类对象,然后调用B类中的方法,虽然能实现效果,不过存在一个问题,更改需求会对源代码进行修改,这是大忌。现在创建B对象就交给了Spring,在Spring中,B类对象被看成Bean对象(Spring中类就是Bean),这个Bean对象由spring容器进行创建和管理,当我们在配置文件中配置<Bean>下的<property>子元素(类的属性)时,spring就会自动执行在A中B对象的setter方法(前提要有),这样的话A对象获取B对象中的方法,由主动new,变成被动等Spring创建。主动变被动,就可以理解成控制反转,通俗讲就是“你别动,我(Spring)来做就好”,主动变被动,这样就大大降低了耦合,Spring中全都用这种思想,即依赖类不由程序员实例化,而是通过spring容器帮我们new指定实例并且将实例注入到需要该对象的类中,Spring通过DI(依赖注入)实现IOC(控制反转)。
可以看到后面讲aop时,applicationContext.xml(Spring配置)中就体现这种思想,比如applicationContext.xml注册三个bean,也就是Spring创建了这三个类。id可以理解成变量名,class就是实现类,第一个bean可以等价于UserService userService = new UserServiceImpl(); 同理,第二个等价于Log log = new Log();

以前Person类中定义age属性,并有getAge/setAge,然后创建并赋值 Person person = new Person(); person.setAge(16);现在换成Spring的话就是<bean id="person" class="com.yx.entity.Person"><property name="age" value="16"></property></bean>,这两个是一一对应的,id相当于变量名person,属性property会自动执行对应的setAge方法。Spring负责创建,这就是以前需主动创建,现在由Spring创建与管理,大大降低耦合,体现控制反转思想(主动变被动)。
AOP
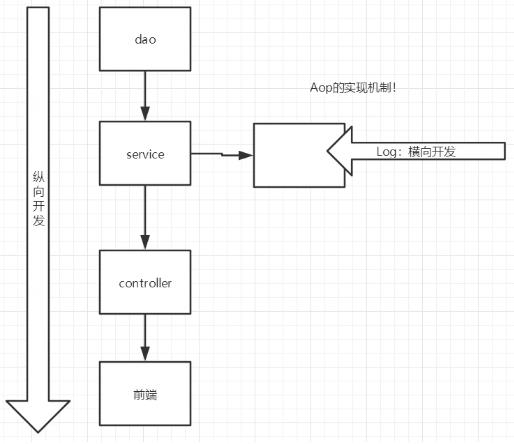
面向切片编程(AOP—Aspect Oriented Programming)可以说是对OOP(面向对象编程)的补充和完善,面向对象就是将事物的特性和行为抽象为一个对象,如people类有身高、体重、年龄等属性,也有吃饭、睡觉等行为。把这些特性和行为封装成一个类,然后可以统一调用。面向切片也可以举个例子,比如people类有自己的属性和行为,但是有小一部分人生病要去医院看病,看病这个业务逻辑就不属于哪一个类,因为people泛指所有人,所有人不会都看病。AOP就是把医院看病这一个业务逻辑功能抽取出来,然后动态把这个功能切入到需要的方法(或行为)中,需要的才切入,这样便于减少系统的重复代码,降低模块间的耦合度。常用到AOP的就是安全校验、日志操作、事务操作等,给你先定义好,然后在想用的地方用,这样不会影响已经在服务器运行的项目,然后又能注入新功能,灵活。我们开发dao->service->controller是纵向的,这个AOP就是横向切入,如横向切入一个日志Log,打印执行过程。

Spring AOP就是基于动态代理实现的, 分为两种代理,jdk动态代理(基于接口)和cglib代理(基于类的)。如果目标对象实现了接口,就用jdk动态代理,如果未实现接口就用cglib动态代理。虽然动态代理可以解决耦合问题,但比较抽象,复杂,属于底层实现代理模式,我们这里直接用AOP,AOP做了很多封装,只要调用API即可,简化开发,但是AOP底层原理还是需要了解。
注意:动态代理底层利用了反射机制,反射包下Proxy类,如果想了解底层原理的,推荐这个视频 动态代理详解。
如果是面试,可以按上面文字答(图片上面的部分),比如面试官让你谈谈对IOC和AOP理解。
二、AOP的三种实现方式
方式1:使用Spring的API接口
首先需要导入aop相关依赖
	<dependency>
      <groupId>org.aspectj</groupId>
      <artifactId>aspectjweaver</artifactId>
      <version>1.9.1</version>
    </dependency>

    <dependency>
      <groupId>org.springframework</groupId>
      <artifactId>spring-context</artifactId>
      <version>5.3.6</version>
      <scope>test</scope>
    </dependency>
    <dependency>
      <groupId>org.springframework</groupId>
      <artifactId>spring-aop</artifactId>
      <version>5.3.6</version>
      <scope>compile</scope>
    </dependency>

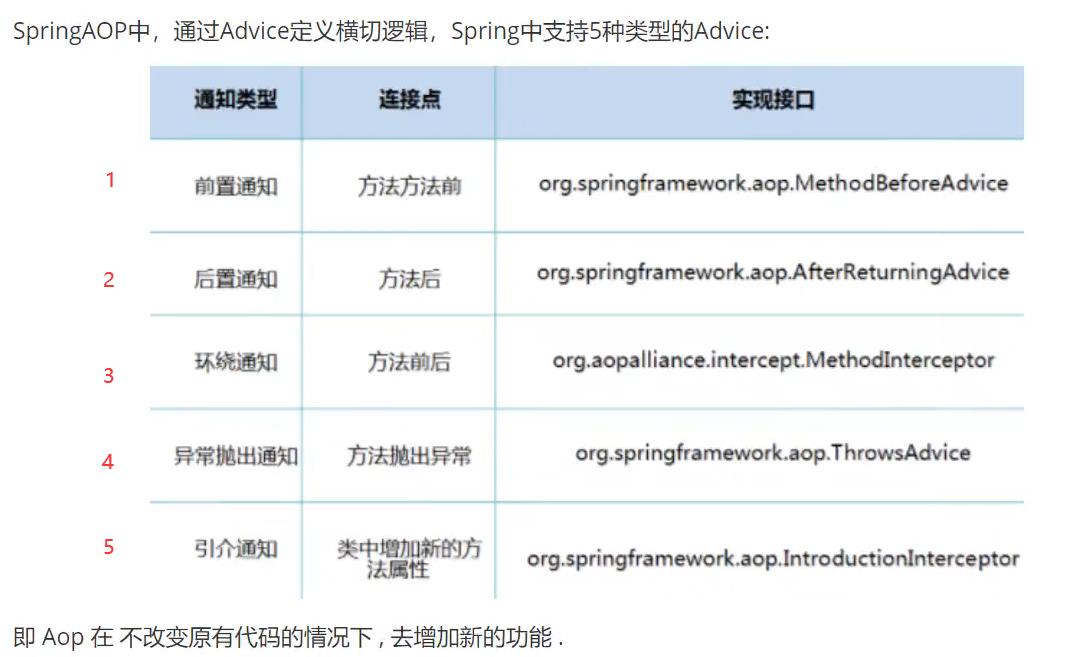
然后通过不同接口实现切入位置,我们这里测试一下前置通知(MethodBeforeAdvice)和后置通知(AfterReturningAdvice)
首先新建一个Maven项目,然后创建service包,并在其中写一个业务UserService,User可以增删改查

public interface UserService {
    public void add();
    public void del();
    public void update();
    public void select();
}
并写一个实现类UserServiceImpl
public class UserServiceImpl implements UserService {
    @Override
    public void add() {
        System.out.println("增加了一个用户");
    }

    @Override
    public void del() {
        System.out.println("删除了一个用户");
    }

    @Override
    public void update() {
        System.out.println("更新了一个用户");
    }

    @Override
    public void select() {
        System.out.println("查询了一个用户");
    }
}
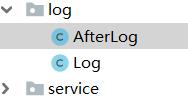
再写一个Log包,里面写日志,就是需要新增的功能,实际开发中常常也需要切入安全校验,日志操作和事务操作,写两个一个前置一个后置

Log.java
import org.springframework.aop.MethodBeforeAdvice;

import java.lang.reflect.Method;

public class Log implements MethodBeforeAdvice {

    //Method:要执行目标对象的方法
    //args:参数
    //target:目标对象
    @Override
    public void before(Method method, Object[] args, Object target) throws Throwable {
        System.out.println(target.getClass().getName()+"->方法:"+method.getName()+"被执行");
    }
}
AfterLog.java
import org.springframework.aop.AfterReturningAdvice;

import java.lang.reflect.Method;

public class AfterLog implements AfterReturningAdvice {

    /**
     *
     * @param returnValue 返回值
     * @param method
     * @param args
     * @param target
     * @throws Throwable
     */
    @Override
    public void afterReturning(Object returnValue, Method method, Object[] args, Object target) throws Throwable {
        System.out.println("执行了"+method.getName()+"返回结果为:"+returnValue);
    }
}
resources包进行相关配置,包括注册bean,配置aop,以及切入

<?xml version="1.0" encoding="UTF-8"?>
<beans xmlns="http://www.springframework.org/schema/beans"
       xmlns:xsi="http://www.w3.org/2001/XMLSchema-instance"
       xmlns:aop="http://www.springframework.org/schema/aop"
       xsi:schemaLocation="http://www.springframework.org/schema/beans
       http://www.springframework.org/schema/beans/spring-beans.xsd
       http://www.springframework.org/schema/aop
       http://www.springframework.org/schema/aop/spring-aop.xsd">

    <!--注册bean-->
    <bean id="userService" class="com.yx.service.UserServiceImpl"></bean>
    <bean id="log" class="com.yx.log.Log"></bean>
    <bean id="afterLog" class="com.yx.log.AfterLog"></bean>

    <!--配置aop-->
    <aop:config>
        <!--切入点 expression为表达式,参数为切入的位置,UserServiceImpl.*表示类中所有方法都切入,*(..)两个点表示不指定参数(任意)-->
        <aop:pointcut id="pointcut" expression="execution(* com.yx.service.UserServiceImpl.*(..))"/>

        <!--配置类切入到哪里:如log类切入到expression表达式指的位置,即UserServiceImpl类下的所有方法-->
        <aop:advisor advice-ref="log" pointcut-ref="pointcut"/>
        <aop:advisor advice-ref="afterLog" pointcut-ref="pointcut"/>
    </aop:config>
</beans>
用Spring进行切入的好处就是,他会自动帮你创建和管理类,不用亲自和以前一样new对象,这样可以实现解耦,因为你只要设置目标类路径即可,然后无论类怎么变都无需进行改动,上面就可以把log和afterLog切入到UserServiceImpl所有方法中。
写一个测试类进行测试
import com.yx.service.UserService;
import org.springframework.context.ApplicationContext;
import org.springframework.context.support.ClassPathXmlApplicationContext;

public class MyTest {
    public static void main(String[] args) {
        //加载配置文件
        ApplicationContext context = new ClassPathXmlApplicationContext("applicationContext.xml");
        //通过目标的bean id,获得代理对象
        UserService proxy = (UserService)context.getBean("userService");
        proxy.add();
    }
}

运行后,两个切入都执行成功,一个实现MethodBeforeAdvice接口的前置通知(切入),一个实现AfterReturningAdvice接口的后置通知。一般我们日志可以用前置打印一下就行。这里为了演示,所以前置和后置都写了
方式2:自定义类来实现AOP
先自定义一个类diyPointCut,类中定义要切入的方法
public class diyPointCut {

    public void before(){
        System.out.println("=========方法执行前==========");
    }

    public void after(){
        System.out.println("=========方法执行后==========");
    }
}
application1.xml配置文件,和方式1类似,但稍微有不同
<?xml version="1.0" encoding="UTF-8"?>
<beans xmlns="http://www.springframework.org/schema/beans"
       xmlns:xsi="http://www.w3.org/2001/XMLSchema-instance"
       xmlns:aop="http://www.springframework.org/schema/aop"
       xsi:schemaLocation="http://www.springframework.org/schema/beans
       http://www.springframework.org/schema/beans/spring-beans.xsd
       http://www.springframework.org/schema/aop
       http://www.springframework.org/schema/aop/spring-aop.xsd">

    <!--注册bean-->
    <bean id="userService" class="com.yx.service.UserServiceImpl"></bean>
    <bean id="log" class="com.yx.log.Log"></bean>
    <bean id="afterLog" class="com.yx.log.AfterLog"></bean>

    <!--自定义类注册bean-->
    <bean id="diy" class="com.yx.Diy.diyPointCut"></bean>

    <aop:config>
        <!--自定义切面(其实就是一个类)-->
        <aop:aspect ref="diy">
            <!--切入点-->
            <aop:pointcut id="point" expression="execution(* com.yx.service.UserServiceImpl.*(..))"/>
            <!--通知(其实就是类中的方法)-->
            <aop:before method="before" pointcut-ref="point"></aop:before>
            <aop:after method="after" pointcut-ref="point"></aop:after>
        </aop:aspect>
    </aop:config>
</beans>
MyTest改成加载application1.xml

运行后,也能add()前后切入

方式3:注解实现
新增一个注解类
import org.aspectj.lang.annotation.After;
import org.aspectj.lang.annotation.Aspect;
import org.aspectj.lang.annotation.Before;

@Aspect
public class AnnotationPointCut {

    @Before("execution(* com.yx.service.UserServiceImpl.*(..))")
    public void before(){
        System.out.println("==========方法执行前==========");
    }

    @After("execution(* com.yx.service.UserServiceImpl.*(..))")
    public void after(){
        System.out.println("==========方法执行前==========");
    }
}
本质还是扫描到注解以后,就会转成类似方式2的配置文件
applicationContext2.xml只需要注册bean,开启注解即可
<?xml version="1.0" encoding="UTF-8"?>
<beans xmlns="http://www.springframework.org/schema/beans"
       xmlns:xsi="http://www.w3.org/2001/XMLSchema-instance"
       xmlns:aop="http://www.springframework.org/schema/aop"
       xsi:schemaLocation="http://www.springframework.org/schema/beans
       http://www.springframework.org/schema/beans/spring-beans.xsd
       http://www.springframework.org/schema/aop
       http://www.springframework.org/schema/aop/spring-aop.xsd">

    <!--注册bean-->
    <bean id="userService" class="com.yx.service.UserServiceImpl"></bean>
    <bean id="annotationPointCut" class="com.yx.Diy.AnnotationPointCut"></bean>
    <!--开启注解支持-->
    <aop:aspectj-autoproxy/>
</beans>
MyTest.java
import com.yx.service.UserService;
import org.springframework.context.ApplicationContext;
import org.springframework.context.support.ClassPathXmlApplicationContext;

public class MyTest {
    public static void main(String[] args) {
        //加载配置文件
        ApplicationContext context = new ClassPathXmlApplicationContext("applicationContext2.xml");
        //通过目标的bean id,获得代理对象
        UserService proxy = (UserService)context.getBean("userService");
        proxy.add();
    }
}

以上是关于面试官:谈谈你对IOC和AOP的理解的主要内容,如果未能解决你的问题,请参考以下文章