Spring源码剖析-Autowired自动注入原理
Posted 墨家巨子@俏如来
tags:
篇首语:本文由小常识网(cha138.com)小编为大家整理,主要介绍了Spring源码剖析-Autowired自动注入原理相关的知识,希望对你有一定的参考价值。
前言
这篇文章接上一篇文章属性注入讲一讲 @Autowired 注解的实现源码,这个也是面试被问的比较多的。
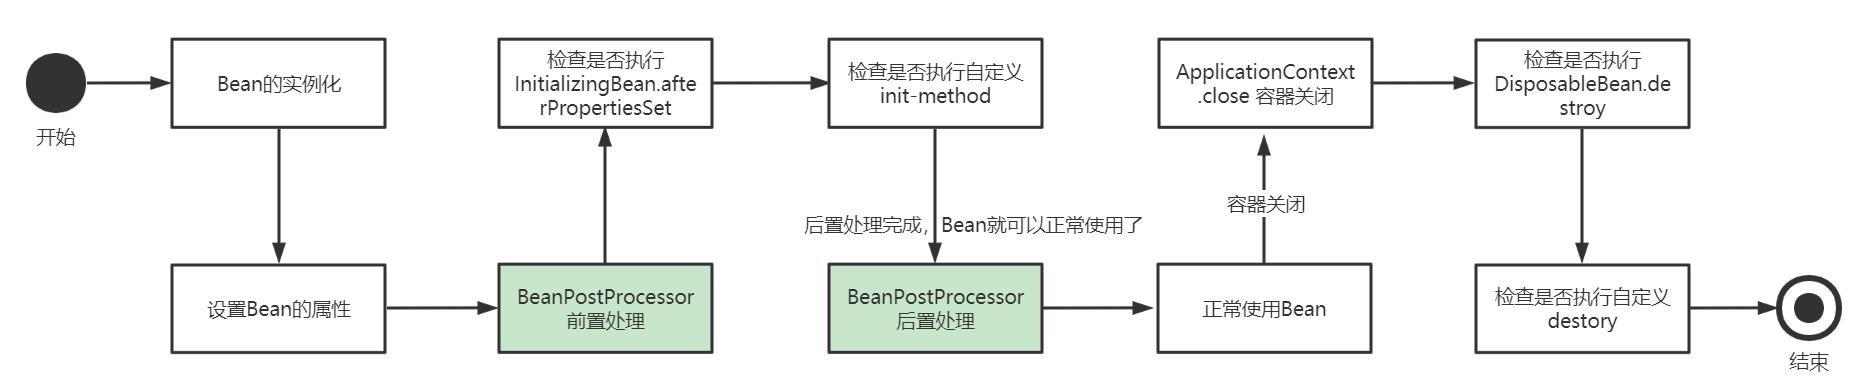
Bean的后置处理器
BeanPostProcessor 通常被叫做Bean的后置处理器,是Spring提供给我们的扩展接口,它允许我们在Bean调用初始化方法前,后对 Bean 做一些扩展逻辑。BeanPostProcessor提供了postProcessBeforeInitialization 前置处理和postProcessAfterInitialization后置处理 两个方法,我们可以实现该接口,复写这两个方法来定义自己的逻辑,Bean的生命周期如下:
AutowiredAnnotationBeanPostProcessor
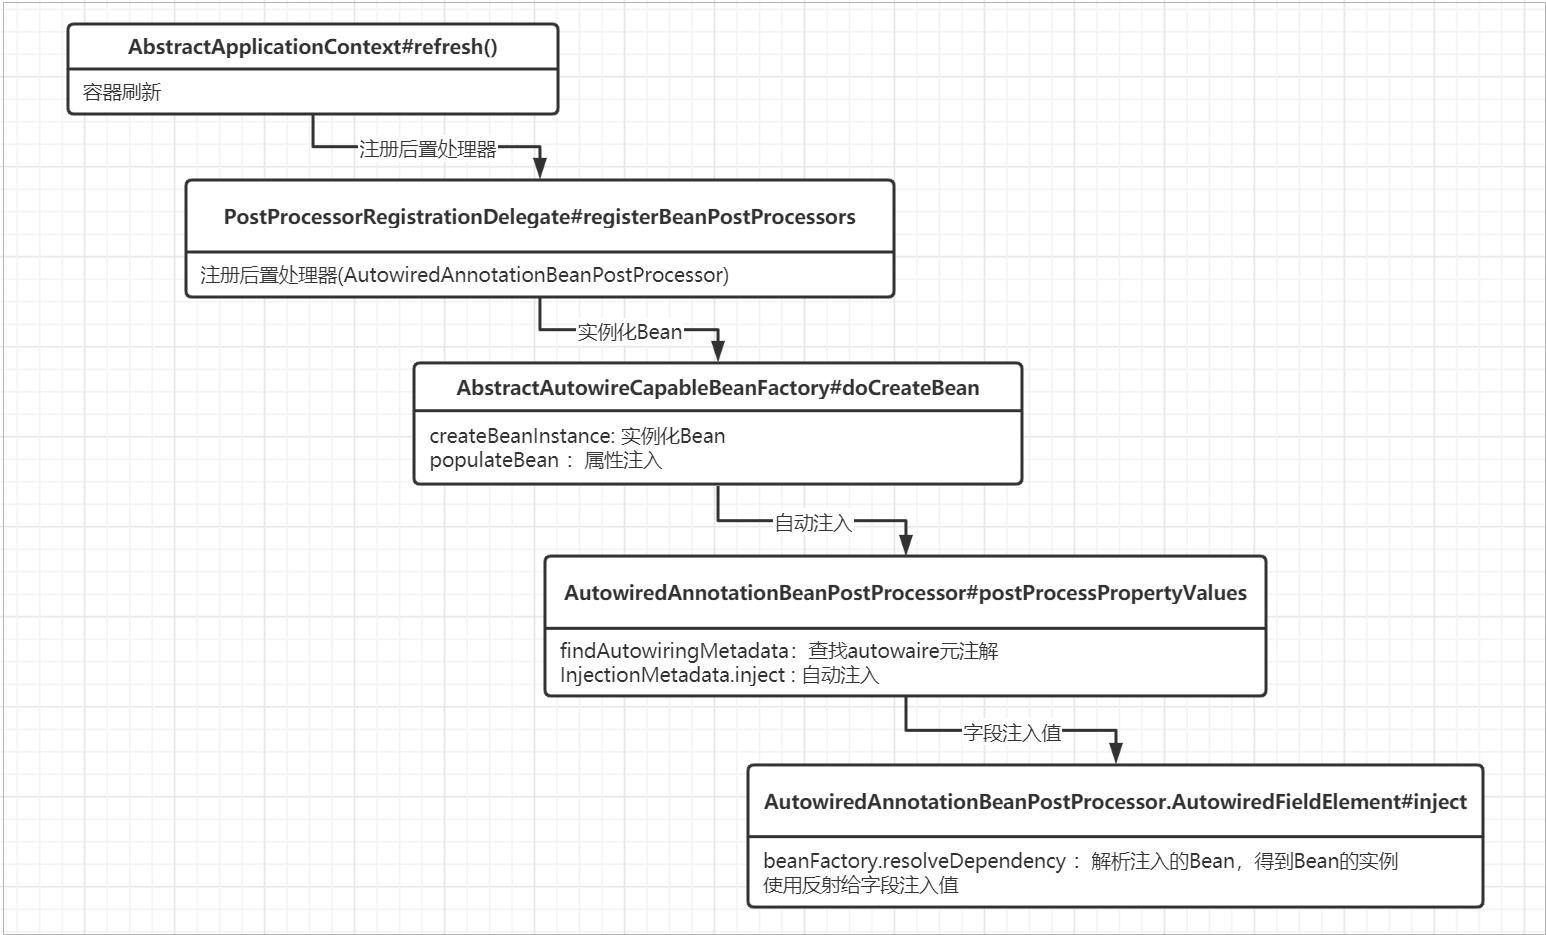
AutowiredAnnotationBeanPostProcessor是用来处理@Autowired注解注入的后置处理器,这里先上一个 AutowiredAnnotationBeanPostProcessor的工作流程图,后面可以根据这个图来看源码。
注册AutowiredAnnotationBeanPostProcessor
AutowiredAnnotationBeanPostProcessor是用来处理@Autowired注解注入的后置处理器,它是在 AbstractApplicationContext#refresh()容器刷新流程中registerBeanPostProcessors() 方法中完成注册,源码如下
public void refresh() throws BeansException, IllegalStateException {
        Object var1 = this.startupShutdownMonitor;
        synchronized(this.startupShutdownMonitor) {
            this.prepareRefresh();
            //【第一步】Bean的加载和注册
            ConfigurableListableBeanFactory beanFactory = this.obtainFreshBeanFactory();
            this.prepareBeanFactory(beanFactory);

            try {
                this.postProcessBeanFactory(beanFactory);
                this.invokeBeanFactoryPostProcessors(beanFactory);
                //【第二步】注册Bean后置处理器,注册到DefaultListableBeanFactory(它的父类)中的一个List存放后置处理器
                this.registerBeanPostProcessors(beanFactory);
                this.initMessageSource();
                this.initApplicationEventMulticaster();
                this.onRefresh();
                this.registerListeners();
                //【第三步】实例化单利且lazy-init=false的Bean
                this.finishBeanFactoryInitialization(beanFactory);
                this.finishRefresh();
            } catch (BeansException var9) {
                if (this.logger.isWarnEnabled()) {
                    this.logger.warn("Exception encountered during context initialization - cancelling refresh attempt: " + var9);
                }

                this.destroyBeans();
                this.cancelRefresh(var9);
                throw var9;
            } finally {
                this.resetCommonCaches();
            }

        }
    }
上面标记了三个步骤:
- ConfigurableListableBeanFactory beanFactory = this.obtainFreshBeanFactory() : 加载解析注册Bean
- this.registerBeanPostProcessors(beanFactory) : 注册BeanPostProcessors后置处理器
- this.finishBeanFactoryInitialization(beanFactory):实例化Bean 以及属性注入
我们现在来看一下 this.registerBeanPostProcessors(beanFactory) 注册BeanPostProcessors后置处理器的源码
	protected void registerBeanPostProcessors(ConfigurableListableBeanFactory beanFactory) {
		PostProcessorRegistrationDelegate.registerBeanPostProcessors(beanFactory, this);
	}
通过PostProcessorRegistrationDelegate去注册
public static void registerBeanPostProcessors(
			ConfigurableListableBeanFactory beanFactory, AbstractApplicationContext applicationContext) {

		String[] postProcessorNames = beanFactory.getBeanNamesForType(BeanPostProcessor.class, true, false);

		// Register BeanPostProcessorChecker that logs an info message when
		// a bean is created during BeanPostProcessor instantiation, i.e. when
		// a bean is not eligible for getting processed by all BeanPostProcessors.
		//后置处理器个数
		int beanProcessorTargetCount = beanFactory.getBeanPostProcessorCount() + 1 + postProcessorNames.length;
		//把BeanPostProcessorChecker后置处理器添加IOC容器中 , 它是用来实例化期间创建 bean 时记录信息消息,当  bean 没有资格被所有 BeanPostProcessor 处理时。
		beanFactory.addBeanPostProcessor(new BeanPostProcessorChecker(beanFactory, beanProcessorTargetCount));
		//实现 PriorityOrdered、 // Ordered 和其余的 BeanPostProcessor。
		// Separate between BeanPostProcessors that implement PriorityOrdered,
		// Ordered, and the rest.

		//实现了 priorityOrdered 接口的优先级最高的处理器,PriorityOrdered是Ordered接口的扩展,表示优先级排序:
		// PriorityOrdered对象总是在普通Ordered对象之前应用
		List<BeanPostProcessor> priorityOrderedPostProcessors = new ArrayList<>();
		//框架内部后置处理器
		List<BeanPostProcessor> internalPostProcessors = new ArrayList<>();
		//具有排序的后置处理器,实现了Ordered 接口,order值越小,越先执行
		List<String> orderedPostProcessorNames = new ArrayList<>();
		//没有指定顺序的后置处理器
		List<String> nonOrderedPostProcessorNames = new ArrayList<>();

		for (String ppName : postProcessorNames) {
			if (beanFactory.isTypeMatch(ppName, PriorityOrdered.class)) {
				//得到后置处理器Bean的实例
				AutowiredAnnotationBeanPostProcessor在这里被实例化
				BeanPostProcessor pp = beanFactory.getBean(ppName, BeanPostProcessor.class);
				//如果是实现了 PriorityOrdered 的后置处理器,添加到priorityOrderedPostProcessors集合中
				priorityOrderedPostProcessors.add(pp);
				if (pp instanceof MergedBeanDefinitionPostProcessor) {
					//合并BeanDefinition的后置处理器
					internalPostProcessors.add(pp);
				}
			}
			else if (beanFactory.isTypeMatch(ppName, Ordered.class)) {
				//添加实现了 Ordered 的后置处理器
				orderedPostProcessorNames.add(ppName);
			}
			else {
				//没有任何顺序的后置处理器
				nonOrderedPostProcessorNames.add(ppName);
			}
		}

		// First, register the BeanPostProcessors that implement PriorityOrdered.
		//首先,注册实现 PriorityOrdered 的 BeanPostProcessors。
		//后置处理器排序
		sortPostProcessors(priorityOrderedPostProcessors, beanFactory);
		//注册priorityOrdered后置处理器
		registerBeanPostProcessors(beanFactory, priorityOrderedPostProcessors);

		// Next, register the BeanPostProcessors that implement Ordered.
		//接下来,注册实现 Ordered 的 BeanPostProcessors。
		List<BeanPostProcessor> orderedPostProcessors = new ArrayList<>();
		//处理实现了 ordered的后置处理器
		for (String ppName : orderedPostProcessorNames) {
			//得到后置处理器Bean
			BeanPostProcessor pp = beanFactory.getBean(ppName, BeanPostProcessor.class);
			//添加到集合中
			orderedPostProcessors.add(pp);
			if (pp instanceof MergedBeanDefinitionPostProcessor) {
				internalPostProcessors.add(pp);
			}
		}
		//排序后置处理器
		sortPostProcessors(orderedPostProcessors, beanFactory);
		//注册后置初期
		registerBeanPostProcessors(beanFactory, orderedPostProcessors);

		// Now, register all regular BeanPostProcessors.
		//现在,注册所有常规 BeanPostProcessor。
		List<BeanPostProcessor> nonOrderedPostProcessors = new ArrayList<>();
		//
		for (String ppName : nonOrderedPostProcessorNames) {
			//得到Bean的实例
			BeanPostProcessor pp = beanFactory.getBean(ppName, BeanPostProcessor.class);
			nonOrderedPostProcessors.add(pp);
			if (pp instanceof MergedBeanDefinitionPostProcessor) {
				internalPostProcessors.add(pp);
			}
		}
		//注册常规后置处理器
		registerBeanPostProcessors(beanFactory, nonOrderedPostProcessors);

		// Finally, re-register all internal BeanPostProcessors.
		sortPostProcessors(internalPostProcessors, beanFactory);
		//最后,重新注册所有内部 BeanPostProcessor。
		registerBeanPostProcessors(beanFactory, internalPostProcessors);

		// Re-register post-processor for detecting inner beans as ApplicationListeners,
		// moving it to the end of the processor chain (for picking up proxies etc).
		//ApplicationListener检测器,也是一个BeanPostProcessor
		beanFactory.addBeanPostProcessor(new ApplicationListenerDetector(applicationContext));
	}
这里根据类型:BeanPostProcessor.class 找到了所有的后置处理器,然后通过beanFactory.getBean创建Bean的实例,根据优先级依次注册到AbstractBeanFactory中的List<BeanPostProcessor> beanPostProcessors = new CopyOnWriteArrayList<>() 集合中 , 注册顺序如下:
- 注册实现了PriorityOrdered 接口的优先级最高的后置处理器
- 注册实现了 Ordered接口的有序的后置处理器
- 注册常规后置处理器
- 注册内部使用的后置处理器MergedBeanDefinitionPostProcessor
对于AutowiredAnnotationBeanPostProcessor而言,它是属于PriorityOrdered的范畴,优先被注册,我们来看一下他的构造器
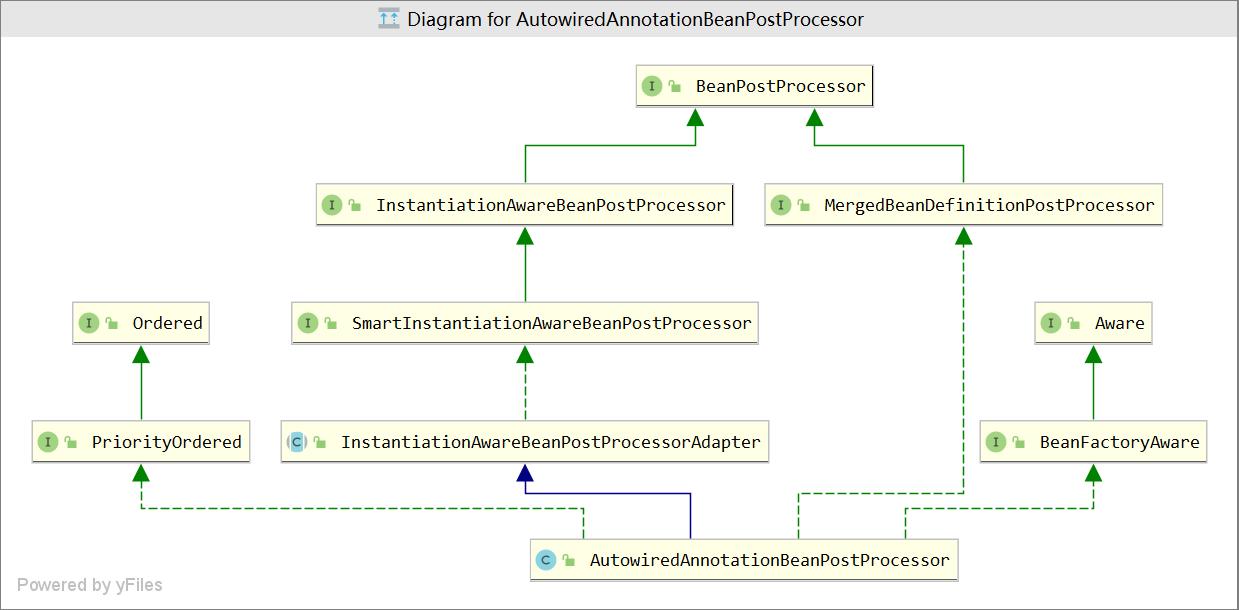
public class AutowiredAnnotationBeanPostProcessor extends InstantiationAwareBeanPostProcessorAdapter
		implements MergedBeanDefinitionPostProcessor, PriorityOrdered, BeanFactoryAware {

	...省略...


	/**
	 * Create a new AutowiredAnnotationBeanPostProcessor
	 * for Spring's standard {@link Autowired} annotation.
	 * <p>Also supports JSR-330's {@link javax.inject.Inject} annotation, if available.
	 */
	 //为 Spring 的标准Autowired注释创建一个新的 AutowiredAnnotationBeanPostProcessor
	@SuppressWarnings("unchecked")
	public AutowiredAnnotationBeanPostProcessor() {
		//增加要注入的注解类型
		this.autowiredAnnotationTypes.add(Autowired.class);
		this.autowiredAnnotationTypes.add(Value.class);
		try {
			//支持 JSR-330 的javax.inject.Inject注释
			this.autowiredAnnotationTypes.add((Class<? extends Annotation>)
					ClassUtils.forName("javax.inject.Inject", AutowiredAnnotationBeanPostProcessor.class.getClassLoader()));
			logger.info("JSR-330 'javax.inject.Inject' annotation found and supported for autowiring");
		}
		catch (ClassNotFoundException ex) {
			// JSR-330 API not available - simply skip.
		}
	}
可以看得出来,它支持 Autowired 和 Value 两种注解的处理,同时支持 JSR-330 的javax.inject.Inject注释下面是继承体系图:
属性注入
上面我们知道了 AutowiredAnnotationBeanPostProcessor 是在什么时候被实例化和被注册到IOC容器中,接下来我们来分析一下 AutowiredAnnotationBeanPostProcessor 的工作流程。
前面文章我们分析过IOC启动流程,在refresh()中
- 调用 obtainFreshBeanFactory(); 对Bean进行加载,解析,注册
- 调用registerBeanPostProcessors(beanFactory); 注册后置处理器
- 调用 this.finishBeanFactoryInitialization(beanFactory); 对单利Bean进行创建。Bean创建成功后,会进行属性注入, 属性注入是在 AbstractAutowireCapableBeanFactory#populateBean 中完成。
我们今天要研究的@Autowire 注解的处理就是在populateBean方法中完成的。
protected void populateBean(String beanName, RootBeanDefinition mbd, @Nullable BeanWrapper bw) {
	//省略....
	if (hasInstAwareBpps) {
			//得到所有的后置处理器
			for (BeanPostProcessor bp : getBeanPostProcessors()) {
				//如果是InstantiationAwareBeanPostProcessor类型
				if (bp instanceof InstantiationAwareBeanPostProcessor) {
					InstantiationAwareBeanPostProcessor ibp = (InstantiationAwareBeanPostProcessor) bp;
					//后置处理器处理属性【AutowireAnnotationBeanPostProcess就是在这里调用】
					pvs = ibp.postProcessPropertyValues(pvs, filteredPds, bw.getWrappedInstance(), beanName);
					if (pvs == null) {
						return;
					}
				}
			}
		}
处理autowired
下面是:AutowiredAnnotationBeanPostProcessor#postProcessPropertyValues 源码
	@Override
	public PropertyValues postProcessPropertyValues(
			PropertyValues pvs, PropertyDescriptor[] pds, Object bean, String beanName) throws BeanCreationException {
		//查找找 autowire 元数据,利用反射根据bean的class得到bean的元注解信息
		InjectionMetadata metadata = findAutowiringMetadata(beanName, bean.getClass(), pvs);
		try {
			//注入
			metadata.inject(bean, beanName, pvs);
		}
		catch (BeanCreationException ex) {
			throw ex;
		}
		catch (Throwable ex) {
			throw new BeanCreationException(beanName, "Injection of autowired dependencies failed", ex);
		}
		return pvs;
	}
这里首先通过findAutowiringMetadata方法查找autowire的元注解信息InjectionMetadata,然后调用InjectionMetadata.inject 执行注入,跟一下findAutowiringMetadata方法,
查找元注解
AutowiredAnnotationBeanPostProcessor#findAutowiringMetadata 源码如下
	private InjectionMetadata findAutowiringMetadata(String beanName, Class<?> clazz, @Nullable PropertyValues pvs) {
		// Fall back to class name as cache key, for backwards compatibility with custom callers.
		//获取Bean的名字,如果没有以类名作为名字
		String cacheKey = (StringUtils.hasLength(beanName) ? beanName : clazz.getName());
		//从 自动注入元数据缓存map中查找InjectionMetadata
		// Quick check on the concurrent map first, with minimal locking.
		InjectionMetadata metadata = this.injectionMetadataCache.get(cacheKey);
		if (InjectionMetadata.needsRefresh(metadata, clazz)) {
			synchronized (this.injectionMetadataCache) {
				metadata = this.injectionMetadataCache.get(cacheKey);
				if (InjectionMetadata.needsRefresh(metadata, clazz)) {
					if (metadata != null) {
						metadata.clear(pvs);
					}
					//构建自动装配元数据,利用反射获取
					metadata = buildAutowiringMetadata(clazz);
					//缓存自动装配元数据
					this.injectionMetadataCache.put(cacheKey, metadata);
				}
			}
		}
		return metadata;
	}
查找元注解比较简单,先从缓存中获取,如果缓存中没有就调用 buildAutowiringMetadata 查找元注解信息然后加入缓存。
private InjectionMetadata buildAutowiringMetadata(final Class<?> clazz) {
		LinkedList<InjectionMetadata.InjectedElement> elements = new LinkedList<>();
		Class<?> targetClass = clazz;

		do {
			final LinkedList<InjectionMetadata.InjectedElement> currElements = new LinkedList<>();

			ReflectionUtils.doWithLocalFields(targetClass, field -> {
				//查找@autowired注解的属性,以及要注入的对象
				AnnotationAttributes ann = findAutowiredAnnotation(field);
				if (ann != null) {
					if (Modifier.isStatic(field.getModifiers())) {
						if (logger.isWarnEnabled()) {
							logger.warn("Autowired annotation is not supported on static fields: " + field);
						}
						return;
					}
					boolean required = determineRequiredStatus(ann);
					//添加到 currElements 集合中
					currElements.add(new AutowiredFieldElement(field, required));
				}
			});

			...省略...,
		//把注解封的属性封装成jectionMetadata
		return new InjectionMetadata(clazz, elements);
	}
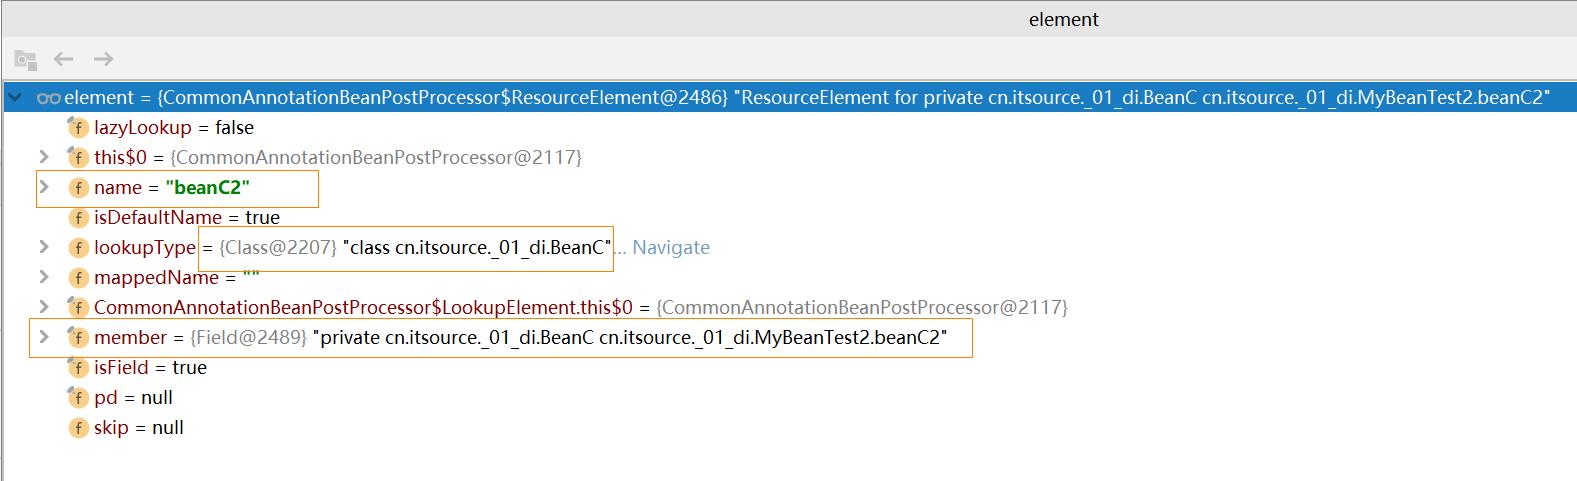
根据Bean的class使用反射查找到Bean中的@Autowire注解信息,以及注入的Bean ,创建成 一个一个的AutowiredFieldElement ,封装到InjectionMetadata 返回。Element结构如下:
属性注入
我们接着看一下 InjectionMetadata#inject 注入方法
public void inject(Object target, @Nullable String beanName, @Nullable PropertyValues pvs) throws Throwable {
		//得到要注入的属性集合
		Collection<InjectedElement> checkedElements = this.checkedElements;
		Collection<InjectedElement> elementsToIterate =
				(checkedElements != null ? checkedElements : this.injectedElements);
		if (!elementsToIterate.isEmpty()) {
			boolean debug = logger.isDebugEnabled();
			for (InjectedElement element : elementsToIterate) {
				if (debug) {
					logger.debug("Processing injected element of bean '" + beanName + "': " + element);
				}
				//调用InjectedElement的inject方法注入
				element.inject(target, beanName, pvs);
			}
		}
	}
这里得到了Bean的依赖的属性,即InjectedElement 集合,然后一个一个调用inject进行注入值。代码来到:AutowiredAnnotationBeanPostProcessor.AutowiredFieldElement#inject
@Override
		protected void inject(Object bean, @Nullable String beanName, @Nullable PropertyValues pvs) throws Throwable {
			Field field = (Field) this.member;
			Object value;
			if (this.cached) {
				value = resolvedCachedArgument(beanName, this.cachedFieldValue);
			}
			else {
				//DependencyDescriptor 依赖描述符
				DependencyDescriptor desc = new DependencyDescriptor(field, this.required);
				desc.setContainingClass(bean.getClass());
				Set<String> autowiredBeanNames = new LinkedHashSet<>(1);
				Assert.state(beanFactory != null, "No BeanFactory available");
				//类型转换器
				TypeConverter typeConverter = beanFactory.getTypeConverter();
				try {
					//得到容器中的Bean实例
					value = beanFactory.resolveDependency(desc, beanName, autowiredBeanNames, typeConverter);
				}
				catch (BeansException ex) {
					throw new UnsatisfiedDependencyException(null, beanName, new InjectionPoint(field), ex);
				}
				synchronized (this) {
					if (!this.cached) {
						//走缓存流程
						if (value != null || this.required) {
							this.cachedFieldValue = desc;
							//注册依赖的Bean
							registerDependentBeans(beanName, autowiredBeanNames);
							if (autowiredBeanNames.size() == 1) {
								String autowiredBeanName = autowiredBeanNames.iterator().next();
								if (beanFactory.containsBean(autowiredBeanName) &&
										beanFactory<以上是关于Spring源码剖析-Autowired自动注入原理的主要内容,如果未能解决你的问题,请参考以下文章