CAM(类激活映射),卷积可视化,神经网络可视化,一个库搞定,真的简单的不能再简单
Posted Tina姐
tags:
篇首语:本文由小常识网(cha138.com)小编为大家整理,主要介绍了CAM(类激活映射),卷积可视化,神经网络可视化,一个库搞定,真的简单的不能再简单相关的知识,希望对你有一定的参考价值。
文章目录
前言
18年,我刚入门的时候,写了这样一篇文章,想要看之前那一篇的点击这里现在都还有很多朋友在看,但我觉得那不够全面。我最近又发现了一个更好的方法去实现它,今天分享给大家。
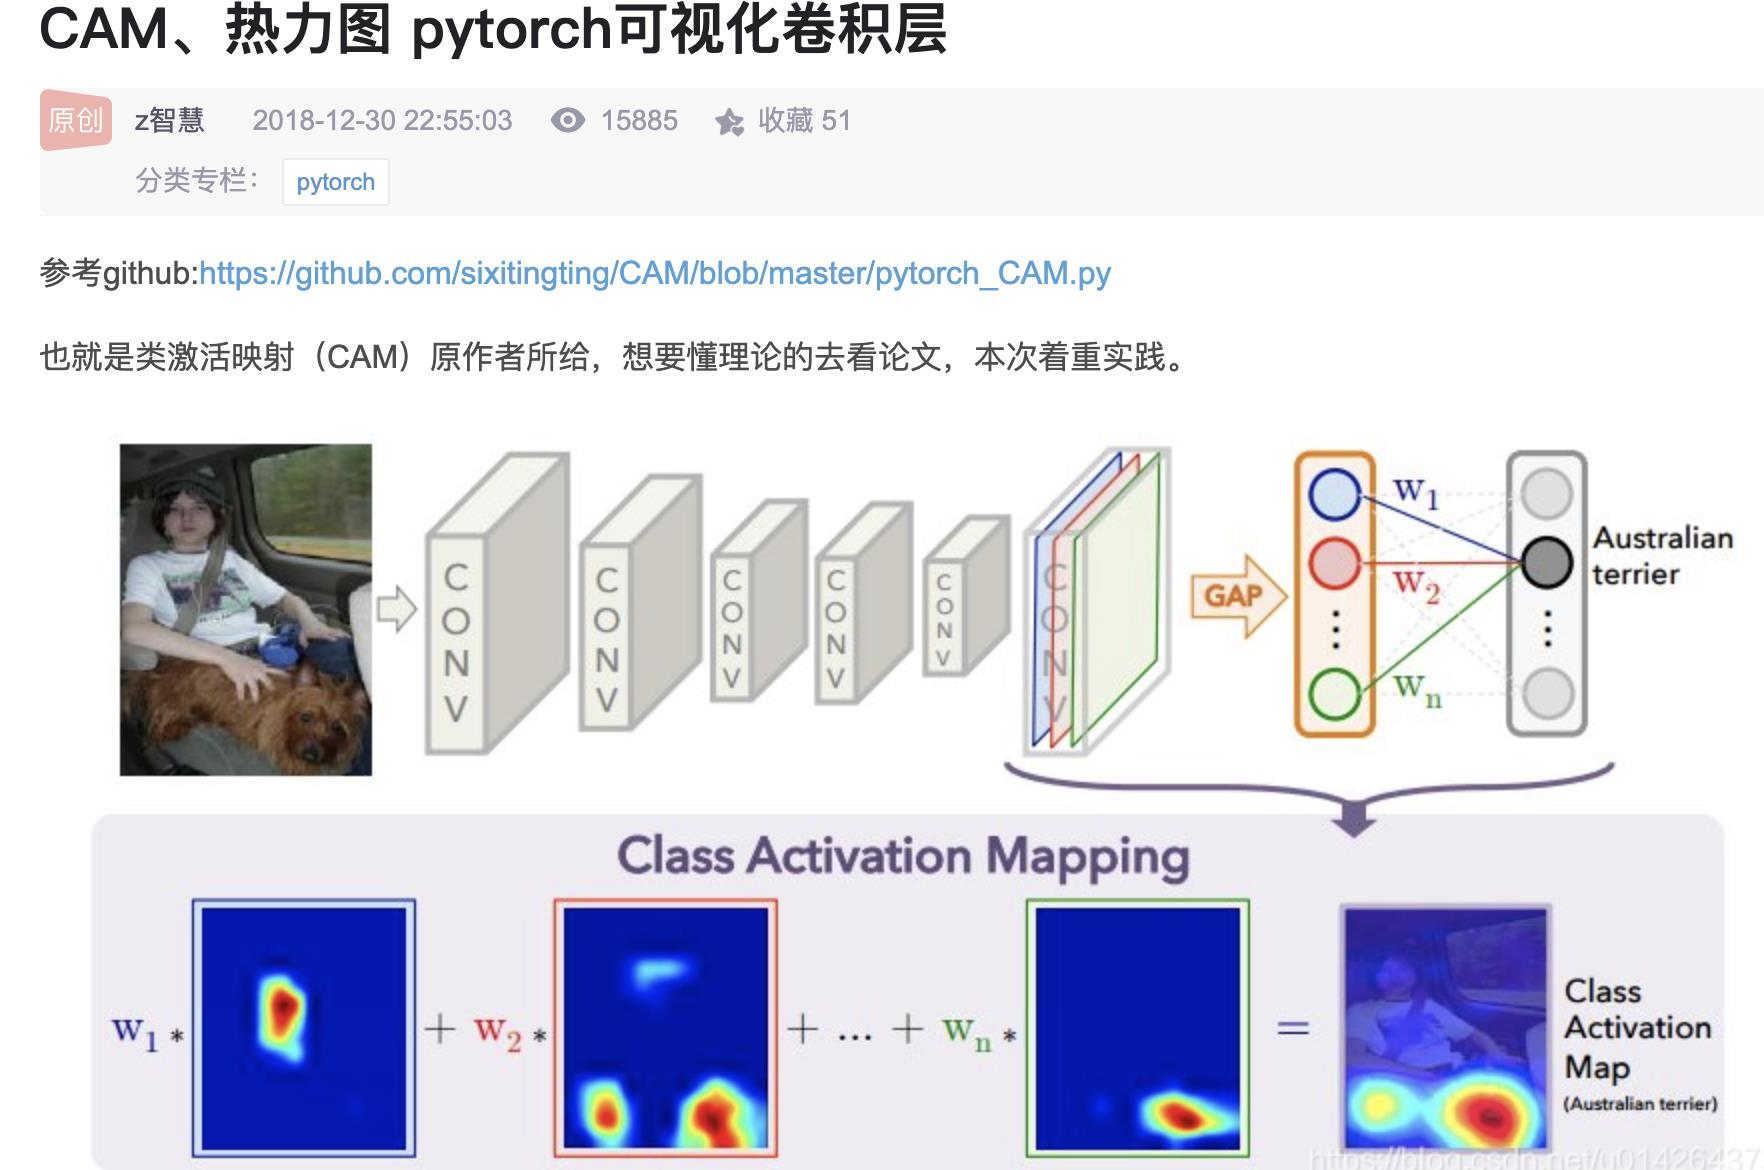
我是一个讲实战的博主,所以~~~~~~,这篇不会讲原理。
神经网络的可解释性一直是讨论的热点,尤其是在做分类的时候,写论文要是不提供一张可视化图,告诉审稿人你的网络究竟学到了什么,估计审稿人都是不会让你过的,相反,你要是提供了,肯定会大大增加论文过的概率。类似下面这种图。

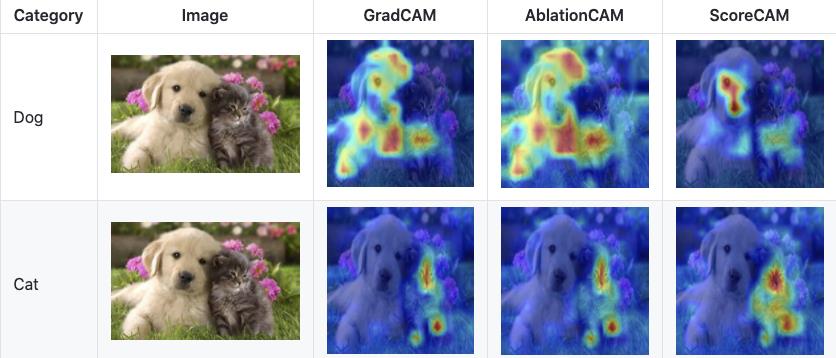
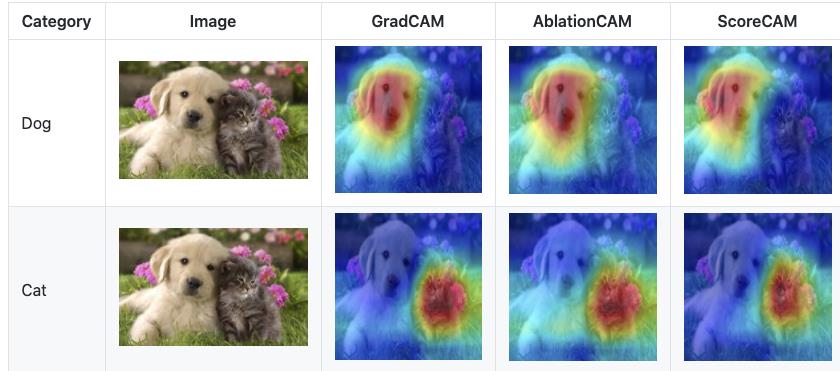
重点:今天介绍一种方法,不用自己写代码,调包就能搞定。简单,高效。
首先,请copy好这个地址👇👇👇
https://github.com/jacobgil/pytorch-grad-cam
接下来具体讲怎么使用。
1.pytorch-grad-cam这个库可以做什么?
这个库提供了多种类激活映射方法,具体如下:
| 方法 | 它能做什么 |
|---|---|
GradCAM | Weight the 2D activations by the average gradient |
GradCAM++ | Like GradCAM but uses second order gradients |
XGradCAM | Like GradCAM but scale the gradients by the normalized activations |
AblationCAM | Zero out activations and measure how the output drops (this repository includes a fast batched implementation) |
ScoreCAM | Perbutate the image by the scaled activations and measure how the output drops |
EigenCAM | Takes the first principle component of the 2D Activations (no class discrimination, but seems to give great results) |
EigenGradCAM | Like EigenCAM but with class discrimination: First principle component of Activations*Grad. Looks like GradCAM, but cleaner |
2. 安装 pytorch-grad-cam
pip install grad-cam
3.具体使用案例
3.1 选择目标层(Target Layer)
您需要选择要为其计算CAM的目标层。一些常见的选择是:
- Resnet18 and 50: model.layer4[-1]
- VGG and densenet161: model.features[-1]
- mnasnet1_0: model.layers[-1]
- ViT: model.blocks[-1].norm1
目标层一般是最后一个卷积层,想要知道最后一个卷积层的名字是什么,可以翻看我之前的笔记点击跳转
3.2 单个图像CAM热力图
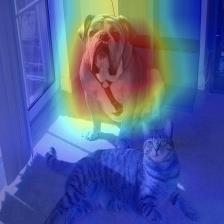
例如上图,我们要求狗这一类别的CAM。图片地址。去下载原图(both.png)下来保存在当前项目的exampls文件夹。具体如下,大概分为7个步骤
1.导入相关的包并加载模型
from pytorch_grad_cam import GradCAM, ScoreCAM, GradCAMPlusPlus, AblationCAM, XGradCAM, EigenCAM
from pytorch_grad_cam.utils.image import show_cam_on_image, \\
                                         deprocess_image, \\
                                         preprocess_image
from torchvision.models import resnet50
import cv2
import numpy as np
import os

os.environ["KMP_DUPLICATE_LIB_OK"]="TRUE"

# 1.加载模型
model = resnet50(pretrained=True)
这里我们将pretrained设置为True,是因为我们直接要用训练好的模型对我们的图片进行预测。加载预训练模型会需要一点时间。如果速度太慢,可以用VPN 加速下载。
这里我增加了os.environ["KMP_DUPLICATE_LIB_OK"]="TRUE"是因为MacOS系统不加这行,容易报以下错误。
OMP: Error #15: Initializing libiomp5.dylib, but found libomp.dylib already initialized.
2.选择目标层
# 2.选择目标层
target_layer = model.layer4[-1]
在3.1节我们已经给了常见模型的目标层
3. 构建输入图像的Tensor形式,使其能传送到model里面去计算
image_path = './examples/both.png'
rgb_img = cv2.imread(image_path, 1)[:, :, ::-1]   # 1是读取rgb
rgb_img = np.float32(rgb_img) / 255

# preprocess_image作用:归一化图像,并转成tensor
input_tensor = preprocess_image(rgb_img, mean=[0.485, 0.456, 0.406],
                                             std=[0.229, 0.224, 0.225])   # torch.Size([1, 3, 224, 224])
# Create an input tensor image for your model..
# Note: input_tensor can be a batch tensor with several images!
这部分包括图像的地址,图像的读取,归一化以及转换成Tensor。这里的图像处理很简单,但如果你的模型有特定的预处理,这里就需要按照你的来,比如图像大小,通道等的设定。这里的input_tensor同样可以是batch
4. 初始化CAM对象,包括模型,目标层以及是否使用cuda等
# Construct the CAM object once, and then re-use it on many images:
# 4.初始化GradCAM,包括模型,目标层以及是否使用cuda
cam = GradCAM(model=model, target_layer=target_layer, use_cuda=False)
这里选择你要的CAM方法,我们选择的是GradCAM, 创建CAM对象后,之后可以重复调用处理很多图像。
5. 选定目标类别,如果不设置,则默认为分数最高的那一类
# If target_category is None, the highest scoring category
# will be used for every image in the batch.
# target_category can also be an integer, or a list of different integers
# for every image in the batch.
# 5.选定目标类别,如果不设置,则默认为分数最高的那一类
target_category = None # 281
我们不仅要设置使用模型的那一层,同样要设置计算那一个类别的CAM 。如果设置为None,表示使用得分最高的那一类,通常我们都可以这样做,也可以指定类别,如target_category = 281 应该就是狗的类别,我没去验证过😂。
6. 计算CAM
# You can also pass aug_smooth=True and eigen_smooth=True, to apply smoothing.
# 6. 计算cam
grayscale_cam = cam(input_tensor=input_tensor, target_category=target_category)  # [batch, 224,224]
前面我们把准备工作都做好了,就可以开始计算cam了。就是一句话,就这么简单。当然,这里面的参数还有几个,感兴趣的可以自行研究一下。比如,如果想要减少CAM中的噪声并使之更好地适合对象,支持两种平滑方法:
-
aug_smooth=True
测试时间增加:将运行时间增加x6
应用水平翻转的组合,并通过[1.0,1.1,0.9]对图像进行多路复用。
这样可以更好地使CAM围绕对象居中。 -
eigen_smooth=True
First principle component of activations*weights
这有去除大量噪声的效果
这两种方法可以单独使用,也可以一起使用。
github的一个例子如下,分别是基础CAM, aug smooth, eigen smooth和aug+eigen smooth的效果展示

7. 展示热力图并保存
# In this example grayscale_cam has only one image in the batch:
# 7.展示热力图并保存, grayscale_cam是一个batch的结果,只能选择一张进行展示
grayscale_cam = grayscale_cam[0]
visualization = show_cam_on_image(rgb_img, grayscale_cam)  # (224, 224, 3)
cv2.imwrite(f'cam_dog.jpg', visualization)
恭喜您,如果顺利的话,就可以得到下面的结果。
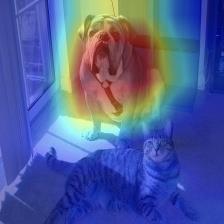
如果你使用的是跟我一样的模型,一样的图片,如果得到的效果没有这么好,有可能是哪一步出了问题,并不是只要得到了类似的图就说明没问题,中间也有可能出现错误,注意检查一下。
我们把这部分代码总结一下,放在一起,方便大家copy.
# 对单个图像可视化
from pytorch_grad_cam import GradCAM, ScoreCAM, GradCAMPlusPlus, AblationCAM, XGradCAM, EigenCAM
from pytorch_grad_cam.utils.image import show_cam_on_image, \\
                                         deprocess_image, \\
                                         preprocess_image
from torchvision.models import resnet50
import cv2
import numpy as np
import os

os.environ["KMP_DUPLICATE_LIB_OK"]="TRUE"

# 1.加载模型
model = resnet50(pretrained=True)
# 2.选择目标层
target_layer = model.layer4[-1]
# 3. 构建输入图像的Tensor形式
image_path = './examples/both.png'
rgb_img = cv2.imread(image_path, 1)[:, :, ::-1]   # 1是读取rgb
rgb_img = np.float32(rgb_img) / 255

# preprocess_image作用:归一化图像,并转成tensor
input_tensor = preprocess_image(rgb_img, mean=[0.485, 0.456, 0.406],
                                             std=[0.229, 0.224, 0.225])   # torch.Size([1, 3, 224, 224])
# Create an input tensor image for your model..
# Note: input_tensor can be a batch tensor with several images!

# Construct the CAM object once, and then re-use it on many images:
# 4.初始化GradCAM,包括模型,目标层以及是否使用cuda
cam = GradCAM(model=model, target_layer=target_layer, use_cuda=False)

# If target_category is None, the highest scoring category
# will be used for every image in the batch.
# target_category can also be an integer, or a list of different integers
# for every image in the batch.
# 5.选定目标类别,如果不设置,则默认为分数最高的那一类
target_category = None # 281

# You can also pass aug_smooth=True and eigen_smooth=True, to apply smoothing.
# 6. 计算cam
grayscale_cam = cam(input_tensor=input_tensor, target_category=target_category)  # [batch, 224,224]

# In this example grayscale_cam has only one image in the batch:
# 7.展示热力图并保存, grayscale_cam是一个batch的结果,只能选择一张进行展示
grayscale_cam = grayscale_cam[0]
visualization = show_cam_on_image(rgb_img, grayscale_cam)  # (224, 224, 3)
cv2.imwrite(f'cam_dog.jpg', visualization)
3.3 批处理图像
以上是我们对一张图像的处理办法,但我们往往是需要处理很多图像的,那无非就是加一个循环的事情。
这里只提供一个思路: 把所有图像地址放在列表里, 然后循环列表,do【 加载图像,处理图像,计算CAM 并保存】。
3.4 一个CAM计算模板
如果我们每次计算不同图像都要修改内部代码,这是不科学的,因此,我们可以包装一下代码,每次只修改参数就可以了。整个代码如下,copy from 原作者,真要给这些认真搞学术的作者点赞,他一直在更新代码,大家可以多去github查看。
# copy from https://github.com/jacobgil/pytorch-grad-cam/blob/master/cam.py

import argparse
import cv2
import numpy as np
import torch
from torchvision import models

from pytorch_grad_cam import GradCAM, \\
                             ScoreCAM, \\
                             GradCAMPlusPlus, \\
                             AblationCAM, \\
                             XGradCAM, \\
                             EigenCAM, \\
                             EigenGradCAM

from pytorch_grad_cam import GuidedBackpropReLUModel
from pytorch_grad_cam.utils.image import show_cam_on_image, \\
                                         deprocess_image, \\
                                         preprocess_image


# 如果出现 OMP: Error #15: Initializing libiomp5.dylib, but found libomp.dylib already initialized.
import os
os.environ["KMP_DUPLICATE_LIB_OK"]="TRUE"

def get_args():
    parser = argparse.ArgumentParser()
    parser.add_argument('--use-cuda', action='store_true', default=False,
                        help='Use NVIDIA GPU acceleration')
    parser.add_argument('--image-path', type=str, default='./examples/both.png',
                        help='Input image path')
    parser.add_argument('--aug_smooth', action='store_true',
                        help='Apply test time augmentation to smooth the CAM')
    parser.add_argument('--eigen_smooth', action='store_true',
                        help='Reduce noise by taking the first principle componenet'
                        'of cam_weights*activations')
    parser.add_argument('--method', type=str, default='gradcam',
                        choices=['gradcam', 'gradcam++', 'scorecam', 'xgradcam',
                                 'ablationcam', 'eigencam', 'eigengradcam'],
                        help='Can be gradcam/gradcam++/scorecam/xgradcam'
                             '/ablationcam/eigencam/eigengradcam')

    args = parser.parse_args()
    args.use_cuda = args.use_cuda and torch.cuda.is_available()
    if args.use_cuda:
        print('Using GPU for acceleration')
    else:
        print('Using CPU for computation')

    return args


if __name__ == '__main__':
    """ python cam.py -image-path <path_to_image>
    Example usage of loading an image, and computing:
        1. CAM
        2. Guided Back Propagation
        3. Combining both
    """

    args = get_args()
    methods = \\
        {"gradcam": GradCAM,
         "scorecam": ScoreCAM,
         "gradcam++": GradCAMPlusPlus,
         "ablationcam": AblationCAM,
         "xgradcam": XGradCAM,
         "eigencam": EigenCAM,
         "eigengradcam": EigenGradCAM}

    model = models.resnet50(pretrained=True)

    # Choose the target layer you want to compute the visualization for.
    # Usually this will be the last convolutional layer in the model.
    # Some common choices can be:
    # Resnet18 and 50: model.layer4[-1]
    # VGG, densenet161: model.features[-1]
    # mnasnet1_0: model.layers[-1]
    # You can print the model to help chose the layer
    target_layer = model.layer4[-1]

    cam = methods[args.method](model=model,
                               target_layer=target_layer,
                               use_cuda=args.use_cuda)

    rgb_img = cv2.imread(args.image_path, 1)[:, :, ::-1]
    rgb_img = np.float32(rgb_img) / 255
    input_tensor = preprocess_image(rgb_img, mean=[0.485, 0.456, 0.406],
                                             std=[0.229, 0.224, 0.225])

    # If None, returns the map for the highest scoring category.
    # Otherwise, targets the requested category.
    target_category = None

    # AblationCAM and ScoreCAM have batched implementations.
    # You can override the internal batch size for faster computation.
    cam.batch_size = 32

    grayscale_cam = cam(input_tensor=input_tensor,
                        target_category=target_category,
                        aug_smooth=args.aug_smooth,
                        eigen_smooth=args.eigen_smooth)

    # Here grayscale_cam has only one image in the batch
    grayscale_cam = grayscale_cam[0, :]

    cam_image = show_cam_on_image(rgb_img, grayscale_cam)

    gb_model = GuidedBackpropReLUModel(model=model, use_cuda=args.use_cuda)
    gb = gb_model(input_tensor, target_category=target_category)

    cam_mask = cv2.merge([grayscale_cam, grayscale_cam, grayscale_cam])
    cam_gb = deprocess_image(cam_mask * gb)
    gb = deprocess_image(gb)

    cv2.imwrite(f'{args.method}_cam.jpg', cam_image)
    cv2.imwrite(f'{args.method}_gb.jpg', gb)
    cv2.imwrite(f'{args.method}_cam_gb.jpg', cam_gb)
通过以下在终端调用即可
python cam.py --image-path <path_to_image> --method <method>
如:
python cam.py --image-path './examples/both.png' --method 'gradcam'
一个小tips, 我喜欢在pycharm中直接打开终端,这样就不用再额外激活环境,和切换地址了。

这篇文章断断续续,花了一周的休息时间才完美结束。我就是一个喜欢虚荣的人,有人夸我我就高兴,新增了一个粉丝也高兴,有人肯定我的贡献我就高兴,分享的激情也越高。所以,这么长一篇文章都看到这里了,觉得不错的话,一定要点赞,留言,关注告诉我哦。

以上是关于CAM(类激活映射),卷积可视化,神经网络可视化,一个库搞定,真的简单的不能再简单的主要内容,如果未能解决你的问题,请参考以下文章