cgb2104-day15
Posted cgblpx
tags:
篇首语:本文由小常识网(cha138.com)小编为大家整理,主要介绍了cgb2104-day15相关的知识,希望对你有一定的参考价值。
文章目录
一,改造springmvc的post提交数据
–1,需求
基于把cgb2104-day14中,通过ajax把数据用post的方式提交的案例。进一步把请求携带的数据入库。
–2,添加jdbc的jar包依赖
<dependencies>
        <dependency>
            <groupId>mysql</groupId>
            <artifactId>mysql-connector-java</artifactId>
            <version>5.1.48</version>
        </dependency>
</dependencies>
–3,创建student表,保存数据
CREATE TABLE `student` (
  `name` varchar(255) default NULL,
  `age` int(11) default NULL,
  `sex` int(11) default NULL,
  `edu` int(11) default NULL,
  `hobby` varchar(255) default NULL
) ENGINE=InnoDB DEFAULT CHARSET=utf8;
–4,修改StuController类,添加jdbc代码
package cn.tedu.controller;

import cn.tedu.pojo.Student;
import org.springframework.web.bind.annotation.CrossOrigin;
import org.springframework.web.bind.annotation.RequestMapping;
import org.springframework.web.bind.annotation.RestController;

import java.sql.Connection;
import java.sql.DriverManager;
import java.sql.PreparedStatement;
import java.util.Arrays;

//作为MVC的C层,用来接受请求给出响应
@RestController
@RequestMapping("stu")
@CrossOrigin//放行所有的请求,解决跨域问题
public class StuController {
    //解析post方式提交的数据
    @RequestMapping("add")
    public Student add(Student s) throws Exception {
        //jdbc入库:加jar包+创建student表+6步
        Class.forName("com.mysql.jdbc.Driver");
        String url="jdbc:mysql:///cgb2104?characterEncoding=utf8";
        Connection conn = DriverManager.getConnection(url,"root","root");
        //利用新工具,发送SQL骨架
        String sql = "insert into student values(?,?,?,?,?)" ;
        PreparedStatement ps = conn.prepareStatement(sql);
        //设置SQL的参数
        ps.setString(1,s.getName());
        ps.setInt(2,s.getAge());
        ps.setInt(3,s.getSex());
        ps.setInt(4,s.getEdu());
        //把hobby的值从[]变成字符串,存入数据库
        String hs = Arrays.toString(s.getHobby());//[ps, cg, ppq]
        //hs.substring(1,hs.length()-1)截取字符串ps, cg, ppq入库
        ps.setString(5,hs.substring(1,hs.length()-1));
        //执行SQL
        ps.executeUpdate();
        //释放资源
        ps.close();
        conn.close();

        System.out.println("数据入库成功!!!!");
        return s;
    }
}
–5,测试

二,Spring
–1,XML实现IOC

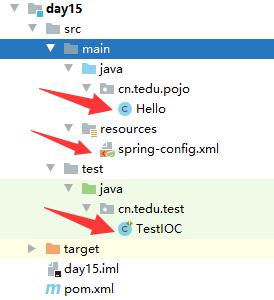
创建Hello类
package cn.tedu.pojo;

public class Hello {
    public void hi(){
        System.out.println("hi spring ioc~");
    }
}
创建核心配置文件
<?xml version="1.0" encoding="UTF-8"?>
<beans xmlns="http://www.springframework.org/schema/beans"
       xmlns:xsi="http://www.w3.org/2001/XMLSchema-instance"
       xsi:schemaLocation="http://www.springframework.org/schema/beans http://www.springframework.org/schema/beans/spring-beans.xsd">

    <!-- 在框架里开始了ioc ,会把每个类创建对象,并存起来 Map<id的值,对象>
        Map<String,Object> 存的是 {"hello" = new Hello()}
        框架只会拿到class文件,需要反射创建对象:
        {"hello" = Class.forName("cn.tedu.pojo.Hello").newInstance() }
    -->
    <bean class="cn.tedu.pojo.Hello" id="hello"></bean>

</beans>
创建测试类
package cn.tedu.test;
import org.junit.jupiter.api.Test;
import org.springframework.context.support.ClassPathXmlApplicationContext;

public class TestIOC {
    @Test
    public void ioc(){
        //读取核心配置文件
        ClassPathXmlApplicationContext spring =
                new ClassPathXmlApplicationContext(
                        "spring-config.xml");
        //根据核心配置文件中,id属性的值,获取对应对象
        Object o = spring.getBean("hello");
        System.out.println(o);//cn.tedu.pojo.Hello@4c178a76

        //OOP 向下造型,用子类的方法、属性
        Hello h = (Hello) o;
        h.hi();

    }
}
–2,注解实现IOC

创建Person类,要求使用注解
package cn.tedu.pojo;

import org.springframework.stereotype.Component;

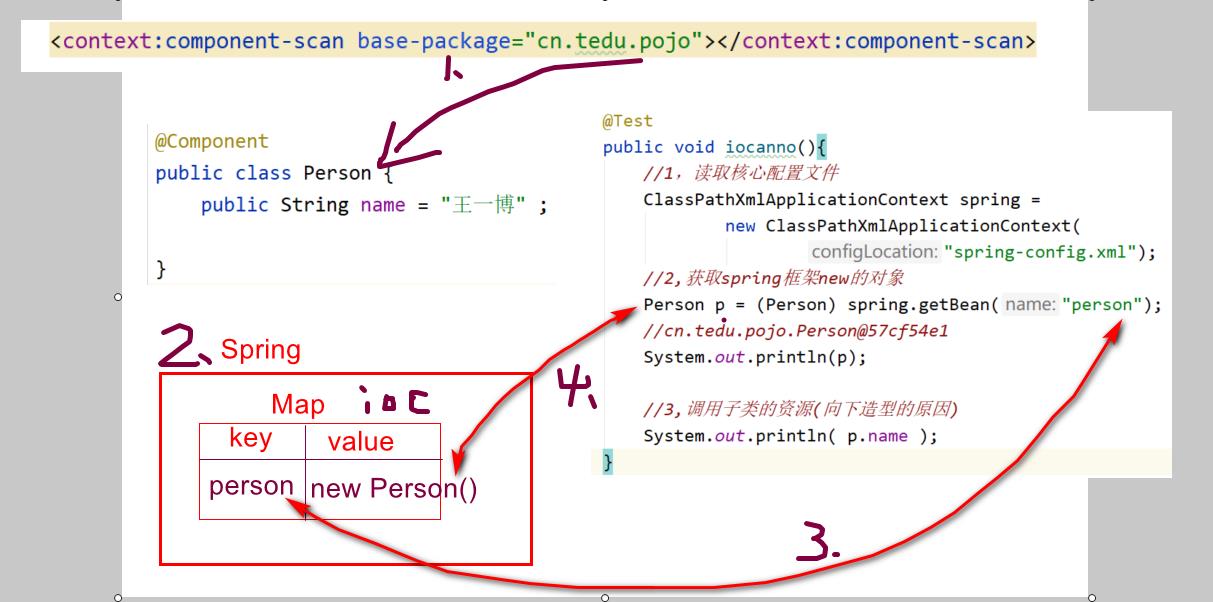
//spring框架提供的,用来完成ioc,存入map{ "person"= new Person() }
@Component
public class Person {
    public String name = "王一博" ;

}
修改核心配置文件
<?xml version="1.0" encoding="UTF-8"?>
<beans xmlns="http://www.springframework.org/schema/beans"
       xmlns:xsi="http://www.w3.org/2001/XMLSchema-instance"
       xmlns:context="http://www.springframework.org/schema/context"
       xsi:schemaLocation="http://www.springframework.org/schema/beans http://www.springframework.org/schema/beans/spring-beans.xsd http://www.springframework.org/schema/context https://www.springframework.org/schema/context/spring-context.xsd">

    <!--2.让spring框架,知道哪些类上面使用了@Component注解-->
    <!--配置扫描器,并指定 扫描哪个包 里的资源-->
    <context:component-scan base-package="cn.tedu.pojo"></context:component-scan>

</beans>
创建单元测试方法
 @Test
    public void iocanno(){
        //1,读取核心配置文件
        ClassPathXmlApplicationContext spring =
                new ClassPathXmlApplicationContext(
                        "spring-config.xml");
        //2,获取spring框架new的对象
        Person p = (Person) spring.getBean("person");
        //cn.tedu.pojo.Person@57cf54e1
        System.out.println(p);

        //3,调用子类的资源(向下造型的原因)
        System.out.println( p.name );
    }
三,模拟IOC

–1,创建Bean类,记录类名、类的全路径
package cn.tedu.myioc;
//指定哪些类需要spring框架管理
public class Bean {
    private String name;//类名
    private String path;//类的全路径
    //construtor
    public Bean(){}
    public Bean(String name, String path) {
        this.name = name;
        this.path = path;
    }
    //get set
    public String getName() {
        return name;
    }
    public String getPath() {
        return path;
    }
    public void setPath(String path) {
        this.path = path;
    }
    public void setName(String name) {
        this.name = name;
    }
}
–2,创建对象,存到Map里
package cn.tedu.myioc;
import javafx.beans.binding.ObjectExpression;

import java.util.*;

//自己实现IOC的核心类
public class MyIOC {
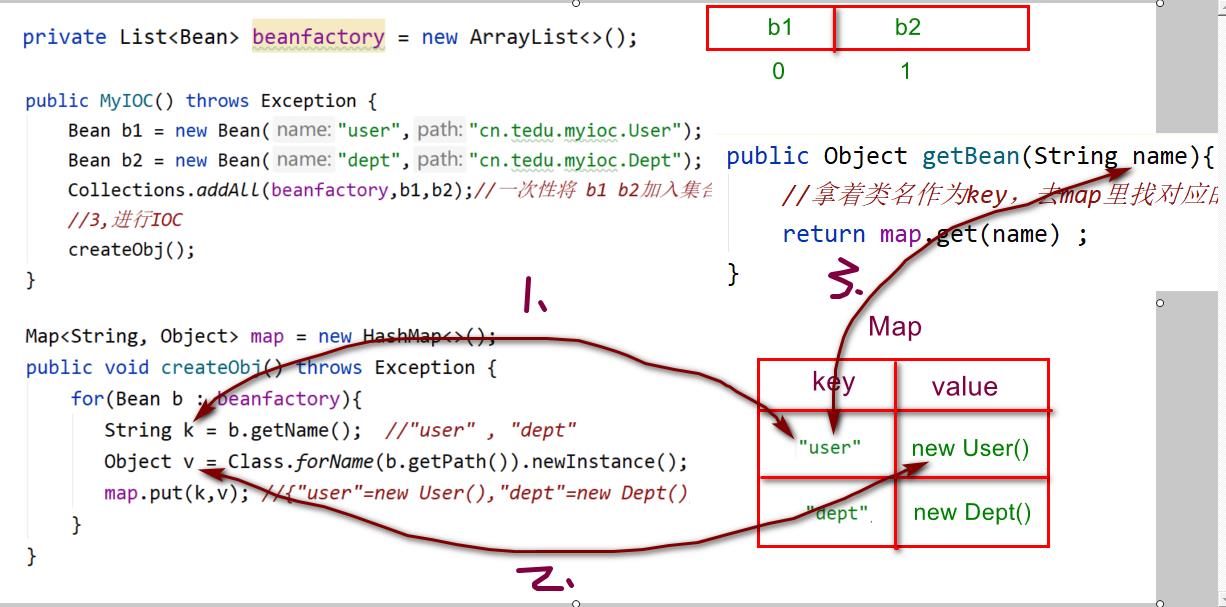
    //1,告诉spring框架,需要管理的bean有谁
    private List<Bean> beanfactory = new ArrayList<>();
    //2,初始化beanfactory
    public MyIOC() throws Exception {
        Bean b1 = new Bean("user","cn.tedu.myioc.User");
        Bean b2 = new Bean("dept","cn.tedu.myioc.Dept");
        Collections.addAll(beanfactory,b1,b2);//一次性将 b1 b2加入集合
        //3,进行IOC
        createObj();
    }
    //3,进行IOC ,核心就是Map里put(bean的name属性的值,根据bean的path值创建的对象)
    //{"user"=new User(),"dept"=new Dept()}
    private Map<String, Object> map = new ConcurrentHashMap<>();
    public void createObj() throws Exception {
        for(Bean b : beanfactory){
           String k = b.getName();  //"user" , "dept"
           Object v = Class.forName(b.getPath()).newInstance(); //new User() , new Dept()
           map.put(k,v); //{"user"=new User(),"dept"=new Dept()}
        }
    }
    //4,getBean返回创建好的对象
    public Object getBean(String name){
        //拿着类名作为key,去map里找对应的value(创建好的对象)
        return map.get(name) ;
    }
}
–3,创建User类和Dept类
package cn.tedu.myioc;

public class Dept {
}

package cn.tedu.myioc;

public class User {
}
–4,测试
package cn.tedu.myioc;
import org.junit.Test;
public class TestMyioc {
    @Test
    public void get() throws Exception {
        MyIOC my = new MyIOC();
        //根据指定的类名,获取对应的对象
        Object o = my.getBean("user");
        System.out.println(o);//cn.tedu.myioc.User@6ed3ef1
    }
}
四,DI

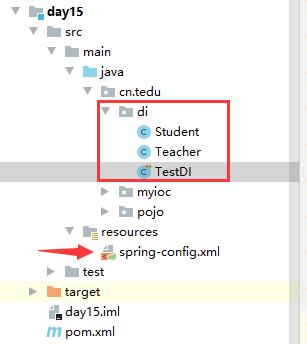
–1,准备Student类
package cn.tedu.di;
import org.springframework.beans.factory.annotation.Autowired;
import org.springframework.stereotype.Component;
@Component//spring提供的ioc
public class Student {
    String sname = "王撕葱" ;

    @Autowired //1.完成对象间的依赖关系spring di
    //相当于底层帮你维护了两个对象间的关系:new Student().setTeacher(new Teacher())
    Teacher teacher;

    @Override
    public String toString() {
        return "Student{" +
                "sname='" + sname + '\\'' +
                ", teacher=" + teacher +
                '}';
    }
}
–2,准备Teacher类
package cn.tedu.di;
import org.springframework.stereotype.Component;
@Component//spring提供的ioc
public class Teacher {
    String tname = "刘昱江" ;

    @Override
    public String toString() {
        return "Teacher{" +
                "tname='" + tname + '\\'' +
                '}';
    }

}
–3,修改核心配置文件,重新指定要扫描的包路径
<?xml version="1.0" encoding="UTF-8"?>
<beans xmlns="http://www.springframework.org/schema/beans"
       xmlns:xsi="http://www.w3.org/2001/XMLSchema-instance"
       xmlns:context="http://www.springframework.org/schema/context"
       xsi:schemaLocation="http://www.springframework.org/schema/beans http://www.springframework.org/schema/beans/spring-beans.xsd http://www.springframework.org/schema/context https://www.springframework.org/schema/context/spring-context.xsd">

    <!-- 在框架里开始了ioc ,会把每个类创建对象,并存起来 Map<id的值,对象>
        Map<String,Object> 存的是 {"hello" = new Hello()}
        框架只会拿到class文件,需要反射创建对象:
        {"hello" = Class.forName("cn.tedu.pojo.Hello").newInstance() }
    -->
    <!--<bean class="cn.tedu.pojo.Hello" id="hello"></bean>-->


    <!--2.让spring框架,知道哪些类上面使用了@Component注解-->
    <!--配置扫描器,并指定 扫描哪个包 里的资源-->
    <context:component-scan base-package="cn.tedu"></context:component-scan>

</beans>
–4,测试
package cn.tedu.di;

import org.junit.Test;
import org.springframework.context.support.ClassPathXmlApplicationContext;

public class TestDI {
    @Test
    public void di(){
        //1,读取核心配置文件
        ClassPathXmlApplicationContext spring =
                new ClassPathXmlApplicationContext("spring-config.xml");
        //2,直接从spring容器中获取bean--参数是类名,首字母变小写
        Student s = (Student) spring.getBean("student");
//        s.teacher.tname ="张三"; //自己设置两个对象间的关系
        System.out.println(s);
        //没有使用@Autowried时,Student{sname='王撕葱', teacher=null}
        //使用@Autowried时,Student{sname='王撕葱', teacher=Teacher{tname='刘昱江'}}
    }
}
五,扩展:模拟SpringDI的底层实现
以上是关于cgb2104-day15的主要内容,如果未能解决你的问题,请参考以下文章