Android 源码分析 应用程序启动的过程
Posted 小图包
tags:
篇首语:本文由小常识网(cha138.com)小编为大家整理,主要介绍了Android 源码分析 应用程序启动的过程相关的知识,希望对你有一定的参考价值。
记录进阶解密学习,再看源码层面思路不会那么杂乱无章,有了一个很清晰的脉络。
启动过程
启动过程可以分为两步:
-
AMS 发送启动应用程序进程请求
AMS 如果想要启动应用程序进程,就需要向 Zygote 进程发送创建应用程序进程的请求,AMS 会通过调用 startProcessLocked 方法向 Zygote 进程发送请求。
-
Zygote 接收请求并创建应用程序进程
出处。
一 AMS 发送启动应用程序进程请求
时序图如下
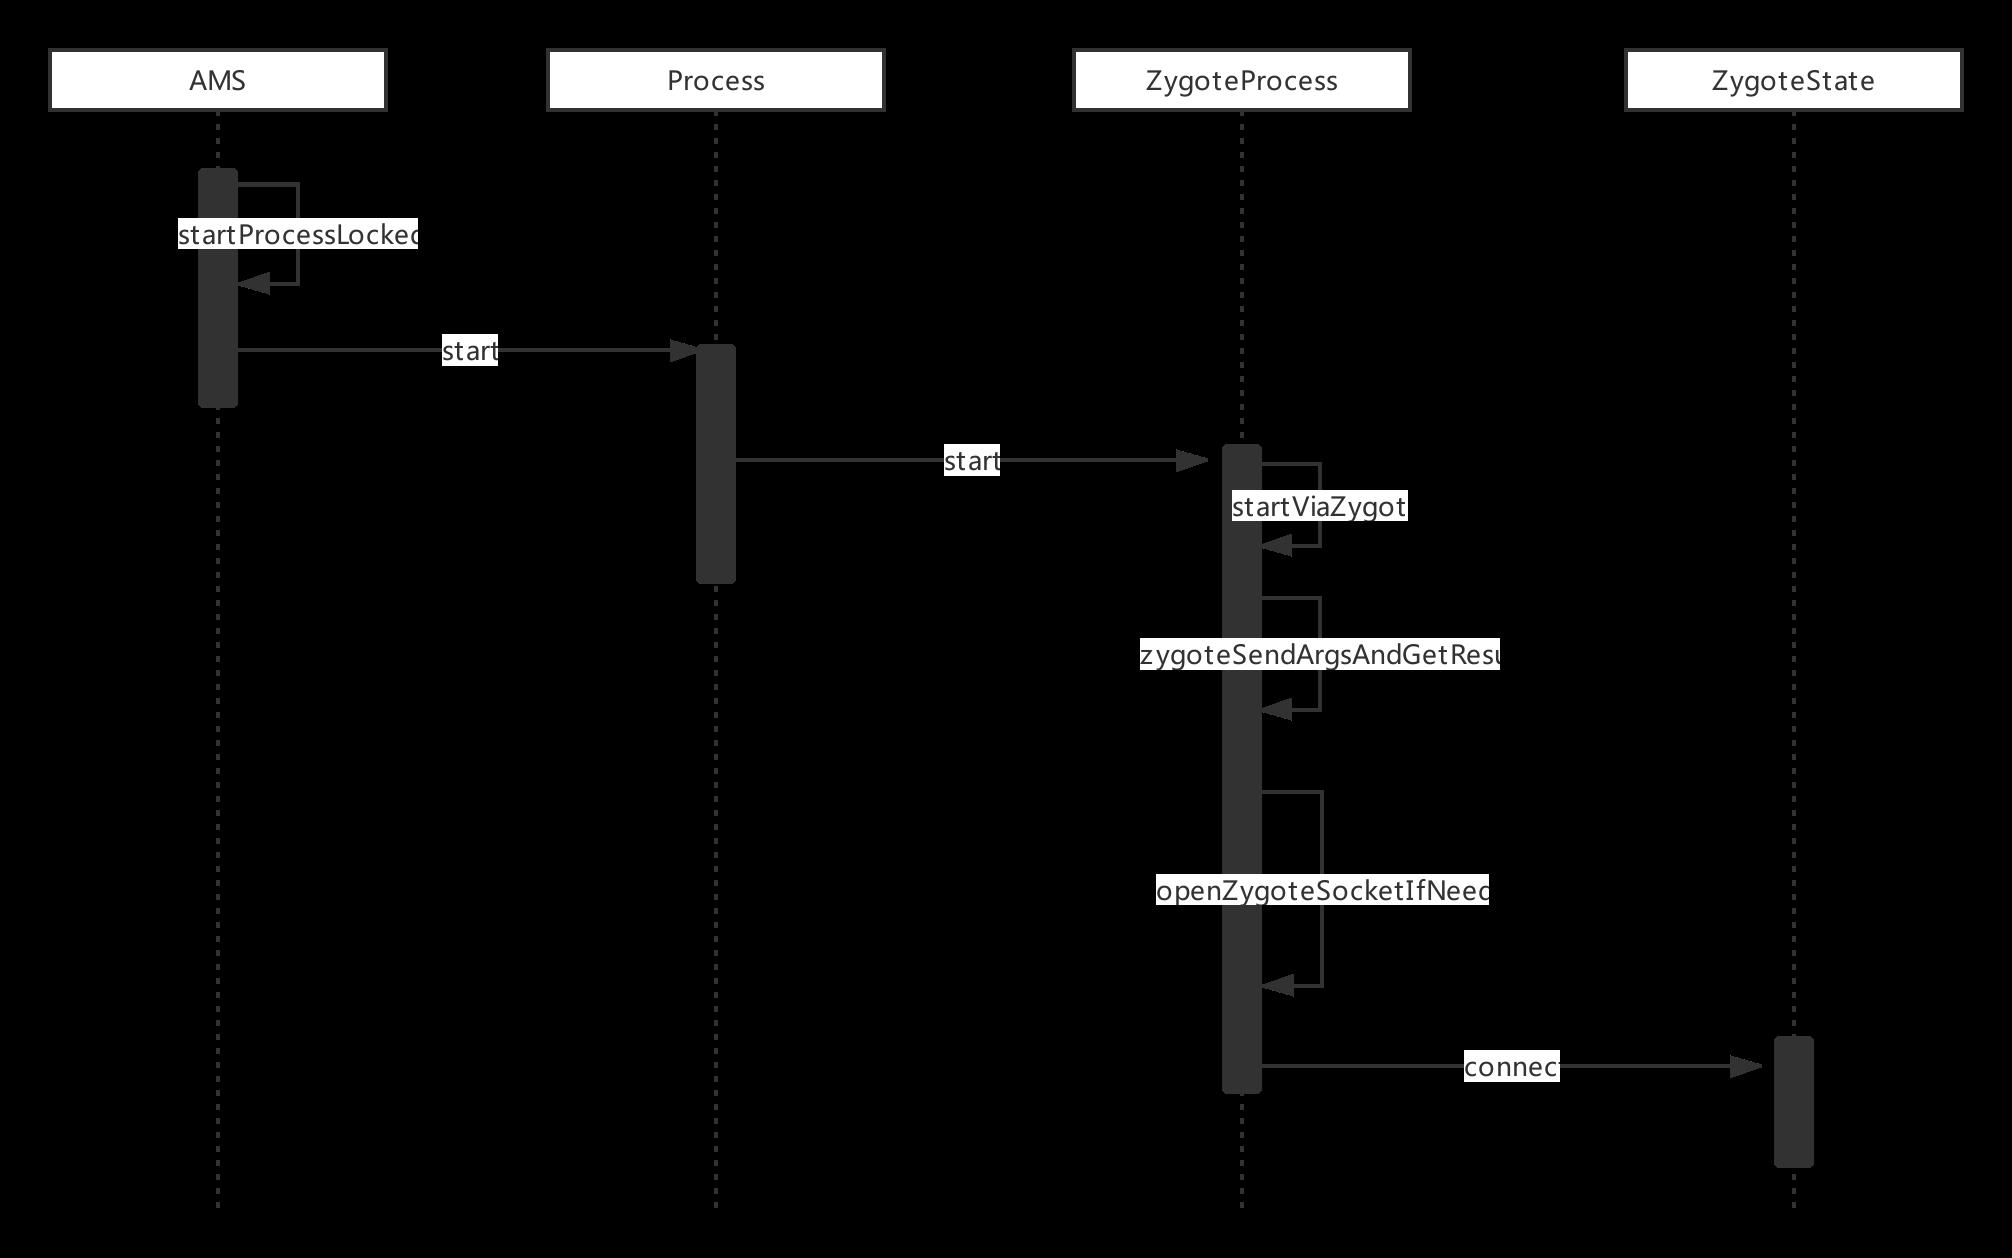
AMS 启动应用程序进程,向 Zygote 进程发送创建应用程序进程的请求, AMS 会通过调用 startProcessLocked 函数向 Zygote 进程发送请求 代码如下:
//com.android.server.am; ActivityManagerService.java

    /**
     * 启动进程的函数
     * @param app
     * @param hostingType
     * @param hostingNameStr
     * @param abiOverride
     * @param entryPoint
     * @param entryPointArgs
     */
    private final void startProcessLocked(
            ProcessRecord app, String hostingType,
            String hostingNameStr, String abiOverride,
            String entryPoint, String[] entryPointArgs){

        ...

        try {
            try {
                final int userId = UserHandle.getUserId(app.uid);
                AppGlobals.getPackageManager().checkPackageStartable(app.info.packageName, userId);
            } catch (RemoteException e) {
                throw e.rethrowAsRuntimeException();
            }
             1. 获取要创建的应用程序进程的 用户 id
            int uid = app.uid;
            int[] gids = null;
            int mountExternal = Zygote.MOUNT_EXTERNAL_NONE;
            if (!app.isolated) {
              ...

               2. 对 gids 进行创建和赋值
                if (ArrayUtils.isEmpty(permGids)) {
                    gids = new int[3];
                } else {
                    gids = new int[permGids.length + 3];
                    System.arraycopy(permGids, 0, gids, 3, permGids.length);
                }
                gids[0] = UserHandle.getSharedAppGid(UserHandle.getAppId(uid));
                gids[1] = UserHandle.getCacheAppGid(UserHandle.getAppId(uid));
                gids[2] = UserHandle.getUserGid(UserHandle.getUserId(uid));
            }
           ...
            boolean isActivityProcess = (entryPoint == null);

            3. 如果 entryPoint == null 那么将 ActivityThread 全类名赋值给 entryPoint
            if (entryPoint == null) entryPoint = "android.app.ActivityThread";
            Trace.traceBegin(Trace.TRACE_TAG_ACTIVITY_MANAGER, "Start proc: " +
                    app.processName);
            checkTime(startTime, "startProcess: asking zygote to start proc");
            ProcessStartResult startResult;
            if (hostingType.equals("webview_service")) {
                startResult = startWebView(entryPoint,
                        app.processName, uid, uid, gids, debugFlags, mountExternal,
                        app.info.targetSdkVersion, seInfo, requiredAbi, instructionSet,
                        app.info.dataDir, null, entryPointArgs);
            } else {

                4. 在 AMS 中调用 start 函数进行通知 Zygote fork 进程
                startResult = Process.start(entryPoint,
                        app.processName, uid, uid, gids, debugFlags, mountExternal,
                        app.info.targetSdkVersion, seInfo, requiredAbi, instructionSet,
                        app.info.dataDir, invokeWith, entryPointArgs);
            }
          ...
    }
总结上面主要做了4个步骤
1 获取创建应用程序进程的用户 ID
2 对用户组 ID(gids)进行创建和赋值
3 如果 entryPoint 为 null ,就把 ActivityThread 全类名赋值给它
4 调用 Process 的 start 函数
我们看下 Process 的 start 函数:
//android.os; Process.java

    public static final ProcessStartResult start(final String processClass,
                                  final String niceName,
                                  int uid, int gid, int[] gids,
                                  int debugFlags, int mountExternal,
                                  int targetSdkVersion,
                                  String seInfo,
                                  String abi,
                                  String instructionSet,
                                  String appDataDir,
                                  String invokeWith,
                                  String[] zygoteArgs) {
      	1. 通过 ZygoteProcess 调用 start 函数
        return zygoteProcess.start(processClass, niceName, uid, gid, gids,
                    debugFlags, mountExternal, targetSdkVersion, seInfo,
                    abi, instructionSet, appDataDir, invokeWith, zygoteArgs);
    }
ZygoteProcess 的Start 调用了startViaZygote 方法
//android.os; ZygoteProcess.java

    public final Process.ProcessStartResult start(final String processClass,
                                                  final String niceName,
                                                  int uid, int gid, int[] gids,
                                                  int debugFlags, int mountExternal,
                                                  int targetSdkVersion,
                                                  String seInfo,
                                                  String abi,
                                                  String instructionSet,
                                                  String appDataDir,
                                                  String invokeWith,
                                                  String[] zygoteArgs) {
        try {
            1
            return startViaZygote(processClass, niceName, uid, gid, gids,
                    debugFlags, mountExternal, targetSdkVersion, seInfo,
                    abi, instructionSet, appDataDir, invokeWith, zygoteArgs);
        } catch (ZygoteStartFailedEx ex) {
            Log.e(LOG_TAG,
                    "Starting VM process through Zygote failed");
            throw new RuntimeException(
                    "Starting VM process through Zygote failed", ex);
        }
    }

    private Process.ProcessStartResult startViaZygote(final String processClass,
                                                      final String niceName,
                                                      final int uid, final int gid,
                                                      final int[] gids,
                                                      int debugFlags, int mountExternal,
                                                      int targetSdkVersion,
                                                      String seInfo,
                                                      String abi,
                                                      String instructionSet,
                                                      String appDataDir,
                                                      String invokeWith,
                                                      String[] extraArgs)
                                                      throws ZygoteStartFailedEx {

        //创建字符串列表argsForZygote 并将应用进程的启动参数保存到argsForZygote
        ArrayList<String> argsForZygote = new ArrayList<String>();

        // --runtime-args, --setuid=, --setgid=,
        // and --setgroups= must go first
        argsForZygote.add("--runtime-args");
        argsForZygote.add("--setuid=" + uid);
        argsForZygote.add("--setgid=" + gid);


        synchronized(mLock) {
            2
            return zygoteSendArgsAndGetResult(openZygoteSocketIfNeeded(abi), argsForZygote);
        }
    }
看2 处的openZygoteSocketIfNeeded
//android.os; ZygoteProcess.java
    @GuardedBy("mLock")
    private ZygoteState openZygoteSocketIfNeeded(String abi) throws ZygoteStartFailedEx {
        Preconditions.checkState(Thread.holdsLock(mLock), "ZygoteProcess lock not held");

        if (primaryZygoteState == null || primaryZygoteState.isClosed()) {
            try {
                1
                primaryZygoteState = ZygoteState.connect(mSocket);
            } catch (IOException ioe) {
                throw new ZygoteStartFailedEx("Error connecting to primary zygote", ioe);
            }
        }

         2
        if (primaryZygoteState.matches(abi)) {
            return primaryZygoteState;
        }

        // 如果不匹配,则尝试连接 zygote 辅模式
        if (secondaryZygoteState == null || secondaryZygoteState.isClosed()) {
            try {
                3
                secondaryZygoteState = ZygoteState.connect(mSecondarySocket);
            } catch (IOException ioe) {
                throw new ZygoteStartFailedEx("Error connecting to secondary zygote", ioe);
            }
        }

        4
        if (secondaryZygoteState.matches(abi)) {
            return secondaryZygoteState;
        }

        //如果都不匹配那么就抛一个异常
        throw new ZygoteStartFailedEx("Unsupported zygote ABI: " + abi);
    }
总结如上方法
1 连接 zygote 名称为 "zygote" 服务端的 Socket ,建立进程间通信
2 连接 Zygote 主模式返回的 ZygoteState 是否与启动应用程序进程所需要的 ABI 匹配
3 如果不匹配那么就尝试连接 name 为 "zygote_secondary" 的 Socket
4 连接 Zygote 辅模式返回的 ZygoteState 是否与启动应用程序进程所需要的 ABI 匹配
连接成功zygoteSendArgsAndGetResult 做了些什么
//android.os; ZygoteProcess.java
    private static Process.ProcessStartResult zygoteSendArgsAndGetResult(
            ZygoteState zygoteState, ArrayList<String> args)
            throws ZygoteStartFailedEx {
       			...
            final BufferedWriter writer = zygoteState.writer;
            final DataInputStream inputStream = zygoteState.inputStream;

            writer.write(Integer.toString(args.size()));
            writer.newLine();

            for (int i = 0; i < sz; i++) {
                String arg = args.get(i);
                writer.write(arg);
                writer.newLine();
            }

            writer.flush();

            ...
            }
            return result;
        } catch (IOException ex) {
            zygoteState.close();
            throw new ZygoteStartFailedEx(ex);
        }
    }
zygote 进程的服务端 Socket 连接成功,那么就将存储起来的应用程序进程启动参数写入到 ZygoteState 中 .ZygoteState是ZygoteProcess的静态内部类,表示与Zygote的状态。
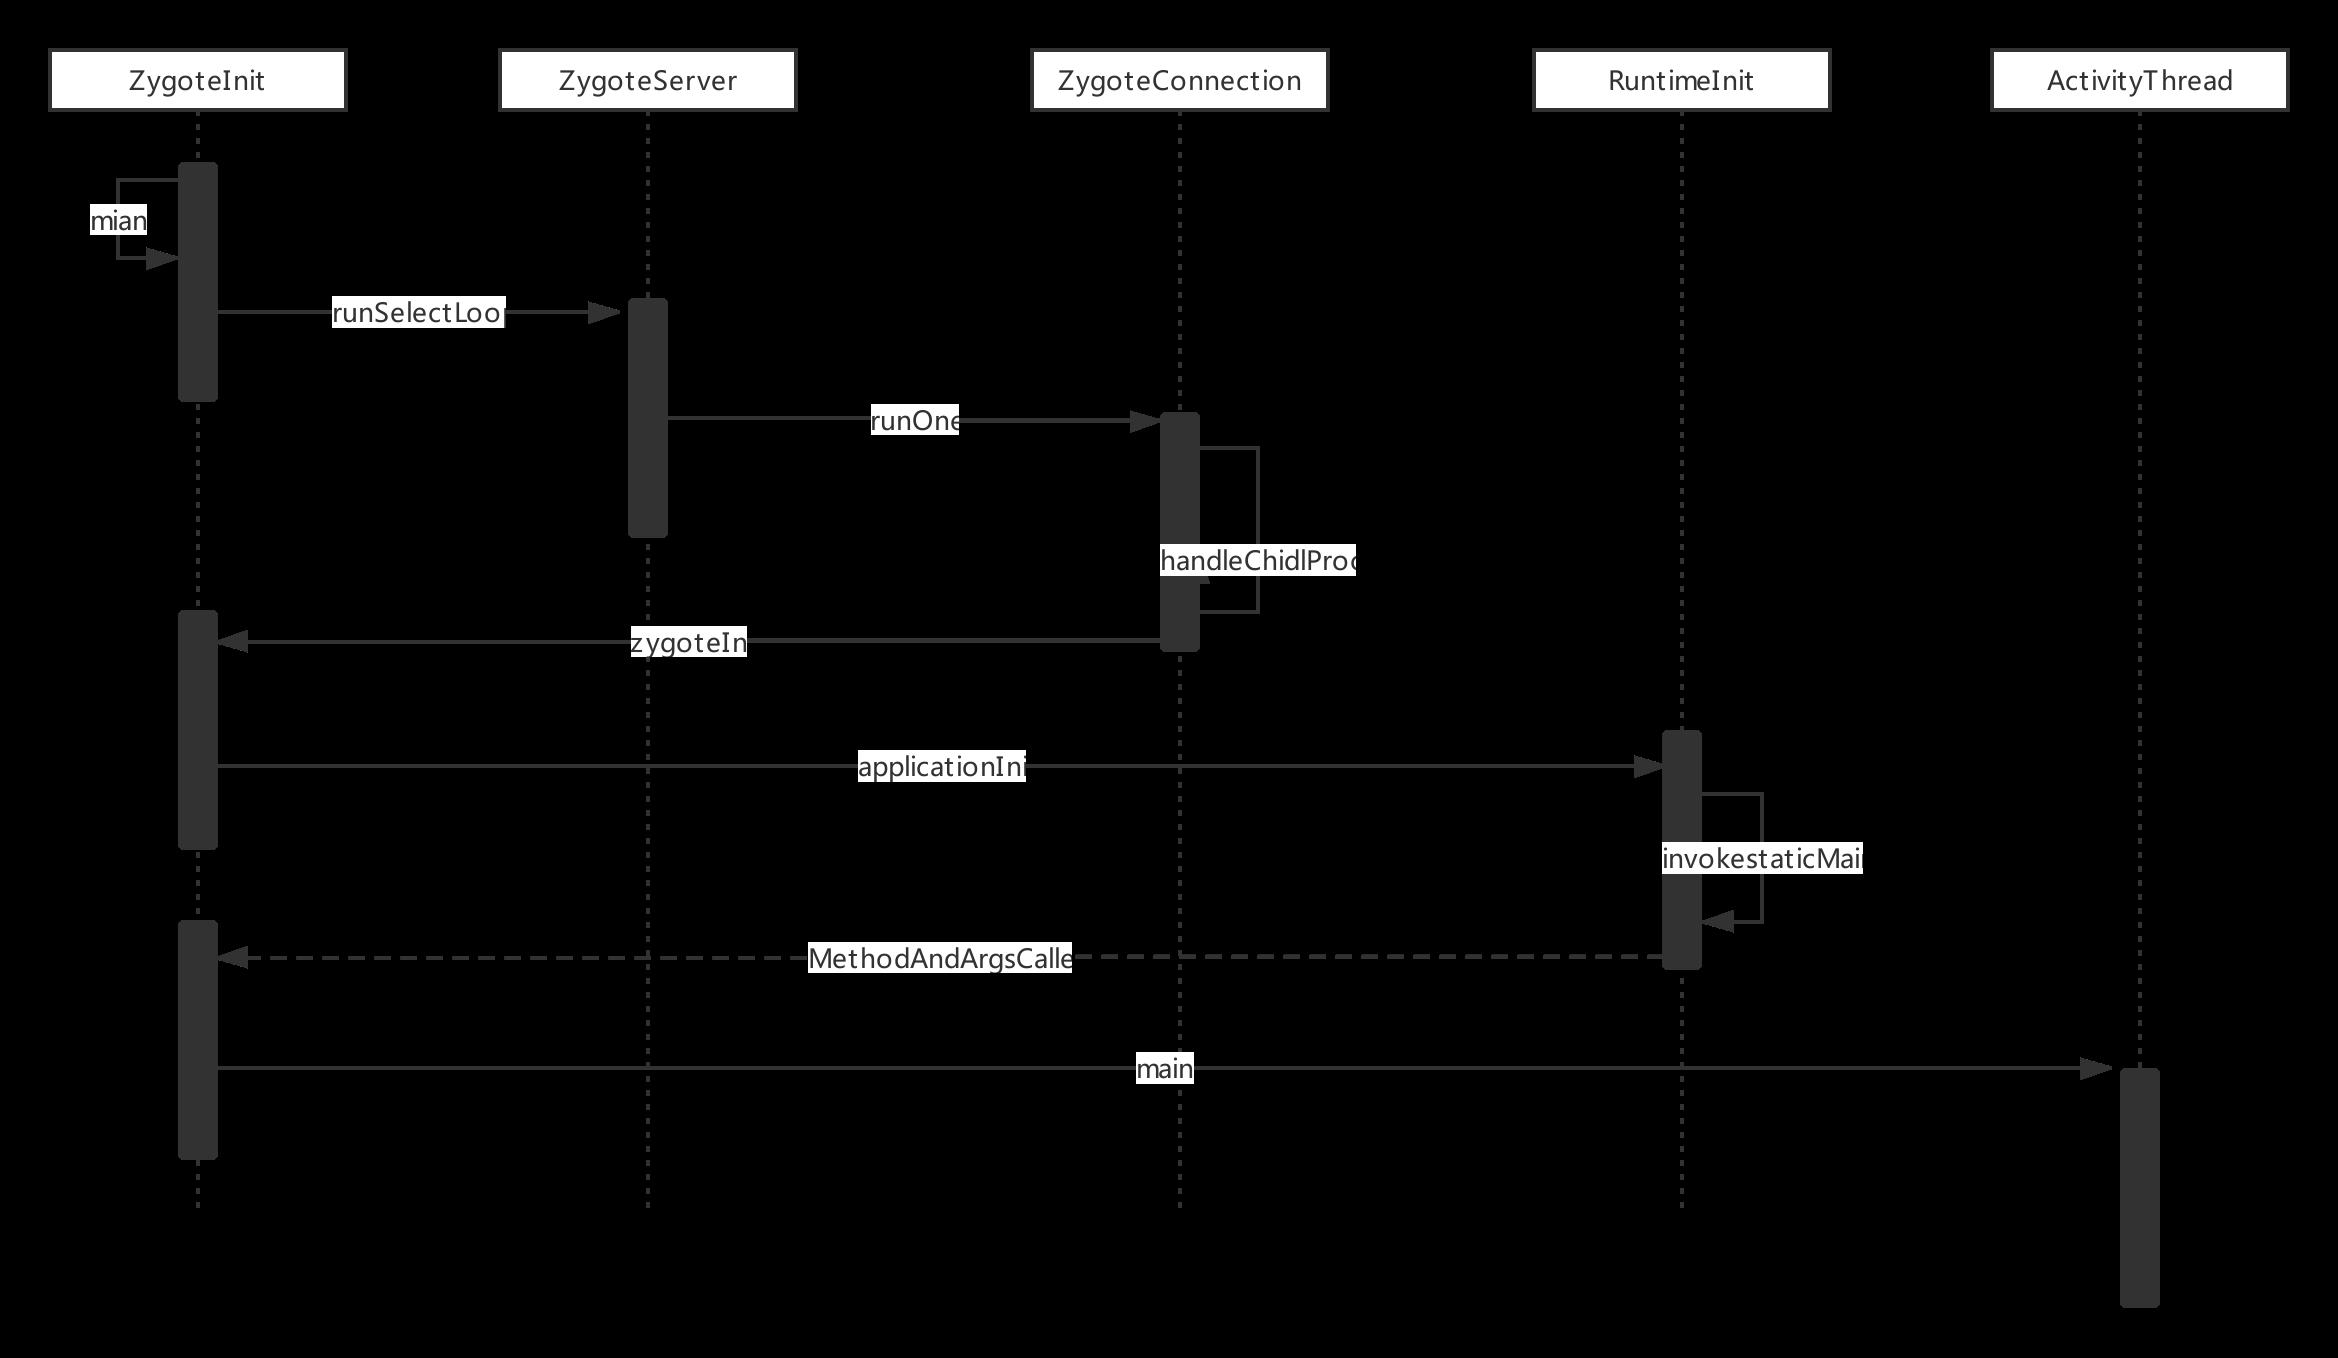
二 Zygote 接收请求并创建应用程序进程
SystemServer 跟应用进程启动在 Zygote 处理 的方式相似,看下时序图
服务端的Socket的创建
//com.android.internal.os.ZygoteInit.java
    public static void main(String argv[]) {

	    ....

        try {


            1

            zygoteServer.registerServerSocket(socketName);

            if (!enableLazyPreload) {
                bootTimingsTraceLog.traceBegin("ZygotePreload");
                EventLog.writeEvent(LOG_BOOT_PROGRESS_PRELOAD_START,
                    SystemClock.uptimeMillis());
                2
                preload(bootTimingsTraceLog);
                EventLog.writeEvent(LOG_BOOT_PROGRESS_PRELOAD_END,
                    SystemClock.uptimeMillis());
                bootTimingsTraceLog.traceEnd(); // ZygotePreload
            } else {
                Zygote.resetNicePriority();
            }

            ...

            if (startSystemServer) {
                3
                startSystemServer(abiList, socketName, zygoteServer);
            }

            Log.i(TAG, "Accepting command socket connections");
            4
            zygoteServer.runSelectLoop(abiList);
						//清理或者关闭对应的 Socket
            zygoteServer.closeServerSocket();
        } catch (Zygote.MethodAndArgsCaller caller) {
            caller.run();
        } catch (Throwable ex) {
            Log.e(TAG, "System zygote died with exception", ex);
            zygoteServer.closeServerSocket();
            throw ex;
        }
    }
总结如上步骤
1 创建服务端的 Socket ,名称为 "zygote"
2 用来预加载资源
3 启动 SystemServer 进程
4 等待 AMS 请求创建新的应用程序进程
看下zygoteServer.runSelectLoop(abiList); 方法
//  com.android.internal.os ZygoteInit.main->runSelectLoop

    void runSelectLoop(String abiList) throws Zygote.MethodAndArgsCaller {
        ArrayList<FileDescriptor> fds = new ArrayList<FileDescriptor>();
        ArrayList<ZygoteConnection> peers = new ArrayList<ZygoteConnection>();

        1
        fds.add(mServerSocket.getFileDescriptor());
        peers.add(null);

        死循环等待 AMS 的请求
        while (true) {
            StructPollfd[] pollFds = new StructPollfd[fds.size()];
            2
            for (int i = 0; i < pollFds.length; ++i) {
                pollFds[i] = new StructPollfd();
                pollFds[i].fd = fds.get(i);
                pollFds[i].events = (short) POLLIN;
            }
            try {
                Os.poll(pollFds, -1);
            } catch (ErrnoException ex) {
                throw new RuntimeException("poll failed", ex);
            }

             3
            for (int i = pollFds.length - 1; i >= 0; --i) {

                if ((pollFds[i].revents & POLLIN) == 0) {
                    continue;
                }
                //如果 i == 0 那么就认为 服务端 Socket 与客户端连接上了,就是与 AMS 建立了连接
                if (i == 0) {
                    4
                    ZygoteConnection newPeer = acceptCommandPeer(abiList);
                    //将 ZygoteConnection 添加到 Socket 连接列表中
                    peers.add(newPeer);
                    //将 ZygoteConnection 的文件描述符 添加到 fds 列表中
                    fds.add(newPeer.getFileDesciptor());
                } else {//如果不等于 0 ,那么就说明 AMS 向 Zygote 发送了一个创建应用进程的请求
                    5
                    boolean done = peers.get(i).runOnce(this);
                    if (done) {
                        peers.remove(i);
                        fds.remove(i);
                    }
                }
            }
        }
    }
上述方法的主要作用
1. 添加获得该 Socket 的 fd 字段的值
2. 将 fds 信息转存到 pollFds 数组中。
3 对 pollFds 信息进行遍历
4 添加到 Socket 连接列表中
5 调用 ZygoteConnection 的 runOnce 函数来创建一个新的应用进程,并在成功创建后将这个连接从 Socket 连接列表中 peers、fd 列表中关闭
如果 AMS 发来了一个新的请求任务,会走5 处通过 peers.get(i).runOnce(this); 来处理请求数据,我们看 runOnce 函数具体实现:
//com.android.internal.os; ZygoteConnection.java
    boolean runOnce(ZygoteServer zygoteServer) throws Zygote.MethodAndArgsCaller {

        String args[];
        Arguments parsedArgs = null;
        FileDescriptor[] descriptors;

        try {
            1. 获取应用程序进程的启动参数
            args = readArgumentList();
            descriptors = mSocket.getAncillaryFileDescriptors();
        } catch (IOException ex) {
            Log.w(TAG, "IOException on command socket " + ex.getMessage());
            closeSocket();
            return true;
        }
				...
        int pid = -1;
        FileDescriptor childPipeFd = null;
        FileDescriptor serverPipeFd = null;

        try {
            2. 将获取到启动应用程序进程的启动参数 args 数组 封装到 Arguments 类型的 parsedArgs 对象中
            parsedArgs = new Arguments(args);

           ...
            fd = null;

           3. 通过 Zygote 来创建应用程序进程
            pid = Zygote.forkAndSpecialize(parsedArgs.uid, parsedArgs.gid, parsedArgs.gids,
                    parsedArgs.debugFlags, rlimits, parsedArgs.mountExternal, parsedArgs.seInfo,
                    parsedArgs.niceName, fdsToClose, fdsToIgnore, parsedArgs.instructionSet,
                    parsedArgs.appDataDir);
        } catch (ErrnoException ex) {
          ...
        }

        try {
            //当前代码逻辑运行在被创建出来的子进程中
            if (pid == 0) {
                // in child
                zygoteServer.closeServerSocket();
                IoUtils.closeQuietly(serverPipeFd);
                serverPipeFd = null;
                4. 处理应用程序进程
                handleChildProc(parsedArgs, descriptors, childPipeFd, newStderr);

                // should never get here, the child is expected to either
                // throw Zygote.MethodAndArgsCaller or exec().
                return true;
            } else {
                // in parent...pid of < 0 means failure
                IoUtils.closeQuietly(childPipeFd);
                childPipeFd = null;
                return handleParentProc(pid, descriptors, serverPipeFd, parsedArgs);
            }
        } finally {
            IoUtils.closeQuietly(childPipeFd);
            IoUtils.closeQuietly(serverPipeFd);
        }
    }
Zygote.forkAndSpecialize主要通过创建fork当前程序创建一个子程序的,如果pid等于0 则说明当前的 代码逻辑运行在新创建的子进程的应用程序当中。我们这里来看下 handleChildProc怎么处理应用程序进程
//com.android.internal.os; ZygoteConnection.java
		private void handleChildProc(Arguments parsedArgs,
            FileDescriptor[] descriptors, FileDescriptor pipeFd, PrintStream newStderr)
            throws Zygote.MethodAndArgsCaller {
        ...
        if (parsedArgs.invokeWith != null) {
            ...
        } else {
           //调用 ZygoteInit 的 zygoteInit 函数
            ZygoteInit.zygoteInit(parsedArgs.targetSdkVersion,
                    parsedArgs.remainingArgs, null /* classLoader */);
        }
    }
// com.android.internal.os ZygoteInit

    public static final void zygoteInit(int targetSdkVersion, String[] argv,
            ClassLoader classLoader) throws Zygote.MethodAndArgsCaller {
        if (RuntimeInit.DEBUG) {
            Slog.d(RuntimeInit.TAG, "RuntimeInit: Starting application from zygote");
        }

        Trace.traceBegin(Trace.TRACE_TAG_ACTIVITY_MANAGER, "ZygoteInit");
        RuntimeInit.redirectLogStreams();

        RuntimeInit.commonInit();
        1. 启动 Binder 线程池
        ZygoteInit.nativeZygoteInit();
        2. 进入 ActivityThread 的 main 方法
        RuntimeInit.applicationInit(targetSdkVersion, argv, classLoader);
    }
1 处先启动 Binder 线程池,用于进程间通信,接下来看applicationInit 处理了什么
  //com.android.internal.os RuntimeInit.java
    protected static void applicationInit(int targetSdkVersion, String[] argv, ClassLoader classLoader)
            throws Zygote.MethodAndArgsCaller {
       	...
        invokeStaticMain(args.startClass, args.startArgs, classLoader);
    }

    private static void invokeStaticMain(String className, String[] argv, ClassLoader classLoader)
            throws Zygote.MethodAndArgsCaller
    {
        Class<?> cl;

        try {
            1
            cl = Class.forName(className, true, classLoader);
        } catch (ClassNotFoundException ex) {
            throw new RuntimeException(
                    "Missing class when invoking static main " + className,
                    ex);
        }

        Method m;
        try {
            2
            m = cl.getMethod("main", new Class[] { String[].class });
        } catch (NoSuchMethodException ex) {
            ...
        } catch (SecurityException ex) {
            ...
        }

        int modifiers = m.getModifiers();
        if (! (Modifier.isStatic(modifiers) && Modifier.isPublic(modifiers))) {
           ...
        }

        3
        throw new Zygote.MethodAndArgsCaller(m, argv);
    }
总结如上方法做了3件事:
1 通过 className("android.app.ActivityThread" )反射得到 ActivityThread 类
2 获取ActivityThread的main的方法,并将main的方法传入3处的Zygote中的MethodAndArhsCaller类的构造方法当中
3将 m 、argv 传入 MethodAndArgsCaller,然后抛一个异常,并在 ZygoteInit.main 中进行捕获异常
//com.android.internal.os.ZygoteInit.java
    public static void main(String argv[]) {

	    ....

        try {


            1
            zygoteServer.registerServerSocket(socketName);

        	2
            zygoteServer.runSelectLoop(abiList);

        } catch (Zygote.MethodAndArgsCaller caller) {
            3
            caller.run();
        } catch (Throwable ex) {
            Log.e(TAG, "System zygote died with exception", ex);
            zygoteServer.closeServerSocket();
            throw ex;
        }
    }
1 创建服务端的 Socket ,名称为 "zygote"
2. 等待 AMS 请求
3. 捕获到 RuntimeInit applicationInit 中的异常
看 RuntimeInit applicationInit 中的异常,然后看它的 run 函数
com.android.internal.os Zygote.java

    public static class MethodAndArgsCaller extends Exception
            implements Runnable {
        /** method to call */
        private final Method mMethod;

        /** argument array */
        private final String[] mArgs;

        public MethodAndArgsCaller(Method method, String[] args) {
            mMethod = method;
            mArgs = args;
        }

        public void run() {
            try {
                1. 这里就开始执行 ActivityThread main 方法了
                mMethod.invoke(null, new Object[] { mArgs });
            } catch (IllegalAccessException ex) {
                throw new RuntimeException(ex);
            } catch (InvocationTargetException ex) {
                Throwable cause = ex.getCause();
                if (cause instanceof RuntimeException) {
                    throw (RuntimeException) cause;
                } else if (cause instanceof Error) {
                    throw (Error) cause;
                }
                throw new RuntimeException(ex);
            }
        }
    }
至此应用程序的进程创建和 应用程序进程的入口 ActivityThread main 都已经执行,我们看下ActivityThread消息的创建处理
//android.app; ActivityThread.java
    //通过 ZygoteInit 反射调用执行的
    public static void main(String[] args) {
        ...
        1
        Looper.prepareMainLooper();
        2
        ActivityThread thread = new ActivityThread();

        thread.attach(false);
	    3
        if (sMainThreadHandler == null) {
            sMainThreadHandler = thread.getHandler();
        }

        4
        Looper.loop();

        throw new RuntimeException("Main thread loop unexpectedly exited");
    }
1 主线程消息循环 Looper 创建
2 创建 ActivityThread 对象
3 拿到H类的Hander并且 赋值给sMainThreadHandler
4 开启 Looper开启了循环,使得Looper开始处理消息。
通过对系统源码的源码的分析,对系统进程、系统桌面 Launcher 进程、应用程序进程的启动过程,Binder,Hander的更加深的理解, 后续将对四大组件启动流程进行分析.
以上是关于Android 源码分析 应用程序启动的过程的主要内容,如果未能解决你的问题,请参考以下文章