Tinker 源码解析-代码修复和资源修复
Posted 小图包
tags:
篇首语:本文由小常识网(cha138.com)小编为大家整理,主要介绍了Tinker 源码解析-代码修复和资源修复相关的知识,希望对你有一定的参考价值。
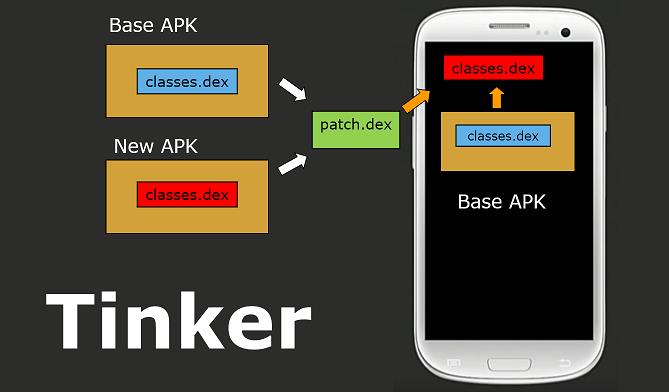
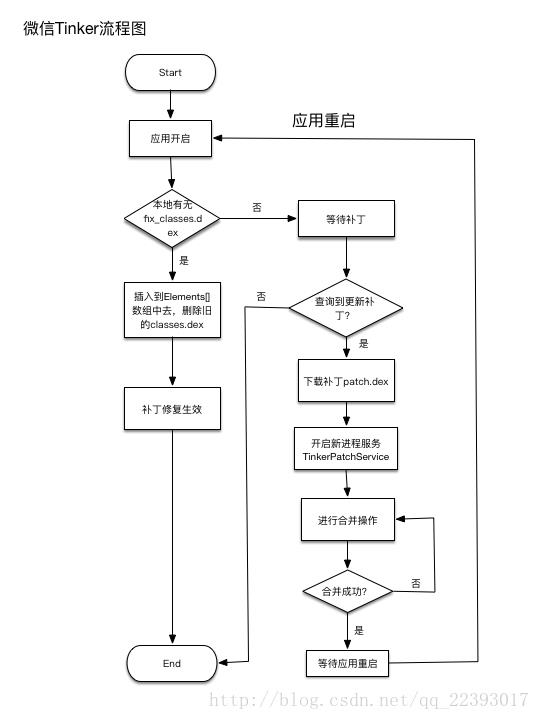
原理如下图

Tinker 将 old.apk 和 new.apk 做了 diff,生成一个 patch.dex,然后下发到手机,将 patch.dex 和本机 apk 中的 classes.dex 做了合并,生成新的 classes.dex,然后加载。
一 Tinker代码修复原理
先从ThinkerApplication看
public abstract class TinkerApplication extends Application {


    protected void onBaseContextAttached(Context base, long applicationStartElapsedTime, long applicationStartMillisTime) {
        try {
            1
            loadTinker();
            mCurrentClassLoader = base.getClassLoader();
            mInlineFence = createInlineFence(this, tinkerFlags, delegateClassName,
                    tinkerLoadVerifyFlag, applicationStartElapsedTime, applicationStartMillisTime,
                    tinkerResultIntent);
            TinkerInlineFenceAction.callOnBaseContextAttached(mInlineFence, base);
            //reset save mode
            if (useSafeMode) {
                ShareTinkerInternals.setSafeModeCount(this, 0);
            }
        } catch (TinkerRuntimeException e) {
            throw e;
        } catch (Throwable thr) {
            throw new TinkerRuntimeException(thr.getMessage(), thr);
        }
    }

    @Override
    protected void attachBaseContext(Context base) {
        super.attachBaseContext(base);
        final long applicationStartElapsedTime = SystemClock.elapsedRealtime();
        final long applicationStartMillisTime = System.currentTimeMillis();
        Thread.setDefaultUncaughtExceptionHandler(new TinkerUncaughtHandler(this));
        onBaseContextAttached(base, applicationStartElapsedTime, applicationStartMillisTime);
    }


}
private void loadTinker() {
try {
//reflect tinker loader, because loaderClass may be define by user!
Class<?> tinkerLoadClass = Class.forName(loaderClassName, false, TinkerApplication.class.getClassLoader());
Method loadMethod = tinkerLoadClass.getMethod(TINKER_LOADER_METHOD, TinkerApplication.class);
Constructor<?> constructor = tinkerLoadClass.getConstructor();
tinkerResultIntent = (Intent) loadMethod.invoke(constructor.newInstance(), this);
} catch (Throwable e) {
//has exception, put exception error code
tinkerResultIntent = new Intent();
ShareIntentUtil.setIntentReturnCode(tinkerResultIntent, ShareConstants.ERROR_LOAD_PATCH_UNKNOWN_EXCEPTION);
tinkerResultIntent.putExtra(INTENT_PATCH_EXCEPTION, e);
}
}
1 loadTinker主要做的就是通过TinkerApplication的类加载器去加载loaderClassName, 如果开发者没有自定义配置, 那么这里加载的类就是TinkerLoader, 然后调用他的tryLoad方法
看调用的TinkerLoader tryLoad 的方法
    public Intent tryLoad(TinkerApplication app) {
        ShareTinkerLog.d(TAG, "tryLoad test test");
        Intent resultIntent = new Intent();

        long begin = SystemClock.elapsedRealtime();
        1
        tryLoadPatchFilesInternal(app, resultIntent);
        long cost = SystemClock.elapsedRealtime() - begin;
        ShareIntentUtil.setIntentPatchCostTime(resultIntent, cost);
        return resultIntent;
    }
private void tryLoadPatchFilesInternal(TinkerApplication app, Intent resultIntent) {
final int tinkerFlag = app.getTinkerFlags();
1 资源, dex, so的校验
final boolean isArkHotRuning = ShareTinkerInternals.isArkHotRuning();
2 会进行一些md5安全校验, 然后针对OAT做的一些补丁优化处理
if (!isArkHotRuning && isEnabledForDex) {
3 代码补丁加载
boolean loadTinkerJars = TinkerDexLoader.loadTinkerJars(app, patchVersionDirectory, oatDex, resultIntent, isSystemOTA, isProtectedApp);
if (isSystemOTA) {
// update fingerprint after load success
patchInfo.fingerPrint = Build.FINGERPRINT;
patchInfo.oatDir = loadTinkerJars ? ShareConstants.INTERPRET_DEX_OPTIMIZE_PATH : ShareConstants.DEFAULT_DEX_OPTIMIZE_PATH;
// reset to false
oatModeChanged = false;
if (!SharePatchInfo.rewritePatchInfoFileWithLock(patchInfoFile, patchInfo, patchInfoLockFile)) {
ShareIntentUtil.setIntentReturnCode(resultIntent, ShareConstants.ERROR_LOAD_PATCH_REWRITE_PATCH_INFO_FAIL);
ShareTinkerLog.w(TAG, "tryLoadPatchFiles:onReWritePatchInfoCorrupted");
return;
}
// update oat dir
resultIntent.putExtra(ShareIntentUtil.INTENT_PATCH_OAT_DIR, patchInfo.oatDir);
}
if (!loadTinkerJars) {
ShareTinkerLog.w(TAG, "tryLoadPatchFiles:onPatchLoadDexesFail");
return;
}
}
if (isArkHotRuning && isEnabledForArkHot) {
boolean loadArkHotFixJars = TinkerArkHotLoader.loadTinkerArkHot(app,
patchVersionDirectory, resultIntent);
if (!loadArkHotFixJars) {
ShareTinkerLog.w(TAG, "tryLoadPatchFiles:onPatchLoadArkApkFail");
return;
}
}
if (isEnabledForResource) {
4 资源补丁加载
boolean loadTinkerResources = TinkerResourceLoader.loadTinkerResources(app, patchVersionDirectory, resultIntent);
if (!loadTinkerResources) {
Log.w(TAG, "tryLoadPatchFiles:onPatchLoadResourcesFail");
return;
}
}
// Init component hotplug support.
if ((isEnabledForDex || isEnabledForArkHot) && isEnabledForResource) {
ComponentHotplug.install(app, securityCheck);
}
}TinkerLoader#tryLoadPatchFilesInternal主要是做以下几件事情:
1 Tinker 功能的验证(包括 Tinker是否打开, 清单文件的获取和校验)
2 补丁文件, 补丁内容(包括dex, resource, so)与清单的校验, 并将相关信息对象存入对应列表对象
3 代码补丁的加载(TinkerDexLoader.loadTinkerJars)
4 资源补丁的加载(TinkerResourceLoader.loadTinkerResources)
5 杀死主进程以外的进程
我们看3处TinkerDexLoader.loadTinkerJars 会进行一些md5安全校验, 然后针对OAT做的一些补丁优化处理 然后通过SystemClassLoaderAdder.installDexes执行安装补丁的工作
 public static boolean loadTinkerJars(final TinkerApplication application, String directory, String oatDir, Intent intentResult, boolean isSystemOTA, boolean isProtectedApp) {
    ......
        try {
            final boolean useDLC = application.isUseDelegateLastClassLoader();
            1 执行安装补丁的工作
            SystemClassLoaderAdder.installDexes(application, classLoader, optimizeDir, legalFiles, isProtectedApp, useDLC);
        } catch (Throwable e) {
            ShareTinkerLog.e(TAG, "install dexes failed");
            intentResult.putExtra(ShareIntentUtil.INTENT_PATCH_EXCEPTION, e);
            ShareIntentUtil.setIntentReturnCode(intentResult, ShareConstants.ERROR_LOAD_PATCH_VERSION_DEX_LOAD_EXCEPTION);
            return false;
        }

        return true;
    }
public static void installDexes(Application application, ClassLoader loader, File dexOptDir, List<File> files,
boolean isProtectedApp, boolean useDLC) throws Throwable {
ShareTinkerLog.i(TAG, "installDexes dexOptDir: " + dexOptDir.getAbsolutePath() + ", dex size:" + files.size());
if (!files.isEmpty()) {
1 针对dex进行排序
files = createSortedAdditionalPathEntries(files);
没有指定特定的类加载器处理, 所以用的应该是DVM下的PathClassloade
ClassLoader classLoader = loader;
if (Build.VERSION.SDK_INT >= 24 && !isProtectedApp) {
classLoader = NewClassLoaderInjector.inject(application, loader, dexOptDir, useDLC, files);
} else {
2 低于24版本的SDK 的处理
injectDexesInternal(classLoader, files, dexOptDir);
}
//install done
sPatchDexCount = files.size();
ShareTinkerLog.i(TAG, "after loaded classloader: " + classLoader + ", dex size:" + sPatchDexCount);
if (!checkDexInstall(classLoader)) {
//reset patch dex
SystemClassLoaderAdder.uninstallPatchDex(classLoader);
throw new TinkerRuntimeException(ShareConstants.CHECK_DEX_INSTALL_FAIL);
}
}
}接着看injectDexesInternal
 static void injectDexesInternal(ClassLoader cl, List<File> dexFiles, File optimizeDir) throws Throwable {
        if (Build.VERSION.SDK_INT >= 23) {
            V23.install(cl, dexFiles, optimizeDir);
        } else if (Build.VERSION.SDK_INT >= 19) {
            V19.install(cl, dexFiles, optimizeDir);
        } else if (Build.VERSION.SDK_INT >= 14) {
            V14.install(cl, dexFiles, optimizeDir);
        } else {
            V4.install(cl, dexFiles, optimizeDir);
        }
    }
根据不同的sdk编译版本, tinker做了适配处理, 我们看下V23.install(classLoader, files, dexOptDir)
 private static final class V23 {

        private static void install(ClassLoader loader, List<File> additionalClassPathEntries,
                                    File optimizedDirectory)
            throws IllegalArgumentException, IllegalAccessException,
            NoSuchFieldException, InvocationTargetException, NoSuchMethodException, IOException {
            /* The patched class loader is expected to be a descendant of
             * dalvik.system.BaseDexClassLoader. We modify its
             * dalvik.system.DexPathList pathList field to append additional DEX
             * file entries.
             */
            Field pathListField = ShareReflectUtil.findField(loader, "pathList");
            Object dexPathList = pathListField.get(loader);
            ArrayList<IOException> suppressedExceptions = new ArrayList<IOException>();
            ShareReflectUtil.expandFieldArray(dexPathList, "dexElements", makePathElements(dexPathList,
                new ArrayList<File>(additionalClassPathEntries), optimizedDirectory,
                suppressedExceptions));
            if (suppressedExceptions.size() > 0) {
                for (IOException e : suppressedExceptions) {
                    ShareTinkerLog.w(TAG, "Exception in makePathElement", e);
                    throw e;
                }

            }
        }
可以看到, 最终, Tinker是通过hook 类加载器内的的pathList对象, 通过调用`DexPathList#makeDexElements, 替换DexPathList对象内的dexElements集合对象, 至此就算Dex补丁加载完成.
我们在看24版本上的 使用的是创建的是 ClassLoader,这是由于安卓 7.0 支持混合编译 混合编译对热修复的影响
在Dalvik虚拟机中,总是在运行时通过JIT(Just-In—Time)把字节码文件编译成机器码文件再执行,这样跑起来程序就很慢,所在ART上,改为AOT(Ahead-Of—Time)提前编译,即在安装应用或OTA系统升级时提前把字节码编译成机器码,这样就可以直接执行了,提高了运行效率。但是AOT有个缺点就是每次执行的时间都太长了,并且占用的ROM空间又很大,所以在android N上Google做了混合编译同时支持JIT和AOT。混合编译的作用简单来说,在应用运行时分析运行过的代码以及“热代码”,并将配置存储下来。在设备空闲与充电时,ART仅仅编译这份配置中的“热代码”。
就是在应用安装和首次运行不做AOT编译,先让用户愉快的玩耍起来,然后把在运行中JIT解释执行的那部分代码收集起来,在手机空闲的时候通过dex2aot编译生成一份名为app image的base.art文件,然后在下次启动的时候一次性把app image加载进来到缓存,预先加载代替用时查找以提升应用的性能。
Tinker的解决方案是,采用一个新建Classloader来加载后续的所有类,即可达到将cache无用化的效果。
二 Tinker资源修复
1 资源的获取看 Resources
private static Resources createResources(IBinder activityToken, LoadedApk pi, String splitName,
            int displayId, Configuration overrideConfig, CompatibilityInfo compatInfo) {
        final String[] splitResDirs;
        final ClassLoader classLoader;
        try {
            splitResDirs = pi.getSplitPaths(splitName);
            classLoader = pi.getSplitClassLoader(splitName);
        } catch (NameNotFoundException e) {
            throw new RuntimeException(e);
        }
        return ResourcesManager.getInstance().getResources(activityToken,
                pi.getResDir(),
                splitResDirs,
                pi.getOverlayDirs(),
                pi.getApplicationInfo().sharedLibraryFiles,
                displayId,
                overrideConfig,
                compatInfo,
                classLoader);
    }
ResourceManager是个单例, 内部维护了以ResourcesKey为key的ResourcesImpl缓存集合, 当调用getResources的时候, 首先会去match缓存中的resourceImpl, 当无法命中的情况下, 则创建新的ResourceImpl对象, ResourceImpl是Resource的具体实现
public @Nullable Resources getResources(@Nullable IBinder activityToken,
            @Nullable String resDir,
            @Nullable String[] splitResDirs,
            @Nullable String[] overlayDirs,
            @Nullable String[] libDirs,
            int displayId,
            @Nullable Configuration overrideConfig,
            @NonNull CompatibilityInfo compatInfo,
            @Nullable ClassLoader classLoader) {
        final ResourcesKey key = new ResourcesKey(
                    resDir,
                    splitResDirs,
                    overlayDirs,
                    libDirs,
                    displayId,
                    overrideConfig != null ? new Configuration(overrideConfig) : null, // Copy
                    compatInfo);
            classLoader = classLoader != null ? classLoader : ClassLoader.getSystemClassLoader();
            return getOrCreateResources(activityToken, key, classLoader);
    }
private @Nullable Resources getOrCreateResources(@Nullable IBinder activityToken,
            @NonNull ResourcesKey key, @NonNull ClassLoader classLoader) {
        synchronized (this) {

        1
        ResourcesImpl resourcesImpl = createResourcesImpl(key);
        if (resourcesImpl == null) {
            return null;
        }

        synchronized (this) {
            ResourcesImpl existingResourcesImpl = findResourcesImplForKeyLocked(key);
            if (existingResourcesImpl != null) {
                resourcesImpl.getAssets().close();
                resourcesImpl = existingResourcesImpl;
            } else {
                // Add this ResourcesImpl to the cache.
                2
                mResourceImpls.put(key, new WeakReference<>(resourcesImpl));
            }

            final Resources resources;
            if (activityToken != null) {
                resources = getOrCreateResourcesForActivityLocked(activityToken, classLoader,
                        resourcesImpl, key.mCompatInfo);
            } else {
                resources = getOrCreateResourcesLocked(classLoader, resourcesImpl, key.mCompatInfo);
            }
            return resources;
        }
    }
private @Nullable ResourcesImpl createResourcesImpl(@NonNull ResourcesKey key) {
        final DisplayAdjustments daj = new DisplayAdjustments(key.mOverrideConfiguration);
        daj.setCompatibilityInfo(key.mCompatInfo);

        3
        final AssetManager assets = createAssetManager(key);
        if (assets == null) {
            return null;
        }

        final DisplayMetrics dm = getDisplayMetrics(key.mDisplayId, daj);
        final Configuration config = generateConfig(key, dm);
        4
        final ResourcesImpl impl = new ResourcesImpl(assets, dm, config, daj);

        return impl;
    }
总结上述代码做了些什么
1 如果不存在对应的缓存, 则新建ResourcesImpl对象
2 缓存更新
3 创建AssertManager
4 创建新的 ResourcesImpl 对象, 并持有AssetManager对象引用
看创建的createAssetManager
protected @Nullable AssetManager createAssetManager(@NonNull final ResourcesKey key) {
        AssetManager assets = new AssetManager();

        // resDir can be null if the 'android' package is creating a new Resources object.
        // This is fine, since each AssetManager automatically loads the 'android' package
        // already.
        if (key.mResDir != null) {
            if (assets.addAssetPath(key.mResDir) == 0) {
                Log.e(TAG, "failed to add asset path " + key.mResDir);
                return null;
            }
        }

        if (key.mSplitResDirs != null) {
            for (final String splitResDir : key.mSplitResDirs) {
                if (assets.addAssetPath(splitResDir) == 0) {
                    Log.e(TAG, "failed to add split asset path " + splitResDir);
                    return null;
                }
            }
        }

        if (key.mOverlayDirs != null) {
            for (final String idmapPath : key.mOverlayDirs) {
                assets.addOverlayPath(idmapPath);
            }
        }

        if (key.mLibDirs != null) {
            for (final String libDir : key.mLibDirs) {
                if (libDir.endsWith(".apk")) {
                    // Avoid opening files we know do not have resources,
                    // like code-only .jar files.
                    if (assets.addAssetPathAsSharedLibrary(libDir) == 0) {
                        Log.w(TAG, "Asset path '" + libDir +
                                "' does not exist or contains no resources.");
                    }
                }
            }
        }
        return assets;
    }
可以看到, 创建Resource, 主要是新建AssertManager对象, 通过addAssetPath方法新增资源对应路径维护, 并将对应实例由新建的ResourceImpl对象内部持有. 而Resource的真正实现类ResourceImpl我们来做资源修复, 应该就是需要针对ResourceManager单例里维护的Resources缓存进行处理, 使得对应创建Resource的时候, 可以通过AssertManager#addAssetPath新增新的资源路径达到资源修复的效果
2 Tinker资源修复
之前我们分析了 资源加载的入口
public static boolean loadTinkerResources(TinkerApplication application, String directory, Intent intentResult) {
        if (resPatchInfo == null || resPatchInfo.resArscMd5 == null) {
            return true;
        }
        String resourceString = directory + "/" + RESOURCE_PATH +  "/" + RESOURCE_FILE;
        File resourceFile = new File(resourceString);
        ...
        TinkerResourcePatcher.monkeyPatchExistingResources(application, resourceString);

        ...
        return true;
    }
public static void monkeyPatchExistingResources(Context context, String externalResourceFile) throws Throwable {
final ApplicationInfo appInfo = context.getApplicationInfo();
final Field[] packagesFields;
1 packagesFiled 为 ActivityThread里的mPackages对象, 为ArrayMap类型, key为包名, value为LoadedApk
// resourcePackagesFiled 为 ActivityThread里的mResourcePackages对象, 为ArrayMap类型, key为包名, value为LoadedApk
if (Build.VERSION.SDK_INT < 27) {
packagesFields = new Field[]{packagesFiled, resourcePackagesFiled};
} else {
packagesFields = new Field[]{packagesFiled};
}
2 遍历 packagesFields, 获取所有loadedApk
for (Field field : packagesFields) {
final Object value = field.get(currentActivityThread);
for (Map.Entry<String, WeakReference<?>> entry
: ((Map<String, WeakReference<?>>) value).entrySet()) {
final Object loadedApk = entry.getValue().get();
if (loadedApk == null) {
continue;
}
3 resDir 为LoadedApk内mResDir对象, 即资源文件路径
final String resDirPath = (String) resDir.get(loadedApk);
if (appInfo.sourceDir.equals(resDirPath)) {
4 通过hook 将resDir设置为补丁资源文件路径
resDir.set(loadedApk, externalResourceFile);
}
}
}
// Create a new AssetManager instance and point it to the resources installed under
5 创建新的assetManager对象, 并且通过反射调用addAssetPath方法, 添加补丁资源路径
if (((Integer) addAssetPathMethod.invoke(newAssetManager, externalResourceFile)) == 0) {
throw new IllegalStateException("Could not create new AssetManager");
}
// Kitkat needs this method call, Lollipop doesn't. However, it doesn't seem to cause any harm
// in L, so we do it unconditionally.
if (stringBlocksField != null && ensureStringBlocksMethod != null) {
stringBlocksField.set(newAssetManager, null);
ensureStringBlocksMethod.invoke(newAssetManager);
}
for (WeakReference<Resources> wr : references) {
final Resources resources = wr.get();
if (resources == null) {
continue;
}
// Set the AssetManager of the Resources instance to our brand new one
6 将resourceImpl内的mAssets对象通过hook设置为上面新建的assertManager
try {
//pre-N
// assetsFiled 为 resourceImpl内的mAssets
// 将resourceImpl内的assertManager对象替换为我们新建的对象
assetsFiled.set(resources, newAssetManager);
} catch (Throwable ignore) {
// N
final Object resourceImpl = resourcesImplFiled.get(resources);
// for Huawei HwResourcesImpl
final Field implAssets = findField(resourceImpl, "mAssets");
implAssets.set(resourceImpl, newAssetManager);
}
clearPreloadTypedArrayIssue(resources);
7 更新资源
resources.updateConfiguration(resources.getConfiguration(), resources.getDisplayMetrics());
}
...
if (!checkResUpdate(context)) {
throw new TinkerRuntimeException(ShareConstants.CHECK_RES_INSTALL_FAIL);
}
}至此Tinker基本的流程是分析完了,总结如下

以上是关于Tinker 源码解析-代码修复和资源修复的主要内容,如果未能解决你的问题,请参考以下文章