鸿蒙HarMonyOS的UI组件学习二之拨号界面
Posted 笔触狂放
tags:
篇首语:本文由小常识网(cha138.com)小编为大家整理,主要介绍了鸿蒙HarMonyOS的UI组件学习二之拨号界面相关的知识,希望对你有一定的参考价值。
打开DevEco studio,选择java语言新建项目
打开Layout布局文件夹,编辑布局文件
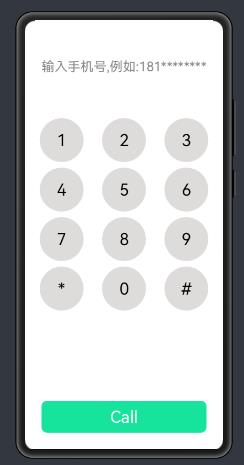
该练习使用DirectionalLayout布局嵌套使用,完成手机拨号界面,该界面包含Text和Button组件组成,其效果图如下:

在graphic文件夹中创建Button使用的圆形背景样式background_button_phone.xml,其代码如下:
<?xml version="1.0" encoding="utf-8"?>
<shape
    xmlns:ohos="http://schemas.huawei.com/res/ohos"
    ohos:shape="oval">
    <solid
        ohos:color="#ffC6C4C2"/>
</shape>
布局代码如下:
<?xml version="1.0" encoding="utf-8"?>
<DirectionalLayout
    xmlns:ohos="http://schemas.huawei.com/res/ohos"
    ohos:height="match_parent"
    ohos:width="match_parent"
    ohos:alignment="horizontal_center"
    ohos:orientation="vertical">
    <!--文本框,显示手机号-->
    <Text
        ohos:id="$+id:tv_phone"
        ohos:height="match_content"
        ohos:width="match_parent"
        ohos:weight="1"
        ohos:left_margin="30fp"
        ohos:right_margin="30fp"
        ohos:auto_font_size="true"
        ohos:text_alignment="center"
        ohos:text_size="70px"
        ohos:max_text_lines="1"
        ohos:hint="输入手机号,例如:181********"/>
    <!--数字盘-->
    <DirectionalLayout
        ohos:height="match_content"
        ohos:width="match_parent"
        ohos:weight="3"
        ohos:margin="10vp"
        ohos:alignment="horizontal_center"
        ohos:orientation="vertical">
        <!--第一行-->
        <DirectionalLayout
            ohos:height="match_content"
            ohos:orientation="horizontal"
            ohos:width="match_parent">
            <DirectionalLayout
                ohos:height="match_content"
                ohos:width="match_content"
                ohos:alignment="center"
                ohos:weight="1">
                <Button
                    ohos:id="$+id:b1"
                    ohos:height="240px"
                    ohos:width="240px"
                    ohos:background_element="$graphic:background_button_phone"
                    ohos:text_size="30vp"
                    ohos:text="1"/>
            </DirectionalLayout>
            <DirectionalLayout
                ohos:height="match_content"
                ohos:width="match_content"
                ohos:alignment="center"
                ohos:weight="1">
                <Button
                    ohos:id="$+id:b2"
                    ohos:height="240px"
                    ohos:width="240px"
                    ohos:text_size="30vp"
                    ohos:background_element="$graphic:background_button_phone"
                    ohos:text="2"/>
            </DirectionalLayout>
            <DirectionalLayout
                ohos:height="match_content"
                ohos:width="match_content"
                ohos:alignment="center"
                ohos:weight="1">
                <Button
                    ohos:id="$+id:b3"
                    ohos:height="240px"
                    ohos:width="240px"
                    ohos:text_size="30vp"
                    ohos:background_element="$graphic:background_button_phone"
                    ohos:text="3"/>
            </DirectionalLayout>

        </DirectionalLayout>
        <!--第二行-->
        <DirectionalLayout
            ohos:height="match_content"
            ohos:orientation="horizontal"
            ohos:top_margin="10vp"
            ohos:width="match_parent">
            <DirectionalLayout
                ohos:height="match_content"
                ohos:width="match_content"
                ohos:alignment="center"
                ohos:weight="1">
                <Button
                    ohos:id="$+id:b4"
                    ohos:height="240px"
                    ohos:width="240px"
                    ohos:background_element="$graphic:background_button_phone"
                    ohos:text_size="30vp"
                    ohos:text="4"/>
            </DirectionalLayout>
            <DirectionalLayout
                ohos:height="match_content"
                ohos:width="match_content"
                ohos:alignment="center"
                ohos:weight="1">
                <Button
                    ohos:id="$+id:b5"
                    ohos:height="240px"
                    ohos:width="240px"
                    ohos:text_size="30vp"
                    ohos:background_element="$graphic:background_button_phone"
                    ohos:text="5"/>
            </DirectionalLayout>
            <DirectionalLayout
                ohos:height="match_content"
                ohos:width="match_content"
                ohos:alignment="center"
                ohos:weight="1">
                <Button
                    ohos:id="$+id:b6"
                    ohos:height="240px"
                    ohos:width="240px"
                    ohos:text_size="30vp"
                    ohos:background_element="$graphic:background_button_phone"
                    ohos:text="6"/>
            </DirectionalLayout>

        </DirectionalLayout>
        <!--第三行-->
        <DirectionalLayout
            ohos:height="match_content"
            ohos:orientation="horizontal"
            ohos:top_margin="10vp"
            ohos:width="match_parent">
            <DirectionalLayout
                ohos:height="match_content"
                ohos:width="match_content"
                ohos:alignment="center"
                ohos:weight="1">
                <Button
                    ohos:id="$+id:b7"
                    ohos:height="240px"
                    ohos:width="240px"
                    ohos:background_element="$graphic:background_button_phone"
                    ohos:text_size="30vp"
                    ohos:text="7"/>
            </DirectionalLayout>
            <DirectionalLayout
                ohos:height="match_content"
                ohos:width="match_content"
                ohos:alignment="center"
                ohos:weight="1">
                <Button
                    ohos:id="$+id:b8"
                    ohos:height="240px"
                    ohos:width="240px"
                    ohos:text_size="30vp"
                    ohos:background_element="$graphic:background_button_phone"
                    ohos:text="8"/>
            </DirectionalLayout>
            <DirectionalLayout
                ohos:height="match_content"
                ohos:width="match_content"
                ohos:alignment="center"
                ohos:weight="1">
                <Button
                    ohos:id="$+id:b9"
                    ohos:height="240px"
                    ohos:width="240px"
                    ohos:text_size="30vp"
                    ohos:background_element="$graphic:background_button_phone"
                    ohos:text="9"/>
            </DirectionalLayout>

        </DirectionalLayout>
        <!--第四行-->
        <DirectionalLayout
            ohos:height="match_content"
            ohos:orientation="horizontal"
            ohos:top_margin="10vp"
            ohos:width="match_parent">
            <DirectionalLayout
                ohos:height="match_content"
                ohos:width="match_content"
                ohos:alignment="center"
                ohos:weight="1">
                <Button
                    ohos:id="$+id:b10"
                    ohos:height="240px"
                    ohos:width="240px"
                    ohos:background_element="$graphic:background_button_phone"
                    ohos:text_size="30vp"
                    ohos:text="*"/>
            </DirectionalLayout>
            <DirectionalLayout
                ohos:height="match_content"
                ohos:width="match_content"
                ohos:alignment="center"
                ohos:weight="1">
                <Button
                    ohos:id="$+id:b11"
                    ohos:height="240px"
                    ohos:width="240px"
                    ohos:text_size="30vp"
                    ohos:background_element="$graphic:background_button_phone"
                    ohos:text="0"/>
            </DirectionalLayout>
            <DirectionalLayout
                ohos:height="match_content"
                ohos:width="match_content"
                ohos:alignment="center"
                ohos:weight="1">
                <Button
                    ohos:id="$+id:b12"
                    ohos:height="240px"
                    ohos:width="240px"
                    ohos:text_size="30vp"
                    ohos:background_element="$graphic:background_button_phone"
                    ohos:text="#"/>
            </DirectionalLayout>

        </DirectionalLayout>
    </DirectionalLayout>
    <!--拨打按钮-->
    <Button
        ohos:height="match_content"
        ohos:width="match_parent"
        ohos:left_margin="30fp"
        ohos:right_margin="30fp"
        ohos:bottom_margin="30fp"
        ohos:padding="10fp"
        ohos:text_size="30vp"
        ohos:text_color="#ffffff"
        ohos:text_weight="1000"
        ohos:text_alignment="center"
        ohos:background_element="$graphic:background_button8"
        ohos:text="Call"/>
</DirectionalLayout>
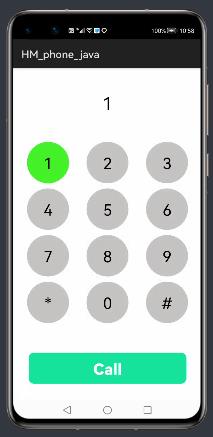
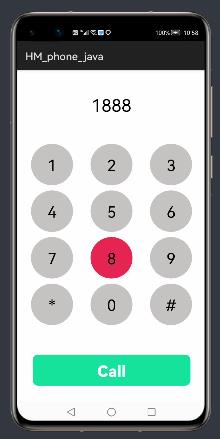
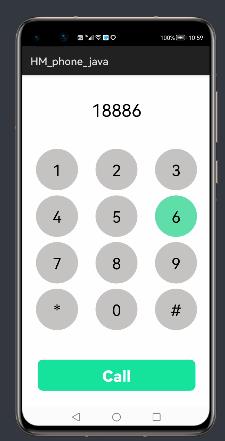
在对应的AbilitySilce类的界面中,使用setUIContent方法加载布局文件,并通过组件的id获得所有组件的对象。给所有数字键添加触摸事件,并监听其按下和弹起状态,完成拨号键盘的功能并随机完成背景颜色按下时的颜色改变。
其java代码如下:
package com.example.hm_phone_java.slice;

import com.example.hm_phone_java.ResourceTable;
import ohos.aafwk.ability.AbilitySlice;
import ohos.aafwk.content.Intent;
import ohos.agp.colors.RgbColor;
import ohos.agp.components.Button;
import ohos.agp.components.Component;
import ohos.agp.components.Text;
import ohos.agp.components.element.ShapeElement;
import ohos.multimodalinput.event.KeyEvent;
import ohos.multimodalinput.event.TouchEvent;

import java.util.Random;

public class ButtonAbilitySlice extends AbilitySlice {
    private Button[] buttons=new Button[12];
    private int[] ids={ResourceTable.Id_b1,ResourceTable.Id_b2,
            ResourceTable.Id_b3,ResourceTable.Id_b4,
            ResourceTable.Id_b5,ResourceTable.Id_b6,
            ResourceTable.Id_b7,ResourceTable.Id_b8,
            ResourceTable.Id_b9,ResourceTable.Id_b10,
            ResourceTable.Id_b11,ResourceTable.Id_b12};
    @Override
    protected void onStart(Intent intent) {
        super.onStart(intent);
        super.setUIContent(ResourceTable.Layout_ability_callphone);
        Text text= (Text) this.findComponentById(ResourceTable.Id_tv_phone);
        //设置自动更改字体大小的范围
        text.setAutoFontSizeRule(70,100,5);
        initButton(text);
    }
    //初始化所有键盘数字按钮
   public void initButton(Text text){
       for (int i = 0; i < buttons.length; i++) {
           buttons[i]= (Button) this.findComponentById(ids[i]);
           //给所有按键设置点击事件
          /* buttons[i].setClickedListener(new Component.ClickedListener() {
               @Override
               public void onClick(Component component) {
                           //Button btn= (Button) component;
                           //text.setText(text.getText()+btn.getText());
               }
           });*/
            //给所有数字按键添加触摸事件
           buttons[i].setTouchEventListener(new Component.TouchEventListener() {
               @Override
               public boolean onTouchEvent(Component component, TouchEvent touchEvent) {
                   ShapeElement se=new ShapeElement();
                   se.setShape(ShapeElement.OVAL);
                   Button btn= (Button) component;
                   //将监听按下和弹起两种事件
                   switch (touchEvent.getAction()){
                       case TouchEvent.PRIMARY_POINT_DOWN:
                           //当有按键被按下,获得该数字键上的数字追加在text文本上,并随机改变背景颜色
                           text.setText(text.getText()+btn.getText());
                           se.setRgbColor(new RgbColor(new Random().nextInt(255),
                                   new Random().nextInt(255),
                                   new Random().nextInt(255)));
                           break;
                       case TouchEvent.PRIMARY_POINT_UP:
                           //当弹起时,恢复数字键默认颜色
                           se.setRgbColor(new RgbColor(198,196,194));
                           break;
                   }
                    btn.setBackground(se);
                   return true;
               }
           });
       }


   }
}
运行效果如下:
(因不能上传录制的效果视频,先截图给大家看一下效果,抱歉不能展示更好的效果体验,请亲自尝试,看到效果)


以上是关于鸿蒙HarMonyOS的UI组件学习二之拨号界面的主要内容,如果未能解决你的问题,请参考以下文章