[ 设计模式 ] 彻底搞懂建造者模式 —— 全网最透彻理解
Posted 削尖的螺丝刀
tags:
篇首语:本文由小常识网(cha138.com)小编为大家整理,主要介绍了[ 设计模式 ] 彻底搞懂建造者模式 —— 全网最透彻理解相关的知识,希望对你有一定的参考价值。
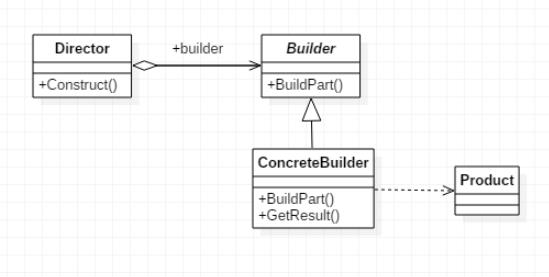
相信很多人搜索 “建造者模式” 的时候和我一样,首先映入眼帘的就是下面这张UML图(除了属性的区别,结构完全一样):
[小声说:“不了解UML类图的话,欢迎移步 —— UML类图介绍 ——程序员(灵魂画手)必备画图技能之一” 😏 ]

看完这张图后再来一个对Builder的实现类,然后再Director完成构造,再到末尾附上几句雷同的解释,让你有种似懂非懂,飘飘欲仙的感觉(此处可省略1w字)~

好了,如果觉得没飘够的同学可以继续飘一会,反之请忘掉上面的一切吧(包括那张UML图),跟随笔者迅雷不及掩耳盗铃般的脚步,深入探索如何真正成为一名合格的 “建造者” !
关于建造者模式(当然也有人叫它构建者模式、创建者模式、Builder模式、生成器模式…Anyway)你要记住的关键的也是第一的要素就是(个人提炼,如有雷同纯属巧合):
把一个对象原本看似复杂繁琐的 [构造过程] 变得更加简单、清晰、明了
当然,设计模式的好处肯定不止一两个,建造者也不会例外。
但是笔者认为建造者最重要的体现就是我上面说的这句话,你也可以理解为让构造的语义更加简单明了。那么其他就都是根据不同需求场景下,体现出来边边角角的好处了。前提,首先你记住上面这句话,然后思考这个问题 ——假如让你设计一个完美的机器人"类",包含head、body、hands、legs、size洗个属性,你会怎么设计 ?(请面壁十秒后再来看下文)
相信你已经有了自己的答案,没错,一个可供人使用的完美的机器人"类"应该是可以配置的,是不是应该有默认值,和非默认值的必填选项? (可以类比第三方工具的配置类),具体代码如下
public class Robot {
    private static final int DEFAULT_HANDS = 2;
    private static final int DEFAULT_LEGS = 2;
    private static final int DEFAULT_SIZE = 10;

    // 假设大脑必须根据个人要求设定(必填)
    private String head;
    // 假设身体必须根据个人要求设定(必填)
    private String body;
    private int hands = DEFAULT_HANDS;
    private int legs = DEFAULT_LEGS;
    private int size = DEFAULT_SIZE;

    public Robot(String head, String body, Integer hands, Integer legs, Integer size) {
        if (StringUtils.isBlank(head)) {
            throw new IllegalArgumentException("WTF , don't you have head ?");
        }
        this.head = head;

        if (StringUtils.isBlank(body)) {
            throw new IllegalArgumentException("WTF , don't you have body ?");
        }
        this.body = body;

        if(null !=hands) {
            if (hands <= 0) {
                throw new IllegalArgumentException("Come on , you need hands to work !");
            }
            this.head = head;
        }


        if(null !=legs) {
            if (legs <= 0) {
                throw new IllegalArgumentException("Come on , you need legs to walk !");
            }
            this.legs = legs;
        }

        if(null !=size) {
            if (size <= 0) {
                throw new IllegalArgumentException("Come on , you need to be exist !");
            }
            this.size = size;
        }

    }


    // getter方法省略...
}
好上面这个Robot让你new出来的画风是不是这样的?
Robot robot = new Robot("bigHead","bigBody",null,null,null);
这还只有6个构造参数还好,那么如果有16个、60个、100个、10086个呢?代码可读性是否就降低了?而且可能一不小心就弄错了构造参数的顺序?就算你乍一眼能看出来这些参数的意思,你让熟悉代码的新员工咋办?玩锤子?作为一名负责的程序猿是否得对新猿友好?

品了半天,你可能想到了全部改为Setter,嗯….兄嘚果然天资聪颖,是稍微好看点了(setter细节就不改了,大体构造就变会成如下)
Robot robot = new Robot("bigHead","bigBody");
robot.setHands();
robot.setLegs();
robot.setSize();
...
但是稍微加大点难度,上面的设计思路就不满足了:
- 参数冗长: 必填属性多,任然会导致构造参数变长
- 安全问题: 假设我们要求一个robot在构造完后就不能再对其做改动了(否则视为不安全的异常操作)
- 依赖问题: 假设我们要求hands被改变了那legs也必须被改变,或者hands/legs必须小于size等特殊校验需求,那代码又会近一步变的凌乱
兄嘚我就问你怎么办???

这时候,建造者模式的各个闪光点就充分体现出来了:
- 所有Setter方法放入一个Builder内部类中(robot没有暴露Setter方法,外部自然无法改变)
- 把robot的构造方法改为私有的(这样robot就 只有Bulder能够构造 了)
- Bulder中自然会调用robot的构造方法,把所有 特殊且必要的校验 在Robot构造方法被调用之前 统一完成
改造代码如下:
public class Robot {
    // 默认值
    private static final int DEFAULT_HANDS = 2;
    private static final int DEFAULT_LEGS = 2;
    private static final int DEFAULT_SIZE = 10;

    // Robot的属性
    private String head;
    private String body;
    private int hands = DEFAULT_HANDS;
    private int legs = DEFAULT_LEGS;
    private int size = DEFAULT_SIZE;

    // 注意:Robot的构造是私有的,且是通过传入Builder来构造
    // 你无法在外面对已构造好的Robot做出任何改变
    private Robot(Builder builder) {
        this.head = builder.head;
        this.body = builder.body;
        this.hands = builder.hands;
        this.legs = builder.legs;
        this.size = builder.size;
    }
    // 省略Getter方法...

 public static class Builder {
    private static final int DEFAULT_HANDS = 2;
    private static final int DEFAULT_LEGS = 2;
    private static final int DEFAULT_SIZE = 10;
    private String head;
    private String body;
    private int hands = DEFAULT_HANDS;
    private int legs = DEFAULT_LEGS;
    private int size = DEFAULT_SIZE;
    // Robot在此构建,在构建之前完成所有必须的 "特殊校验"
    public Robot build() {
        if (StringUtils.isBlank(head)) {
            throw new IllegalArgumentException("WTF , don't you have head ?");
        }
        if (StringUtils.isBlank(body)) {
            throw new IllegalArgumentException("WTF , don't you have body ?");
        }
        if (hands != DEFAULT_HANDS && legs == DEFAULT_LEGS) {
            throw new IllegalArgumentException("Bro, you should update your legs");
        }
        if (hands == DEFAULT_HANDS && legs != DEFAULT_LEGS) {
            throw new IllegalArgumentException("Bro, you should update your hands");
        }
        return new Robot(this);
    }

    // 可以看到每个setter方法返回的都是Builder本身
    public Builder setHead(String head) {
        if (StringUtils.isBlank(head)) {
            throw new IllegalArgumentException("WTF , don't you have head ?");
        }
        this.head = head;
        return this;
    }
    public Builder setBody(String body) {
        if (StringUtils.isBlank(body)) {
            throw new IllegalArgumentException("WTF , don't you have body ?");
        }
        this.body = body;
        return this;
    }
    public Builder setHands(Integer hands) {
        if (null != hands) {
            if (hands <= 0) {
                throw new IllegalArgumentException("Come on , you need hands to work !");
            }
            this.head = head;
        }
        return this;
    }
    public Builder setLegs(Integer legs) {
        if (null != legs) {
            if (legs <= 0) {
                throw new IllegalArgumentException("Come on , you need legs to walk !");
            }
            this.legs = legs;
        }
        return this;
    }
    public Builder setSize(Integer size) {
        if (null != size) {
            if (size <= 0) {
                throw new IllegalArgumentException("Come on , you need to be exist !");
            }
            this.size = size;
        }
        return this;
    }
  }
}
这样一来,一个构造条理清晰,且一旦构造完成,则外部无法改变的超级Robot就此诞生 !!

  Robot robot = new Robot.Builder()
                .setHead("superHead")
                .setBody("superBody")
                .setHands(999)
                .setLegs(999)
                .setSize(10086)
                .build();
至此,一个《建造者模式》被完美演绎完毕!其实除了建造者除了上述的边角闪光点,还有另一个闪光点就是能避免对象的无效存在,什么是无效存在呢?比如一个“矩形”对象,你是不是必须设置完长、宽才能算有效?不然你单独设置一个长你就当矩形用?那建造者模式就完美解决了这个问题,因为被此模式建造出来的对象一定是完整可用的。
【 小结 】
想必你已经摸清建造者模式的大致轮廓了,接下来依然离不开谈到建造者模式必然和工厂模式对比,那个老生常谈的问题了!这里必须套娃引用某位网友对此的看法
—— “ 顾客走进一家餐馆点餐,我们利用工厂模式,根据用户不同的选择,来制作不同的食物,比如披萨、汉堡、沙拉。对于披萨来说,用户又有各种配料可以定制,比如奶酪、西红柿、起司,我们通过建造者模式根据用户选择的不同配料来制作披萨。 ”
上面的故事应该很容易理解 :
- 其实不管是工厂模式还是抽象工厂模式,本质上都是站在类的层面,对各种类进行创建。
- 而建造者模式,关注的是类本身的创建,所以区别还是很明显的(其实和模板模式也有点像,都是设计好一个清晰的车骨架,然后让你在骨架里造轮子和其他部件。只不过模板模式是行为型模式,属于方法的运作,而建造者是创建型模式,属于对象的构建)。
上面大体已经应该把建造者模式说清楚了,年轻人,如果你觉得已经可以了,那就放心大胆的出去闯吧!建造你自己的世界!!

但是你如果意犹未尽,执意要做最强的建造者,那我这里还有一本《RabbitMQ的建造者模式》演绎法,你品品和我上面的例子有什么不同?
请带着最开头我说的那句话 —— 让构造的语义更加简单明了来欣赏下文:

如果你使用过或者见过RabbitMQ的配置类,那么你应该可以看到大致如下的代码:
return BindingBuilder.bind(queue).to(exchange);
return BindingBuilder.bind(queue).to(exchange).with(routingKey);
兄弟,惊讶吗?这语义是有多明显???稍微有点小学英语文化水平的也懂这个to、with的意思吧?这还用去看底层源码?隔壁新猿小王是不是直接就可以上手?

如果你看过BindingBuilder内的代码逻辑,就会发现,其实这两段绑定代码也可以写成这样,依然有效。
return new Binding(queue.getName(),Binding.DestinationType.QUEUE,exchange.getName(),"",null);
return new Binding(queue.getName(),Binding.DestinationType.QUEUE,exchange.getName(),routingKey,null);
但是,这样又回到了最开始的问题,你让隔壁新猿小王玩锤子??玩锤子呢?!
总之,四不像和独角兽,你选一个,还是最初我说道的那句话 —— 让构造的语义更加简单明了,你品你细品。
最后,如果你点进BindingBuilder的代码看,会发现他每层的setter返回的并不是BindingBuilder本身,而是一个叫…哎光说不练假把式,talk is cheap 为了不被怼有烂尾的嫌疑,我还是show you the code 把。
首先看 BindingBuilder.bind() 方法
public static DestinationConfigurer bind(Queue queue) {
		return new DestinationConfigurer(queue.getName(), DestinationType.QUEUE);
	}
你可以看到他们无一例外都返回了一个DestinationConfigurer
接下来看 BindingBuilder.bind().to() 方法
public static final class DestinationConfigurer {

		protected final String name; // NOSONAR

		protected final DestinationType type; // NOSONAR

		DestinationConfigurer(String name, DestinationType type) {
			this.name = name;
			this.type = type;
		}

        // 看到没,这下面足足有5个to方法来应对各种交换机
		public Binding to(FanoutExchange exchange) {
			return new Binding(this.name, this.type, exchange.getName(), "",
                               new HashMap<String, Object>());
		}

		public HeadersExchangeMapConfigurer to(HeadersExchange exchange) {
			return new HeadersExchangeMapConfigurer(this, exchange);
		}

    	// 这个是我下面要举例的方法哦
		public DirectExchangeRoutingKeyConfigurer to(DirectExchange exchange) {
			return new DirectExchangeRoutingKeyConfigurer(this, exchange);
		}

		public TopicExchangeRoutingKeyConfigurer to(TopicExchange exchange) {
			return new TopicExchangeRoutingKeyConfigurer(this, exchange);
		}

		public GenericExchangeRoutingKeyConfigurer to(Exchange exchange) {
			return new GenericExchangeRoutingKeyConfigurer(this, exchange);
		}
	}
如果你了解RabbitMQ的话,你应该知道Fanout模式是不需要指定routingKey的,所以你可以看到Fanout交换机直接执行最终的建造方法 —— 也就是 Binding() 方法
但是你也能看到在之后需要with方法的to都返回了另一个对象,其实这对象都是继承自AbstractRoutingKeyConfigurer的子类,这里就拿DirectExchangeRoutingKeyConfigurer举例把
- 首先看 AbstractRoutingKeyConfigurer
	private abstract static class AbstractRoutingKeyConfigurer {

		protected final DestinationConfigurer destination; // NOSONAR

		protected final String exchange; // NOSONAR

		AbstractRoutingKeyConfigurer(DestinationConfigurer destination, String exchange) {
			this.destination = destination;
			this.exchange = exchange;
		}
	}
- 然后看DirectExchangeRoutingKeyConfigurer
public static final class DirectExchangeRoutingKeyConfigurer extends AbstractRoutingKeyConfigurer {

		DirectExchangeRoutingKeyConfigurer(DestinationConfigurer destination,
                                           DirectExchange exchange) {
            // 这里调用父类构造就是赋值而已
			super(destination, exchange.getName());
		}

   		// 可以看到下面有三个with方法来完成对routingKey的绑定,以及最终的建造Binding()方法
		public Binding with(String routingKey) {
			return new Binding(destination.name, destination.type, exchange, routingKey,
					Collections.<String, Object>emptyMap());
		}

		public Binding with(Enum<?> routingKeyEnum) {
			return new Binding(destination.name, destination.type, exchange, r
                               outingKeyEnum.toString(),
					Collections.<String, Object>emptyMap());
		}

		public Binding withQueueName() {
			return new Binding(destination.name, destination.type, exchange,
                               destination.name,
					Collections.<String, Object>emptyMap());
		}
	}
至此你已经看到了整个绑定关系的构建流程,无一例外最终都会指向那个对象的构造方法(这一点和我上面的例子一样,也是建造者模式必然的宿命),下面我们来看看这个最终的构造方法 —— Binding()
public class Binding extends AbstractDeclarable {
/**
* The binding destination.
*/
public enum DestinationType {
/**
* Queue destination.
*/
QUEUE,
/**
* Exchange destination.
*/
EXCHANGE;
}
private final String destination;
private final String exchange;
private final String routingKey;
private final DestinationType destinationType;
// 构造方法在这里
public Binding(String destination, DestinationType destinationType, String exchange,
String routingKey, @Nullable Map<String, Object> arguments) {
super(arguments);
this.destination = destination;
this.destinationType = destinationType;
this.exchange = exchange;
this.routingKey = routingKey;
}
public String getDestination() {
return this.destination;
}
public DestinationType getDestinationType() {
return this.destinationType;
}
public String getExchange() {
return this.exchange;
}
public String getRoutingKey() {
return this.routingKey;
}
public boolean isDestinationQueue(以上是关于[ 设计模式 ] 彻底搞懂建造者模式 —— 全网最透彻理解的主要内容,如果未能解决你的问题,请参考以下文章