Vue高德地图api使用指南(动态渲染信息窗体)
Posted 火腿肠烧烤大赛冠军
tags:
篇首语:本文由小常识网(cha138.com)小编为大家整理,主要介绍了Vue高德地图api使用指南(动态渲染信息窗体)相关的知识,希望对你有一定的参考价值。
项目中用到了高德地图API,写完后感觉功能/结构都很散乱,自己整理一下留以备用
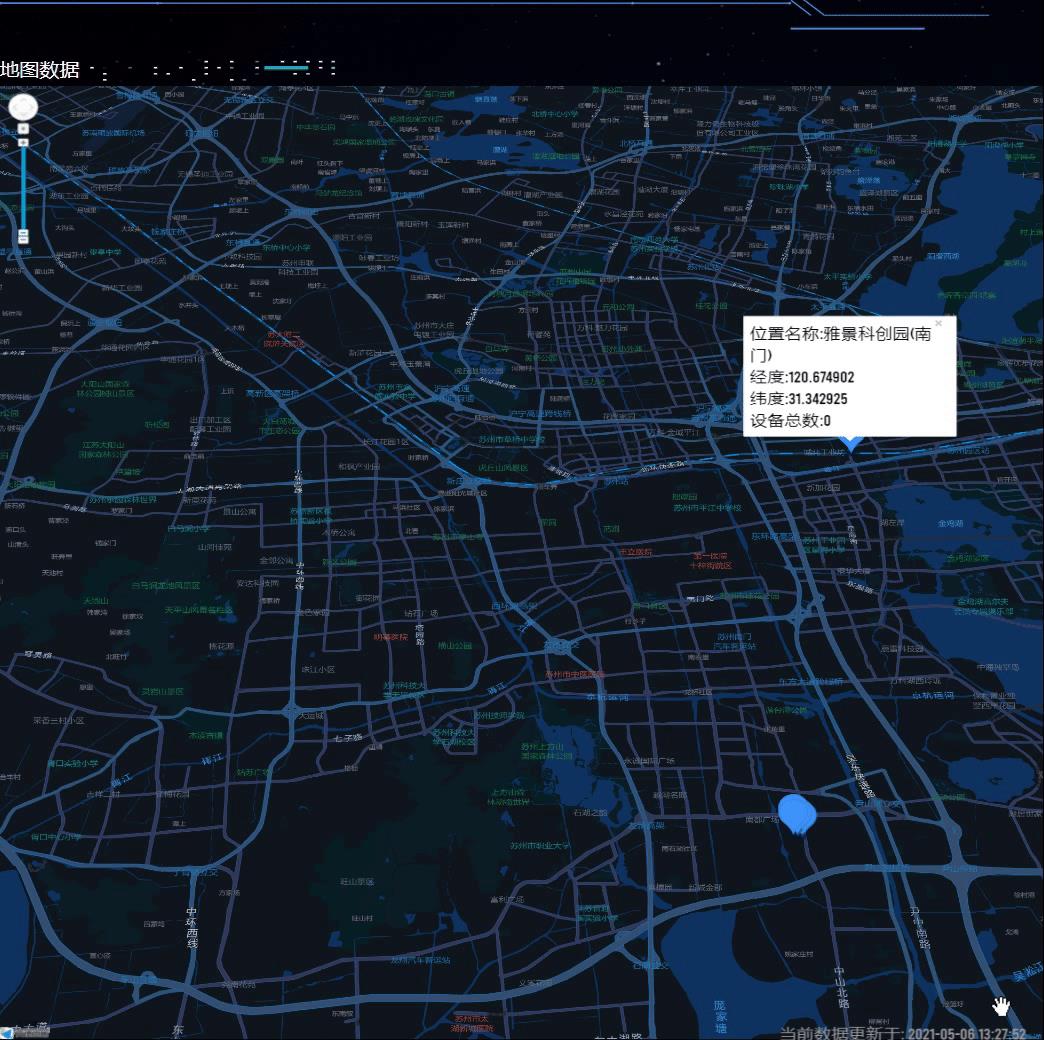
地图动态渲染样式(卡片内容可自定义)

地图API的引入
直接采用古老的方式index.heml中引入js
index.html
<!DOCTYPE html>
<html lang="en">
  <head>
    <meta charset="utf-8">
    <meta http-equiv="X-UA-Compatible" content="IE=edge">
    <meta name="viewport" content="width=device-width,initial-scale=1.0">
    <link rel="icon" href="<%= BASE_URL %>favicon.ico">
    <title><%= htmlWebpackPlugin.options.title %></title>
  </head>
  <script type="text/javascript" src="https://webapi.amap.com/maps?v=1.4.15&key=aaaaaaaaaa&plugin=AMap.InfoWindow"></script>
  <body>
    <noscript>
      <strong>浏览器版本过旧,需要升级后使用</strong>
    </noscript>
    <div id="app"></div>
    <!-- built files will be auto injected -->
  </body>
</html>
在plugin中可以直接引入一些api(后续介绍动态引入方式)
使用高德地图控件
因为使用方式大同小异这里仅介绍一种动态渲染的api
首先需要创建一个map对象
创建map后加入地图视野、模式、角度等参数。
      let map = new AMap.Map("container", {
        mapStyle: "amap://styles/93cf8411173f9097e8488ab69af8bbc0", //自定义样式的地址
        zoom: 13, //级别
        zooms: [13, 16],
        layers: [],
        // center: [121.498586, 31.239637],//上海
        center: [120.5853, 31.298886], //苏州
        viewMode: "3D", //使用3D视图
        pitch: 40, // 地图俯仰角度,有效范围 0 度- 83 度
      });
使用infowindow
因为需要不断循环所以要在定时器中进行操作注意这里要在一个能访问到数据及map的作用域中
卡片信息为jsx写法
步骤分为显示卡片、打开信息窗体、循环判断、关闭上一卡片
        setInterval(() => {
          infowindow1?infowindow1.close():'';
          //卡片信息
          let content = `<div style="background-color:rgba(255,255,255,0.2);">
            <div>位置名称:${that.addressArr[that.index].name}</div>
            <div>经度:${
              that.addressArr[that.index].longitude
            }</div><div>纬度:${that.addressArr[that.index].latitude}</div>
                <div>设备总数:${that.addressArr[that.index].value}<div><div>
                `;
          //显示卡片
          let infowindow1 = new AMap.InfoWindow({
            content: content,
            offset: new AMap.Pixel(15, 10),
          });
          console.log(that.index,that.addressArr[that.index]);
          console.log(that.index,that.addressArr.length);
          // 打开信息窗体
          infowindow1.open(map, [
            that.addressArr[that.index].longitude,
            that.addressArr[that.index].latitude,
          ]);
          that.index++
          if (that.index > that.addressArr.length-1) {
            that.index = 0;
          }
        }, 2000);
异步加载插件方法
      AMap.plugin(["AMap.ToolBar", "AMap.Scale"], function () {
        //异步加载插件
        var toolbar = new AMap.ToolBar();
        map.addControl(toolbar);
        var scale = new AMap.Scale({
          offset: new AMap.Pixel(10, 10),
        });
        map.addControl(scale);

        // var geolocation = new AMap.Geolocation({
        //   // 是否使用高精度定位,默认:true
        //   enableHighAccuracy: true,
        //   // 设置定位超时时间,默认:无穷大
        //   timeout: 4000,
        //   // 定位按钮的停靠位置的偏移量,默认:Pixel(10, 20)
        //   // buttonOffset: new AMap.Pixel(5, 10),
        //   //  定位成功后调整地图视野范围使定位位置及精度范围视野内可见,默认:false
        //   zoomToAccuracy: true,
        //   //  定位按钮的排放位置,  RB表示右下
        //   buttonPosition: "RB",
        // });
        map.addControl(geolocation);
        geolocation.getCurrentPosition(function (status, result) {
          // console.log(status);
          // console.log(result);
        });
      });
具体JSAPI需要查看官方文档
以上是关于Vue高德地图api使用指南(动态渲染信息窗体)的主要内容,如果未能解决你的问题,请参考以下文章