RT-AK 新增支持 Linux 环境
Posted RT-Thread物联网操作系统
tags:
篇首语:本文由小常识网(cha138.com)小编为大家整理,主要介绍了RT-AK 新增支持 Linux 环境相关的知识,希望对你有一定的参考价值。

前言:
RT-AK 地址:
https://github.com/RT-Thread/RT-AK
RT-AK 之 STM32 插件快速上手地址:
https://github.com/RT-Thread/RT-AK/tree/main/RT-AK/documents
RT-AK 之前仅适用于 Windows 10 场景下,发现对于 Linux 开发者有点不太友好。
有一个解决方法是:在 Windows 环境下先用 RT-AK 生成 AI BSP,然后切换到 Liunx 编写应用代码,这样就比较麻瓜。

所有就有了现在这个教程。距离保姆级的教程差的有点远,我尽量努力说明每一个步骤。有问题请留言
1. 运行前的准备
我用的还是 ART-PI BSP,如果手边没有这块板子可以换成其他 stm32 的板子
准备以下四份重要重要重要的材料:
准备
ART-PI BSP下载地址:http://117.143.63.254:9012/www/RT-AK/sdk-bsp-artpi.zip
准备
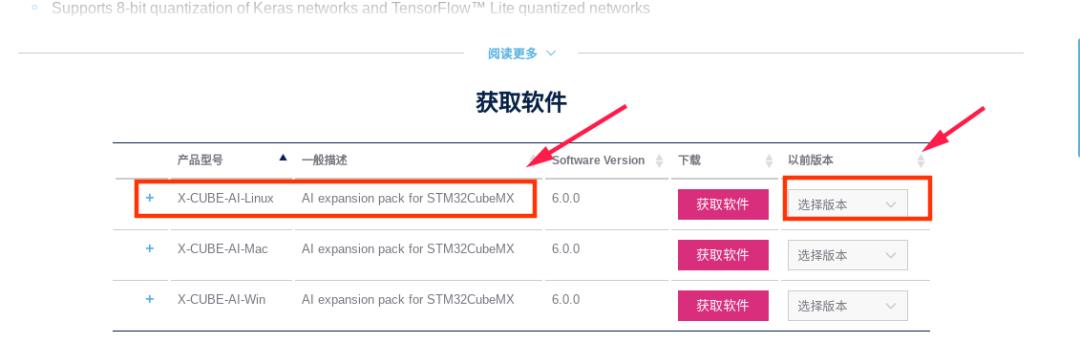
X-CUBE-AI下载地址:https://www.st.com/zh/embedded-software/x-cube-ai.html
选择 linux 版本
选择 v5.2.0 版本
2. RT-AK 运行
已经将 RT-AK linux 版本的代码补充,直接运行即可
具体的和 Windows 版本一样。
内部的流程请看源码或者 plugin_stm32 仓库下的 readme 文档
RT-AK STM32 Github:
https://github.com/RT-Thread/RT-AK-plugin-stm32
请在 rt-ak/RTAK/tools 路径下运行该程序
1# 基础运行命令
2$ python aitools.py --project=<your_project_path> --model=<your_model_path> --platform=stm32 --ext_tools=<your_x-cube-ai_path> --clear
3
4# 示例
5$ python aitools.py --model="./Models/keras_mnist.h5" --project /home/lebhoryi/RT-Thread/test --platform stm32 --ext_tools /home/lebhoryi/Software/x-cube-ai --clear
6
7# 指定转换模型的名称,--model_name 默认为 network
8$ python aitools.py --project=<your_project_path> --model=<your_model_path>  --model_name=<model_name>  --platform=stm32 --ext_tools=<your_x-cube-ai_path>
3. 编译
需要安装编译器 gcc-arm-none-eabi-6_2-2016q4,参考:在 Ubuntu 平台开发 RT-Thread
https://www.rt-thread.org/document/site/#/rt-thread-version/rt-thread-standard/application-note/setup/qemu/ubuntu/an0005-qemu-ubuntu?id=在-ubuntu-平台开发-rt-thread
3.1 安装 Scons 和 ncurses
1$ sudo apt-get install scons libncurses5-dev
3.2 安装编译器
使用 apt-get 命令安装的编译器版本太旧会导致编译报错,
可依次使用如下命令下载安装新版本,
下载链接和解压文件夹名因下载版本而异:
1tom@laptop:~$ cd /tmp/
2tom@laptop:/tmp$ wget https://armkeil.blob.core.windows.net/developer/Files/downloads/gnu-rm/6-2016q4/gcc-arm-none-eabi-6_2-2016q4-20161216-linux.tar.bz2
3tom@laptop:/tmp$ tar xf ./gcc-arm-none-eabi-6_2-2016q4-20161216-linux.tar.bz2
4tom@laptop:/tmp$ mv gcc-arm-none-eabi-6_2-2016q4/ /opt/
5tom@laptop:/tmp$ /opt/gcc-arm-none-eabi-6_2-2016q4/bin/arm-none-eabi-gcc --version
以上命令下载编译器,并安装到 /opt/gcc-arm-none-eabi-6_2-2016q4/ 。
如果最后输出结果如下,则安装完成:
1arm-none-eabi-gcc (GNU Tools for ARM Embedded Processors) 6.2.1 20161205 (release) [ARM/embedded-6-branch revision 243739]
2Copyright (C) 2016 Free Software Foundation, Inc.
3This is free software; see the source for copying conditions.  There is NO
4warranty; not even for MERCHANTABILITY or FITNESS FOR A PARTICULAR PURPOSE.
3.3 设置指定编译器
在 ~/.bashrc 最后面添加下面这一行:
1export RTT_EXEC_PATH=/opt/gcc-arm-none-eabi-6_2-2016q4/bin
3.4 编译
进入到 BSP 路径下,运行 scons -j 6
4. 下载固件
这里我选择的是 STM32Programmer CLI
linux 版本安装步骤:
0.教程
1https://wiki.stmicroelectronics.cn/stm32mpu/wiki/STM32CubeProgrammer#Installing_the_STM32CubeProgrammer_tool1.下载 SetupSTM32CubeProgrammer
https://www.st.com/en/development-tools/stm32cubeprog.html
2.运行 ./SetupSTM32CubeProgrammer-2.7.0.linux
3.设置环境变量 export PATH=/bin:$PATH
编译的命令:
1# 进入到你的 BSP 路径
2$ cd <BSP>
3
4# extload 是 art-pi 专属下载算法
5$ STM32_Programmer_CLI -c port=SWD --extload ./board/stldr/ART-Pi_W25Q64.stldr -d rtthread.bin 0x90000000 -hardRst -s
5. 运行程序
我们提供了一份运行模型推理的示例应用代码,mnist_app.c。
下载地址:
http://117.143.63.254:9012/www/RT-AK/mnist_app.zip
下载解压,放置到 <BSP>/applications 路径下,然后重新编译和烧录
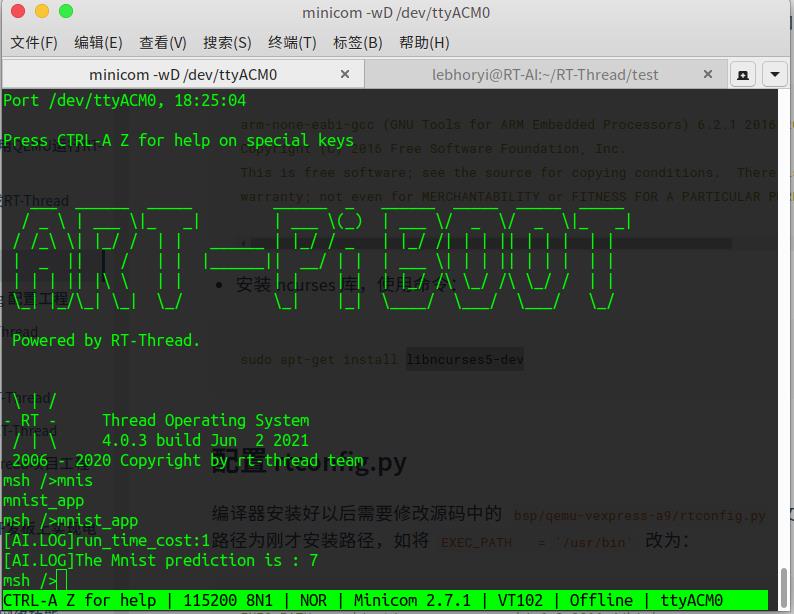
串口通信工具我用的是 minicom,具体安装和使用请百度
 1# 查看串口
 2$ ls /dev
 3
 4# 我的串口是 /dev/ttyACM0
 5$ minicom -wD /dev/ttyACM0
 6
 7 \\ | /
 8- RT -     Thread Operating System
 9 / | \\     4.0.3 build Jun  2 2021
10 2006 - 2020 Copyright by rt-thread team
11msh />mnis
12mnist_app
13msh />mnist_app
14[AI.LOG]run_time_cost:1
15[AI.LOG]The Mnist prediction is : 7
16msh />
点击阅读原文,进入本项目GitHub

你可以添加微信17775982065为好友,注明:公司+姓名,拉进 RT-Thread 官方微信交流群!

???????????? 点击阅读进入GitHub
以上是关于RT-AK 新增支持 Linux 环境的主要内容,如果未能解决你的问题,请参考以下文章
新增3.2万行代码,Linux内核有望在2022年正式支持Rust
新增3.2万行代码,Linux内核有望在2022年正式支持Rust
AI简报20210618期AI高仿你的笔迹只需1个词与你共享300 + 开源模型
RT-Thread AI Kit 之 RISC-V 插件初体验