源码编译安装lamp
Posted 人间忽晚,山河以秋
tags:
篇首语:本文由小常识网(cha138.com)小编为大家整理,主要介绍了源码编译安装lamp相关的知识,希望对你有一定的参考价值。
一、编译安装mysql
首先下载安装包到本地
[root@shell ~]# cd /usr/local/src
[root@shell src]# wget http://mirrors.sohu.com/mysql/MySQL-5.6/mysql-5.6.43-linux-glibc2.12-x86_64.tar.gz
然后解压压缩包
[root@shell src]# tar -zxvf mysql-5.6.43-linux-glibc2.12-x86_64.tar.gz
解压后,创建一个MySQL的目录,然后将数据移动过去
[root@shell src]# mv mysql-5.6.43-linux-glibc2.12-x86_64 /usr/local/mysql/
然后创建MySQL用户和存放数据库数据的目录,并且授权给该目录
[root@shell mysql]# useradd -s /sbin/nologin mysql
[root@shell mysql]# mkdir -p /data/mysql ; chown -R mysql:mysql /data/mysql
[root@shell mysql]# ls -la /data/mysql
total 0
drwxr-xr-x. 2 mysql mysql  6 May 21 00:52 .
drwxr-xr-x. 4 root  root  28 May 21 00:52 ..
编译MySQL
[root@shell mysql]# ./scripts/mysql_install_db --user=mysql --datadir=/data/mysql
如果编译时发现如图所示错误,则需要安装Perl

[root@shell mysql]# yum install -y perl-Module-Install
然后在编译即可
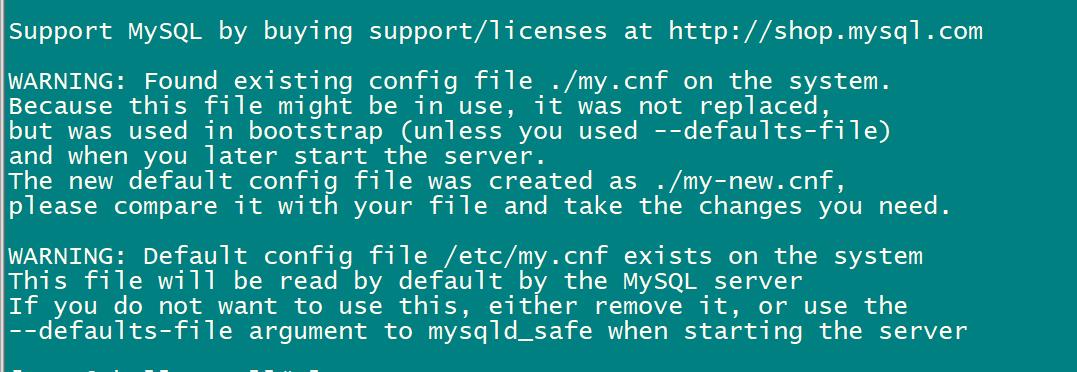
出现如下图情形,即是编译完成,只不过我们要去覆盖配置文件

修改配置文件,先把配置文件复制
[root@shell mysql]# cp support-files/my-default.cnf /etc/my.cnf
cp: overwrite ‘/etc/my.cnf’? y
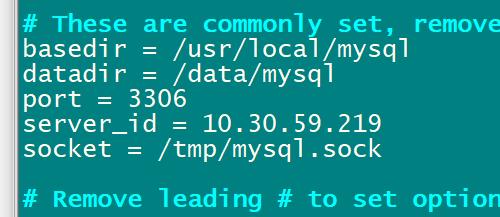
修改文件,把下面段落的#去掉,然后根据自己的情况填写,

basedir = /usr/local/mysql ## 这里的路径是你安装MySQL的路径
datadir = /data/mysql #存放MySQL数据的目录
port = 3306 # MySQL的端口
server_id = 10.30.59.219 # 主机地址
socket = /tmp/mysql.sock #
例如,
[root@shell src]# vim /etc/my.cnf
datadir = /data/mysql
# For advice on how to change settings please see
# http://dev.mysql.com/doc/refman/5.6/en/server-configuration
-defaults.html
# *** DO NOT EDIT THIS FILE. It's a template which will be co
pied to the
# *** default location during install, and will be replaced i
f you
# *** upgrade to a newer version of MySQL.

[mysqld]

# Remove leading # and set to the amount of RAM for the most
important data
  cache in MySQL. Start at 70% of total RAM for dedicated ser
ver, else 10%.
# innodb_buffer_pool_size = 128M

# Remove leading # to turn on a very important data integrity
 option: logging
# changes to the binary log between backups.
# log_bin

# These are commonly set, remove the # and set as required.
basedir = /usr/local/mysql
datadir = /data/mysql
port = 3306
server_id = 219
socket = /tmp/mysql.sock

# Remove leading # to set options mainly useful for reporting
 servers.
# The server defaults are faster for transactions and fast SE
LECTs.
@
"/etc/my.cnf" 31L, 1150C written
修改启动脚本,同样要先把文件复制过去
[root@shell src]# cd /usr/local/mysql/
[root@shell mysql]# ls
bin      docs     man         mysql-test  share
COPYING  include  my.cnf      README      sql-bench
data     lib      my-new.cnf  scripts     support-files
[root@shell mysql]# cp support-files/mysql.server /etc/init.d/mysqld
然后修改,basedir=/usr/local/mysql datadir=/data/mysql,与上一个配置文件同样的道理
[root@shell mysql]# vim !$
vim /etc/init.d/mysqld
#!/bin/sh

# MySQL daemon start/stop script.

# started and shut down when the systems goes down.

# Comments to support LSB init script conventions
# Required-Start: $local_fs $network $remote_fs
# Should-Start: ypbind nscd ldap ntpd xntpd
# Required-Stop: $local_fs $network $remote_fs
# Default-Start:  2 3 4 5
# Default-Stop: 0 1 6
# Short-Description: start and stop MySQL
# Description: MySQL is a very fast and reliable SQL database
 engine.
### END INIT INFO

# If you install MySQL on some other places than /usr/local/m
ysql, then you
# have to do one of the following things for this script to w
ork:
#
# - Run this script from within the MySQL installation direct
ory
# - Create a /etc/my.cnf file with the following information:
#   [mysqld]
#   basedir=<path-to-mysql-installation-directory>
# - Add the above to any other configuration file (for exampl
e ~/.my.ini)
#   and copy my_print_defaults to /usr/bin
# - Add the path to the mysql-installation-directory to the b
asedir variable
#   below.
#
# If you want to affect other MySQL variables, you should mak
e your changes
# in the /etc/my.cnf, ~/.my.cnf or other MySQL configuration
files.

# If you change base dir, you must also change datadir. These
 may get
# overwritten by settings in the MySQL configuration files.

basedir=/usr/local/mysql
datadir=/data/mysql

</rc.d/init.d/mysqld" 378L, 10592C written
把启动脚本加入到系统中去,并设置成开机自启,然后开启MySQL服务
[root@shell mysql]# chkconfig --add mysqld
[root@shell mysql]# chkconfig mysqld on
[root@shell mysql]# service mysqld start
Starting MySQL.Logging to '/data/mysql/shell.err'.
 SUCCESS!
二、编译安装Apache
1、下载安装包和依赖包
[root@shell mysql]# cd /usr/local/src
[root@shell src]# ls
apr-1.6.5.tar.gz
apr-util-1.6.1.tar.gz
httpd-2.4.46.tar.gz
[root@shell src]#
解压
[root@shell src]# tar -zxf apr-1.6.5.tar.gz
[root@shell src]# tar -zxf apr-util-1.6.1.tar.gz
[root@shell src]# tar -zxf httpd-2.4.46.tar.gz
2、先安装apr
[root@shell src]# cd apr-1.6.5
[root@shell apr-1.6.5]# ls
apr-config.in     dso           NOTICE
apr.dep           emacs-mode    NWGNUmakefile
apr.dsp           encoding      passwd
apr.dsw           file_io       poll
apr.mak           helpers       random
apr.pc.in         include       README
apr.spec          libapr.dep    README.cmake
atomic            libapr.dsp    shmem
build             libapr.mak    strings
buildconf         libapr.rc     support
build.conf        LICENSE       tables
build-outputs.mk  locks         test
CHANGES           Makefile.in   threadproc
CMakeLists.txt    Makefile.win  time
config.layout     memory        tools
configure         misc          user
configure.in      mmap
docs              network_io
[root@shell apr-1.6.5]# ./configure --prefix=/usr/local/apr
输入命令出现如图的错误,则需要安装libtoolt

[root@shell apr-1.6.5]# yum install libtool* -y
执行安装命令后可能还会出现以上的错误,忽略掉
再次编译,然后安装
[root@shell apr-1.6.5]# ./configure --prefix=/usr/local/apr
[root@shell apr-1.6.5]# make && make install
3、同样的方式安装apr-util
[root@shell src]# cd apr-util-1.6.1
[root@shell apr-util-1.6.1]# ./configure --prefix=/usr/local/apr-util --with-apr=/usr/local/apr
[root@shell apr-util-1.6.1]# make && make install
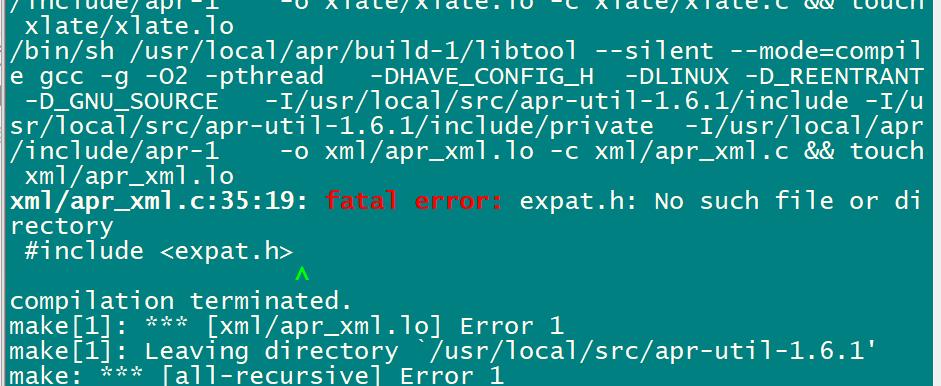
编译完成后如果显示缺少expat模块,安装即可

[root@shell apr-util-1.6.1]# yum install -y expat-devel
[root@shell apr-util-1.6.1]# make && make install
查看上述编译是否有错误
[root@shell apr-util-1.6.1]# echo $?
0
4、安装httpd
[root@shell httpd-2.4.46]# cd /usr/local/src/httpd-2.4.46
[root@shell httpd-2.4.46]# ./configure --prefix=/usr/local/apache2.4 --enable-so --with-pcre --with-included-apr --enable-modules=most --enable-mpms-shared=all --with-mpm=prefork
[root@shell httpd-2.4.46]# make -j4 && make install
[root@shell httpd-2.4.46]# echo $?
0
查看安装大小
[root@shell local]# du -sh apache2.4/
43M     apashe2.4/
进入查看后的目录查看,htdocs是存放默认首页文件的地方,logs是放日志的地方,modules是存放模块的目录。
[root@shell httpd-2.4.46]# cd /usr/local/apache2.4/
[root@shell apache2.4]# ls
bin    cgi-bin  error   icons    lib   man     modules
build  conf     htdocs  include  logs  manual
[root@shell apache2.4]# cd htdocs
[root@shell htdocs]# ls
index.html
[root@shell htdocs]# cat index.html
<html><body><h1>It works!</h1></body></html>
[root@shell apache2.4]# cd modules/
[root@shell modules]# ls
httpd.exp                   mod_log_debug.so
mod_access_compat.so        mod_logio.so
mod_actions.so              mod_macro.so
mod_alias.so                mod_mime.so
mod_allowmethods.so         mod_mpm_event.so
mod_auth_basic.so           mod_mpm_prefork.so
mod_auth_digest.so          mod_mpm_worker.so
mod_auth_form.so            mod_negotiation.so
mod_authn_anon.so           mod_proxy_ajp.so
mod_authn_core.so           mod_proxy_balancer.so
mod_authn_dbd.so            mod_proxy_connect.so
mod_authn_dbm.so            mod_proxy_express.so
mod_authn_file.so           mod_proxy_fcgi.so
mod_authn_socache.so        mod_proxy_fdpass.so
mod_authz_core.so           mod_proxy_ftp.so
mod_authz_dbd.so            mod_proxy_hcheck.so
mod_authz_dbm.so            mod_proxy_http.so
mod_authz_groupfile.so      mod_proxy_scgi.so
mod_authz_host.so           mod_proxy.so
mod_authz_owner.so          mod_proxy_uwsgi.so
mod_authz_user.so           mod_proxy_wstunnel.so
mod_autoindex.so            mod_ratelimit.so
mod_buffer.so               mod_remoteip.so
mod_cache_disk.so           mod_reqtimeout.so
mod_cache.so                mod_request.so
mod_cache_socache.so        mod_rewrite.so
mod_cgid.so                 mod_sed.so
mod_dav_fs.so               mod_session_cookie.so
mod_dav.so                  mod_session_dbd.so
mod_dbd.so                  mod_session.so
mod_deflate.so              mod_setenvif.so
mod_dir.so                  mod_slotmem_shm.so
mod_dumpio.so               mod_socache_dbm.so
mod_env.so                  mod_socache_memcache.so
mod_expires.so              mod_socache_redis.so
mod_ext_filter.so           mod_socache_shmcb.so
mod_file_cache.so           mod_speling.so
mod_filter.so               mod_status.so
mod_headers.so              mod_substitute.so
mod_include.so              mod_unique_id.so
mod_info.so                 mod_unixd.so
mod_lbmethod_bybusyness.so  mod_userdir.so
mod_lbmethod_byrequests.so  mod_version.so
mod_lbmethod_bytraffic.so   mod_vhost_alias.so
mod_lbmethod_heartbeat.so   mod_watchdog.so
mod_log_config.so
这个命令可以查看一下使用的模块
[root@shell modules]# /usr/local/apache2.4/bin/httpd -M
AH00558: httpd: Could not reliably determine the server's fully qualified domain name, using 10.30.59.219. Set the 'ServerName' directive globally to suppress this message
Loaded Modules:
 core_module (static)
 so_module (static)
 http_module (static)
 mpm_prefork_module (shared)
 authn_file_module (shared)
 authn_core_module (shared)
 authz_host_module (shared)
 authz_groupfile_module (shared)
 authz_user_module (shared)
 authz_core_module (shared)
 access_compat_module (shared)
 auth_basic_module (shared)
 reqtimeout_module (shared)
 filter_module (shared)
 mime_module (shared)
 log_config_module (shared)
 env_module (shared)
 headers_module (shared)
 setenvif_module (shared)
 version_module (shared)
 unixd_module (shared)
 status_module (shared)
 autoindex_module (shared)
 dir_module (shared)
 alias_module (shared)
三、安装编译php
[root@shell ~]# cd /usr/local/src
[root@shell src]# tar -zxf php-7.4.19.tar.gz
[root@shell src]# cd php-7.4.19
[root@shell php-7.4.19]# ls
appveyor             pear
azure                php.ini-development
azure-pipelines.yml  php.ini-production
build                README.md
buildconf            README.REDIST.BINS
buildconf.bat        run-tests.php
CODING_STANDARDS.md  sapi
configure            scripts
configure.ac         tests
CONTRIBUTING.md      travis
docs                 TSRM
ext                  UPGRADING
EXTENSIONS           UPGRADING.INTERNALS
LICENSE              win32
main                 Zend
NEWS
[root@shell php-7.4.19]#  ./configure --prefix=/usr/local/php7 --with-apxs2=/usr/local/apache2.4/bin/apxs --with-config-file-path=/usr/local/php7/etc  --with-pdo-mysql=/usr/local/mysql --with-mysqli=/usr/local/mysql/bin/mysql_config --with-libxml-dir --with-gd --with-jpeg-dir --with-png-dir --with-freetype-dir --with-iconv-dir --with-zlib-dir --with-bz2 --with-openssl --with-mcrypt --enable-soap --enable-gd-native-ttf --enable-mbstring --enable-sockets --enable-exif
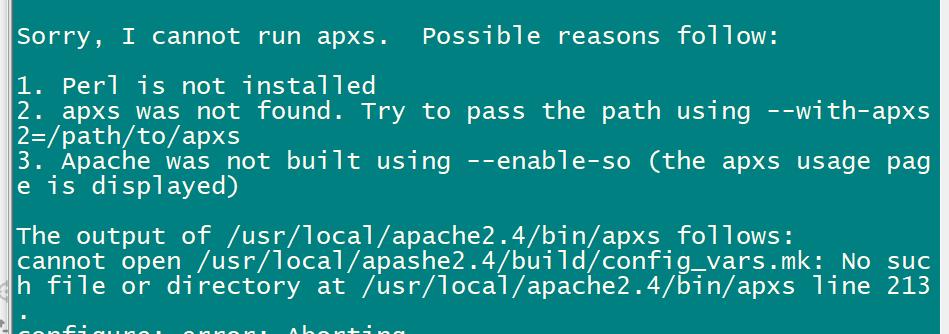
中间报了一个错

依据提示,安装perl
[root@shell php-7.4.19]# yum install -y perl*
[root@shell php-7.4.19]# yum install libxml2-devel bzip2 bzip2-devel libpng ligpng-devel openssl openssl-devel freetype freetype-devel opel-release -y
编译过程中可能会出现缺少一些包,像这样的,使用yum命令安装即可

如果安装不上在后面加上一个-devel,或者*号,就像这样
[root@shell php-7.4.19]# yum install oniguruma-devel -y
还安装不上,则安装一个这个
[root@shell php-7.4.19]# yum install epel-release -y
安装后再次编译
[root@shell php-7.4.19]# ./configure --prefix=/usr/local/php7 --with-apxs2=/usr/local/apache2.4/bin/apxs --with-config-file-path=/usr/local/php7/etc --with-pdo-mysql=/usr/local/mysql --with-mysqli=/usr/local/mysql/bin/mysql_config --with-libxml-dir --with-gd --with-jpeg-dir --with-png-dir --with-freetype-dir --with-iconv-dir --with-zlib-dir --with-bz2 --with-openssl --with-mcrypt --enable-soap --enable-gd-native-ttf --enable-mbstring --enable-sockets --enable-exif
查看返回值
[root@shell php-7.4.19]# echo $?
0
[root@shell php-7.4.19]#
安装
[root@shell php-7.4.19]# make clean
[root@shell php-7.4.19]# make -j4 && make install
检测一下是否安装成功,查看模块,如果有PHP模块则说明安装成功。
[root@shell php-7.4.19]# /usr/local/apache2.4/bin/httpd -M
AH00558: httpd: Could not reliably determine the server's fully qualified domain name, using 10.30.59.219. Set the 'ServerName' directive globally to suppress this message
Loaded Modules:
 core_module (static)
 so_module (static)
 http_module (static)
 mpm_prefork_module (shared)
 authn_file_module (shared)
 authn_core_module (shared)
 authz_host_module (shared)
 authz_groupfile_module (shared)
 authz_user_module (shared)
 authz_core_module (shared)
 access_compat_module (shared)
 auth_basic_module (shared)
 reqtimeout_module (shared)
 filter_module (shared)
 mime_module (shared)
 log_config_module (shared)
 env_module (shared)
 headers_module (shared)
 setenvif_module (shared)
 version_module (shared)
 unixd_module (shared)
 status_module (shared)
 autoindex_module (shared)
 dir_module (shared)
 alias_module (shared)
 php7_module (shared)
这里有PHP模块,所以安装成功
最后备份PHP配置文件
[root@shell php-7.4.19]# cp php.ini-production /usr/local/php7/etc/php.ini
安装完成
以上是关于源码编译安装lamp的主要内容,如果未能解决你的问题,请参考以下文章