学习自动化运维工具-ansible
Posted 人间忽晚,山河以秋
tags:
篇首语:本文由小常识网(cha138.com)小编为大家整理,主要介绍了学习自动化运维工具-ansible相关的知识,希望对你有一定的参考价值。
三、拷贝文件或者目录
1、拷贝文件
把ansible上的1.txt给ansible-02复制一份到/tmp里
src是源地址,dest是目标地址
注意:如果拷贝的文件,dest指定的名字和源不同并且它不是已经存在的目录,相当于拷贝过去后有重命名。但相反,如果dest第目标机器上已经存在的目录,则会直接把文件拷贝到该目录下面。
[root@ansible-01 ~]# ansible 10.30.59.216 -m copy -a "src=1.txt dest=/tmp/123"
10.30.59.216 | CHANGED => {
    "ansible_facts": {
        "discovered_interpreter_python": "/usr/bin/python"
    },
    "changed": true,
    "checksum": "dd71038f3463f511ee7403dbcbc87195302d891c",
    "dest": "/tmp/123",
    "gid": 0,
    "group": "root",
    "md5sum": "166d77ac1b46a1ec38aa35ab7e628ab5",
    "mode": "0644",
    "owner": "root",
    "secontext": "unconfined_u:object_r:admin_home_t:s0",
    "size": 3,
    "src": "/root/.ansible/tmp/ansible-tmp-1621972080.95-31657-44212271911214/source",
    "state": "file",
    "uid": 0
}
复制到本机的tmp目录下
[root@ansible-01 ~]# ansible 127.0.0.1 -m copy -a "src=1.txt dest=/tmp/123"
127.0.0.1 | CHANGED => {
    "ansible_facts": {
        "discovered_interpreter_python": "/usr/bin/python"
    },
    "changed": true,
    "checksum": "dd71038f3463f511ee7403dbcbc87195302d891c",
    "dest": "/tmp/123",
    "gid": 0,
    "group": "root",
    "md5sum": "166d77ac1b46a1ec38aa35ab7e628ab5",
    "mode": "0644",
    "owner": "root",
    "secontext": "unconfined_u:object_r:admin_home_t:s0",
    "size": 3,
    "src": "/root/.ansible/tmp/ansible-tmp-1621972113.08-31685-266616194507356/source",
    "state": "file",
    "uid": 0
}
以主机组的方式执行命令
下面的命令意思是,复制本机的2.txt文件给testhost主机组里的所有主机
[root@ansible-01 ~]# ansible testhost -m copy -a "src=2.txt dest=/tmp/test1"
127.0.0.1 | CHANGED => {
    "ansible_facts": {
        "discovered_interpreter_python": "/usr/bin/python"
    },
    "changed": true,
    "checksum": "020a0d69b011db6512aa8fe7deff2fc950d3d614",
    "dest": "/tmp/test1",
    "gid": 0,
    "group": "root",
    "md5sum": "813cd7022ca5a0dda58a22e2d5a73a70",
    "mode": "0644",
    "owner": "root",
    "secontext": "unconfined_u:object_r:admin_home_t:s0",
    "size": 5,
    "src": "/root/.ansible/tmp/ansible-tmp-1621972941.26-32223-134159284553162/source",
    "state": "file",
    "uid": 0
}
10.30.59.216 | CHANGED => {
    "ansible_facts": {
        "discovered_interpreter_python": "/usr/bin/python"
    },
    "changed": true,
    "checksum": "020a0d69b011db6512aa8fe7deff2fc950d3d614",
    "dest": "/tmp/test1",
    "gid": 0,
    "group": "root",
    "md5sum": "813cd7022ca5a0dda58a22e2d5a73a70",
    "mode": "0644",
    "owner": "root",
    "secontext": "unconfined_u:object_r:admin_home_t:s0",
    "size": 5,
    "src": "/root/.ansible/tmp/ansible-tmp-1621972941.27-32224-17091925975894/source",
    "state": "file",
    "uid": 0
}
看一下结果
[root@ansible-02 ~]# cd /tmp/
[root@ansible-02 tmp]# ls
123  test1
[root@ansible-01 ~]# cd /tmp/
[root@ansible-01 tmp]# ls
123  ifcfg-ens193  test1
二、拷贝目录
复制目录时,如果出现这种情况,它显示失败,有可能是备份的目录里面必须需要有东西
[root@ansible-01 ~]# mkdir www
[root@ansible-01 ~]# ansible 10.30.59.216 -m copy -a "src=www dest=/tmp/7 "
10.30.59.216 | SUCCESS => {
    "changed": false,
    "dest": "/tmp/7/",
    "src": "/root/www"
}
在要备份的目录里再创建一个目录,已达到目录里有东西,然后再次备份。
[root@ansible-01 ~]# cd www
[root@ansible-01 www]# mkdir eee
[root@ansible-01 www]# cd
[root@ansible-01 ~]# ansible 10.30.59.216 -m copy -a "src=www dest=/tmp/7 "
10.30.59.216 | CHANGED => {
    "changed": true,
    "dest": "/tmp/7/",
    "src": "/root/www"
}
注意:源目录回放到目标目录下面去,如果目标指定的目录不存在,他会自动创建,例如以上的目标地址/tmp/7在10.30.59.216主机里是没有的,在ansible执行命令后查看,它自行创建了这个目录
也可使用主机组
[root@ansible-01 ~]# ansible testhost -m copy -a "src=www dest=/tmp/8"
127.0.0.1 | CHANGED => {
    "changed": true,
    "dest": "/tmp/8/",
    "src": "/root/www"
}
10.30.59.216 | CHANGED => {
    "changed": true,
    "dest": "/tmp/8/",
    "src": "/root/www"
}
四、远程执行脚本,即shell模块的使用
1、远程执行脚本
先编辑一个用于测试的脚本,例如,写一个把当前时间显示存在/tmp/ansible_teset.txt下
[root@ansible-01 ~]# vim /tmp/test.sh
#!/bin/bash
echo `date` > /tmp/ansible_test.txt
~
~
~
~
~
~
"/tmp/test.sh" [新] 2L, 48C 已写入
原脚本存放的目录是ansible-01主机的/tmp/下,首先我们把脚本复制到主机组里的每一个主机里。
[root@ansible-01 ~]# ansible testhost -m copy -a "src=/tmp/test.sh dest=/tmp/test.sh mode=0755"
127.0.0.1 | CHANGED => {
    "ansible_facts": {
        "discovered_interpreter_python": "/usr/bin/python"
    },
    "changed": true,
    "checksum": "1a6e4af02dba1bda6fc8e23031d4447efeba0ade",
    "dest": "/tmp/test.sh",
    "gid": 0,
    "group": "root",
    "mode": "0755",
    "owner": "root",
    "path": "/tmp/test.sh",
    "secontext": "unconfined_u:object_r:user_tmp_t:s0",
    "size": 48,
    "state": "file",
    "uid": 0
}
10.30.59.216 | CHANGED => {
    "ansible_facts": {
        "discovered_interpreter_python": "/usr/bin/python"
    },
    "changed": true,
    "checksum": "1a6e4af02dba1bda6fc8e23031d4447efeba0ade",
    "dest": "/tmp/test.sh",
    "gid": 0,
    "group": "root",
    "md5sum": "edfaa4371316af8c5ba354e708fe8a97",
    "mode": "0755",
    "owner": "root",
    "secontext": "unconfined_u:object_r:admin_home_t:s0",
    "size": 48,
    "src": "/root/.ansible/tmp/ansible-tmp-1622021691.76-708-43430881349460/source",
    "state": "file",
    "uid": 0
}
显示成功了,我们检查一下
[root@ansible-01 ~]# ls -l /tmp/
总用量 16
-rw-r--r--. 1 root root   3 5月  26 03:48 123
drwxr-xr-x. 3 root root  17 5月  26 16:54 8
-rw-r--r--. 1 root root 201 5月  21 23:37 ifcfg-ens193
-rw-r--r--. 1 root root   5 5月  26 04:02 test1
-rwxr-xr-x. 1 root root  48 5月  26 17:33 test.sh
[root@ansible-02 tmp]# ls -l /tmp/
总用量 16
-rw-r--r--. 1 root root  3 5月  26 03:48 123
-rw-r--r--. 1 root root  6 5月  26 16:36 23
drwxr-xr-x. 3 root root 18 5月  26 16:39 45
drwxr-xr-x. 3 root root 18 5月  26 16:39 5
drwxr-xr-x. 3 root root 18 5月  26 16:41 6
drwxr-xr-x. 3 root root 17 5月  26 16:45 7
drwxr-xr-x. 3 root root 17 5月  26 16:54 8
-rw-r--r--. 1 root root  5 5月  26 04:02 test1
-rwxr-xr-x. 1 root root 48 5月  26 17:34 test.sh
两台主机都有test.sh脚本,远程执行脚本
这里用到的模块就是shell
[root@ansible-01 ~]# ansible testhost -m shell -a "/tmp/test.sh"
127.0.0.1 | CHANGED | rc=0 >>

10.30.59.216 | CHANGED | rc=0 >>
验证一下是否成功,也可以使用ansible命令验证
[root@ansible-01 tmp]# ansible testhost -m command -a"cat /tmp/ansible_test.sh"
2021年 05月 26日 星期三 17:36:01 CST
10.30.59.216 | CHANGED | rc=0 >>
2021年 05月 26日 星期三 17:36:01 CST
被创建了,则说明远程执行脚本成功了
2、shell模块还支持远程执行命令,还可以带管道符
例如查看/etc/passwd里有多少用户
[root@ansible-01 ~]# ansible testhost -m shell -a "cat /etc/passwd|wc -l"
127.0.0.1 | CHANGED | rc=0 >>
20
10.30.59.216 | CHANGED | rc=0 >>
18
五、ansible管理任务计划
任务管理命令是crontab,编辑任务管理时加上-e参数,开头的时间表示为* * * * * ,五个星号表示没分钟、小时、日、月、星期
远程创建任务计划
使用cron模块,name指任务名称,job指任务执行的什么动作,本例中指创建一个1212.txt的文件,weekday=6是指星期六执行
[root@ansible-01 ~]# ansible testhost -m cron -a "name='test cron' job='/bin/touch /tmp/1212.txt' weekday=6"
127.0.0.1 | CHANGED => {
    "ansible_facts": {
        "discovered_interpreter_python": "/usr/bin/python"
    },
    "changed": true,
    "envs": [],
    "jobs": [
        "test cron"
    ]
}
10.30.59.216 | CHANGED => {
    "ansible_facts": {
        "discovered_interpreter_python": "/usr/bin/python"
    },
    "changed": true,
    "envs": [],
    "jobs": [
        "test cron"
    ]
}
看一下是否创建成功
ansible-01
[root@ansible-01 ~]# crontab -e
#Ansible: test cron
* * * * 6 /bin/touch /tmp/1212.txt
~
~
~
~
~
~
~
~
~
"/tmp/crontab.A8pHAR" 2L, 55C written
crontab: installing new crontab
ansible-02
[root@ansible-02 tmp]#  crontab -e
#Ansible: test cron
* * * * 6 /bin/touch /tmp/1212.txt
~
~
~
~
~
~
~
~
~
~
~
crontab: no changes made to crontab
删除该cron,指定名字在加上state=absent
[root@ansible-01 ~]# ansible testhost -m cron -a "name='test cron' state=absent"
127.0.0.1 | CHANGED => {
    "ansible_facts": {
        "discovered_interpreter_python": "/usr/bin/python"
    },
    "changed": true,
    "envs": [],
    "jobs": []
}
10.30.59.216 | CHANGED => {
    "ansible_facts": {
        "discovered_interpreter_python": "/usr/bin/python"
    },
    "changed": true,
    "envs": [],
    "jobs": []
}
看是否删除成功
[root@ansible-01 ~]# crontab -e

~
~
~
~
~
~
crontab: no changes made to crontab
[root@ansible-02 tmp]#  crontab -e

~
~
~
~
~

~
~
crontab: no changes made to crontab
六、ansible安装rpm包,和管理服务
1、安装http服务使用yum模块,名字直接指定要安装的服务名,后面返回的结果太多,没有粘贴,只要有正确的反馈即可
[root@ansible-01 ~]# ansible testhost -m yum -a "name=httpd"
服务安装完成后开启服务,并设置开机自启,stated表示开启,enabled表示开机自启
[root@ansible-01 ~]# ansible testhost -m service -a "name=httpd state=started enabled=yes"
查看服务的状态看是否成功,
[root@ansible-01 ~]# systemctl status httpd
● httpd.service - The Apache HTTP Server
   Loaded: loaded (/usr/lib/systemd/system/httpd.service; enabled; vendor preset: disabled)
   Active: active (running) since 三 2021-05-26 18:32:06 CST; 51s ago
     Docs: man:httpd(8)
           man:apachectl(8)
 Main PID: 1773 (httpd)
   Status: "Total requests: 0; Current requests/sec: 0; Current traffic:   0 B/sec"
    Tasks: 6
   Memory: 2.8M
   CGroup: /system.slice/httpd.service
           ├─1773 /usr/sbin/httpd -DFOREGROUND
           ├─1774 /usr/sbin/httpd -DFOREGROUND
           ├─1775 /usr/sbin/httpd -DFOREGROUND
           ├─1776 /usr/sbin/httpd -DFOREGROUND
           ├─1777 /usr/sbin/httpd -DFOREGROUND
           └─1778 /usr/sbin/httpd -DFOREGROUND

5月 26 18:32:06 ansible-01 systemd[1]: Starting The Apache HTTP Se...
5月 26 18:32:06 ansible-01 httpd[1773]: AH00558: httpd: Could not ...
5月 26 18:32:06 ansible-01 systemd[1]: Started The Apache HTTP Ser...
Hint: Some lines were ellipsized, use -l to show in full.
[root@ansible-02 tmp]# systemctl status httpd
● httpd.service - The Apache HTTP Server
   Loaded: loaded (/usr/lib/systemd/system/httpd.service; enabled; vendor preset: disabled)
   Active: active (running) since 三 2021-05-26 18:32:06 CST; 58s ago
     Docs: man:httpd(8)
           man:apachectl(8)
 Main PID: 30499 (httpd)
   Status: "Total requests: 0; Current requests/sec: 0; Current traffic:   0 B/sec"
    Tasks: 6
   Memory: 2.9M
   CGroup: /system.slice/httpd.service
           ├─30499 /usr/sbin/httpd -DFOREGROUND
           ├─30500 /usr/sbin/httpd -DFOREGROUND
           ├─30501 /usr/sbin/httpd -DFOREGROUND
           ├─30502 /usr/sbin/httpd -DFOREGROUND
           ├─30503 /usr/sbin/httpd -DFOREGROUND
           └─30504 /usr/sbin/httpd -DFOREGROUND

5月 26 18:32:06 ansible-02 systemd[1]: Starting The Apache HTTP Se...
5月 26 18:32:06 ansible-02 httpd[30499]: AH00558: httpd: Could not...
5月 26 18:32:06 ansible-02 systemd[1]: Started The Apache HTTP Ser...
Hint: Some lines were ellipsized, use -l to show in full.
可以看到是运行状态
也可以使用 chkconfig --list查看服务,但是会提示使用 systemctl list-unit-files命令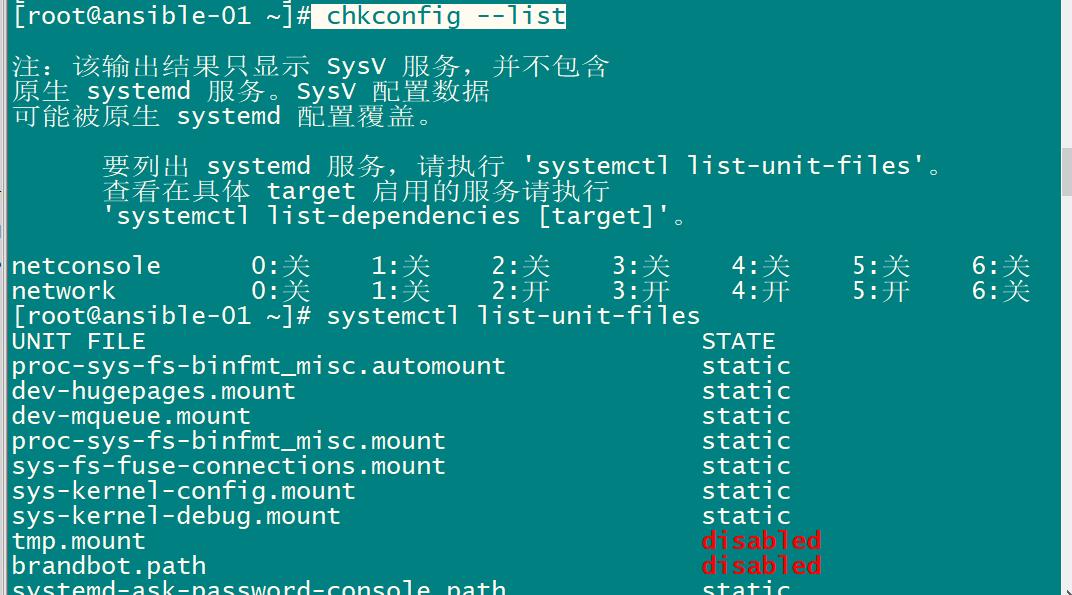
该命令有显示的有点多,可以使用grep结合查找
[root@ansible-01 ~]# systemctl list-unit-files | grep http httpd.service enabled
这里状态也是开启的
2、到这里可以发现,ansible的远程执行命令都是使用的模块 即命令中的-m 参数,所以关于模块的命令也非常重要
列出所有的模块,有点多,后面的省略
[root@ansible-01 ~]# ansible-doc -l
fortios_router_community_list                                 Configur
azure_rm_devtestlab_info                                      Get Azur
ecs_taskdefinition                                            register
avi_alertscriptconfig                                         Module f
tower_receive                                                 Receive
netapp_e_iscsi_target                                         NetApp E
azure_rm_acs                                                  Manage a
fortios_log_syslogd2_filter                                   Filters
junos_rpc                                                     Runs an
na_elementsw_vlan                                             NetApp E
pn_ospf                                                       CLI comm
pn_snmp_vacm                                                  CLI comm
cp_mgmt_service_sctp                                          Manages
onyx_ospf                                                     Manage O
icx_command                                                   Run arbi
cs_snapshot_policy                                            Manages
nxos_install_os                                               Set boot
cnos_static_route                                             Manage s
win_eventlog                                                  Manage W
vmware_category                                               Manage V
vmware_host_feature_info                                      Gathers
avi_cluster                                                   Module f
na_ontap_user                                                 NetApp O
aci_l3out                                                     Manage L
memset_server_info                                            Retrieve
gcp_compute_subnetwork_info                                   Gather i
azure_rm_virtualmachinescalesetextension                      Manage A
fortios_report_dataset                                        Report d
avi_api_session                                               Avi API
avi_networkprofile                                            Module f
avi_backup
......
查看指定模块的文档,后面的省略
[root@ansible-01 ~]# ansible-doc cron
> CRON    (/usr/lib/python2.7/site-packages/ansible/modules/system/cro

        Use this module to manage crontab and environment variables
        entries. This module allows you to create environment
        variables and named crontab entries, update, or delete them.
        When crontab jobs are managed: the module includes one line
        with the description of the crontab entry `"#Ansible: <name>"'
        corresponding to the "name" passed to the module, which is
        used by future ansible/module calls to find/check the state.
        The "name" parameter should be unique, and changing the "name"
        value will result in a new cron task being created (or a
        different one being removed). When environment variables are
        managed, no comment line is added, but, when the module needs
        to find/check the state, it uses the "name" parameter to find
        the environment variable definition line. When using symbols
        such as %, they must be properly escaped.

  * This module is maintained by The Ansible Community
OPTIONS (= is mandatory):

- backup
        If set, create a backup of the crontab before it is modified.
        The location of the backup is returned in the `backup_file'
        variable by this module.
        [Default: False]
        type: bool

- cron_file
        If specified, uses this file instead of an individual user's
        crontab.
        If this is a relative path, it is interpreted with respect to
        `/etc/cron.d'.
以上是关于学习自动化运维工具-ansible的主要内容,如果未能解决你的问题,请参考以下文章