Linux系统编程---进程I/O
Posted 蚍蜉撼树谈何易
tags:
篇首语:本文由小常识网(cha138.com)小编为大家整理,主要介绍了Linux系统编程---进程I/O相关的知识,希望对你有一定的参考价值。
进程I/O
C语言下的文件接口使用
C语言文件描述
示例:
这里实验两个。
调用fwrite()函数–写入函数
  1#include<stdio.h>
  2 #include<string.h>
  3 #include<stdlib.h>
  4 int main()
  5 {
  6     FILE *fp=fopen("1.txt","w");
  7     if(fp==NULL)
  8     {
  9         perror("create error");
 10         exit(1);
 11     }
 12     char buf[256]="hello world\\n";
 13     fwrite(buf,strlen(buf),1,fp);
 14     fclose(fp);
 15     return 0;
 16 }
fwrite(buf,strlen(buf),1,fp); 为什么strlen不加1,
因为’\\0’只是字符串中的描述符,与文件无关,加上可能会造成乱码的情况。

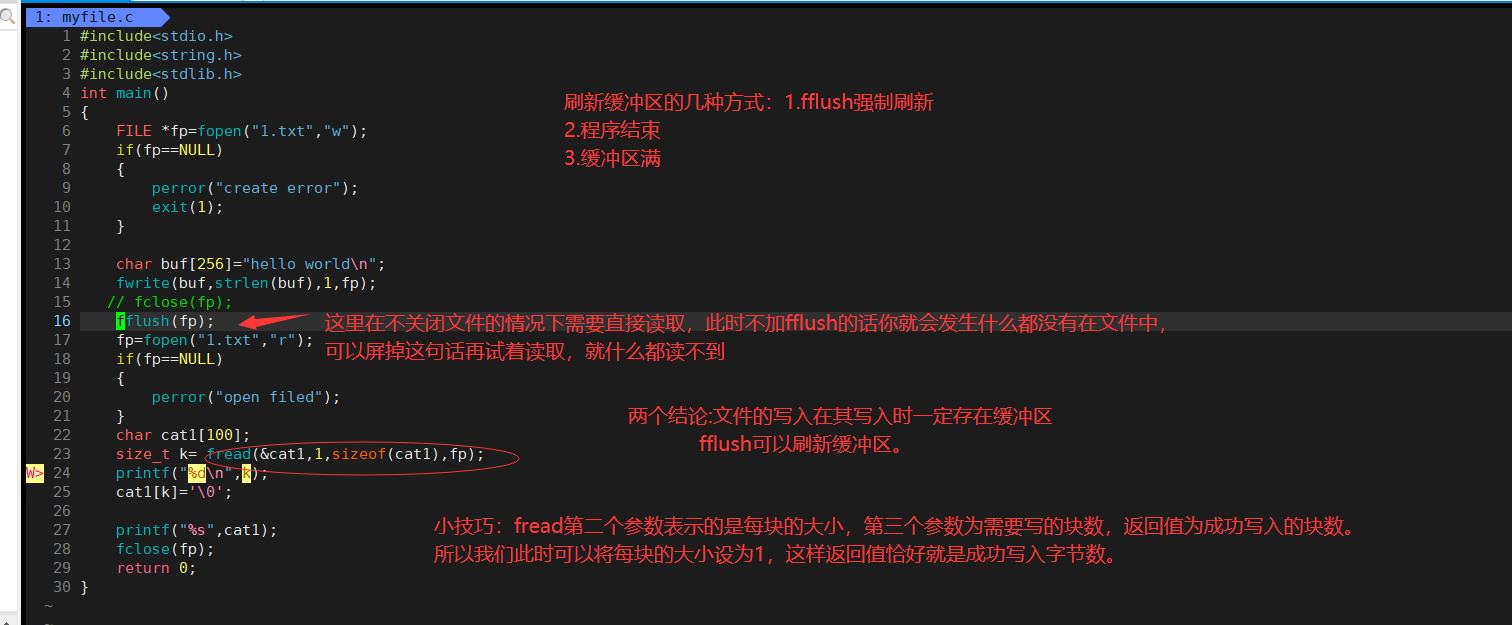
fread()读取文件
   1 #include<stdio.h>
    2 #include<string.h>
    3 #include<stdlib.h>
    4 int main()
    5 {
    6     FILE *fp=fopen("1.txt","w");
    7     if(fp==NULL)
    8     {
    9         perror("create error");
   10         exit(1);
   11     }
   12
   13     char buf[256]="hello world\\n";
   14     fwrite(buf,strlen(buf),1,fp);
   15    // fclose(fp);
   16     fflush(fp);
   17     fp=fopen("1.txt","r");
   18     if(fp==NULL)
   19     {
   20         perror("open filed");
   21     }
   22     char cat1[100];
   23     size_t k= fread(&cat1,1,sizeof(cat1),fp);
   24     printf("%d\\n",k);
   25     cat1[k]='\\0';
   26
   27     printf("%s",cat1);
   28     fclose(fp);
   29     return 0;
   30 }
  ~
  ~

Linux 下的文件操作
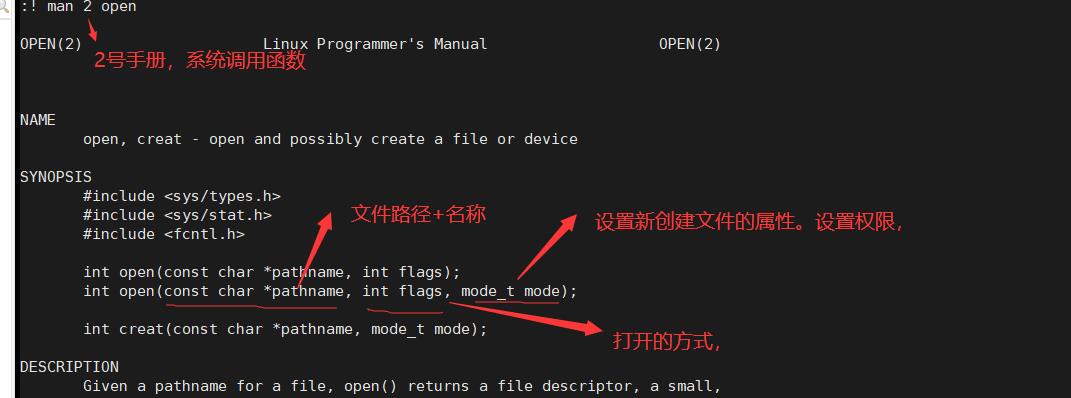
打开文件
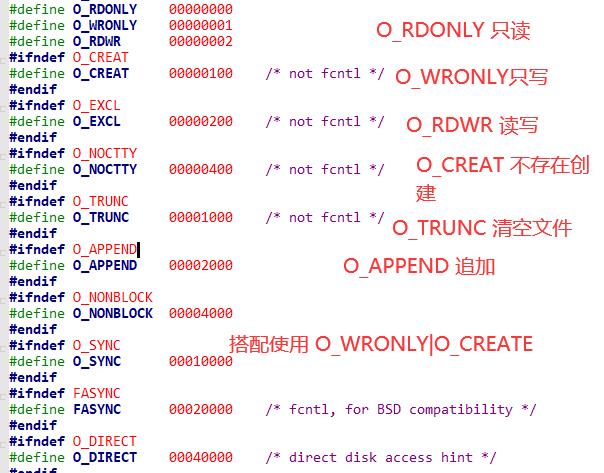
摘自:Linux 2.6.32内核
使用:
 1 #include<stdio.h>
  2 #include<sys/stat.h>
  3 #include<sys/types.h>
  4 #include<fcntl.h>
  5 int main()
  6 {
  7    int fd=open("1.txt",O_RDONLY);
  8    if(fd<0)
  9    {
 10        printf("open error");
 11        return 1;
 12    }
 13    printf("%d\\n",fd);
 14    return 0;
 15 }

write函数

  1 #include<stdio.h>
  2 #include<sys/stat.h>
  3 #include<sys/types.h>
  4 #include<fcntl.h>
  5 #include<string.h>
  6 #include<unistd.h>
  7 int main()
  8 {
  9    int fd=open("write.txt",O_WRONLY|O_CREAT,0664);
 10    if(fd<0)
 11    {
 12        printf("open error");
 13        return 1;
 14    }
 15    const char*str="hello Linux\\n";
 16    write(fd,str,strlen(str));
 17    printf("%d\\n",fd);
 18    return 0;
 19 }
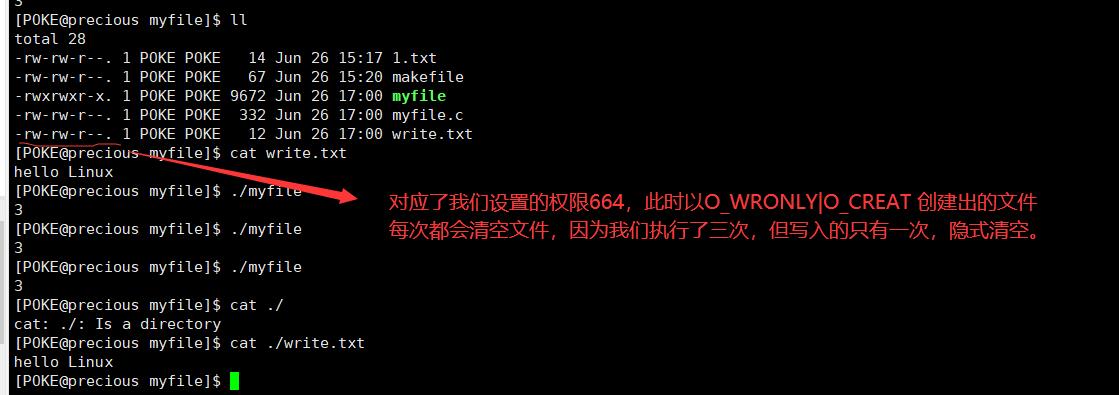
这里的O_WRONLY会在文件有内容的情况下隐式的清空我们的文件。还有一个O_TRUNC显式清空,我们这里试一下。
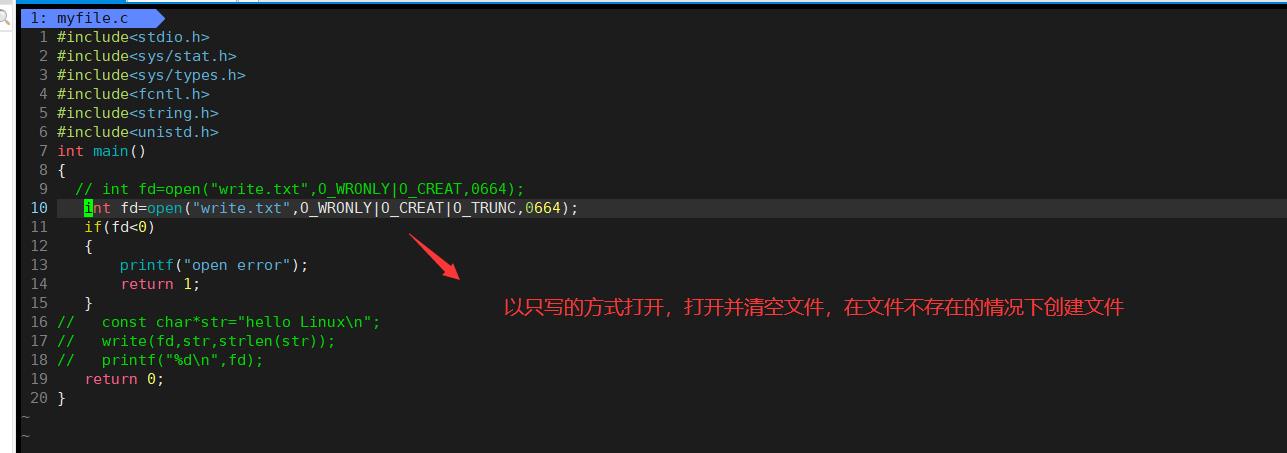
与之相对的,是O_APPEND 追加。
 1 #include<stdio.h>
  2 #include<sys/stat.h>
  3 #include<sys/types.h>
  4 #include<fcntl.h>
  5 #include<string.h>
  6 #include<unistd.h>
  7 int main()
  8 {
  9   // int fd=open("write.txt",O_WRONLY|O_CREAT,0664);
 10   // int fd=open("write.txt",O_WRONLY|O_CREAT|O_TRUNC,0664);
 11
 12    int fd=open("write.txt",O_WRONLY|O_CREAT|O_APPEND,0664);
 13    if(fd<0)
 14    {
 15        printf("open error");
 16        return 1;
 17    }
 18     const char*str="hello Linux\\n";
 19     write(fd,str,strlen(str));
 20     close(fd);
 21 //   printf("%d\\n",fd);
 22    return 0;
 23 }
~
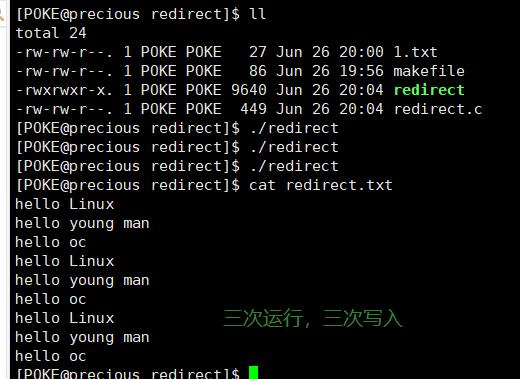
执行三次后,有三个hello Linux被写入

文件描述符。

看第一次验证打开文件时open()函数的返回值为3,这里怎么理解它呢?

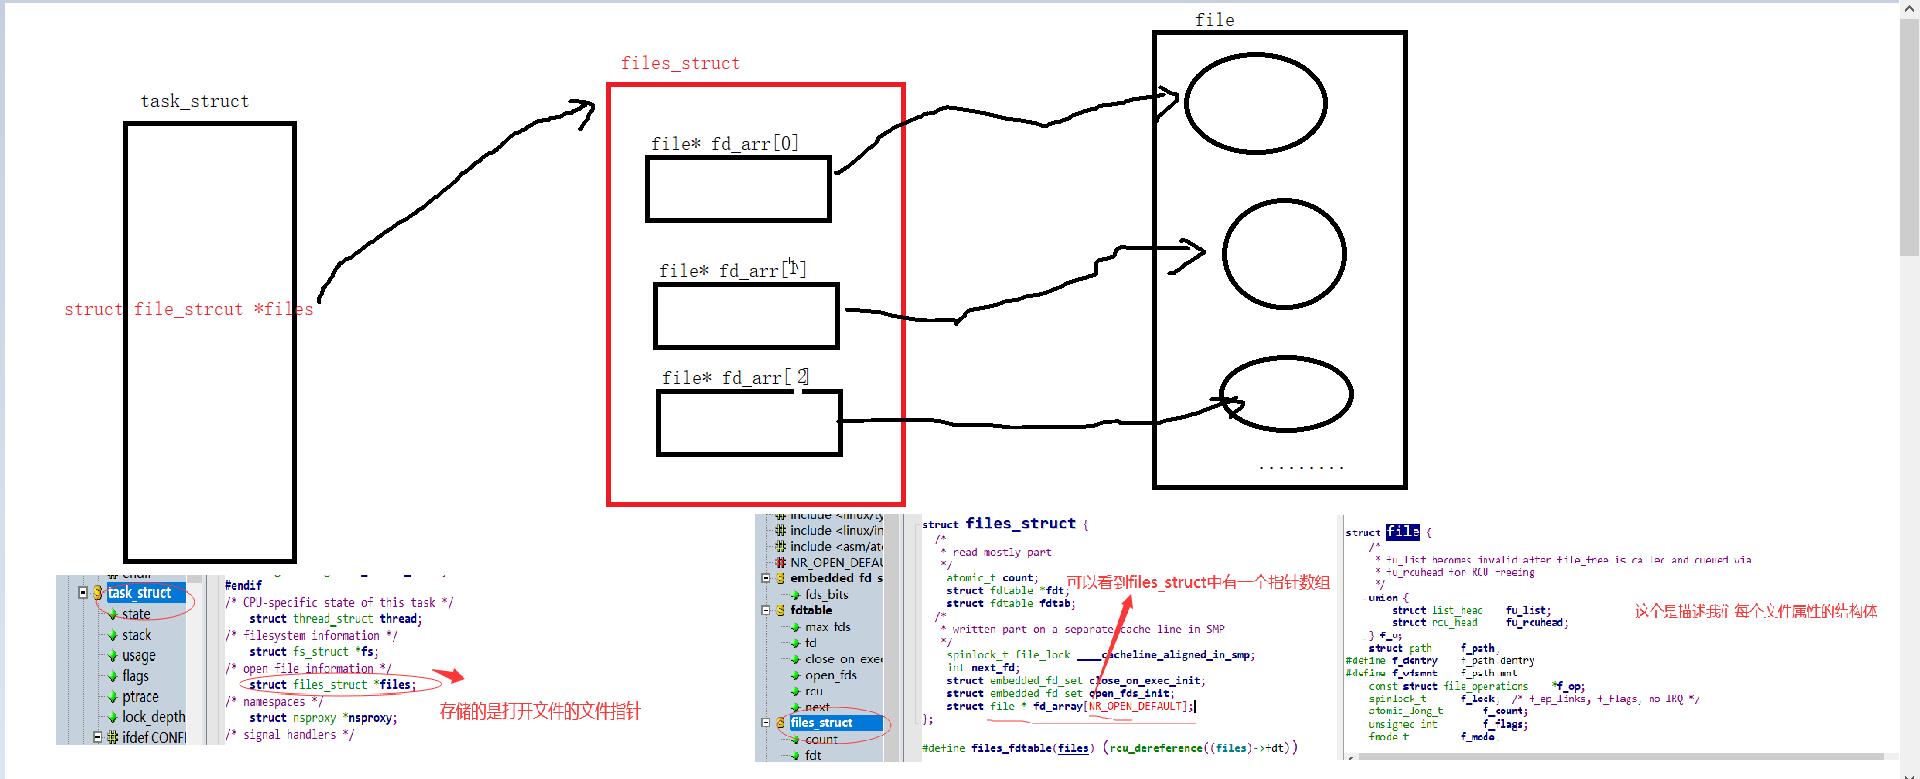
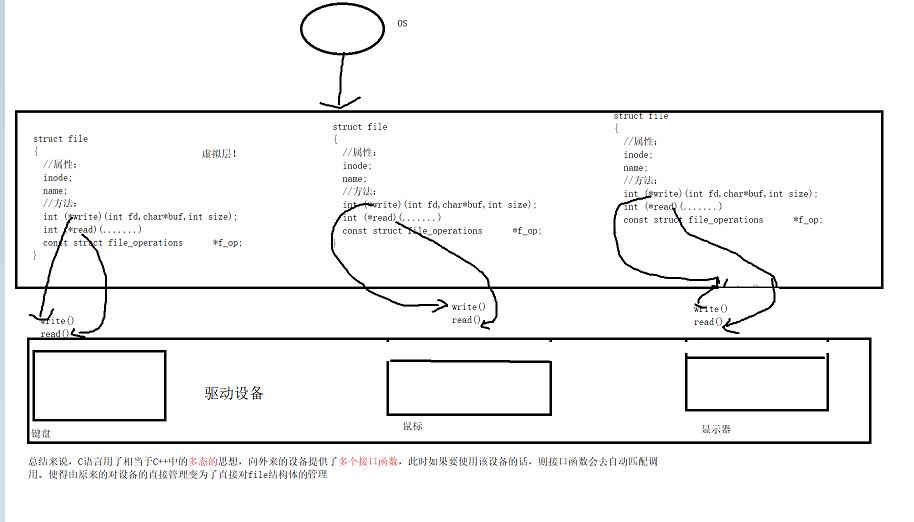
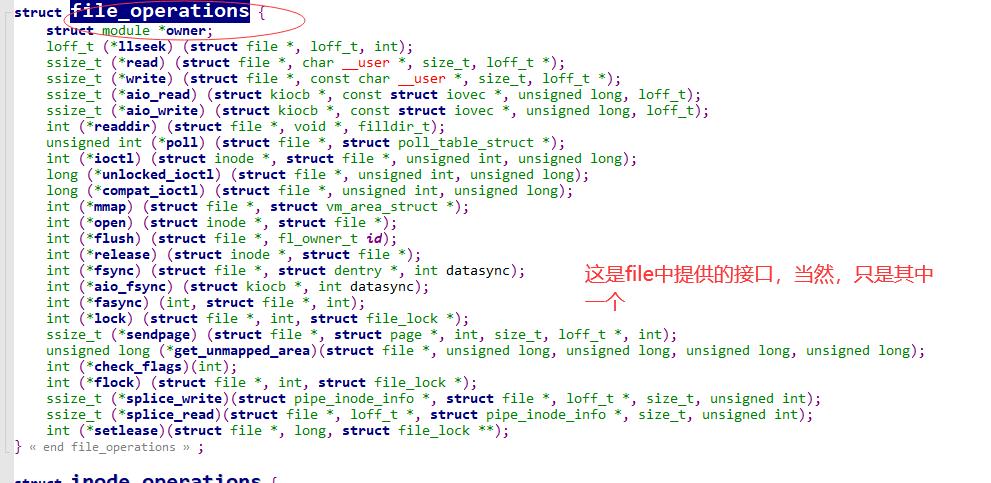
如何理解Linux下一切皆文件
文件描述符的分配规则
默认从小到大进行分配
  1 #include<stdio.h>
  2 #include<sys/stat.h>
  3 #include<sys/types.h>
  4 #include<fcntl.h>
  5 #include<string.h>
  6 #include<unistd.h>
  7 int main()
  8 {
  9   // int fd=open("write.txt",O_WRONLY|O_CREAT,0664);
 10   // int fd=open("write.txt",O_WRONLY|O_CREAT|O_TRUNC,0664);
 11
 12    close(0);
 13    int fd=open("write.txt",O_WRONLY|O_CREAT|O_APPEND,0664);
 14    printf("%d\\n",fd);
 15    int fd1=open("a.txt",O_CREAT|O_WRONLY,0664);
 16    printf("%d\\n",fd1);
 17    int fd2=open("b.txt",O_CREAT|O_WRONLY,0664);
 18    printf("%d\\n",fd2);
 19    sleep(1);
 20    int fd3=open("c.txt",O_CREAT|O_WRONLY,0664);
 21    printf("%d\\n",fd3);
 22    //if(fd<0)
 23    //{
 24    //    printf("open error");
 25    //    return 1;
 26    //}
 27    // const char*str="hello Linux\\n";
 28    // write(fd,str,strlen(str));
 29    // close(fd);
 30 // //  printf("%d\\n",fd);
 31    return 0;
 32 }

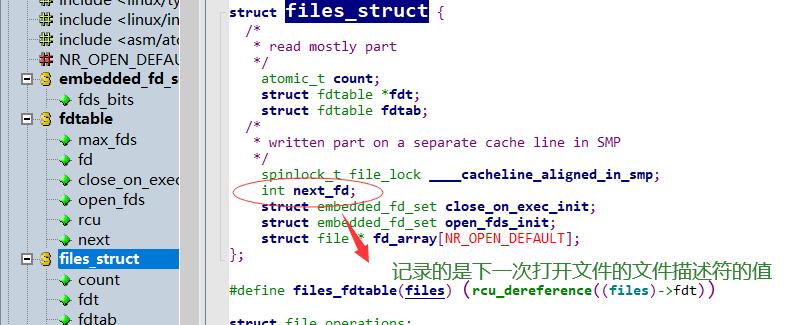
文件流指针FILE*与文件描述符的区别
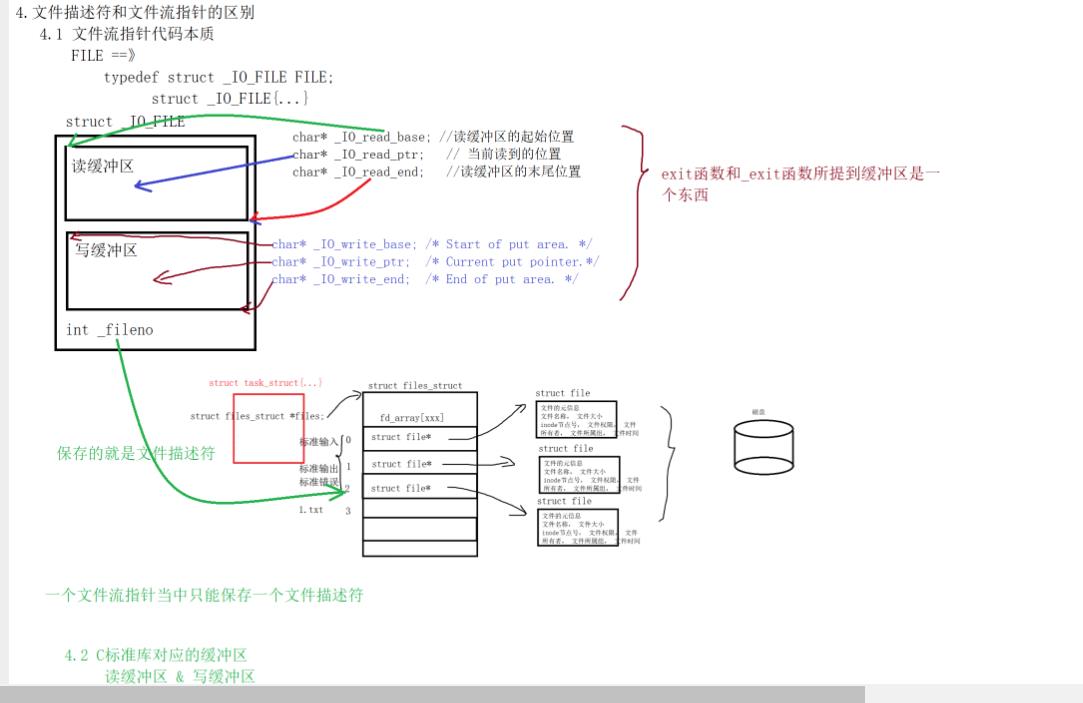
重定向
把原本所要显示到当前文件中的内容输出到别的文件中去。

普通重定向
通俗的说,就是每次在重定向之前,若文件存在则清空该文件,然后执行写入,若不存在,则先创建文件,然后执行写入操作。
使用函数:

  1 #include<stdio.h>
  2 #include<sys/types.h>
  3 #include<sys/stat.h>
  4 #include<fcntl.h>
  5 #include<unistd.h>
  6 int main()
  7 {
  8     int fd=open("redirect.txt",O_CREAT|O_WRONLY|O_TRUNC,0664);
  9     if(fd<0)
 10     {
 11         perror("open failed");
 12         return 1;
 13     }
 14     dup2(3,1);
 15     close(fd);
 16     printf("hello Linux\\n");
 17     printf("hello young man\\n");
 18     printf("hello oc\\n");
 19     return 0;
 20 }
 21
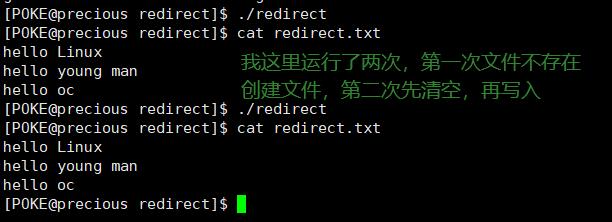
追加重定向
与普通重定向相比来说,其类似于就是文件的追加,不清空文件。

相对于普通重定向来说,我们只需要将其的打开文件的方式由O_TRUNC变为O_APPEND 即可
  1 #include<stdio.h>
  2 #include<sys/types.h>
  3 #include<sys/stat.h>
  4 #include<fcntl.h>
  5 #include<unistd.h>
  6 int main()
  7 {
  8    // int fd=open("redirect.txt",O_CREAT|O_WRONLY|O_TRUNC,0664);
  9     int fd=open("redirect.txt",O_CREAT|O_WRONLY|O_APPEND,0664);
 10     if(fd<0)
 11     {
 12         perror("open failed");
 13         return 1;
 14     }
 15     dup2(3,1);
 16     close(fd);
 17     printf("hello Linux\\n");
 18     printf("hello young man\\n");
 19     printf("hello oc\\n");
 20     return 0;
 21 }
重定向的本质
将其stdout文件的指向由之前的指向变为新创建的文件,(通俗点说,要么你关闭掉1号文件,1号文件就是stdout,然后重新打开新文件,则根据文件描述符的分配方式,则会将1分配给新打开的文件,这时候执行程序的话,将本该打印在屏幕上的数据输出到了你新打开的文件。 第二种方式调用dup2(int newfd,int oldfd).将newfd拷贝给oldfd,其本质也是更改1号文件的指向。
缓冲区
为什么要引入缓冲区?
因为cpu的处理速度是远远大于I/O操作的,所以我们再写入或是读取的时候,都会先将写入或者读取的数据放在一块缓冲区内,等cpu执行完后,用户再去取数据,或者用户先写入到缓冲区,然后由cpu直接去读取。
本质:空间换时间,匹配cpu与I/O差异的情况。
缓冲区归属
我们在学习C/C++中都听到过缓冲区的概念,那么缓冲区位于什么地方,它到底是属于语言层面的缓冲区还是属于系统层面的缓冲区?
  1 #include<stdio.h>
  2 #include<sys/stat.h>
  3 #include<sys/types.h>
  4 #include<fcntl.h>
  5 #include<string.h>
  6 #include<unistd.h>
  7 int main()
  8 {
  9     close(1);
 10     const char*str1="hello Linux\\n";
 11     const char*str2="hello world\\n";
 12     const char*str3="hello peter\\n";
 13     int fd=open("buf.txt",O_WRONLY|O_CREAT|O_APPEND,0664);
 14     if(fd<0)
 15     {
 16         perror("create err");
 17         return 1;
 18     }
 19     write(1,str1,strlen(str1));
 20     printf("%s",str2);
 21     fprintf(stdout,"%s",str3);
 22     fork();
 23     fflush(stdout);
 24     return 0;
 25 }
此时在子进程中会被刷新一次,父进程中也会刷新一次。
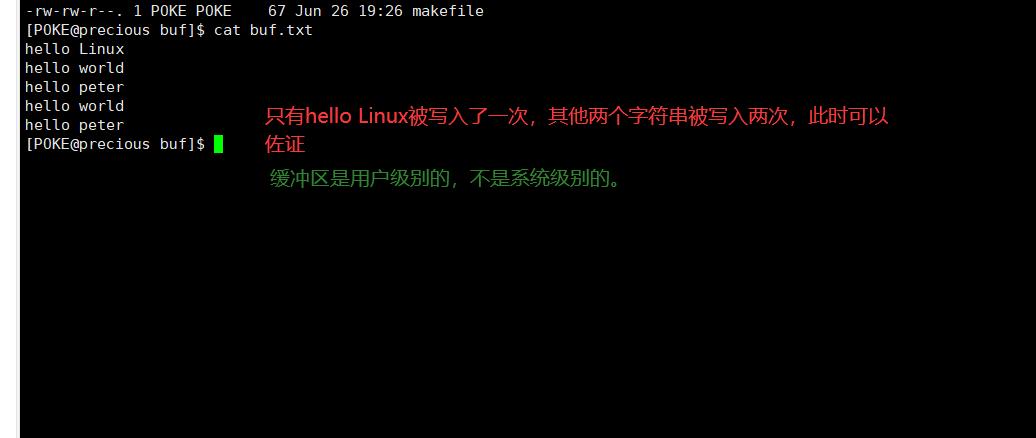
原因:在刷新过程中只对库函数的写入刷新了两次,系统调用只写入一次。
常见的缓冲方式
1、全缓冲
在这种情况下,当填满标准I/O缓存后才进行实际I/O操作。全缓冲的典型代表是对磁盘文件的读写。
2、行缓冲
在这种情况下,当在输入和输出中遇到换行符时,执行真正的I/O操作。这时,我们输入的字符先存放在缓冲区,等按下回车键换行时才进行实际的I/O操作。典型代表是键盘输入数据。
3、不带缓冲
也就是不进行缓冲,标准出错情况stderr是典型代表,这使得出错信息可以直接尽快地显示出来。
理解文件系统
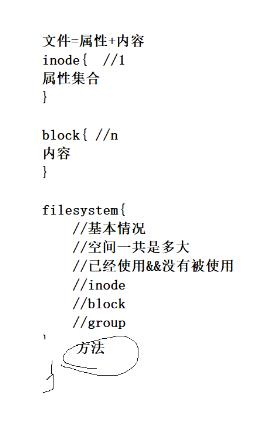
操作系统会将我们的磁盘的管理抽象为对数组的管理。地址映射,根据逻辑地址计算物理地址。
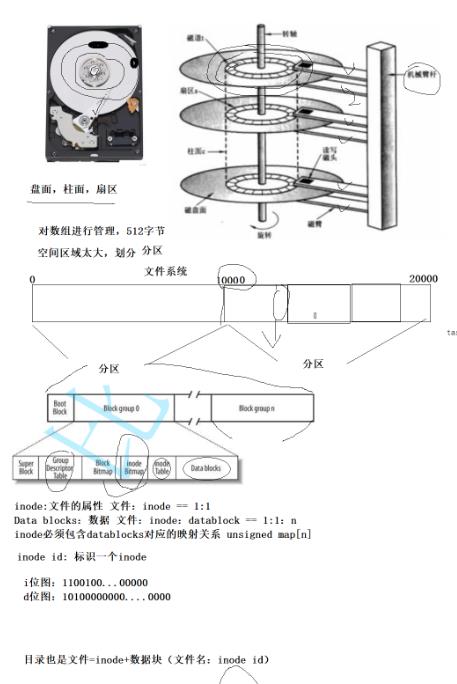
Block Group :ext2文件系统会根据分区的大小划分为数个Block Group。而每个Block Group都有着相同的结构组成。政府管理各区的例子
超级块(Super Block):存放文件系统本身的结构信息。记录的信息主要有:bolck 和 inode的总量,未使用的block和inode的数量,一个block和inode的大小,最近一次挂载的时间,最近一次写入数据的时间,最近一次检验磁盘的时间等其他文件系统的相关信息。Super Block的信息被破坏,可以说整个文件系统结构就被破坏了GDT,
Group Descriptor Table:块组描述符,描述块组属性信息,有兴趣的可以在了解一下
块位图(Block Bitmap):Block Bitmap中记录着Data Block中哪个数据块已经被占用,哪个数据块没有被占用
inode位图(inode Bitmap):每个bit表示一个inode是否空闲可用。
i节点表:存放文件属性 如 文件大小,所有者,最近修改时间等
数据区:存放文件内容
位图:Inode Bitmap:表示该inode有没有被分配出去。这个表标识了有哪些inode被使用,有多少个inode没有被使用。
Block Bitmap:标识了有哪些块已经被使用,哪些块没有被使用。
怎么创建一个文件:首先在inode Bitmap中找到一块未被分配的内存,创建完后再去Block Bitmap中选取相应的内存。
怎么找一个文件:首先确定分区,再查找Inode Bitmap位图找到对应的inode号,接下来根据里面存储的文件所在地方去找文件即可。
问答题:在磁盘容量充足的情况下,创建文件失败,为什么?
这种情况是存在的,因为文件系统自创建起其inode Bitmap 中所能创建的最大的inode 个数已经确定了,此时虽然说你有容量,但是在inode Bitmap这个位图中已经没有多余的空间供你去记录你文件的信息了,所以此时尽管你有空间,你也不能创建文件。
如何理解删除文件?
删除文件是不是将文件删除(物理上的),不是的,因为你会发现你下载的时间可能很长,但删除的时间却很短。为甚么会这样,这是因为在删除时操作系统首先会找到文件,然后将你的文件的inode从inode Bitmap中置0,标识这部分空间没有被使用。相应的,在Block Bitmap中同样的,也会将这文件对应的 data Blocks 从位图中置0。这样在肉眼上你确实看到你文件不见了,同时磁盘可用容量也变多了。
如何恢复删除的文件?
在没有文件覆盖删除文件的inode的情况下,我们可以去inode Table中去查找,其中仍然记录着与data Block 之间的映射关系,此时去找的话我们就可以找到对应的块。本质便是先将它里面的inode Bitmap 中的inode置为1,然后通过映射关系将其data Block对应的 Block Bitmap 置为1。
理解目录
目录也是文件=inode+数据块(文件名:inode id)
理解ls命令:

理解ls -al

通过ls -i查看对应关系。

软硬链接
软链接
软链接又称之为符号连接(Symbolic Link)。软链接文件类似于Windows的快捷方式。它实际上是一个特殊的文件。在符号连接中,文件实际上是一个文本文件,其中包含的有另一文件的位置信息。
软链接文件的特性
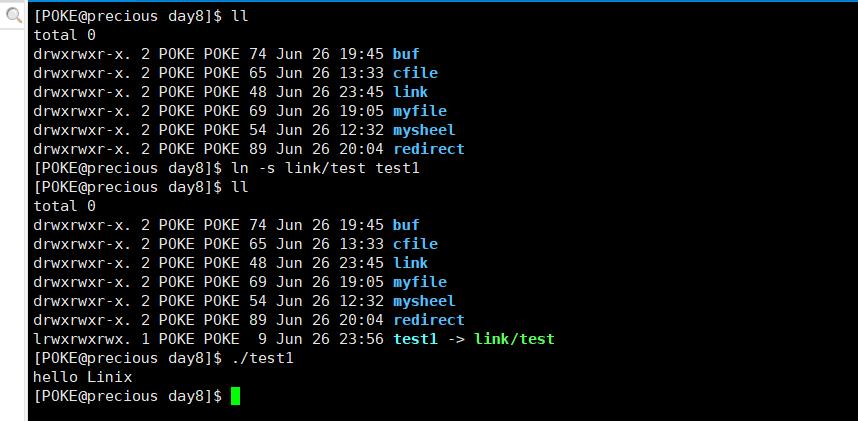
生成软链接文件: ln -s 源文件名 生成文件名
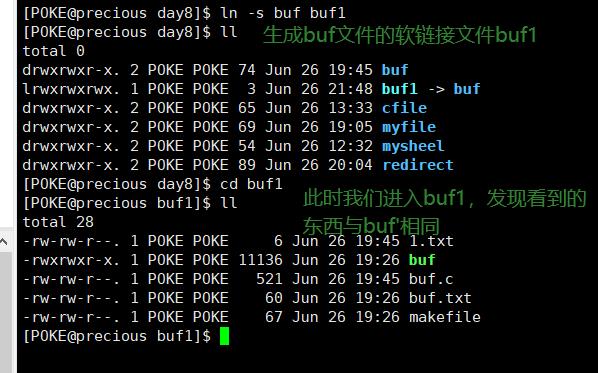

软链接的使用
1.作为启动程序的快捷方式
首先创建一个软链接文件
  1 #include<stdio.h>
  2 int main()
  3 {
  4     printf("hello Linix\\n");
  5     return 0;
  6 }
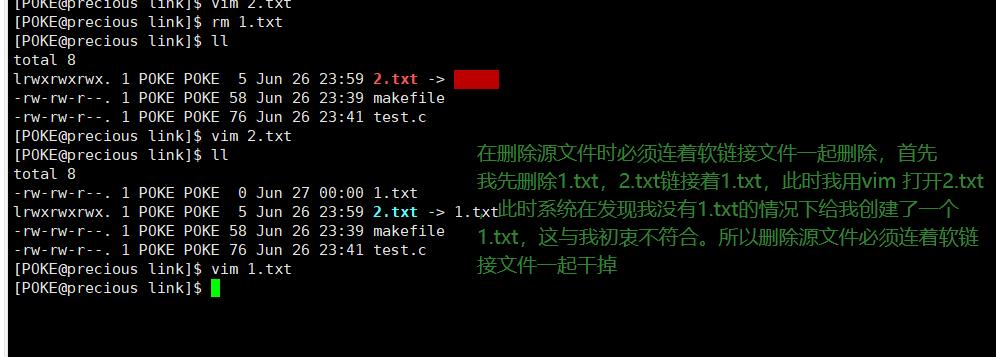
软链接的使用注意
1.软链接文件会随着源文件的修改在变
2.
硬链接
语法:
ln 源文件 硬链接文件
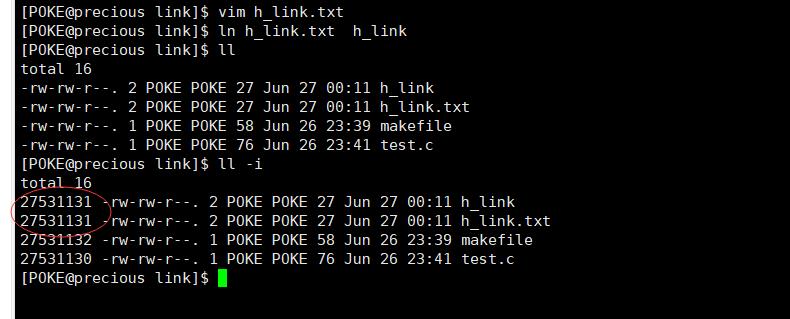
如上图可以看到硬链接文件不是一个独立的文件。因为硬链接文件没有独立的inode。
硬链接的使用
类似于windows下的重命名,重命名可以看作是先生成一个硬链接文件,然后删除源文件,则这个硬链接文件便是 重命名之后的文件。
理解ll命令

1.模式
2.硬链接数
3.文件所有者
4.组
5.大小
6.最后修改时间
7.文件名

软硬链接的区别是软链接具有独立的inode,硬链接与链接文件共有一个inode。
动静态库
静态链接与动态链接生成可执行文件
测试用例:

makefile文件
1 all:test teststatic
2 test:test.c
3 gcc $^ -o $@
4 teststatic:teststatic以上是关于Linux系统编程---进程I/O的主要内容,如果未能解决你的问题,请参考以下文章