RPC基础系列3gRPC简单示例
Posted 楼仔进阶之路
tags:
篇首语:本文由小常识网(cha138.com)小编为大家整理,主要介绍了RPC基础系列3gRPC简单示例相关的知识,希望对你有一定的参考价值。
本文主要讲述Java使用gRPC的简单示例。
前言
我们不能只看原理,而忽略实践,也不能只关注实践,而忽略原理,应该两者兼顾!
前面两篇文章《【RPC基础系列1】聊聊RPC》、《【RPC基础系列2】一文搞懂gRPC和Thrift的基本原理和区别》就能基本搞懂三个重要概念:RPC、gRPC和Thrift,这篇文章我们就看gPRC的使用姿势。
gRPC示例
代码:git@github.com:lml200701158/rpc-study.git
项目结构
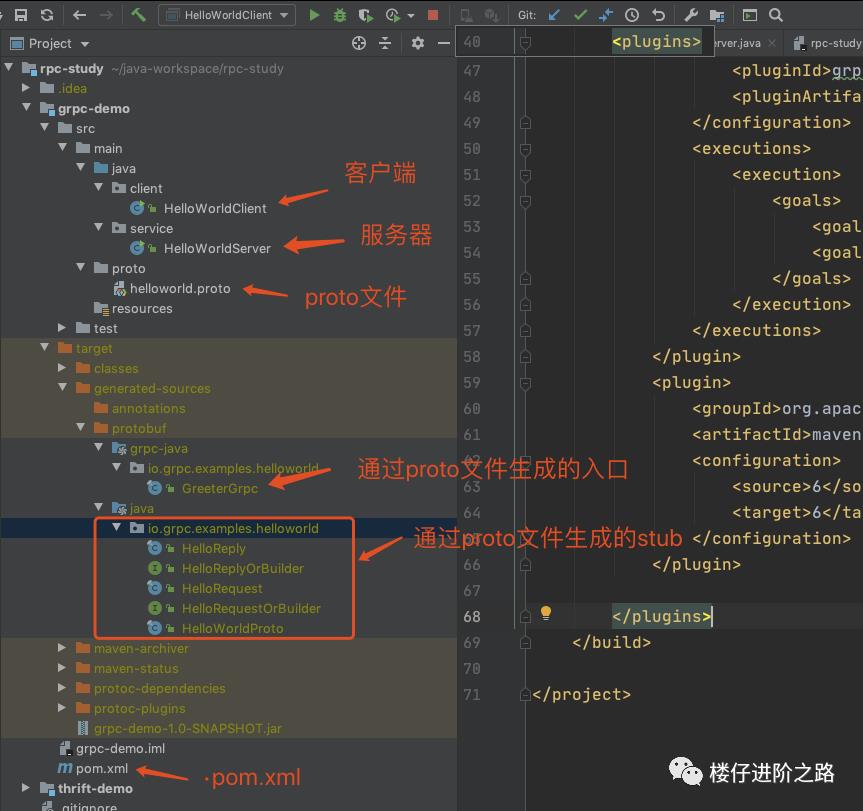
我们先看一下项目结构:

生成protobuf文件
helloworld.proto
syntax = "proto3";

option java_multiple_files = true;
option java_package = "io.grpc.examples.helloworld";
option java_outer_classname = "HelloWorldProto";
option objc_class_prefix = "HLW";

package helloworld;

// The greeting service definition.
service Greeter {
  // Sends a greeting
  rpc SayHello (HelloRequest) returns (HelloReply) {}
}

// The request message containing the user's name.
message HelloRequest {
  string name = 1;
}

// The response message containing the greetings
message HelloReply {
  string message = 1;
}
这里提供了一个SayHello()方法,然后入参为HelloRequest,返回值为HelloReply,可以看到proto文件只定义了入参和返回值的格式,以及调用的接口,至于接口内部的实现,该文件完全不用关心。
pom.xml
<?xml version="1.0" encoding="UTF-8"?>
<project xmlns="http://maven.apache.org/POM/4.0.0"
         xmlns:xsi="http://www.w3.org/2001/XMLSchema-instance"
         xsi:schemaLocation="http://maven.apache.org/POM/4.0.0 http://maven.apache.org/xsd/maven-4.0.0.xsd">
    <parent>
        <artifactId>rpc-study</artifactId>
        <groupId>org.example</groupId>
        <version>1.0-SNAPSHOT</version>
    </parent>
    <modelVersion>4.0.0</modelVersion>

    <artifactId>grpc-demo</artifactId>

    <dependencies>
        <dependency>
            <groupId>io.grpc</groupId>
            <artifactId>grpc-netty-shaded</artifactId>
            <version>1.14.0</version>
        </dependency>
        <dependency>
            <groupId>io.grpc</groupId>
            <artifactId>grpc-protobuf</artifactId>
            <version>1.14.0</version>
        </dependency>
        <dependency>
            <groupId>io.grpc</groupId>
            <artifactId>grpc-stub</artifactId>
            <version>1.14.0</version>
        </dependency>
    </dependencies>

    <build>
        <extensions>
            <extension>
                <groupId>kr.motd.maven</groupId>
                <artifactId>os-maven-plugin</artifactId>
                <version>1.5.0.Final</version>
            </extension>
        </extensions>
        <plugins>
            <plugin>
                <groupId>org.xolstice.maven.plugins</groupId>
                <artifactId>protobuf-maven-plugin</artifactId>
                <version>0.5.1</version>
                <configuration>
                    <protocArtifact>com.google.protobuf:protoc:3.5.1-1:exe:${os.detected.classifier}</protocArtifact>
                    <pluginId>grpc-java</pluginId>
                    <pluginArtifact>io.grpc:protoc-gen-grpc-java:1.14.0:exe:${os.detected.classifier}</pluginArtifact>
                </configuration>
                <executions>
                    <execution>
                        <goals>
                            <goal>compile</goal>
                            <goal>compile-custom</goal>
                        </goals>
                    </execution>
                </executions>
            </plugin>
            <plugin>
                <groupId>org.apache.maven.plugins</groupId>
                <artifactId>maven-compiler-plugin</artifactId>
                <configuration>
                    <source>6</source>
                    <target>6</target>
                </configuration>
            </plugin>

        </plugins>
    </build>
</project>
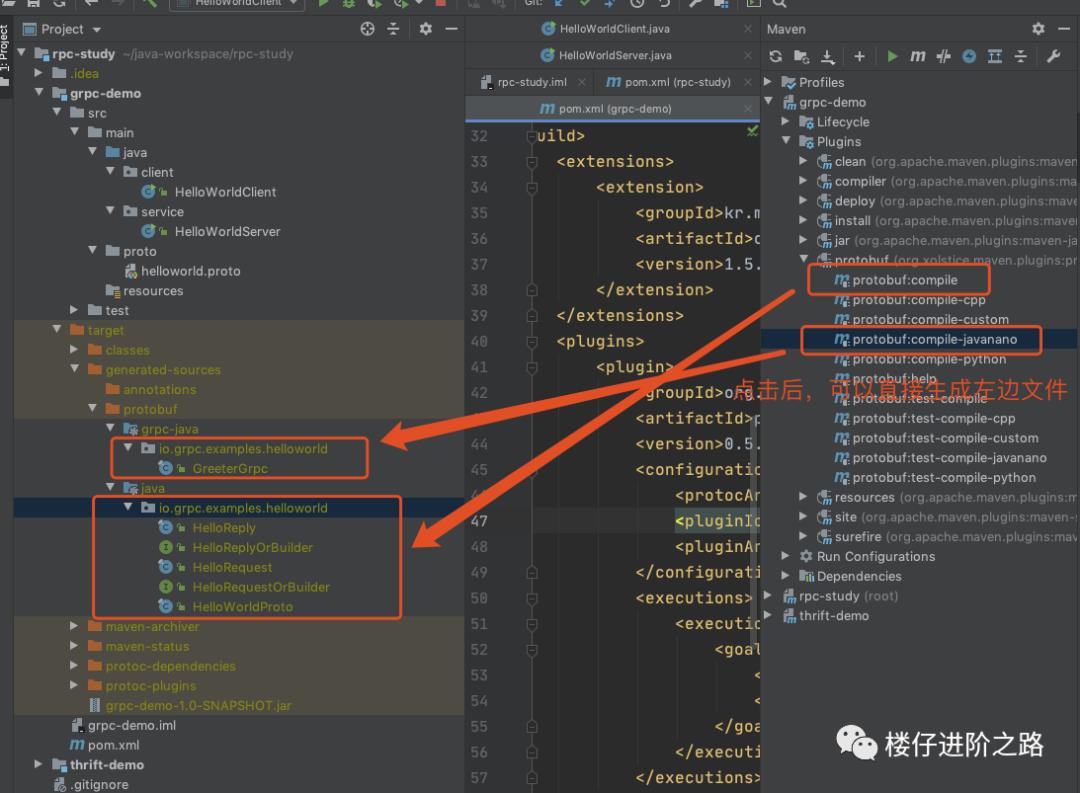
这里面的build其实是为了安装protobuf插件,里面其实有2个插件我们需要用到,分别为protobuf:compile和protobuf:compile-javanano,当我们直接执行时,会生成左侧文件,其中GreeterGrpc提供调用接口,Hello开头的文件功能主要是对数据进行序列化,然后处理入参和返回值。
可能有同学会问,你把文件生成到target中,我想放到main.src中,你可以把这些文件copy出来,或者也可以通过工具生成:
下载protoc.exe 工具 , 下载地址:https://github.com/protocolbuffers/protobuf/releases 下载protoc-gen-grpc 插件 , 下载地址: http://jcenter.bintray.com/io/grpc/protoc-gen-grpc-java/

服务端和客户端
HelloWorldClient.java
public class HelloWorldClient {
    private final ManagedChannel channel;
    private final GreeterGrpc.GreeterBlockingStub blockingStub;
    private static final Logger logger = Logger.getLogger(HelloWorldClient.class.getName());

    public HelloWorldClient(String host,int port){
        channel = ManagedChannelBuilder.forAddress(host,port)
                .usePlaintext(true)
                .build();

        blockingStub = GreeterGrpc.newBlockingStub(channel);
    }


    public void shutdown() throws InterruptedException {
        channel.shutdown().awaitTermination(5, TimeUnit.SECONDS);
    }

    public  void greet(String name){
        HelloRequest request = HelloRequest.newBuilder().setName(name).build();
        HelloReply response;
        try{
            response = blockingStub.sayHello(request);
        } catch (StatusRuntimeException e)
        {
            logger.log(Level.WARNING, "RPC failed: {0}", e.getStatus());
            return;
        }
        logger.info("Message from gRPC-Server: "+response.getMessage());
    }

    public static void main(String[] args) throws InterruptedException {
        HelloWorldClient client = new HelloWorldClient("127.0.0.1",50051);
        try{
            String user = "world";
            if (args.length > 0){
                user = args[0];
            }
            client.greet(user);
        }finally {
            client.shutdown();
        }
    }
}
这个太简单了,就是连接服务端口,调用sayHello()方法。
HelloWorldServer.java
public class HelloWorldServer {
    private static final Logger logger = Logger.getLogger(HelloWorldServer.class.getName());

    private int port = 50051;
    private Server server;

    private void start() throws IOException {
        server = ServerBuilder.forPort(port)
                .addService(new GreeterImpl())
                .build()
                .start();
        logger.info("Server started, listening on " + port);

        Runtime.getRuntime().addShutdownHook(new Thread() {

            @Override
            public void run() {

                System.err.println("*** shutting down gRPC server since JVM is shutting down");
                HelloWorldServer.this.stop();
                System.err.println("*** server shut down");
            }
        });
    }

    private void stop() {
        if (server != null) {
            server.shutdown();
        }
    }

    // block 一直到退出程序
    private void blockUntilShutdown() throws InterruptedException {
        if (server != null) {
            server.awaitTermination();
        }
    }

    public static void main(String[] args) throws IOException, InterruptedException {
        final HelloWorldServer server = new HelloWorldServer();
        server.start();
        server.blockUntilShutdown();
    }

    // 实现 定义一个实现服务接口的类
    private class GreeterImpl extends GreeterGrpc.GreeterImplBase {
        @Override
        public void sayHello(HelloRequest req, StreamObserver<HelloReply> responseObserver) {
            HelloReply reply = HelloReply.newBuilder().setMessage(("Hello " + req.getName())).build();
            responseObserver.onNext(reply);
            responseObserver.onCompleted();
            System.out.println("Message from gRPC-Client:" + req.getName());
            System.out.println("Message Response:" + reply.getMessage());
        }
    }
}
主要是实现sayHello()方法,里面对数据进行了简单处理,入参为“W orld”,返回的是“Hello World”
启动服务
先启动Server,返回如下:

再启动Client,返回如下:

同时Server返回如下:
后记
这个Demo看起来很简单,我TM居然搞了大半天,一开始是因为不知道需要执行2个不同的插件来生成protobuf,以为只需要点击protobuf:compile就可以,结果发现protobuf:compile-javanano也需要点一下。
还有就是我自己喜欢作,感觉通过插件生成protobuf不完美,我想通过自己下载的插件,手动生成protobuf文件,结果手动生成的没有搞定,自动生成的方式也不可用,搞了半天才发现是缓存的问题,最后直接执行“Invalidate Caches / Restart”才搞定。
应征了一句话“no zuo no die”,不过这个过程还是需要经历的。
以上是关于RPC基础系列3gRPC简单示例的主要内容,如果未能解决你的问题,请参考以下文章