制作一个3D旋转相册
Posted 小小#
tags:
篇首语:本文由小常识网(cha138.com)小编为大家整理,主要介绍了制作一个3D旋转相册相关的知识,希望对你有一定的参考价值。
利用html常用标签,CSS常用属性,JS入门语法
制作一个3D旋转相册
part one
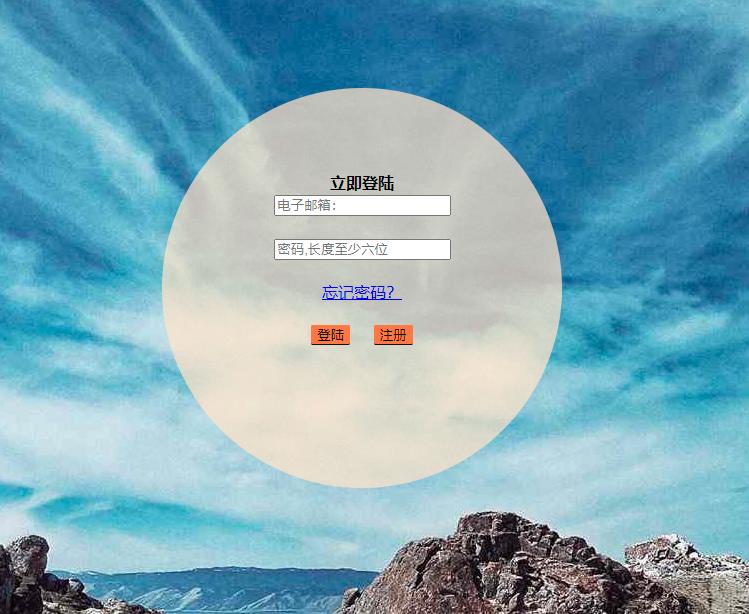
完成《个人相册》项目登录页面

代码如下,如有需要请自行整合
 #but1{
background-color:  coral;
border-bottom: black 1px solid;
                border-top-style: none;
                border-right-style: none;
                border-left-style: none;
       }
       #but2{
background-color: coral;
border-bottom: black 1px solid;
                border-top-style: none;
                border-right-style: none;
                border-left-style: none;
       }

.circle {
	border-radius: 50%;

	width: 400px;
	height: 400px;
    transform: translate(500px,100px);
	text-align: center;
    background-color:rgba(252,230,201,0.7);


}

#num1{
     border-bottom: black 1px solid;
                border-top-style: none;
                border-right-style: none;
                border-left-style: none;
                background-color: transparent;
}
#num2{
     border-bottom: black 1px solid;
                border-top-style: none;
                border-right-style: none;
                border-left-style: none;
                background-color: transparent;
}
<body background="素材/综合.jpg" wight="100%">
<div >
<div class="circle"><br/><br/><br/><br/>
<strong>立即登陆</strong><br/>
<table>
<tr>
<input type="text" id="nm" placeholder="电子邮箱:" />
</tr><br/><br/>
<tr>
<input type="password" id="p1" placeholder="密码,长度至少六位" />
</tr><br/><br/>
<tr>
<a href="#">忘记密码?</a>
</tr><br/><br/>
<tr>
<input type="button" id="but1" value="登陆" onclick="fenn()" />
<input type="button" id="but2" value="注册" onclick="fann()"/>
</tr>
</table>
</div>
</div>
</body>
  function  fann(){

        window.location.href="注册.html";
           window.event.returnValue = false;

    }

    function fenn(){

            if(localStorage.getItem("username")==document.getElementById("nm").value){
                if(localStorage.getItem("password")==document.getElementById("p1").value){
                        alert("登录成功");
                        window.location.href="项目相册页面.html";
                       window.event.returnValue = false;
                     }

        }

    }
part two
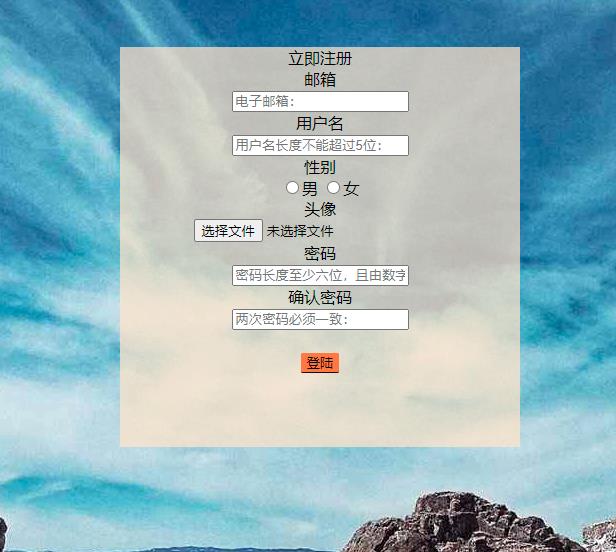
注册页面:
<style>
        #but3{
background-color:  coral;
border-bottom: black 1px solid;
                border-top-style: none;
                border-right-style: none;
                border-left-style: none;
       }


        .rectangle {

	width: 400px;
	height: 400px;
    transform: translate(500px,100px);
	text-align: center;
    background-color:rgba(252,230,201,0.7);

}
    </style>
<body background="素材/综合.jpg">
    <div>
<div class="rectangle">
    <form action="">

        <tr>立即注册</tr><br/>
        <tr>邮箱<br/>
            <input type="text" id="em" name="username" onchange="f1()"   placeholder="电子邮箱:" /></tr><br/>
        <tr>用户名<br/>
            <input type="text" id="nm" name="password"   onchange="f2()"   placeholder="用户名长度不能超过5位:" /></tr><br/>

            <tr> 性别<br><input type="radio" name="性别" />男
        <input type="radio" name="性别" />女</tr><br/>

        <tr>头像<br/>
            <input type="file" name="photo" id="ph"  /></tr><br/>

            <tr>密码<br/>
            <input type="password"  id="p1"   onchange="f3()" placeholder="密码长度至少六位,且由数字和字母组成:"/></tr><br/>
        <tr>

            <tr>确认密码<br/><input type="password"     onchange="f4()"  id="p2" placeholder="两次密码必须一致:"/></tr><br/>
        </tr>
       <br/>
        <tr><input type="button" id="but3" value="登陆" onclick="f5()" />   </tr>

    </form>
</div>
</div>
<div>

</div>
</body>
<script>
     function f1(){
        var em=document.getElementById("em").value
        var reg = /^([a-zA-Z]|[0-9])(\\w|\\-)+@[a-zA-Z0-9]+\\.([a-zA-Z]{2,4})$/;
		if(!reg.test(em)){
			alert("邮箱格式不正确");
		}

      }

      function f2(){

        var nm=document.getElementById("nm").value;
        if(nm.length>=6){
            alert("格式错误");
        }
      }

      function f3(){
          var p1=document.getElementById("p1").value;
          var reg =/^(?![^a-zA-Z]+$)(?!\\D+$)/;
		  if(!reg.test(p1)||p1.length<=6){
			alert("格式不正确");
		}}

        function f4(){
          var p2=document.getElementById("p11").value;
		  if(p2!=document.getElementById("p1").value){
			alert("密码不一致");
		}}


        function f5(){
           localStorage.setItem("username",document.getElementById("em").value);
           localStorage.setItem("password",document.getElementById("p1").value);
           window.location.href="登陆.html";
           window.event.returnValue = false;

		}

        function f6(){

           window.location.href="登陆.html";
           return false;

		}

</script>
part three
个人相册页面:

<style>
     .container {
    display: flex;
    flex-direction: column;
}
    </style>
</head>
<body>
    <style type="text/css">
    a{
        color: honeydew;
    }

        html, body {
            padding: 0; margin: 0px;
        }

        .container {
            display: flex;
            height: 660px; width: 1349px;
            box-shadow: 0 0 0 1px white;
            background-image: url("素材/综合.jpg");
        }

        div:nth-child(1) {
            /* 属于其父元素的第一个子元素 */
            background-color:grey;
            height:5%;
            width: 100%;
            text-align: right;


        }
        div:nth-child(2) {

            width: 100%;
            height:95%;
            width: 280px;
            height: 400px;
            position: fixed;
            left: 0;
            right: 0;
            top:0;
            bottom: 0;
            margin: auto;
            transform-style: preserve-3d;
            transform: rotateX(5deg) rotateY(0deg);
            animation: go 30s linear infinite;/* linear表示匀速、infinite表示让动画无限次播放 */

        }
        #box img{width: 400px;
                 height: 280px;
                 position: absolute;
                 left: 0;
                 top: 0;
        }


        #box img:nth-child(1){
            transform: rotateY(60deg) translateZ(400px);}
        #box img:nth-child(2){
            transform: rotateY(120deg) translateZ(400px);}
        #box img:nth-child(3){
            transform: rotateY(180deg) translateZ(400px);}
        #box img:nth-child(4){
            transform: rotateY(240deg) translateZ(400px);}
        #box img:nth-child(5){
            transform: rotateY(300deg) translateZ(400px);}
        #box img:nth-child(6){
            transform: rotateY(360deg) translateZ(400px);}

		@keyframes go {
		    0%{transform: rotateX(0deg) rotateY(0deg);}
		    25%{transform: rotateX(5deg) rotateY(90deg);}
		    50%{transform: rotateX(0deg) rotateY(180deg);}
		    75%{transform: rotateX(-5deg) rotateY(270deg);}
		    100%{transform: rotateX(0deg) rotateY(355deg);}

		}

    </style>
    <body>
        <section class="container">

            <div >
               <a href="#"  >个人信息</a>
               <a href="#" >退出</a>
            </div>
            <div  id="box">
                <img src="素材/1.jpg">
                <img src="素材/2.jpg">
                <img src="素材/3.jpg">
                <img src="素材/4.jpg">
                <img src="素材/5.jpg">
                <img src="素材/6.jpg">

            </div>

        </section>


</body>
花费一番大力气,干货满满,请大家批评指正
以上是关于制作一个3D旋转相册的主要内容,如果未能解决你的问题,请参考以下文章