拓展springmvc原理详解
Posted Fire king
tags:
篇首语:本文由小常识网(cha138.com)小编为大家整理,主要介绍了拓展springmvc原理详解相关的知识,希望对你有一定的参考价值。
拓展springmvc原理
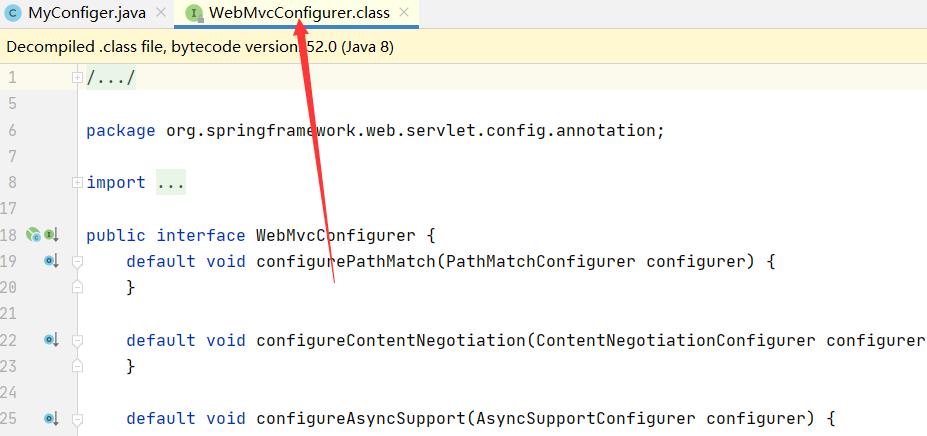
springboot自定义配置采用了策略模式,配置同样的组件采用不同的实现方法,因此必定有一个接口封装了一系列“算法”,这个接口就是WebMvcConfigurer
可以重写的方法:
public class ContentNegotiatingViewResolver extends WebApplicationObjectSupport implements ViewResolver, Ordered, InitializingBean {实现了视图解析器接口的类,就可以看成是一个视图解析器,那么问题来了,我们也要做一个实现视图解析器接口的类,就要知道它的规则,规则应该怎么找呢?因此,我们即使在ContentNegotiatingViewResolver很难找到规则,可以到它的父类或者实现的接口去找,这里选了ViewResolver:
//
// Source code recreated from a .class file by IntelliJ IDEA
// (powered by Fernflower decompiler)
//

package org.springframework.web.servlet;

import java.util.Locale;
import org.springframework.lang.Nullable;

public interface ViewResolver {
    @Nullable
    View resolveViewName(String var1, Locale var2) throws Exception;
}
然后就可以到ContentNegotiatingViewResolver找到resolveViewName方法:
 if (requestedMediaTypes != null) {
            List<View> candidateViews = this.getCandidateViews(viewName, locale, requestedMediaTypes);
            View bestView = this.getBestView(candidateViews, requestedMediaTypes, attrs);
            if (bestView != null) {
                return bestView;
            }
这个方法获取候选视图,得到最好的视图,如何获取候选视图:
进入方法getCandidateViews:这个方法遍历所有的视图解析器,获取视图,封装到view,view添加到候选视图candidateViews,最后返回。
            while(var5.hasNext()) {
                ViewResolver viewResolver = (ViewResolver)var5.next();
                View view = viewResolver.resolveViewName(viewName, locale);
                if (view != null) {
                    candidateViews.add(view);
                }

                Iterator var8 = requestedMediaTypes.iterator();

                while(var8.hasNext()) {
                    MediaType requestedMediaType = (MediaType)var8.next();
                    List<String> extensions = this.contentNegotiationManager.resolveFileExtensions(requestedMediaType);
                    Iterator var11 = extensions.iterator();

                    while(var11.hasNext()) {
                        String extension = (String)var11.next();
                        String viewNameWithExtension = viewName + '.' + extension;
                        view = viewResolver.resolveViewName(viewNameWithExtension, locale);
                        if (view != null) {
                            candidateViews.add(view);
                        }
                    }
                }
            }
        }

        if (!CollectionUtils.isEmpty(this.defaultViews)) {
            candidateViews.addAll(this.defaultViews);
        }

        return candidateViews;
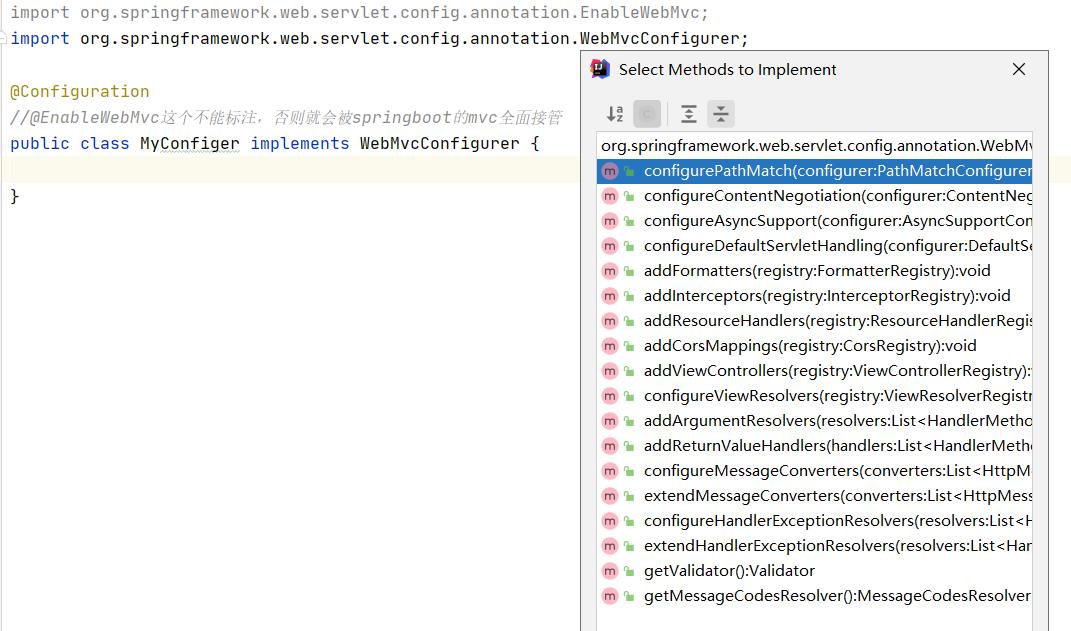
如何自定义视图解析器:
@Configuration
//@EnableWebMvc这个不能标注,否则就会被springboot的mvc全面接管
public class MyConfiger implements WebMvcConfigurer {

    //将自定义视图解析器交给spring管理
    @Bean
    public  ViewResolver myViewResolver(){
        return new MyViewResolver();
    }

    //自定义视图解析器
    public static class MyViewResolver implements ViewResolver{

        @Override
        public View resolveViewName(String s, Locale locale) throws Exception {
            return null;
        }
    }

}
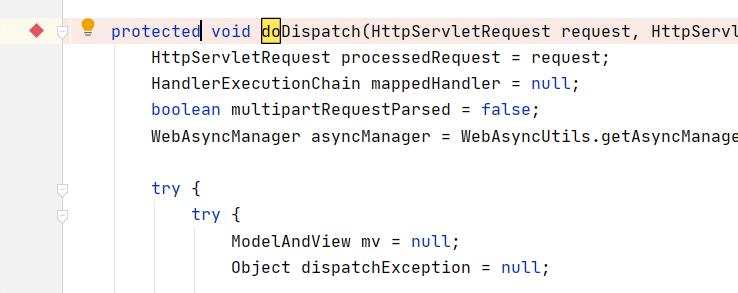
那么如何得知我们配置的视图解析器配置成功呢?
答案:利用dispatcherServlet(前端控制器),因为所有请求都会经过前端控制器,前端控制器把请求发给前端控制器,进入DispatcherServlet的doService方法的this.doDispatch(request, response);方法,所有的请求和响应都经过这里
    protected void doDispatch(HttpServletRequest request, HttpServletResponse response) throws Exception {
        HttpServletRequest processedRequest = request;
        HandlerExecutionChain mappedHandler = null;
        boolean multipartRequestParsed = false;
        WebAsyncManager asyncManager = WebAsyncUtils.getAsyncManager(request);

        try {
            try {
                ModelAndView mv = null;
                Object dispatchException = null;
因此在这里断点
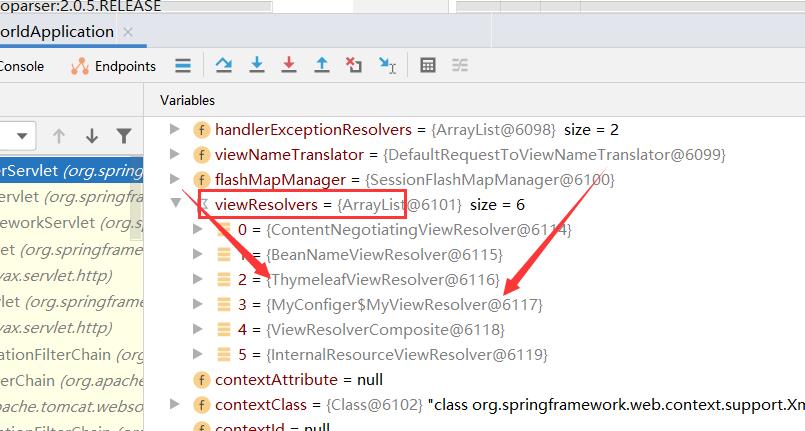
结果:其中thymeleaf是我们导入thymeleaf启动器后有的,而MyConfiger是我们自己配置的,其余都是默认的。
实现WebMvcConfigurer中的方法
@Configuration
//@EnableWebMvc这个不能标注,否则就会被springboot的mvc全面接管
public class MyConfiger implements WebMvcConfigurer {
//视图跳转
@Override
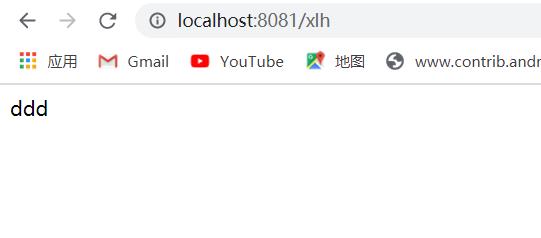
public void addViewControllers(ViewControllerRegistry registry) {
registry.addViewController("/xlh").setViewName("yyds");
}
}
为什么拓展mvc不能导入@EnableWebMvc
@Retention(RetentionPolicy.RUNTIME)
@Target({ElementType.TYPE})
@Documented
@Import({DelegatingWebMvcConfiguration.class})
public @interface EnableWebMvc {
}
@EnableWebMvc导入了DelegatingWebMvcConfiguration.class
public class DelegatingWebMvcConfiguration extends WebMvcConfigurationSupport {
DelegatingWebMvcConfiguration继承了WebMvcConfigurationSupport
进入WebMvcAutoConfiguration类中
 @Import({WebMvcAutoConfiguration.EnableWebMvcConfiguration.class})
    @EnableConfigurationProperties({WebMvcProperties.class, ResourceProperties.class})
    @Order(0)
    public static class WebMvcAutoConfigurationAdapter implements WebMvcConfigurer {
        private static final Log logger = LogFactory.getLog(WebMvcConfigurer.class);
        private final ResourceProperties resourceProperties;
        private final WebMvcProperties mvcProperties;
        private final ListableBeanFactory beanFactory;
        private final ObjectProvider<HttpMessageConverters> messageConvertersProvider;
        final WebMvcAutoConfiguration.ResourceHandlerRegistration
进入@Import({WebMvcAutoConfiguration.EnableWebMvcConfiguration.class})中EnableWebMvcConfiguration.class
 public static class EnableWebMvcConfiguration extends DelegatingWebMvcConfiguration implements ResourceLoaderAware {
        private final ResourceProperties resourceProperties;
        private final WebMvcProperties mvcProperties;
进入DelegatingWebMvcConfiguration,下面方法加入容器中所有的WebMvcConfigurer
  @Autowired(
        required = false
    )
    public void setConfigurers(List<WebMvcConfigurer> configurers) {
        if (!CollectionUtils.isEmpty(configurers)) {
            this.configurers.addWebMvcConfigurers(configurers);
        }

    }
所以说@EnableWebMvc从容器中获取所有的WebMvcConfig。
回归正题,WebMvcAutoConfiguration有效的条件:@ConditionalOnMissingBean({WebMvcConfigurationSupport.class})不存在
@ConditionalOnClass({Servlet.class, DispatcherServlet.class, WebMvcConfigurer.class})
@ConditionalOnMissingBean({WebMvcConfigurationSupport.class})
@AutoConfigureOrder(-2147483638)
@AutoConfigureAfter({DispatcherServletAutoConfiguration.class, TaskExecutionAutoConfiguration.class, ValidationAutoConfiguration.class})
public class WebMvcAutoConfiguration {
而@EnableWebMvc会导入DelegatingWebMvcConfiguration,DelegatingWebMvcConfiguration继承WebMvcConfigurationSupport,因此自动配置部分失效,但是自定义拓展的(例如手动导入的thymeleaf还能用)还能用:
总结:
1.只要看到xxxConfiguration,一定是springmvc拓展功能。
2.WebMvcAutoConfiguration、xxxConfiguration以及自己定义的拓展的xxxConfiguration层级关系:
WebMvcAutoConfiguration是自动配置类,WebMvcAutoConfiguration包含xxxConfiguration,自己定义的拓展的xxxConfiguration和xxxConfiguration同层级,都是组件,里面的是写组件功能(方法),都实现WebMvcConfig接口,WebMvcConfig接口里面有一些webmvc的一些没有实现的功能。
以上是关于拓展springmvc原理详解的主要内容,如果未能解决你的问题,请参考以下文章