《分布式微服务电商》专题(十四)-电商项目商品类目后台页面访问
Posted 熊猫IT学院
tags:
篇首语:本文由小常识网(cha138.com)小编为大家整理,主要介绍了《分布式微服务电商》专题(十四)-电商项目商品类目后台页面访问相关的知识,希望对你有一定的参考价值。
1.三级分类
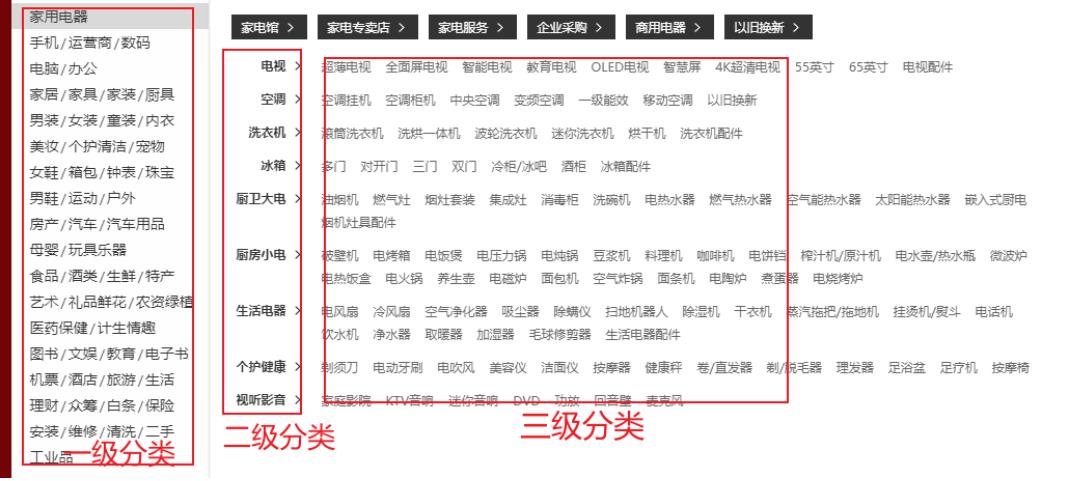
一级分类查出二级分类数据,二级分类中查询出三级分类数据
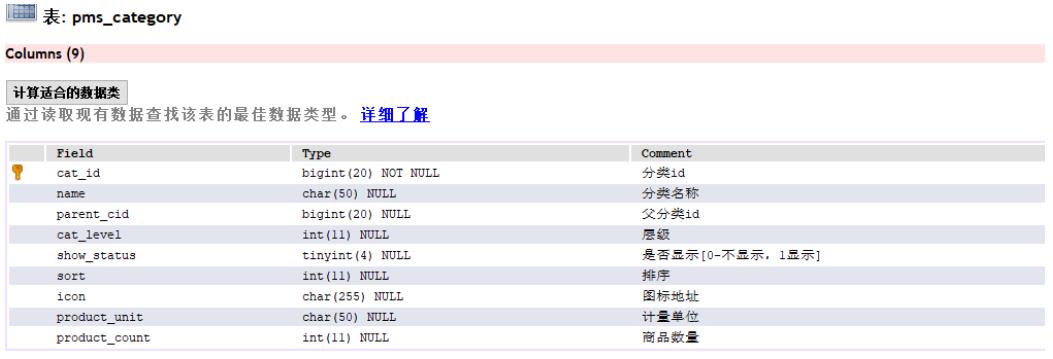
数据库设计
2.递归树形结构获取数据
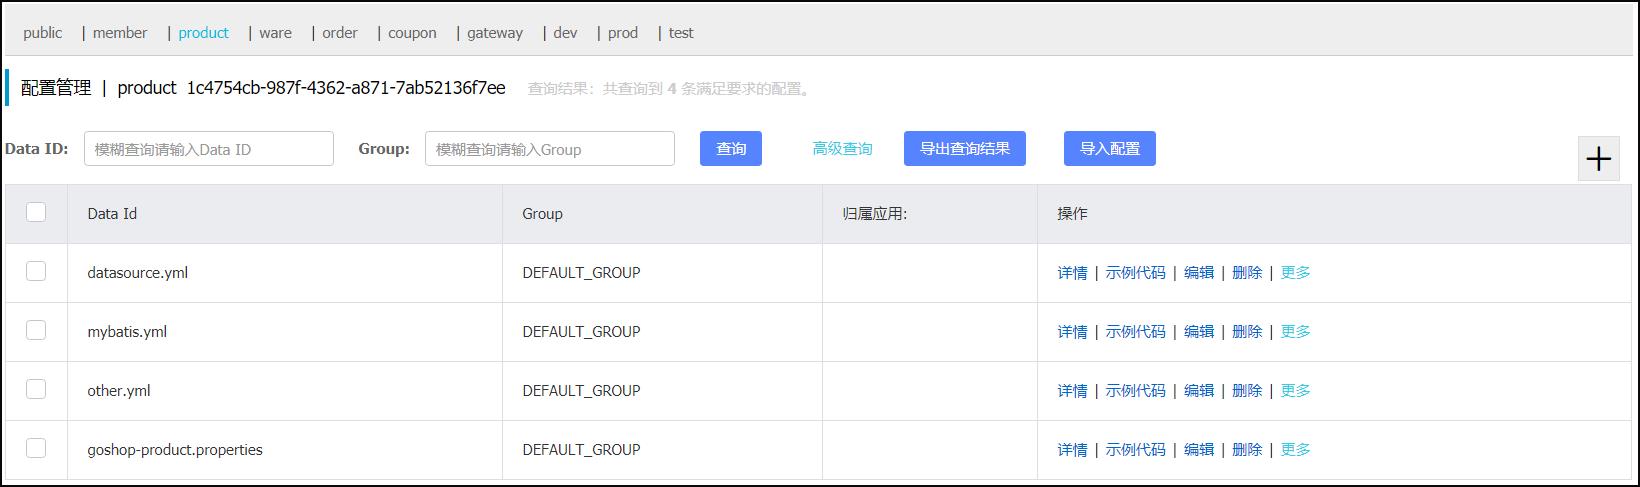
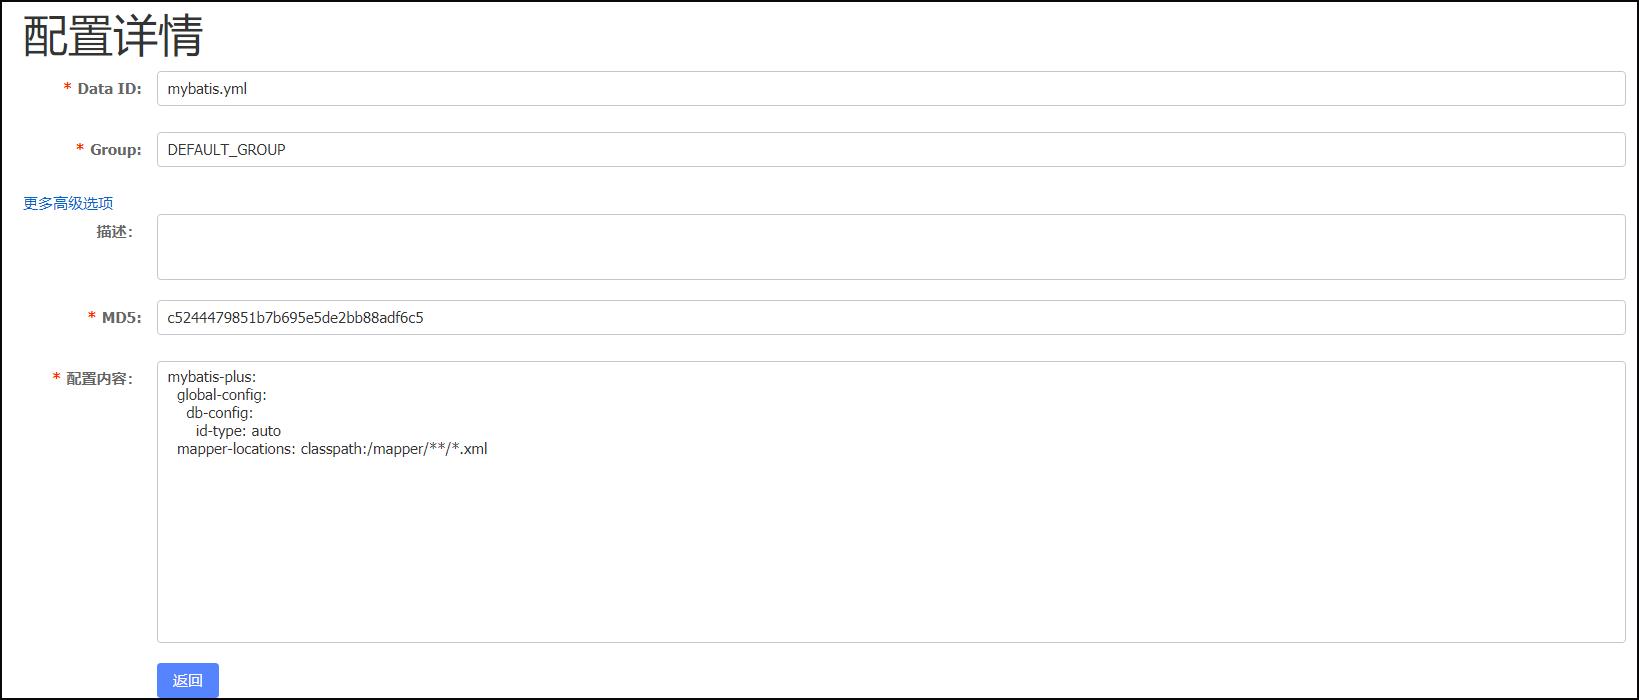
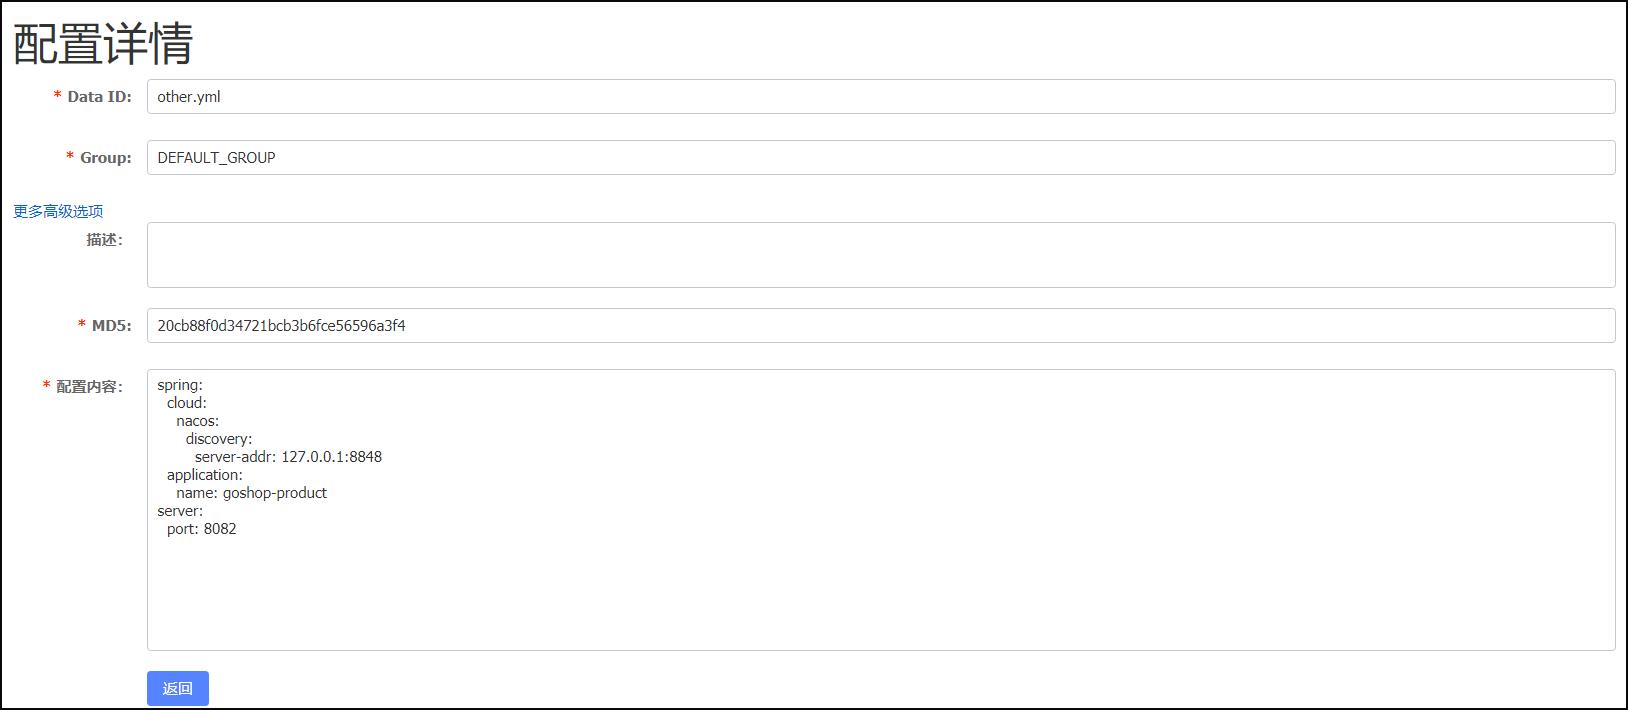
在注册中心中“product”命名空间中,创建“goshop-product.properties”配置文件:
在本地创建“bootstrap.properties”文件,指明配置中心的位置和使用到的配置文件:
spring.application.name=goshop-product
spring.cloud.nacos.config.server-addr=127.0.0.1:8848
spring.cloud.nacos.config.namespace=1c4754cb-987f-4362-a871-7ab52136f7ee
spring.cloud.nacos.config.ext-config[0].data-id=mybatis.yml
spring.cloud.nacos.config.ext-config[0].group=DEFAULT_GROUP
spring.cloud.nacos.config.ext-config[0].refresh=true
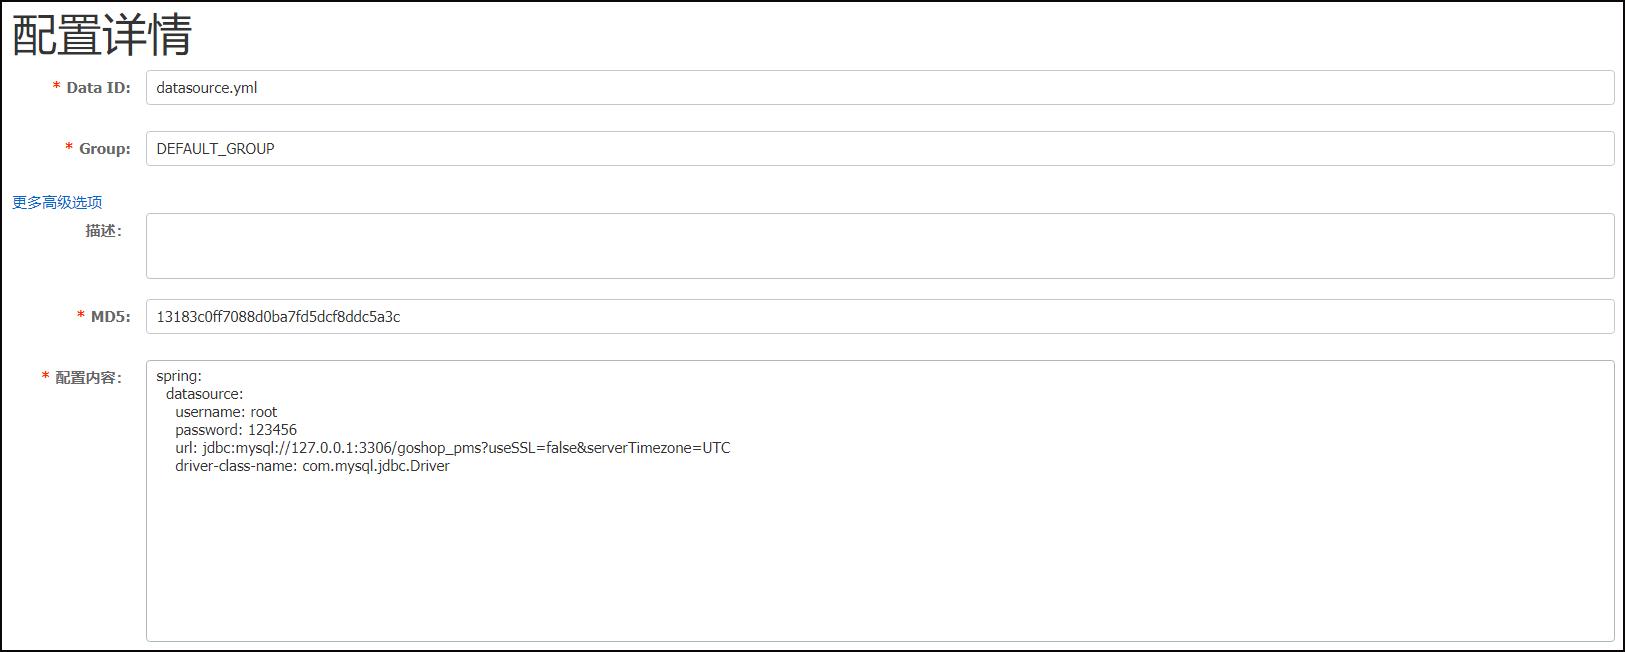
spring.cloud.nacos.config.ext-config[1].data-id=datasource.yml
spring.cloud.nacos.config.ext-config[1].group=DEFAULT_GROUP
spring.cloud.nacos.config.ext-config[1].refresh=true
spring.cloud.nacos.config.ext-config[2].data-id=other.yml
spring.cloud.nacos.config.ext-config[2].group=DEFAULT_GROUP
spring.cloud.nacos.config.ext-config[2].refresh=true
然后启动goshop-product,查看到该服务已经出现在了nacos的注册中心中了
修改“com.itxiongmao.goshop.product.controller.CategoryController”类,添加如下代码:
/**
  * 查出所有分类以及子分类,以树形结构组装起来
  */
 @RequestMapping("/list/tree")
 public R list(){
     List<CategoryEntity> entities = categoryService.listWithTree();
     return R.ok().put("data", entities);
 }
 @Override
 public List<CategoryEntity> listWithTree() {
     //1、查出所有分类
     List<CategoryEntity> entities = baseMapper.selectList(null);
     //2、组装成父子的树形结构
     //2.1)、找到所有的一级分类
     List<CategoryEntity> level1Menus = entities.stream().filter(categoryEntity -> categoryEntity.getParentCid() == 0
     ).map((menu) -> {
         menu.setChildren(getChildrens(menu, entities));
         return menu;
     }).sorted((menu1, menu2) -> {
         return (menu1.getSort() == null ? 0 : menu1.getSort()) - (menu2.getSort() == null ? 0 : menu2.getSort());
     }).collect(Collectors.toList());
     return level1Menus;
 }


 //递归查找所有菜单的子菜单
 private List<CategoryEntity> getChildrens(CategoryEntity root,List<CategoryEntity> all){

     List<CategoryEntity> children = all.stream().filter(categoryEntity -> {
         return categoryEntity.getParentCid() == root.getCatId();
     }).map(categoryEntity -> {
         //1、找到子菜单
         categoryEntity.setChildren(getChildrens(categoryEntity,all));
         return categoryEntity;
     }).sorted((menu1,menu2)->{
         //2、菜单的排序
         return (menu1.getSort()==null?0:menu1.getSort()) - (menu2.getSort()==null?0:menu2.getSort());
     }).collect(Collectors.toList());

     return children;
 }
分类实体类:
package com.itxiongmao.goshop.product.entity;

import com.baomidou.mybatisplus.annotation.TableField;
import com.baomidou.mybatisplus.annotation.TableId;
import com.baomidou.mybatisplus.annotation.TableName;

import java.io.Serializable;
import java.util.Date;
import java.util.List;

import com.fasterxml.jackson.annotation.JsonInclude;
import lombok.Data;

/**
 * 商品三级分类
 *
 * @author bruce
 * @email bruce@163.com
 * @date 2021-04-18 23:40:14
 */
@Data
@TableName("pms_category")
public class CategoryEntity implements Serializable {
	private static final long serialVersionUID = 1L;

	/**
	 * 分类id
	 */
	@TableId
	private Long catId;
	/**
	 * 分类名称
	 */
	private String name;
	/**
	 * 父分类id
	 */
	private Long parentCid;
	/**
	 * 层级
	 */
	private Integer catLevel;
	/**
	 * 是否显示[0-不显示,1显示]
	 */
	private Integer showStatus;
	/**
	 * 排序
	 */
	private Integer sort;
	/**
	 * 图标地址
	 */
	private String icon;
	/**
	 * 计量单位
	 */
	private String productUnit;
	/**
	 * 商品数量
	 */
	private Integer productCount;


	@JsonInclude(JsonInclude.Include.NON_EMPTY)
	@TableField(exist=false)
	private List<CategoryEntity> children;

}
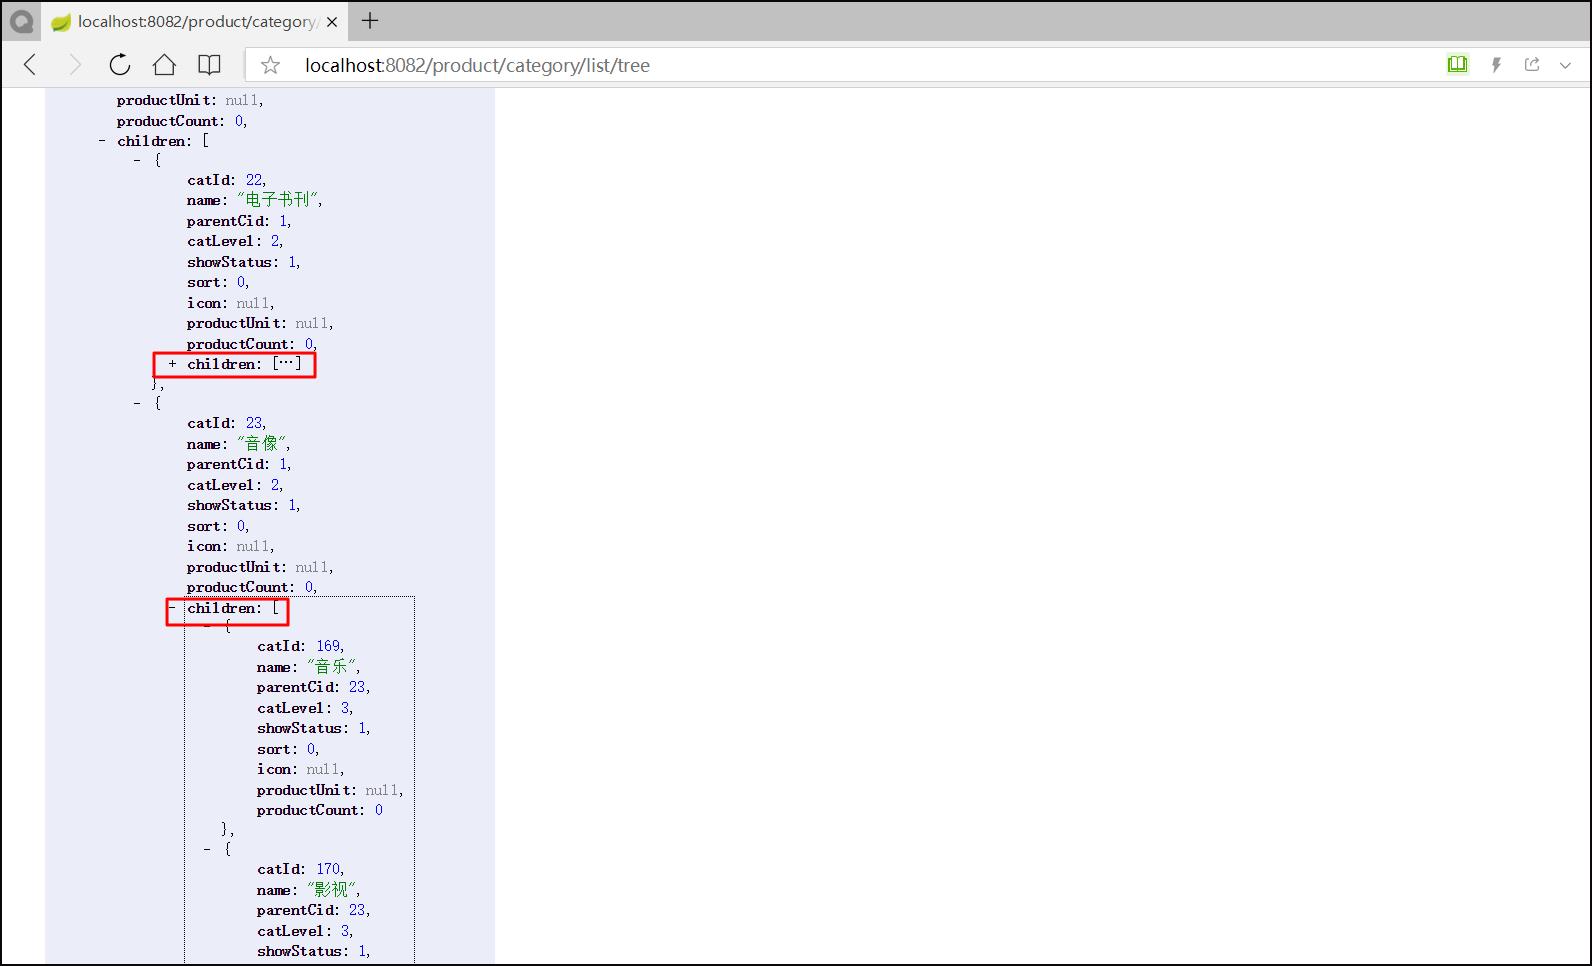
测试结果:
3.配置Vue项目
启动后端项目renren-fast

启动前端项目renren-fast-vue:
npm run dev

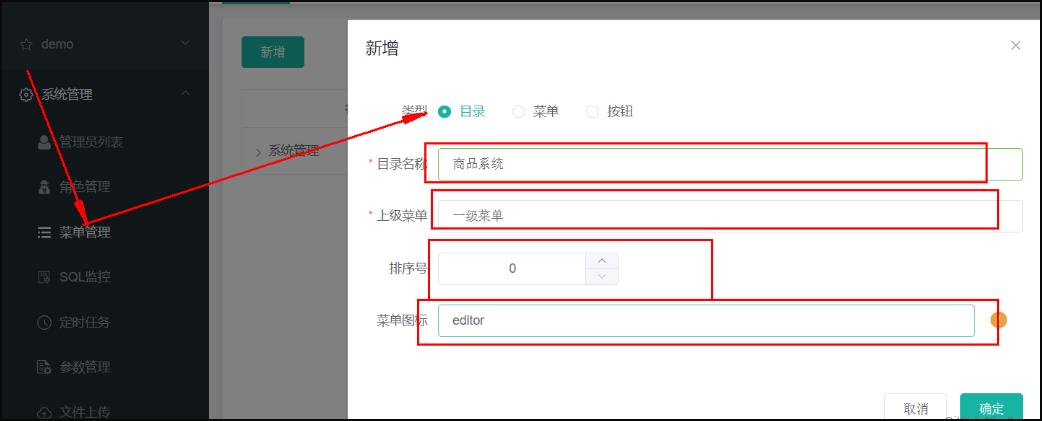
创建一级菜单:
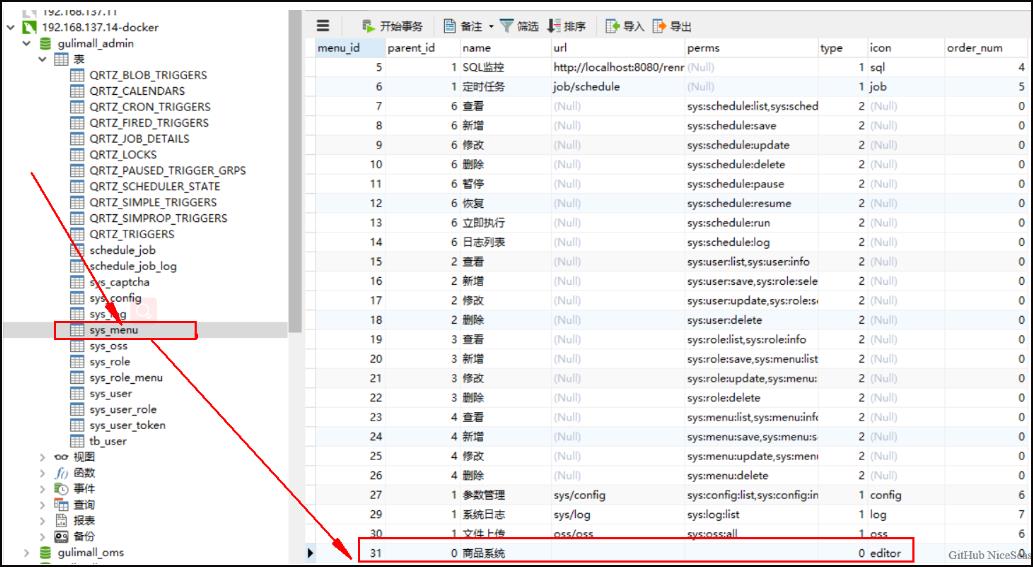
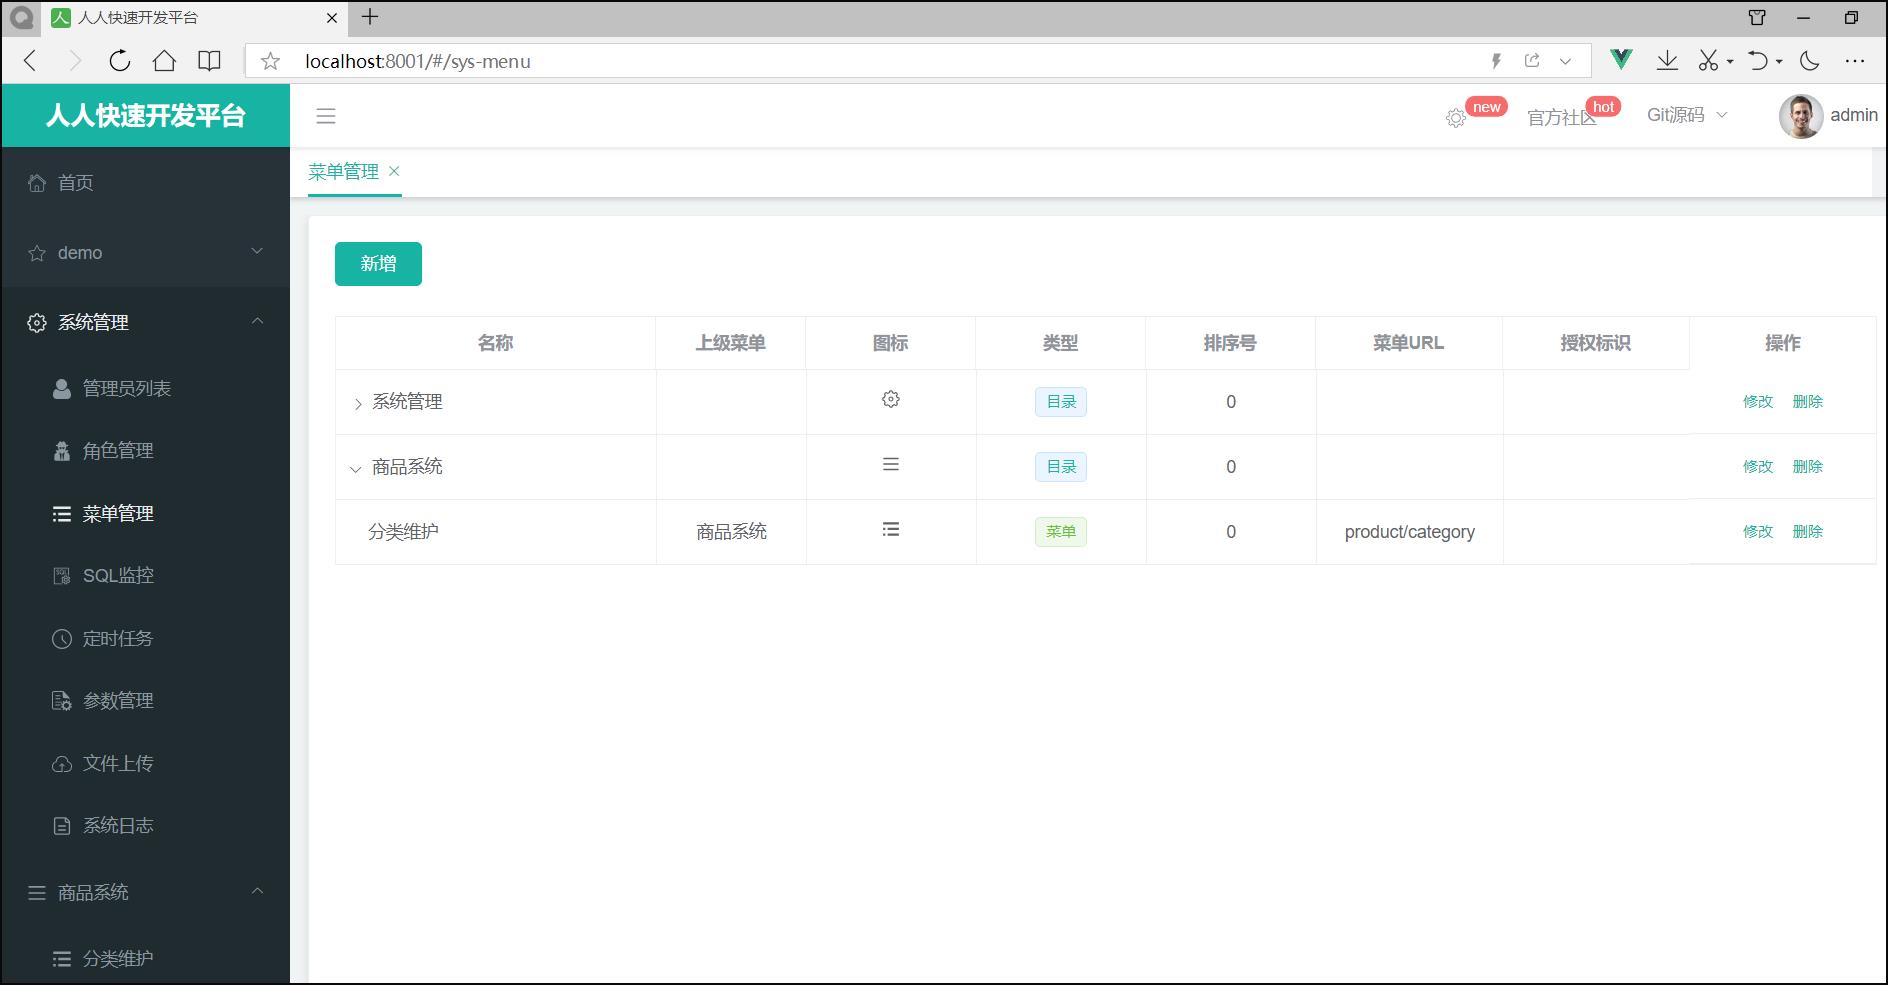
创建完成后,在后台的管理系统中会创建一条记录:
然后创建子菜单:
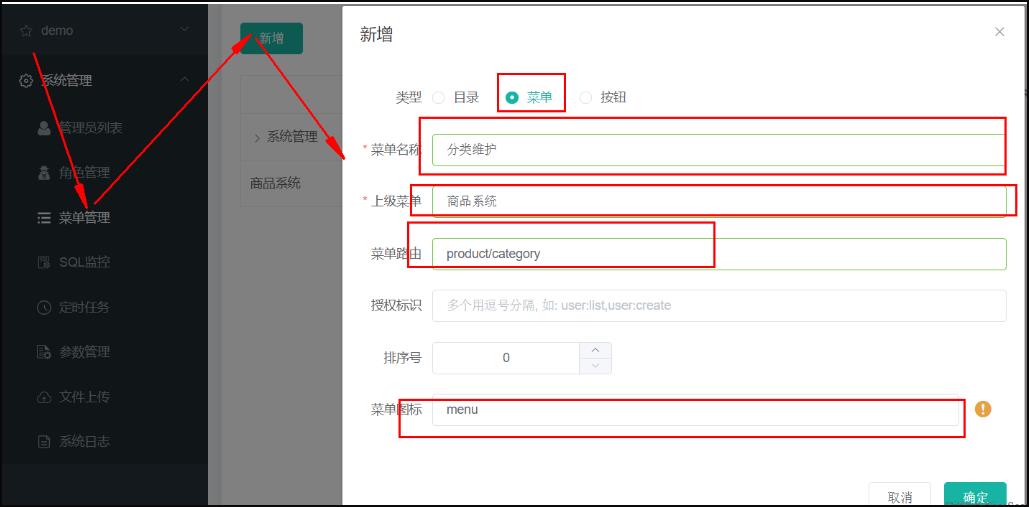
创建renren-fast-vue\\src\\views\\modules\\product目录,之所以是这样来创建,是因为product/category,对应于product-category
在该目录下,新建“category.vue”文件:
<!--  -->
<template>
  <el-tree :data="menus" :props="defaultProps" @node-click="handleNodeClick"></el-tree>
</template>

<script>
//这里可以导入其他文件(比如:组件,工具js,第三方插件js,json文件,图片文件等等)
//例如:import 《组件名称》 from '《组件路径》';

export default {
  //import引入的组件需要注入到对象中才能使用
  components: {},

  //监听属性 类似于data概念
  computed: {},
  //监控data中的数据变化
  watch: {},
  data() {
    return {
      menus: [],
      defaultProps: {
        children: "childrens",
        label: "name"
      }
    };
  },

  methods: {
    handleNodeClick(data) {
      console.log(data);
    },
    getMenus() {
      this.dataListLoading = true;
      this.$http({
        url: this.$http.adornUrl("/product/category/list/tree"),
        method: "get"
      }).then(({ data }) => {
        console.log("获取到数据", data);
        this.menus = data;
      });
    }
  },

  //生命周期 - 创建完成(可以访问当前this实例)
  created() {
    this.getMenus();
  },
  //生命周期 - 挂载完成(可以访问DOM元素)
  mounted(){},
  beforeCreate(){}, //生命周期 - 创建之前
  beforeMount(){}, //生命周期 - 挂载之前
  beforeUpdate(){}, //生命周期 - 更新之前
  updated(){}, //生命周期 - 更新之后
  beforeDestroy(){}, //生命周期 - 销毁之前
  destroyed(){}, //生命周期 - 销毁完成
  activated(){} //如果页面有keep-alive缓存功能,这个函数会触发
};
</script>
<style scoped>
刷新页面出现404异常,查看请求发现,请求的是“http://localhost:8080/renren-fast/product/category/list/tree”

这个请求是不正确的,正确的请求是:http://localhost:10000/product/category/list/tree,
修正这个问题:
替换“static\\config\\index.js”文件中的“window.SITE_CONFIG['baseUrl']”
替换前:
window.SITE_CONFIG['baseUrl'] = 'http://localhost:8080/renren-fast';
替换后:
window.SITE_CONFIG['baseUrl'] = 'http://localhost:88/api';
http://localhost:88,这个地址是我们网关微服务的接口。
4.网关配置
这里我们需要通过网关来完成路径的映射,因此将renren-fast注册到nacos注册中心中,并添加配置中心
<dependency>
	<groupId>com.itxiongmao.goshop</groupId>
	<artifactId>goshop-common</artifactId>
	<version>0.0.1-SNAPSHOT</version>
</dependency>
application:
name: renren-fast
cloud:
nacos:
discovery:
server-addr: 127.0.0.1:8848
config:
name: renren-fast
server-addr: 127.0.0.1:8848
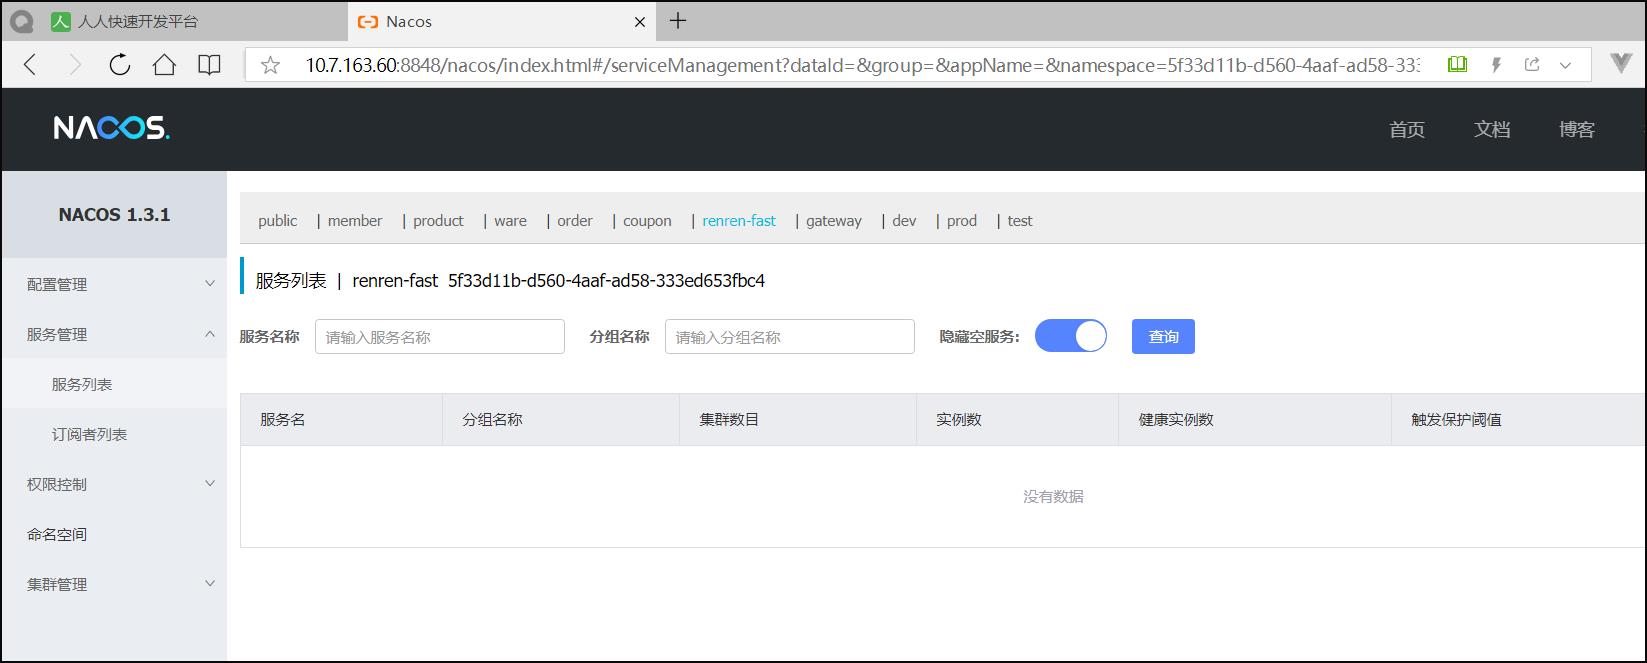
namespace: 5f33d11b-d560-4aaf-ad58-333ed653fbc4
启动类:
@SpringBootApplication
@EnableDiscoveryClient
public class RenrenApplication {

	public static void main(String[] args) {
		SpringApplication.run(RenrenApplication.class, args);
	}
}
注册中心:
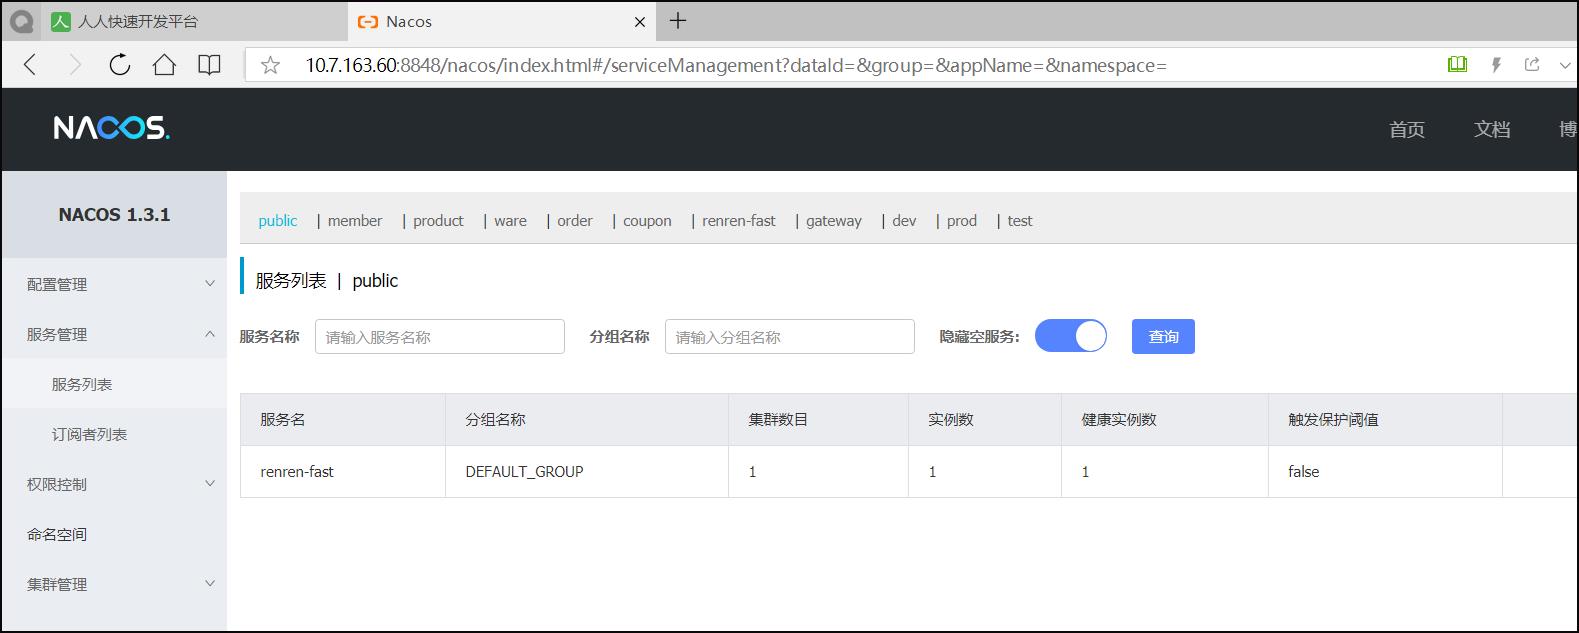
配置网关路由,前台的所有请求都是经由“http://localhost:88/api”来转发的,在“goshop-gateway”中添加路由规则:
        - id: admin_route
          uri: lb://renren-fast
          predicates:
            - Path=/api/**
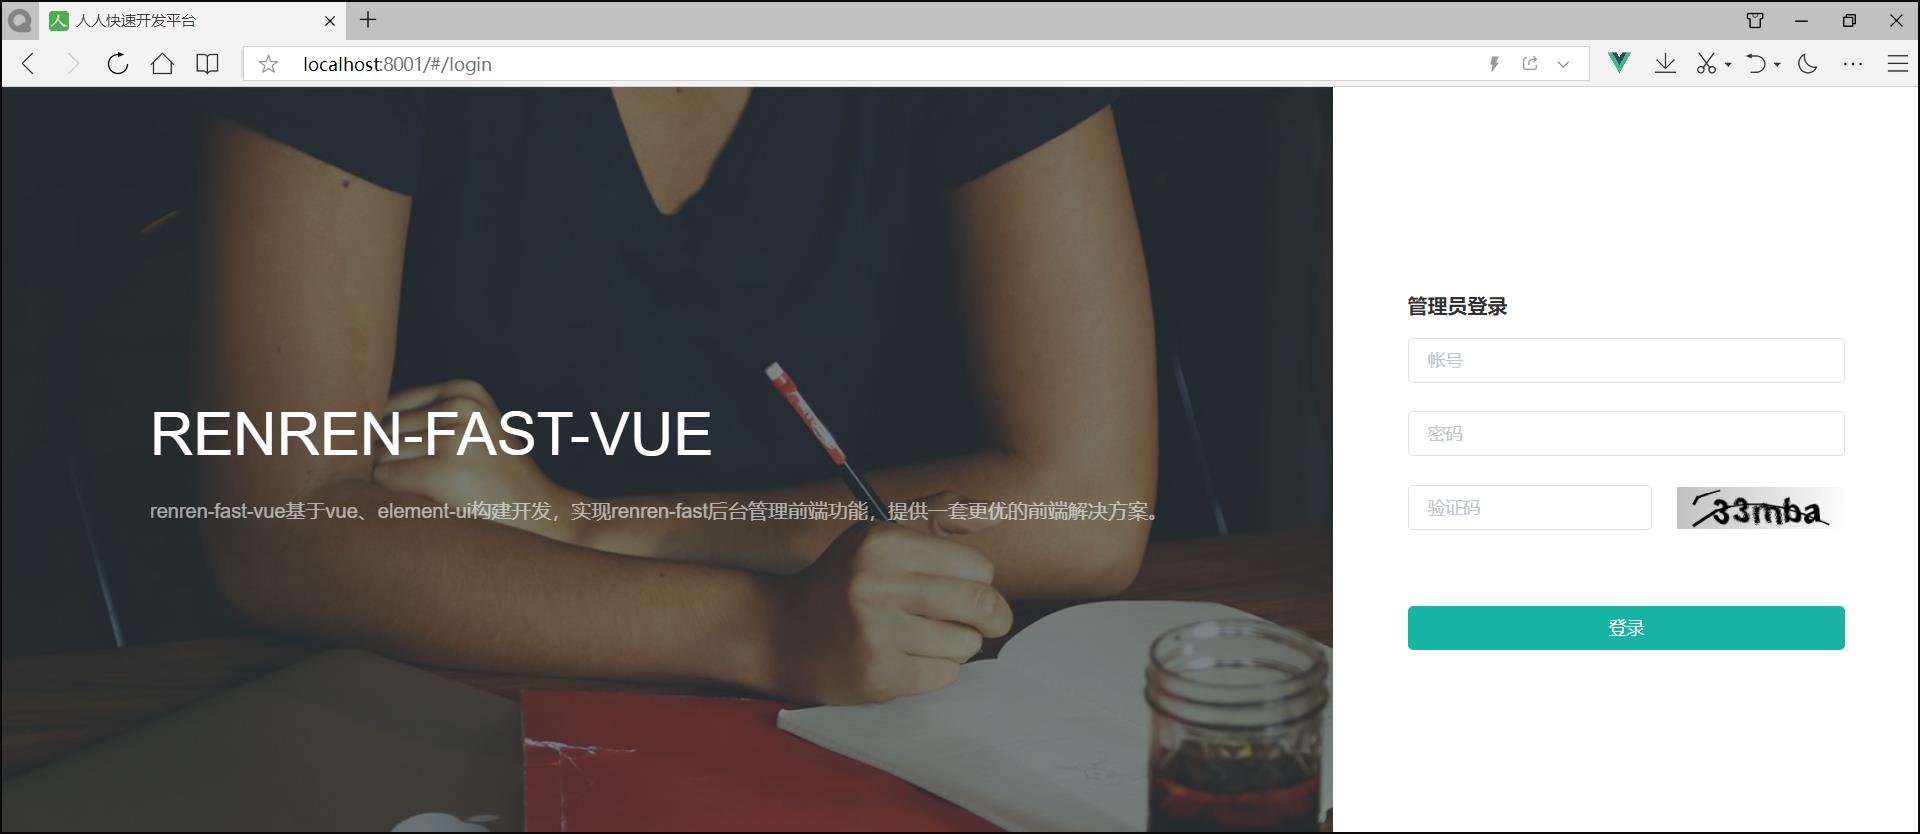
但是这样做也引入了另外的一个问题,再次访问:http://localhost:8001/#/login,发现验证码不再显示:
分析原因:
- 现在的验证码请求路径为,
http://localhost:88/api/captcha.jpg?uuid=69c79f02-d15b-478a-8465-a07fd09001e6 - 原始的验证码请求路径:
http://localhost:8001/renren-fast/captcha.jpg?uuid=69c79f02-d15b-478a-8465-a07fd09001e6
在admin_route的路由规则下,在访问路径中包含了“api”,因此它会将它转发到renren-fast,网关在转发的时候,会使用网关的前缀信息,为了能够正常的取得验证码,我们需要对请求路径进行重写
关于请求路径重写:
6.16. The RewritePath GatewayFilter Factory
The RewritePath GatewayFilter factory takes a path regexp parameter and a replacement parameter. This uses Java regular expressions for a flexible way to rewrite the request path. The following listing configures a RewritePath GatewayFilter:
Example 41. application.yml
spring:
  cloud:
    gateway:
      routes:
      - id: rewritepath_route
        uri: https://example.org
        predicates:
        - Path=/foo/**
        filters:
        - RewritePath=/red(?<segment>/?.*), $\\{segment}
For a request path of /red/blue, this sets the path to /blue before making the downstream request. Note that the $ should be replaced with $\\ because of the YAML specification.
修改“admin_route”路由规则:
        - id: admin_route
          uri: lb://renren-fast
          predicates:
            - Path=/api/**
          filters:
            - RewritePath=/api/(?<segment>/?.*), /renren-fast/$\\{segment}
再次访问:http://localhost:8001/#/login,验证码能够正常的加载了。
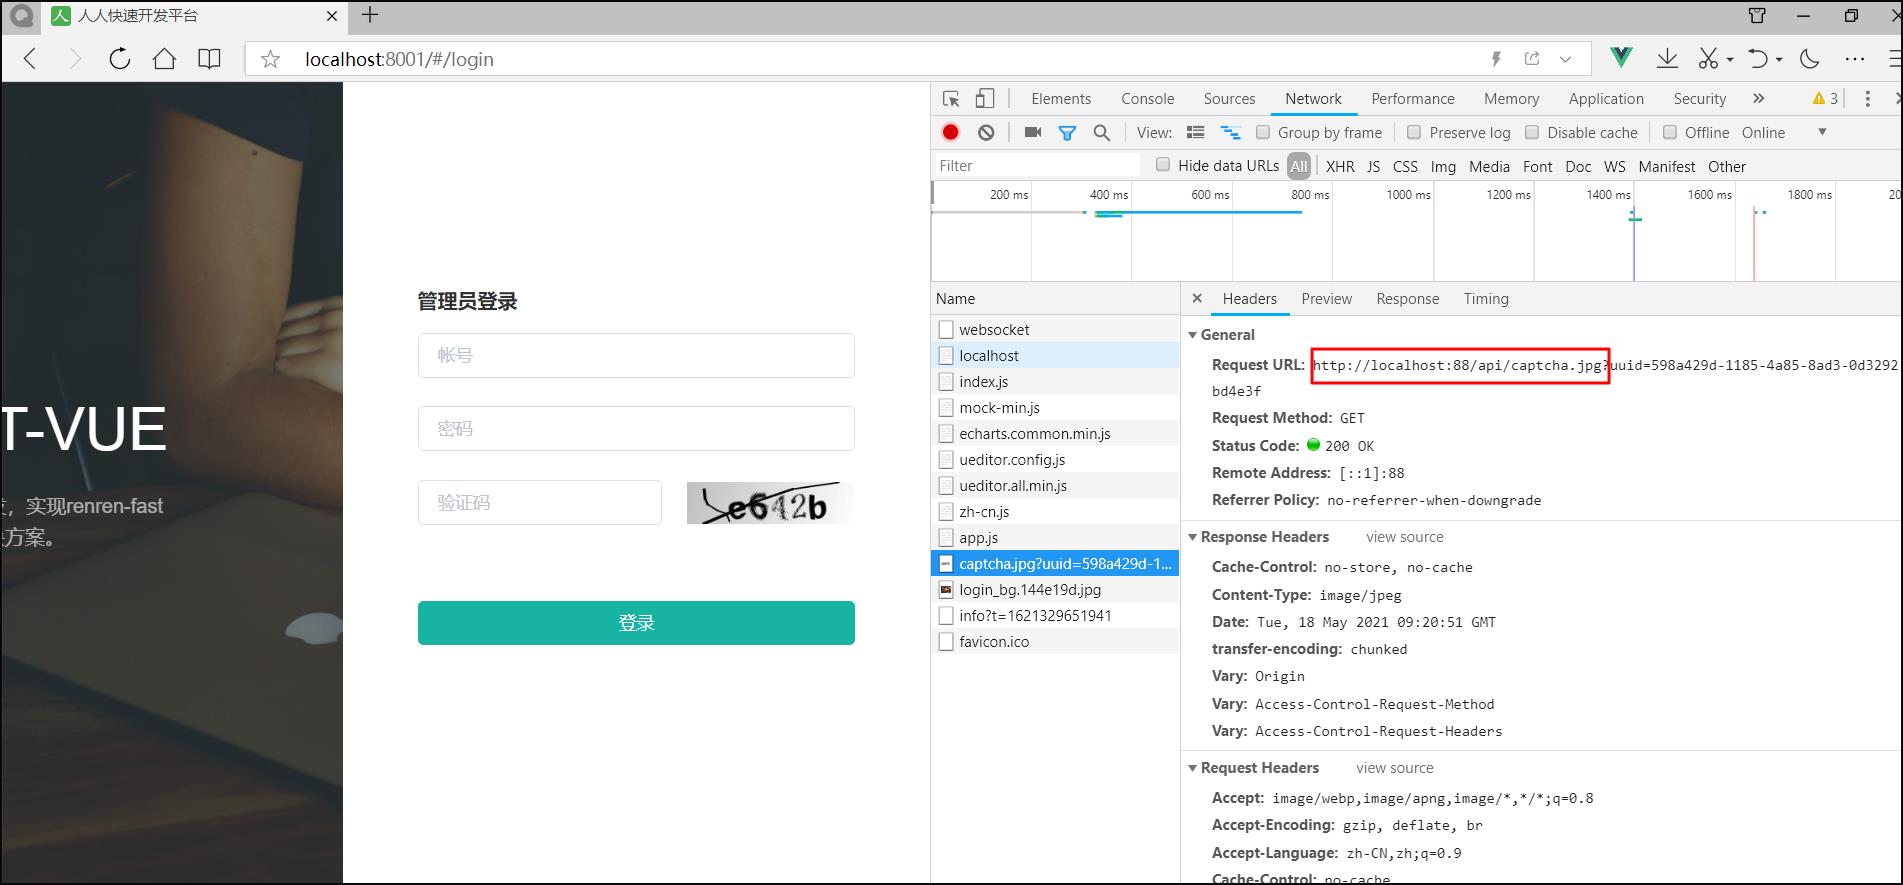
但是很不幸新的问题又产生了,访问被拒绝了
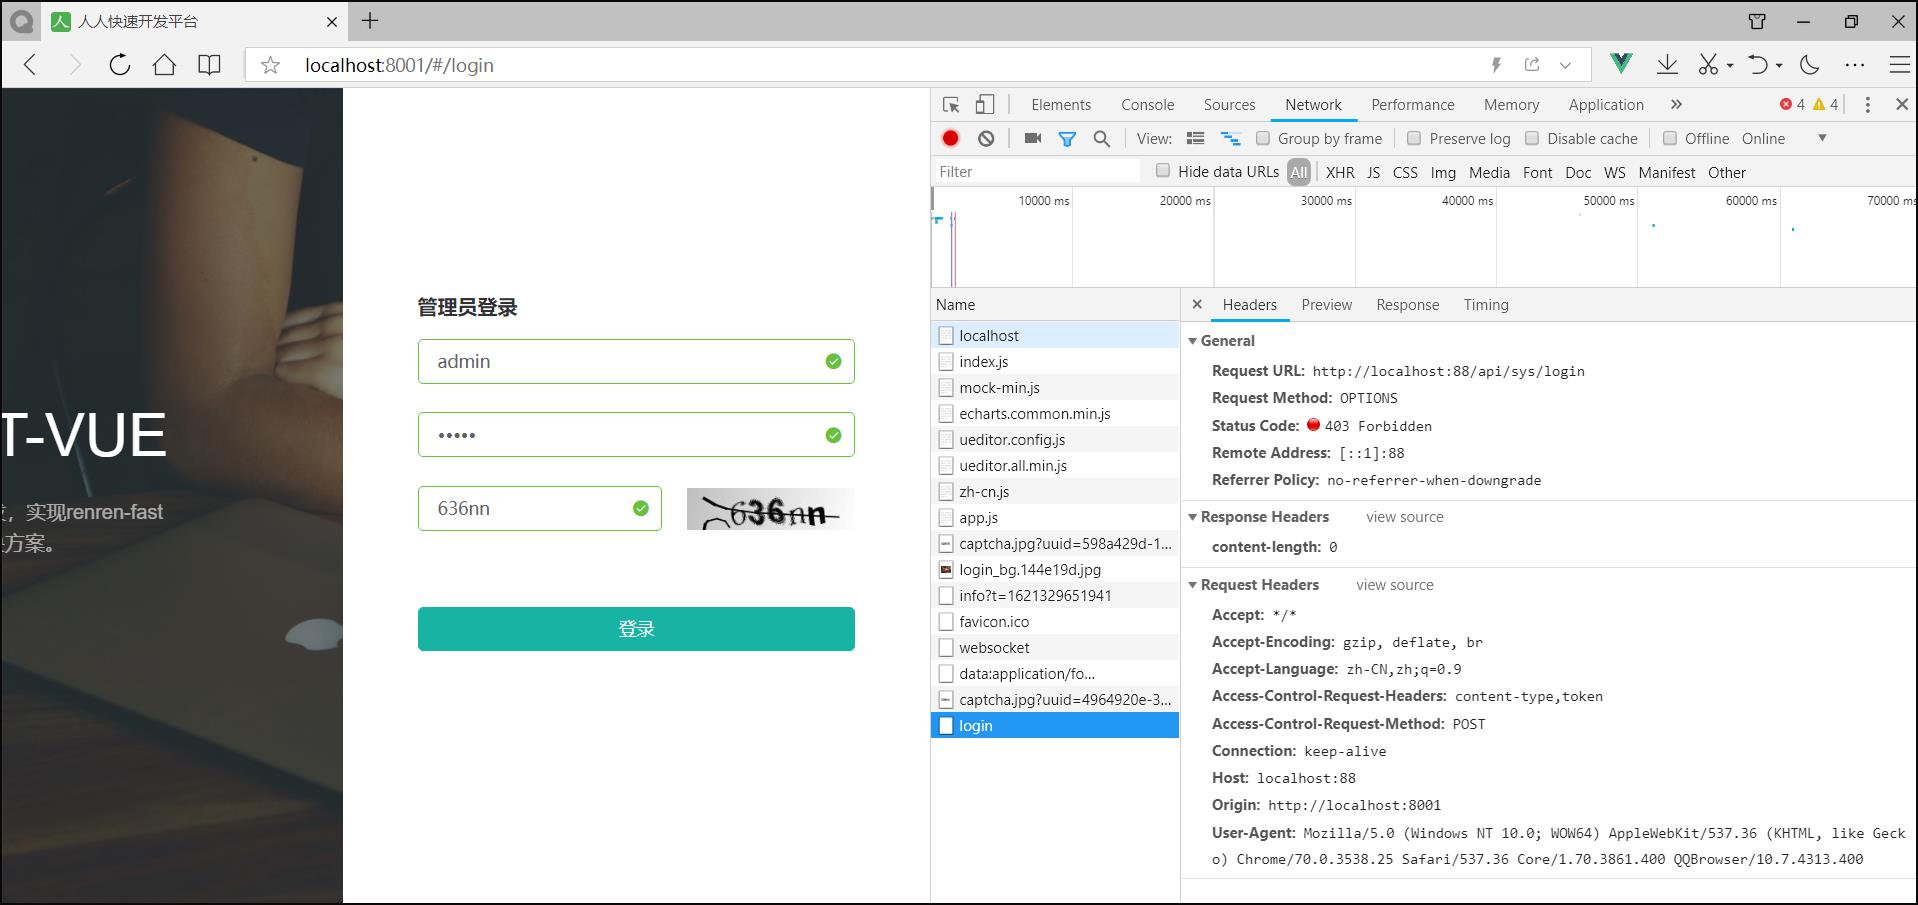
问题描述:已拦截跨源请求:同源策略禁止读取位于 http://localhost:88/api/sys/login 的远程资源。(原因:CORS 头缺少 ‘Access-Control-Allow-Origin’)。
问题分析:这是一种跨域问题。访问的域名和端口和原来的请求不同,请求就会被限制
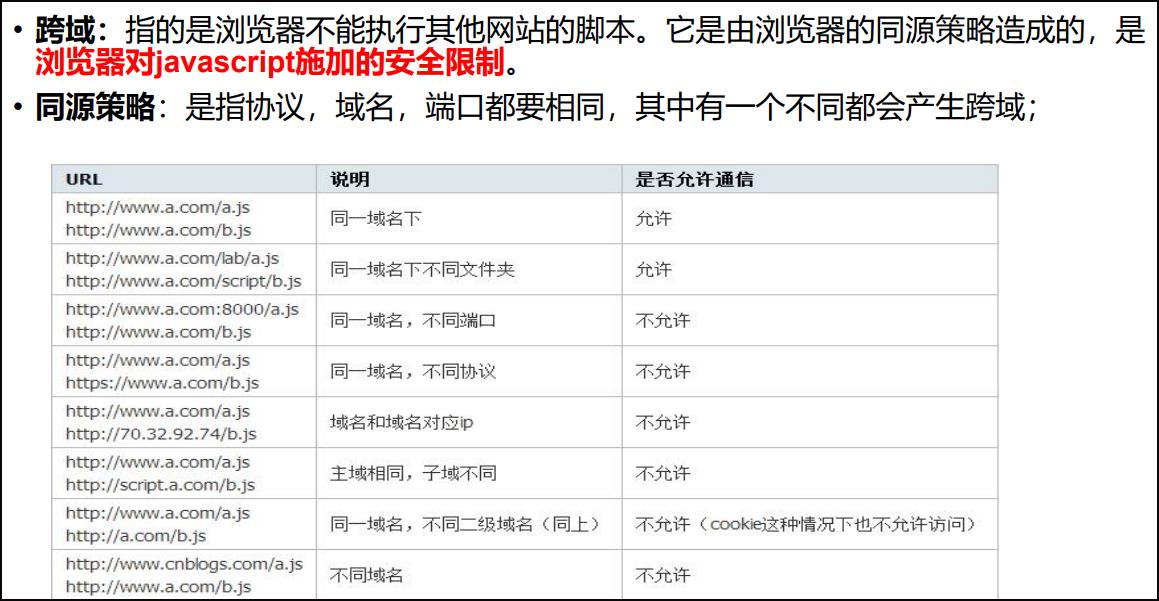
跨域流程
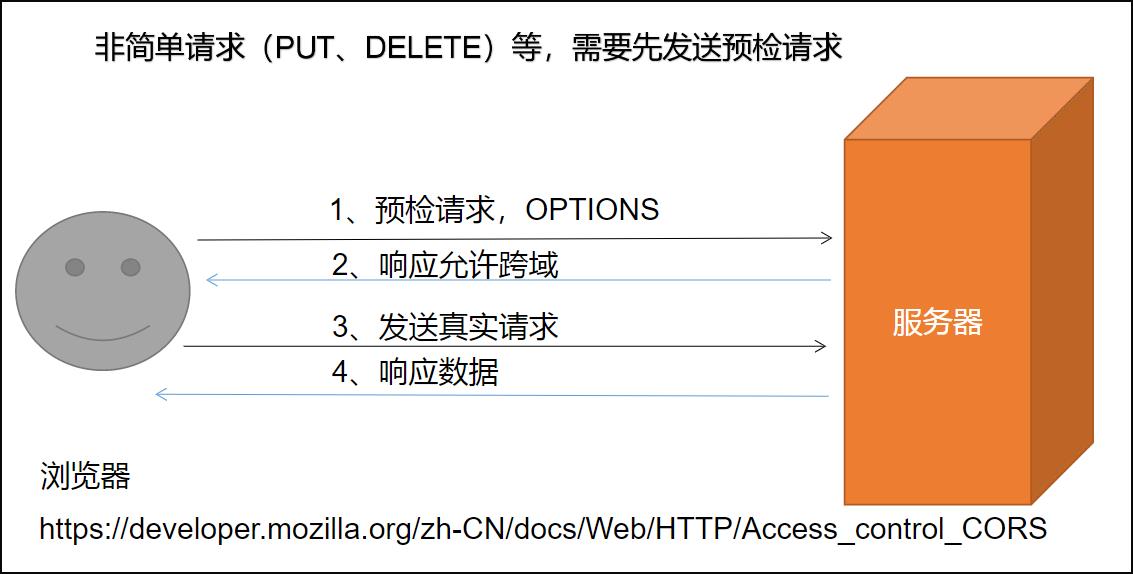
参考地址:https://developer.mozilla.org/zh-CN/docs/Web/HTTP/CORS
解决跨域
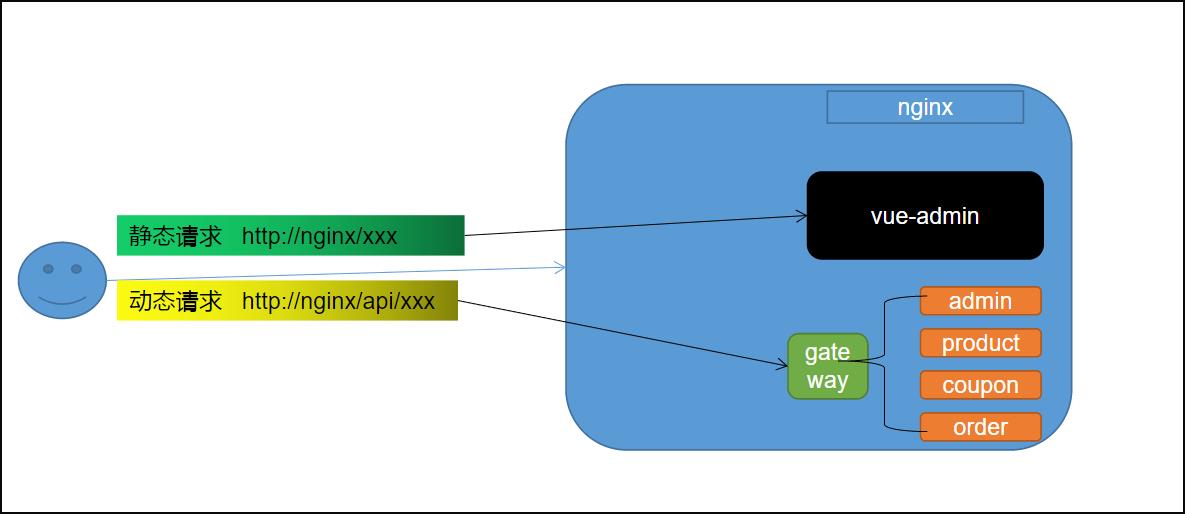
方式1: 使用nginx部署为同一域
方式2: 配置当次请求允许跨域
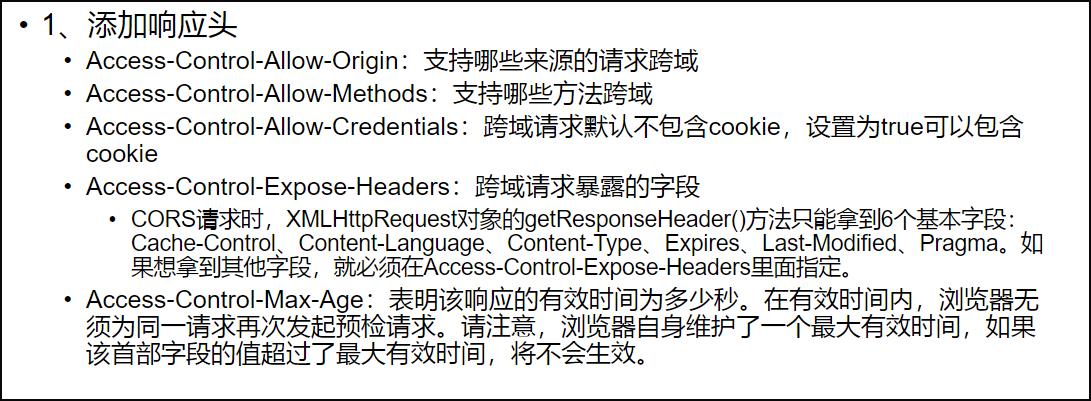
解决方法:在网关中定义“GoShopCorsConfiguration”类,该类用来做过滤,允许所有的请求跨域。
package com.itxiongmao.goshop.gateway.config;


import org.springframework.context.annotation.Bean;
import org.springframework.context.annotation.Configuration;
import org.springframework.web.cors.CorsConfiguration;
import org.springframework.web.cors.reactive.CorsWebFilter;
import org.springframework.web.cors.reactive.UrlBasedCorsConfigurationSource;

/**
 * @BelongsProject: goshop
 * @BelongsPackage: com.itxiongmao.goshop.gateway.config
 * @CreateTime: 2021-05-18 17:31
 * @Description: TODO
 */
@Configuration
public class GoShopCorsConfiguration {

    @Bean
    public CorsWebFilter corsWebFilter(){
        UrlBasedCorsConfigurationSource source = new UrlBasedCorsConfigurationSource();

        CorsConfiguration corsConfiguration = new CorsConfiguration();

        //1、配置跨域
        corsConfiguration.addAllowedHeader("*");
        corsConfiguration.addAllowedMethod("*");
        corsConfiguration.addAllowedOrigin("*");
        corsConfiguration.setAllowCredentials(true);

        source.registerCorsConfiguration("/**",corsConfiguration);
        return new CorsWebFilter(source);
    }
}
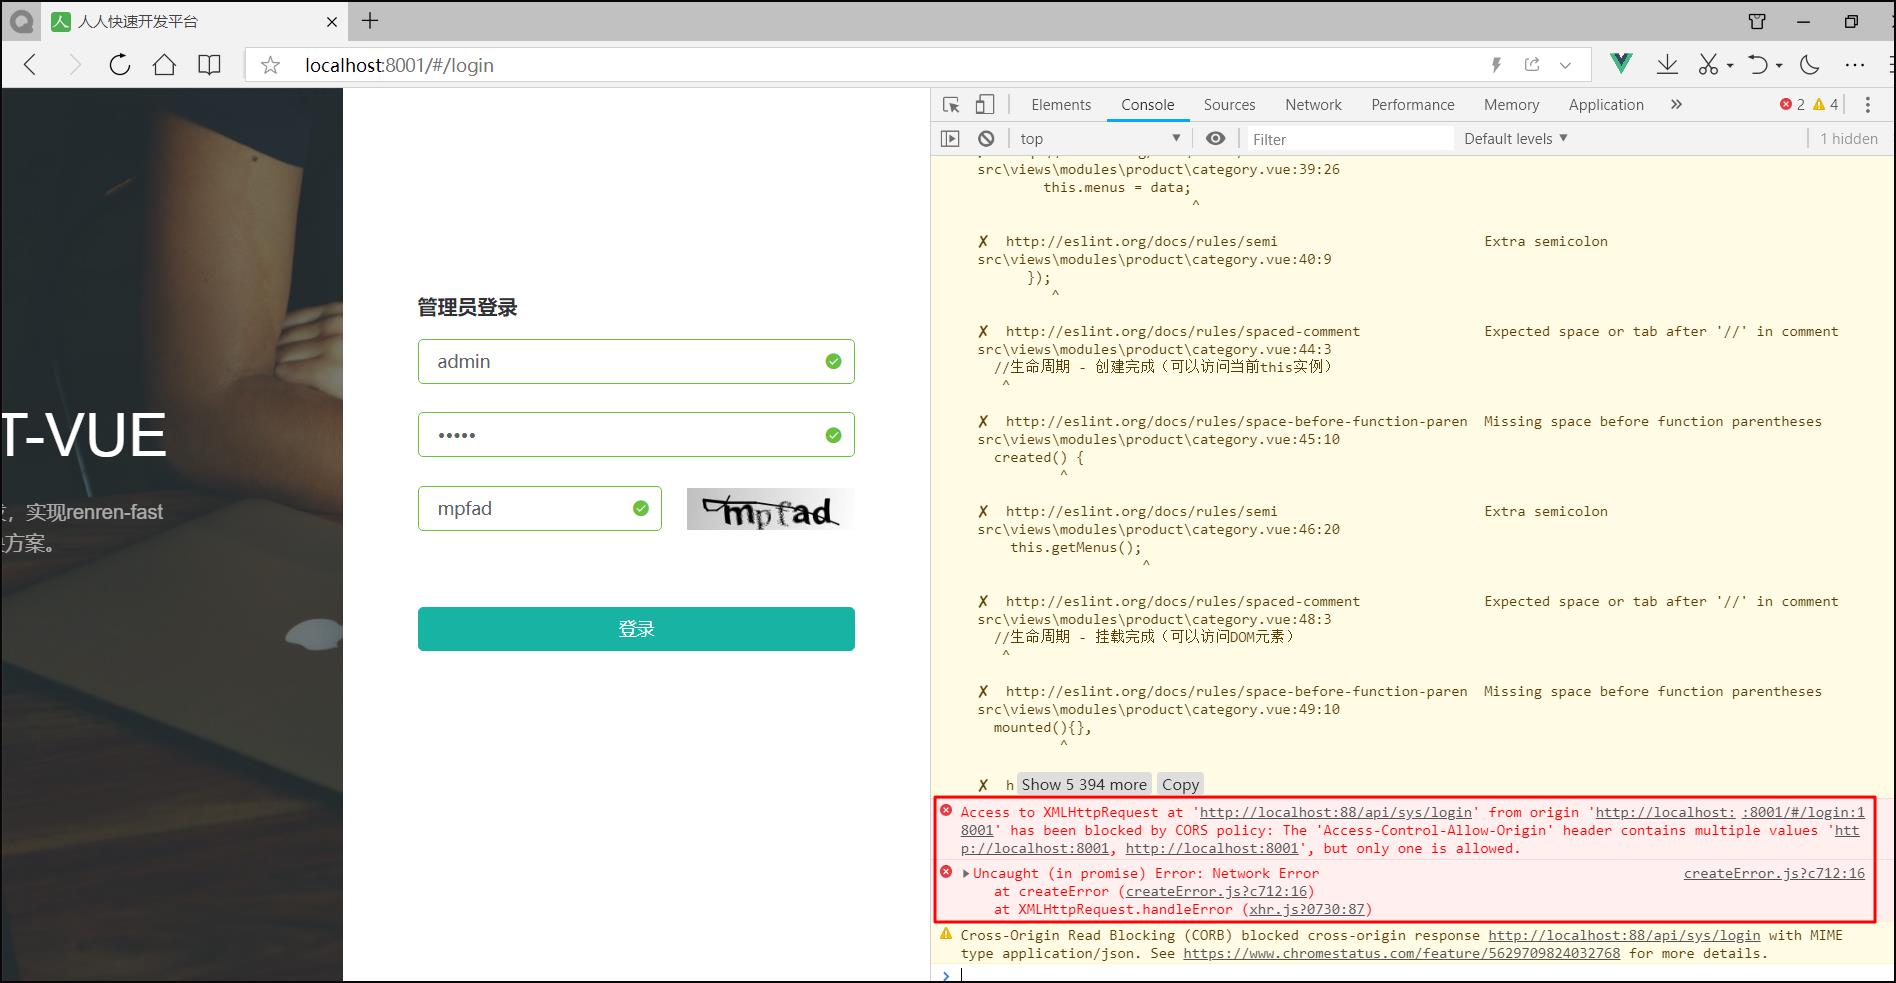
再次访问:http://localhost:8001/#/login
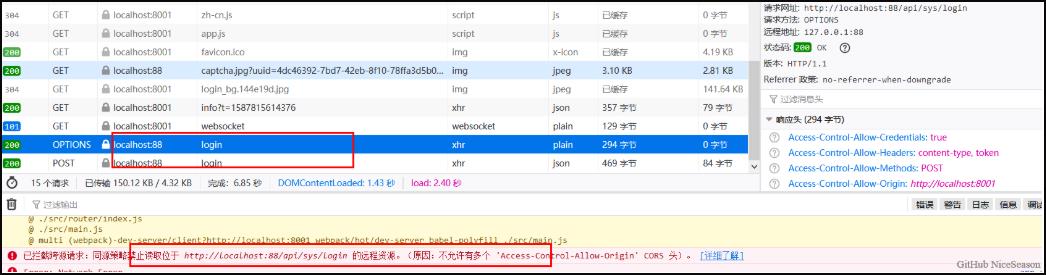
http://localhost:8001/renre已拦截跨源请求:同源策略禁止读取位于 http://localhost:88/api/sys/login 的远程资源。(原因:不允许有多个 ‘Access-Control-Allow-Origin’ CORS 头)renren-fast/captcha.jpg?uuid=69c79f02-d15b-478a-8465-a07fd09001e6
出现了多个请求,并且也存在多个跨源请求。
为了解决这个问题,需要修改renren-fast项目,注释掉“io.renren.config.CorsConfig”类。然后再次进行访问。

在显示分类信息的时候,出现了404异常,请求的http://localhost:88/api/product/category/list/tree不存在
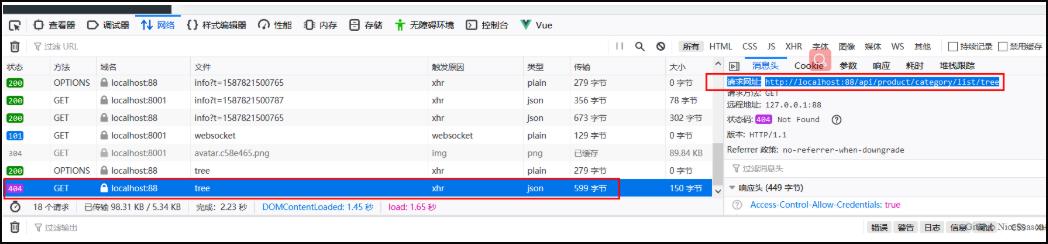
这是因为网关上所做的路径映射不正确,映射后的路径为http://localhost:8001/renren-fast/product/category/list/tree
但是只有通过http://localhost:10000/product/category/list/tree路径才能够正常访问,所以会报404异常。
解决方法就是定义一个product路由规则,进行路径重写:
server:
  port: 88
spring:
  application:
    name: goshop-gateway
  cloud:
    nacos:
      discovery:
        server-addr: 127.0.0.1:8848
    gateway:
      routes:
        - id: test_route
          uri: http://baidu.com:80/
          predicates:
            - Query=url,baidu
        - id: qq_route
          uri: http://qq.com:80/
          predicates:
            - Query=url,qq
        #商品路由
        - id: product_route
          uri: lb://goshop-product
          predicates:
            - Path=/api/product/**
          filters:
            - RewritePath=/api/(?<segment>/?.*),/$\\{segment}
        #将路径为Path=/api/**转发至后台管理
        - id: admin_route
          uri: lb://renren-fast
          predicates:
            - Path=/api/**
          filters:
            - RewritePath=/api/(?<segment>/?.*), /renren-fast/$\\{segment}
logging:
  level:
    org.springframework.cloud.gateway: TRACE
    org.springframework.http.server.reactive: DEBUG
    org.springframework.web.reactive: DEBUG
    reactor.ipc.netty: DEBUG
在路由规则的顺序上,将精确的路由规则放置到模糊的路由规则的前面,否则的话,精确的路由规则将不会被匹配到,类似于异常体系中try catch子句中异常的处理顺序。
<!--  -->
<template>
  <el-tree :data="menus" :props="defaultProps" @node-click="handleNodeClick"></el-tree>
</template>

<script>
//这里可以导入其他文件(比如:组件,工具js,第三方插件js,json文件,图片文件等等)
//例如:import 《组件名称》 from '《组件路径》';

export default {
  //import引入的组件需要注入到对象中才能使用
  components: {},

  //监听属性 类似于data概念
  computed: {},
  //监控data中的数据变化
  watch: {},
  data() {
    return {
      menus: [],
      defaultProps: {
        children: "children",
        label: "name"
      }
    };
  },

  methods: {
    handleNodeClick(data) {
      console.log(data);
    },
    getMenus() {
      this.dataListLoading = true;
      this.$http({
        url: this.$http.adornUrl("/product/category/list/tree"),
        method: "get"
      }).then(({ data }) => {
        console.log("成功获取到菜单数据...", data.data);
        this.menus = data.data;
      });
    }
  },

  //生命周期 - 创建完成(可以访问当前this实例)
  created() {
    this.getMenus();
  },
  //生命周期 - 挂载完成(可以访问DOM元素)
  mounted() {},
  beforeCreate() {}, //生命周期 - 创建之前
  beforeMount() {