WebSocket
Posted HackShendi
tags:
篇首语:本文由小常识网(cha138.com)小编为大家整理,主要介绍了WebSocket相关的知识,希望对你有一定的参考价值。
I’m Shendi
最近在做直播功能,关于评论与统计在线人数方面使用到了WebSocket,在这里记录一下
文章目录
WebSocket是什么
WebSocket是一种在单个TCP连接上进行全双工通信的协议。WebSocket通信协议于2011年被IETF定为标准RFC 6455,并由RFC7936补充规范。WebSocket API也被W3C定为标准
为什么需要
在写网站的时候,我们的需求可能会有非常频繁的交互数据,例如推送功能,像我的统计在线人数,直播评论(推送)
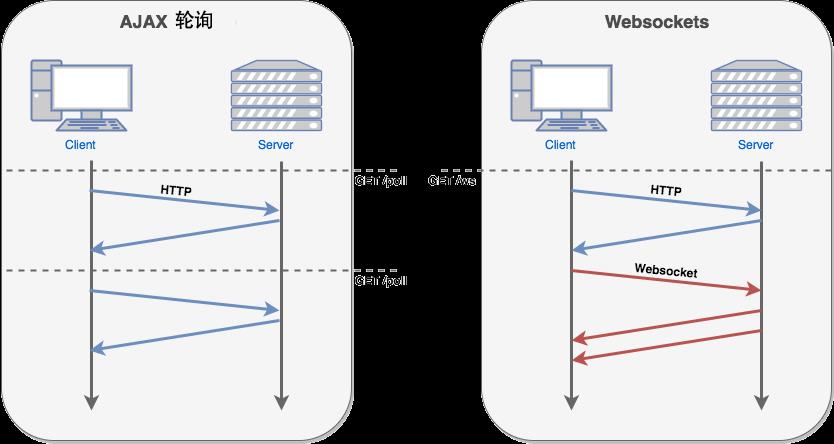
我们第一时间想到的应该就是使用ajax轮询的方式(即隔一段时间循环获取服务器数据)
每一次请求都会携带不必要的数据(http协议内容),所以影响了传输速度
因为是客户端主动请求服务端去拿到数据,所以服务端需要缓存信息(造成格外内存开销)
举个例子
服务器要发送数据123给所有用户,那么服务端需要将数据123保存到某个map,用户会主动请求服务器的某个接口来获取到123这个数据,因为不确定服务器是否有需要告知的消息,所以会每隔一段时间去询问…
而使用WebSocket,能更好的节省服务器资源和带宽,并且能够更实时地进行通讯
使用
websocket协议访问使用 ws:// 或 wss://
当使用了ssl则需使用 wss://
关于websocket的,使用的都是 javax.websocket 包
后端(Java)
1.给类加上ServerEndpoint注解
给类加上此注解后就可以处理websocket相关流程
@ServerEndpoint("/test")
public class TestSocket {}
与Servlet一样,其中的 /test 为路由路径,可自行设置
如果需要在连接时附加其他信息,例如用户id等,则需要加上/{参数名}
@ServerEndpoint("/test/{id}")
public class TestSocket {}
在后面编写函数的时候可以通过 @PathParam 注解获取
@ServerEndpoint("/test/{id}")
public class TestSocket {
	@OnOpen
	public void onOpen(@PathParam("id") String id) {
	}
}
SpringBoot配置(未使用可跳过)
在使用SpringBoot的时候需要进行格外配置,否则会404
首先在pom.xml中引入以下依赖
<dependency>
	<groupId>org.springframework.boot</groupId>
	<artifactId>spring-boot-starter-websocket</artifactId>
</dependency>
然后编写以下类,用于注册
/**
 * 使用到websocket需要此类.
 * @author Shendi <a href='tencent://AddContact/?fromId=45&fromSubId=1&subcmd=all&uin=1711680493'>QQ</a>
 * @version 1.0
 */
@Configuration
public class WebSocketConfig {

	@Bean
	public ServerEndpointExporter see() {
		return new ServerEndpointExporter();
	}

}
最后需要在我们编写的WebSocket类上加上 @Component注解
@ServerEndpoint("/test/{id}")
@Component
public class TestSocket {}
当打包时会出错
因为SpringBoot内置Tomcat(自带WebSocket)
需要在pom.xml的build的plugins加入如下
<plugin>
	<groupId>org.apache.maven.plugins</groupId>
	<artifactId>maven-surefire-plugin</artifactId>
	<configuration>
		<skip>true</skip>
	</configuration>
</plugin>
nginx配置
如果使用到了nginx,则需要在nginx.conf中进行配置代理
否则会404
在代理请求加入如下配置
proxy_set_header Upgrade $http_upgrade;
proxy_set_header Connection "upgrade";
proxy_connect_timeout 4s;
proxy_read_timeout 7200s;//连接如果在7200秒(两小时)没有任何交互则会断开
proxy_send_timeout 12s;
例如
server {
	listen		80;
	server_name	test.localhost;
	location / {
		proxy_pass	http://localhost:8002;
		proxy_set_header Upgrade $http_upgrade;
		proxy_set_header Connection "upgrade";
		proxy_connect_timeout 4s;
		proxy_read_timeout 7200s;
		proxy_send_timeout 12s;
	}
}
2.1 打开连接时的操作
在类里编写一个函数,名称任意,返回值void
使用@OnOpen注解在函数上,此时当连接打开将会调用此函数
例如
@OnOpen
public void onOpen(Session session, @PathParam("id") String id) {
	System.out.println("连接打开了" + id);
}
其中的 session 参数与之前Servlet的 Session 不同,对于服务器主动发消息需要使用到他,所以一般会将此参数保存下来
@ServerEndpoint("/test/{id}")
public class TestSocket {
	private Session session;

	@OnOpen
	public void onOpen(Session session, @PathParam("id") String id) {
		System.out.println("连接打开了" + id);
		this.session = session;
	}
}
2.2 用户发送消息处理
使用 @onMessage 注解表明接收用户发送的消息
@OnMessage public void onMessage(String txt) {}
其中参数txt为用户发送的数据
2.3 用户断开连接
一般用于从列表中移除用户信息等
当网页关闭或跳转页面都将触发此函数
@OnClose public void onClose() {}
2.4 处理上面几个函数发生的异常
/**
	 * 其余几个函数发生错误时触发
	 * @param t 错误
	 */
	@OnError public void onError(Throwable t) {
		t.printStackTrace();
	}
需要注意的是,Throwable参数是必须的,否则运行出错
代码示例
/**
 * @author Shendi <a href='tencent://AddContact/?fromId=45&fromSubId=1&subcmd=all&uin=1711680493'>QQ</a>
 * @version 1.0
 */
@ServerEndpoint("/{id}")
@Component
public class LiveSocket {

	/** 当前的连接信息与操作 */
	public Session session;

	/** 所有用户列表 */
	private static final ConcurrentHashMap<String, List<LiveSocket>> LIVES = new ConcurrentHashMap<>();

	/** 当前直播间的用户列表 */
	private List<LiveSocket> users;

	 * 当连接打开时,将用户存入列表.
	 * @param session 会话
	 * @param id 直播间id
	 */
	@OnOpen
	public void onOpen(Session session, @PathParam("id") String id) {
		this.session = session;

		this.users = LIVES.get(id);
		users.add(this);
	}

	/**
	 * 处理发送的数据
	 * @param txt JSONObject
	 */
	@OnMessage public void onMessage(String txt) {}

	/** 连接关闭将用户移除 */
	@OnClose public void onClose() {
		users.remove(this);
	}

	/**
	 * 其余几个函数发生错误时触发
	 * @param t 错误
	 */
	@OnError public void onError(Throwable t) {
		t.printStackTrace();
	}

	/**
	 * 发送消息给当前直播间所有人.
	 * @param msg 发送的消息
	 */
	private void sendMsgByAll(String msg) {
		for (LiveSocket s : users) {
			// 发送时可能出错,为了不影响其他用户,try起来
			try {
				s.session.getAsyncRemote().sendText(msg);
			} catch (Exception e) {
			}
		}
	}

	/**
	 * 用于组装协议
	 * @param type
	 */
	public String protocol(String type) {
		// TODO
		return null;
	}

	/**
	 * 获取现有的所有直播间列表
	 * @return 所有直播列表
	 */
	public static ConcurrentHashMap<String, List<LiveSocket>> getLives() {
		return LIVES;
	}

	/**
	 * 获取现有直播的聊天记录
	 * @return 所有直播的聊天记录列表
	 */
	public static ConcurrentHashMap<String, JSONArray> getLiveComments() {
		return LIVE_COMMENTS;
	}

}
前端
1.创建WebSocket打开连接
var socket = new WebSocket("websocket地址,例如 ws://localhost:8080");
创建后,就已经连接上了服务器了,服务器的 OnOpen 函数会被调用
2.发送消息/关闭WebSocket
// 发送消息
socket.send("发送给服务器的数据");

// 关闭websocket连接,当页面关闭,页面跳转等操作都会自动关闭websocket
socket.close();
3.事件
// 当连接成功时触发,其中event可以通过打印控制台来查看
socket.onopen = function (event) {
	console.log(event);
};
// 当服务器发送消息时触发,event.data 为服务器发送的消息
socket.onmessage = function (event) {
	console.log("服务器说: " + event.data);
};
// 当服务器关闭此websocket时触发
socket.onclose = function (event) {}
// 当此websocket发生错误时触发
socket.onerror = function (event) {};
代码示例
<html>
	<head>
	</head>
	<body>
		<button id='open'>打开socket</button>
		<input type='text' id='msg'/>
		<button id='send'>发送消息</button>
		<button id='close'>关闭socket</button>
		<script>
			var socket;
			var msg = document.getElementById("msg");
			var open = document.getElementById("open");
			var send = document.getElementById("send");
			var close = document.getElementById("close");

			open.onclick = function () {
				socket = new WebSocket("ws://localhost:8080/123");
				socket.onmessage = function (event) {
					console.log("服务器: " + event.data);
				};
			};
			send.onclick = function () {
				socket.send(msg.value);
			};
			close.onclick = function () {
				socket.close();
			};
		</script>
	</body>
</html>
以上是关于WebSocket的主要内容,如果未能解决你的问题,请参考以下文章