STL源码分析之heap和priority_queue
Posted 小张的code世界
tags:
篇首语:本文由小常识网(cha138.com)小编为大家整理,主要介绍了STL源码分析之heap和priority_queue相关的知识,希望对你有一定的参考价值。
“ 源码面前,了无秘密。”
二叉堆(binary-heap)是一种很重要的数据结构,本质是一种完全二叉树,有最大堆和最小堆两种类型。二叉堆的重要应用是用来实现优先级队列(priority queue)。STL也提供了一种叫做priority_queue的容器适配器,它的底层就是用最大堆来实现。
今天我们就来学习一下STL中的priority_queue和max-heap。
0. binary-heap的特点
要学习二叉堆,我们需要知道它的特点。二叉堆分为大顶堆和小顶堆:大顶堆指的是任何一个父节点的值都大于或等于它左右子节点的值;小顶堆指的是任何一个父节点的值都小于或等于它左右子节点的值。如下图所示,分别为大顶堆和小顶堆。二叉堆的根节点称为堆顶。
大顶堆
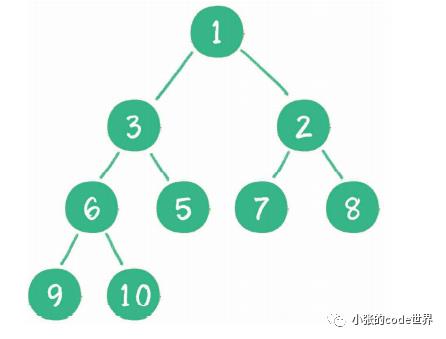
小顶堆
二叉堆虽然是一个完全二叉树,但是它的存储方式并不是链式存储,而是顺序存储的。也就是说,二叉堆的元素都存在于数组中,由于数组的大小是固定的,因此我们一般使用vector来实现heap。
如果我们利用一个数组来存储上图中的大顶堆,且只从数组的第1位开始保存元素的话,数组将是如下形式:

我们可以发现当某个节点位于数组的i处时,其左子节点必位于数组的2i处,其右子节点必位于数组的2i+1处,其父节点必位于i/2处。
同样,如果就从数组的第0位开始保存上图大顶堆的元素,数组将是如下形式:

我们可以发现当某个节点位于数组的i处时,其左子节点必位于数组的2i+1处,其右子节点必位于数组的2i+2处,其父节点必位于(i-1)/2处。
上面都算是二叉堆的理论基础,接下来我们使用图文讲解二叉堆插入和删除元素以及构建二叉堆的过程。这里使用大顶堆作为举例,因为STL提供的是大顶堆,另外堆排序算法也是先构造大顶堆。
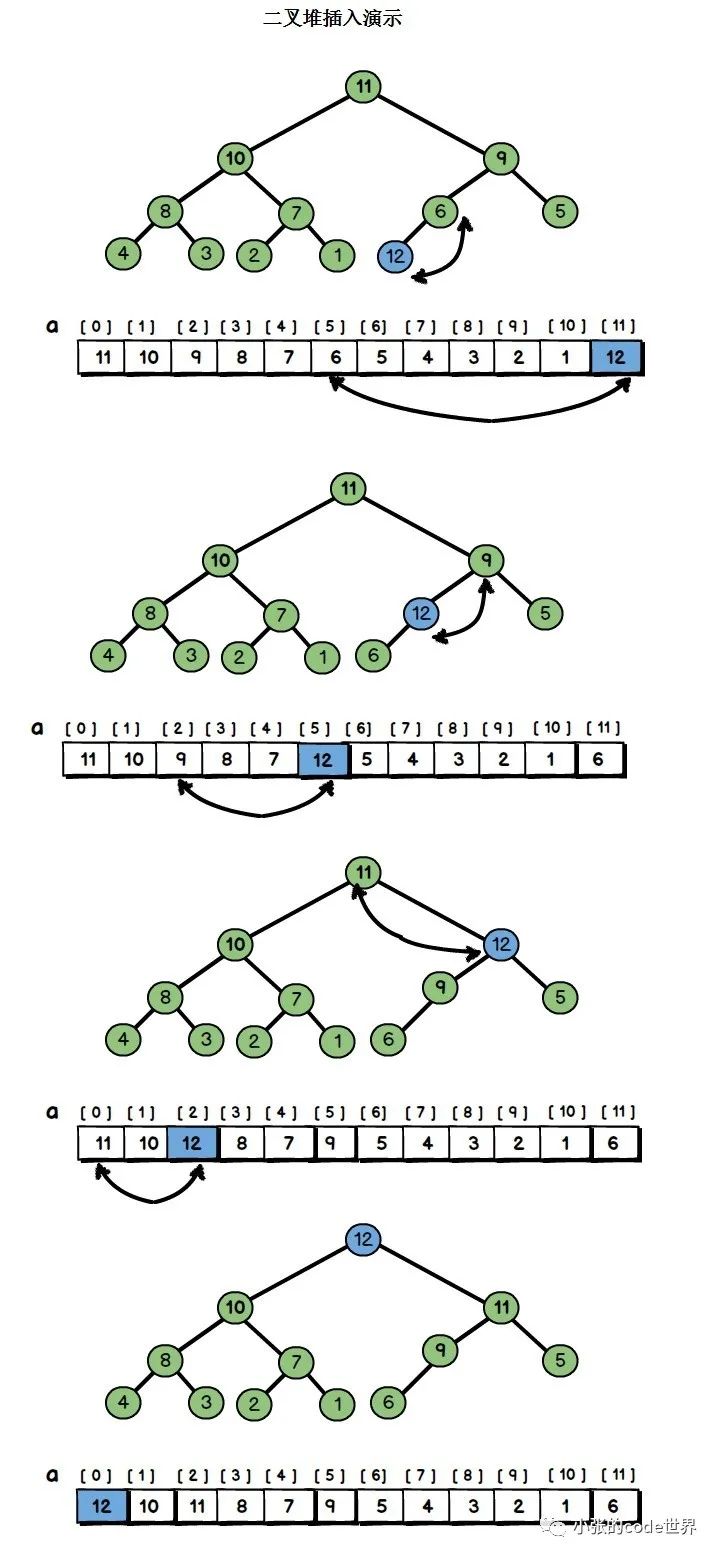
1、二叉堆中插入元素
为了满足完全二叉树的条件,往二叉堆中插入元素,新加入的元素一定是放在最下一层作为叶子节点,并填补在由左至右的第一个空格。如果是使用vector实现的话,就是插入到vector的end()处。
新元素是否适合于当前位置,需要根据二叉堆的特点来判断。对于最大二叉堆,需要满足每个节点都大于或等于其子节点。因此,我们需要执行一个“上溯”程序:将新节点与其父节点作比较,如果其大于父节点,则父子对换位置,如此一直上溯,直到不需要对换或者到根节点为止。
新节点的位置为i,则其父节点的位置为(i-1)/2。如图所示:
2、二叉堆中删除元素
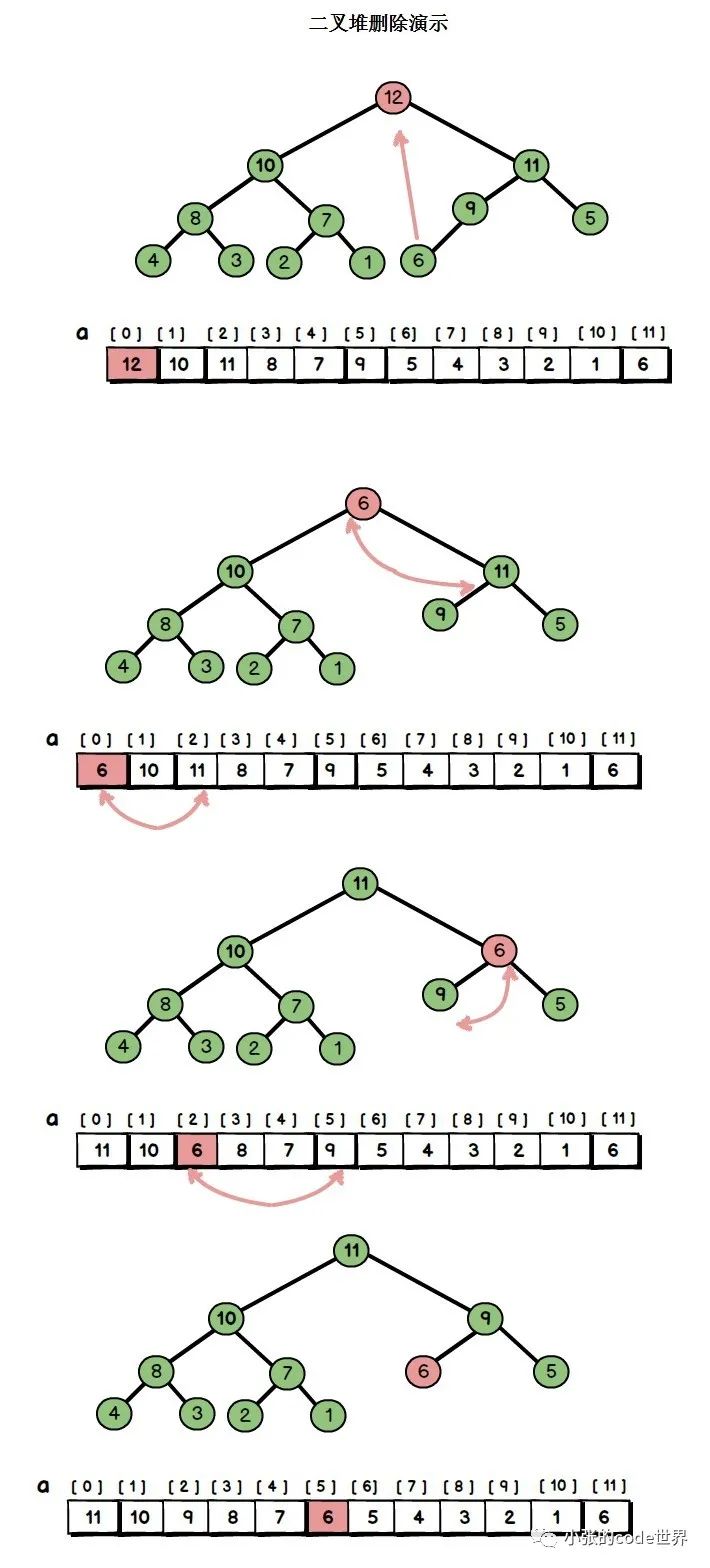
二叉堆删除元素的过程差不多和插入元素的过程相反,删除元素是从删除堆顶元素。为了满足完全二叉树的特点,我们将最下层最右边的叶子节点补充到堆顶。对于最大二叉堆,需要满足每个节点都大于或等于其子节点。因此,我们需要执行一个“下溯”程序:将堆顶与其较大子节点对换位置,如此一直下放,直到不需要对换或者到叶子节点为止。如图所示:
3、构建二叉堆
构建二叉堆就是把一个无序的完全二叉树调整为二叉堆,本质就是让所有非叶子节点“下溯”。我们要构建的数据如下:

首先,我们画出它的完全二叉树:
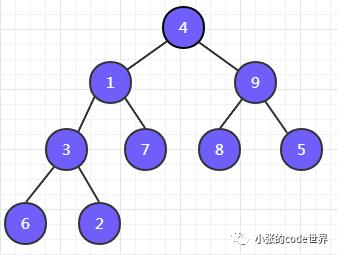
根据(大顶)二叉堆的特点,父节点都应该大于或等于其左右子节点,因此我们从最后一层的父节点开始,逐渐把左右子节点中的较大者与父节点对换位置。如果元素个数为n,则选取的第一个节点的位置为i=(n-2)/2。左右节点的位置分别为:2i+1和2i+2。
第一步,以3为父节点,调整与其左右子节点的位置:左子节点6大于父节点3,交换:
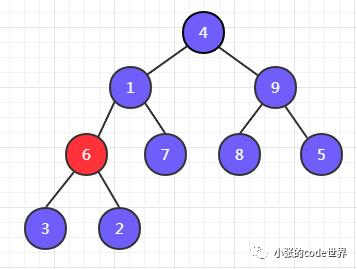
第二步,以9为父节点,由于节点9均大于其左右子节点,因此不需要调整。
第三步,以1为节点,按照父节点与左右子节点中较大者对换位置,因此将1与其右子节点7对换位置:
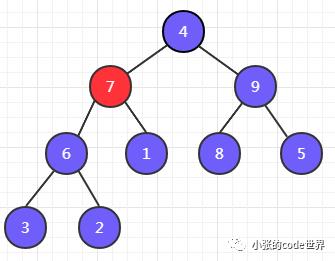
第四步,轮到节点4,发现4比右子节点9小,所以4下沉:
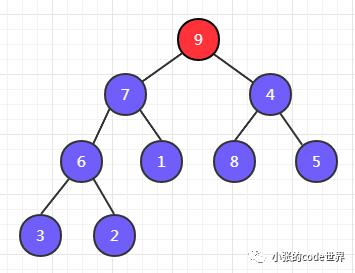
4比左子节点8小,4继续下沉:
最终,实现了大顶堆的构建。
4、堆排序
关于堆排序可以参考文章《》中的堆排序,在此不再赘述。
1. STL中的heap和priority_queue
上一节我们对二叉堆这种数据结构的特点进行了分析总结,也对二叉堆插入和删除元素以及构建一个二叉堆的过程进行了图文描述。有了这些基础,理解STL中heap和priority_queue的源代码就很简单了。
STL中并没有一个叫做heap的类,而是在<stl_heap.h>中提供了一系列的算法,这些算法包括插入元素时执行的“上溯”和删除元素时执行的“下溯”,堆排序和构建堆,STL中堆的底层是使用vector来管理元素。这些算法都接受两个_RandomAccessIterator。接下来我们来分析一下源码。
1、push_heap算法
首先是push_heap算法,当我们给堆插入一个元素的时候会将元素插入到verctor的尾部,然后对尾部元素执行“上溯”操作:
template<typename _RandomAccessIterator>inline voidpush_heap(_RandomAccessIterator __first, _RandomAccessIterator __last){typedef typename iterator_traits<_RandomAccessIterator>::value_type_ValueType;typedef typename iterator_traits<_RandomAccessIterator>::difference_type_DistanceType;__gnu_cxx::__ops::_Iter_less_val __comp;// __value为新插入的元素_ValueType __value = _GLIBCXX_MOVE(*(__last - 1));// __value的位置为(__last - __first) - 1std::__push_heap(__first, _DistanceType((__last - __first) - 1),_DistanceType(0), _GLIBCXX_MOVE(__value), __comp);}
push_heap算法的底层调用__push_heap:
template<typename _RandomAccessIterator, typename _Distance, typename _Tp,typename _Compare>void__push_heap(_RandomAccessIterator __first,_Distance __holeIndex, _Distance __topIndex, _Tp __value,_Compare& __comp){// 首先计算出父节点的位置,根据(i-1)/2_Distance __parent = (__holeIndex - 1) / 2;// 只要待上溯(新插入)的节点位置不是根节点,且父节点小于新插入的节点,就执行上溯while (__holeIndex > __topIndex && __comp(__first + __parent, __value)){// 对换子节点与父节点的位置*(__first + __holeIndex) = _GLIBCXX_MOVE(*(__first + __parent));// 待上溯的节点位置变成了父节点的位置__holeIndex = __parent;// 计算到达新位置后其父节点的位置__parent = (__holeIndex - 1) / 2;}*(__first + __holeIndex) = _GLIBCXX_MOVE(__value);}
可见push_heap算法的过程和上一小节中图示过程一致。
2、pop_heap算法
从堆中删除元素将堆顶元素移走,将最底层的叶子节点补充到堆顶,然后执行“下溯”操作。删除元素时需要pop_heap算法:
template<typename _RandomAccessIterator>inline voidpop_heap(_RandomAccessIterator __first, _RandomAccessIterator __last){if (__last - __first > 1){--__last; // last指向最后一个元素__gnu_cxx::__ops::_Iter_less_iter __comp;std::__pop_heap(__first, __last, __last, __comp);}}
pop_heap底层调用的是__pop_heap:
template<typename _RandomAccessIterator, typename _Compare>inline void__pop_heap(_RandomAccessIterator __first, _RandomAccessIterator __last,_RandomAccessIterator __result, _Compare& __comp){typedef typename iterator_traits<_RandomAccessIterator>::value_type_ValueType;typedef typename iterator_traits<_RandomAccessIterator>::difference_type_DistanceType;// __value为vector最后一个元素_ValueType __value = _GLIBCXX_MOVE(*__result);// 再将__result置为pop掉的堆顶元素,也就是说pop并不是删除元素// 而是将堆顶元素放到了vector的尾部*__result = _GLIBCXX_MOVE(*__first);// 执行__adjust_heap调整堆,待调整的元素为堆顶元素_DistanceType(0)std::__adjust_heap(__first, _DistanceType(0),_DistanceType(__last - __first),_GLIBCXX_MOVE(__value), __comp);}
std::__adjust_heap的源码如下:
_RandomAccessIterator, typename _Distance,typename _Tp, typename _Compare>void__adjust_heap(_RandomAccessIterator __first, _Distance __holeIndex,_Distance __len, _Tp __value, _Compare __comp){= __holeIndex; // 堆顶_Distance __secondChild = __holeIndex;while (__secondChild < (__len - 1) / 2) // __len - 1) / 2为最后一个根节点的位置{// 计算右子节点的位置__secondChild = 2 * (__secondChild + 1);// 找出左右子节点的较大者if (__comp(__first + __secondChild, __first+ (__secondChild - 1)))__secondChild--;将较大者上浮,对换与栈顶的位置+ __holeIndex) = _GLIBCXX_MOVE(*(__first + __secondChild));// 待下沉的新节点__holeIndex = __secondChild;}if ((__len & 1) == 0 && __secondChild == (__len - 2) / 2){__secondChild = 2 * (__secondChild + 1);+ __holeIndex) = _GLIBCXX_MOVE(*(__first(__secondChild - 1)));__holeIndex = __secondChild - 1;}::__ops::__iter_comp_val(_GLIBCXX_MOVE(__comp)))__cmp(_GLIBCXX_MOVE(__comp));std::__push_heap(__first, __holeIndex, __topIndex,__cmp);}
3、make_heap算法
使用一组数据构建堆时使用make_heap算法,本质是将所有非叶子节点“下溯”的过程,从最后一个非叶子节点开始。
template<typename _RandomAccessIterator>inline voidmake_heap(_RandomAccessIterator __first, _RandomAccessIterator __last){__gnu_cxx::__ops::_Iter_less_iter __comp;std::__make_heap(__first, __last, __comp);}
make_heap算法的底层调用__make_heap:
template<typename _RandomAccessIterator, typename _Compare>void__make_heap(_RandomAccessIterator __first, _RandomAccessIterator __last,_Compare& __comp){typedef typename iterator_traits<_RandomAccessIterator>::value_type_ValueType;typedef typename iterator_traits<_RandomAccessIterator>::difference_type_DistanceType;if (__last - __first < 2)return;const _DistanceType __len = __last - __first;// 最后一个元素的父节点为(__len - 2) / 2_DistanceType __parent = (__len - 2) / 2;while (true){_ValueType __value = _GLIBCXX_MOVE(*(__first + __parent));std::__adjust_heap(__first, __parent, __len, _GLIBCXX_MOVE(__value),__comp);if (__parent == 0)return;__parent--;}}
4、sort_heap算法
通过pop_heap的源码解读我们发现每次pop_heap就会获得heap中的最大元素,当对堆中的每个元素执行一遍pop_heap操作后就会得到一个递增序列:
template<typename _RandomAccessIterator>inline voidsort_heap(_RandomAccessIterator __first, _RandomAccessIterator __last){__gnu_cxx::__ops::_Iter_less_iter __comp;std::__sort_heap(__first, __last, __comp);}
对每一个元素执行pop_heap操作:
template<typename _RandomAccessIterator, typename _Compare>void__sort_heap(_RandomAccessIterator __first, _RandomAccessIterator __last,_Compare& __comp){while (__last - __first > 1){--__last;std::__pop_heap(__first, __last, __last, __comp);}}
priority_heap的源码分析
缺省情况下priority_queue的底部容器为vector,再加上heap的处理规则。如下所示为其源代码:
template<typename _Tp, typename _Sequence = vector<_Tp>,typename _Compare = less<typename _Sequence::value_type> >class priority_queue{public:typedef typename _Sequence::value_type value_type;typedef typename _Sequence::reference reference;typedef typename _Sequence::const_reference const_reference;typedef typename _Sequence::size_type size_type;typedef _Sequence container_type;typedef _Compare value_compare;protected:_Sequence c;_Compare comp;// 构造函数priority_queue() : c(), comp() { }explicitpriority_queue(const _Compare& __x, const _Sequence& __s): c(__s), comp(__x){ std::make_heap(c.begin(), c.end(), comp); }explicitpriority_queue(const _Compare& __x, _Sequence&& __s = _Sequence()): c(std::move(__s)), comp(__x){ std::make_heap(c.begin(), c.end(), comp); }template<typename _InputIterator>priority_queue(_InputIterator __first, _InputIterator __last,const _Compare& __x,const _Sequence& __s): c(__s), comp(__x){__glibcxx_requires_valid_range(__first, __last);c.insert(c.end(), __first, __last);std::make_heap(c.begin(), c.end(), comp);}// 插入元素void push(const value_type& __x){c.push_back(__x);std::push_heap(c.begin(), c.end(), comp);}// 删除元素void pop(){__glibcxx_requires_nonempty();std::pop_heap(c.begin(), c.end(), comp);c.pop_back();}};
2.手撕二叉堆
1、插入元素后的“上溯”操作
v为已经在尾部插入元素的需要调整的堆,调整过程的代码实现如下:
void pushHeap(std::vector<int>& v){// 尾部元素需要“上溯”,位置为indexint index = v.size() - 1;int value = v[index];// 计算父节点的位置int present = (index - 1) / 2;while(index > 0 && value > v[present]){v[index] = v[present];index = present;present = (index - 1) / 2;}v[index] = value;}
2、删除元素后的“下溯”操作
“下溯”操作的代码实现如下,其中holdIndex为待“下溯”的节点:
void popHeap(std::vector<int>& v){// 删除堆顶元素后使用尾部元素安插在堆顶int oldRoot = v[0];v[0] = *v.rbegin();// 对新的堆顶执行“下溯”操作,直到原尾节点的前一个,原尾节点已经脱离堆但是还在vector中// v.size() - 1为新堆的元素个数downAjust(v, 0, v.size() - 1);}void downAjust(std::vector<int>& newV, int holdIndex, int length){int value = newV[holdIndex];// 找到左子节点的位置int childIndex = 2 * holdIndex + 1;while(childIndex < length){if(childIndex + 1 < length&& newV[childIndex] < newV[childIndex + 1]){childIndex++;}if(value >= v[childIndex])break;v[holdIndex] = v[childIndex];holdIndex = childIndex;childIndex = 2 * holdIndex + 1;}v[holdIndex] = value;}
3、构建二叉堆
构建二叉堆实际上是从最有一个非叶子节点开始,依次做“下溯”操作,代码实现如下:
void buildHeap(vector<int>& v){for(int i = (v.size() - 2) / 2; i >= 0; i--){downAjust(v, i, v.size());}}
好了,关于堆的知识点就总结到这里。
以上是关于STL源码分析之heap和priority_queue的主要内容,如果未能解决你的问题,请参考以下文章