干货 | 当 YOLOv5 遇见 OpenVINO,实现自动检测佩戴口罩
Posted AI科技大本营
tags:
篇首语:本文由小常识网(cha138.com)小编为大家整理,主要介绍了干货 | 当 YOLOv5 遇见 OpenVINO,实现自动检测佩戴口罩相关的知识,希望对你有一定的参考价值。


YOLOv5网络
YOLOv5代码链接:
https://github.com/ultralytics/yolov5
YOLOv5 于2020年6月横空出世!一经推出,便得到CV圈的瞩目,目前在各大目标检测竞赛、落地实战项目中得到广泛应用。
YOLOv5在COCO上的性能表现:

YOLOv5一共有4个版本,分别是Yolov5s、Yolov5m、Yolov5l、Yolov5x,其中性能依次增强。比如 YOLOv5s模型参数量最小,速度最快,AP精度最低;YOLOv5x模型参数量最大,速度最慢,AP精度最高。
其中YOLOv5网络结构如下:

图源:https://zhuanlan.zhihu.com/p/172121380

OpenVINO™工具套件介绍

OpenVINO™工具套件是英特尔针对自家硬件平台开发的一套深度学习工具库,包含推理库,模型优化等等一系列与深度学习模型部署相关的功能。同时可以兼容各种开源框架训练好的模型,拥有算法模型上线部署的各种能力,只要掌握了该工具,你可以轻松的将预训练模型在Intel的CPU、VPU等设备上快速部署起来。


重新训练YOLOv5
3.1 下载YOLOv5代码和权重文件
大家可以直接clone YOLOv5官方github代码:
git clone https://github.com/ultralytics/yolov5
也可以在官方github的releases中下载正式发布的版本:
https://github.com/ultralytics/yolov5/releases
我们这里下载YOLOv5 v3.1版本的源代码和yolov5s.pt权重文件。值得注意,目前YOLOv5已更新至 v5.0,但在实际转换OpenVINO™工具套件推理应用中遇到不少问题,为了方便使用,因此目前推荐较稳定的YOLOv5 v3.1版本。

3.2 数据集准备
数据集可以是自己标注的,也可以用网上开源的数据集。如果是标注自己的目标检测数据集,一般使用 labelImg工具(超好用!支持COCO等格式)。
这里我们下载使用roboflow开源的口罩检测数据集(Mask Wearing Dataset):https://public.roboflow.com/object-detection/mask-wearing,该数据集只有149幅图像,方便练手,而且格式直接支持 YOLOv5!

3.3 重新训练YOLOv5
3.3.1 修改参数
训练自定义数据集,一般需要修改两个参数:
nc:需要识别的类别 anchors:YOLOv5默认自适应
anchors计算,也可以自定义通过k-means算法计算
其中,nc是一定要修改的,比较每个数据集的类别会不一样,而anchors可以不用修改,即默认自适应计算。
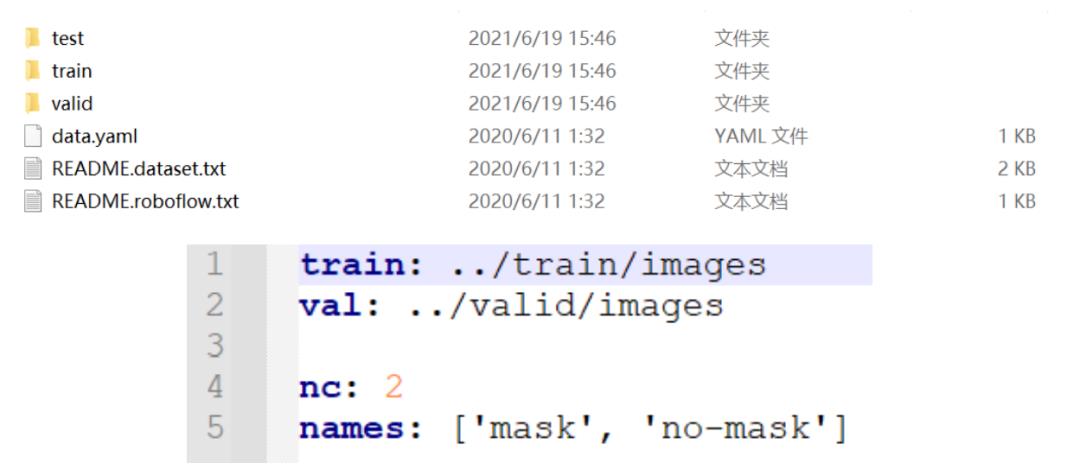
比如Mask Wearing数据集只有两种类别:mask和no-mask,所以nc = 2。可见data.yaml中的信息:

这里使用YOLOv5s进行训练,所以需要同步修改yolov5/models/yolov5s.yaml 文件中的nc数值,设置为2:

3.3.2 训练YOLOv5
训练命令如下:
python train.py --data 数据集路径/data.yaml --cfg models/yolov5s.yaml --weights ''
--batch-size 64 --epochs 100
注:训练命名行的参数含义可参考:https://docs.ultralytics.com,比如batch size、epochs可以根据训练设备自行调整
训练完成后,权重文件会自动保存在runs文件夹中,自动生成last.pt和best.pt,如下图所示:

3.3.3 YOLOv5 Demo检测
对测试集中的图像进行检测,执行命令如下:
python detect.py --weight runs/exp6/weights/best.pt --source 数据集路
径/test/images/1288126-
10255706714jpg_jpg.rf.95f7324cbfd48e0386e0660b5e932223.jpg
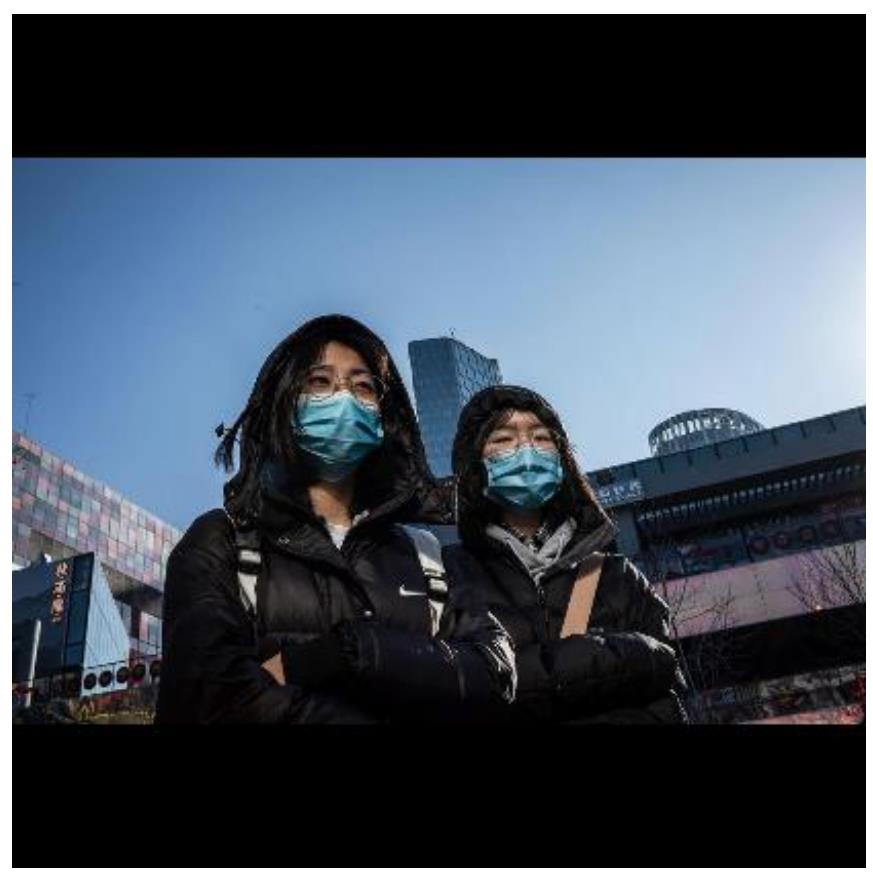
输入图像:

口罩检测结果:


模型转换(YOLOv5—>OpenVINO™工具套件)
将YOLOv5的.pt训练权重文件转换成OpenVINO™工具套件调用的文件,主要的流程是:.pt 权重文件 —> ONNX 权重文件 —> IR 文件(.bin和xml)。其中利用ONNX(Open Neural Network Exchange,开放神经网络交换)进行文件格式转换。

使用版本说明:
Ubuntu 18.04
OpenVINO™ 2021.03
4.1 .pt 权重文件 —> ONNX 权重文件
先安装ONNX,然后运行脚本,实现转换。
4.1.1 安装ONNX
ONNX的安装方法相对简单,直接pip安装即可:
pip install onnx
4.1.2 ONNX转换
YOLOv5官方提供了转换成ONNX权重的脚本文件,位于yolov5/models/export.py,使用说明详见:
https://github.com/ultralytics/yolov5/issues/251
注意,这里需要将export.py脚本文件中的opset_version修改为10:
torch.onnx.export(model, img, f, verbose=False, opset_version=10, input_names= ['images'], output_names=['classes', 'boxes'] if y is None else ['output'])
然后再执行如下转换指令:
python models/export.py --weights runs/exp6/weights/best.pt --img 640 --batch 1
转换成功后,就会在runs/exp6/weights文件夹中生成best.onnx文件。

注:这里可以使用Netron打开yolov5s.onnx,进而可视化YOLOv5模型。
Netron在线可视化:https://netron.app/
Netron github:
https://github.com/lutzroeder/netron
4.2 ONNX 权重文件 —> IR 文件(.bin和.xml)
先安装、配置OpenVINO™工具套件,然后运行脚本,实现转换。
4.2.1 安装OpenVINO™
安装OpenVINO™工具套件的方法有很多,详见官网:
https://docs.openvinotoolkit.org/latest/index.html
这里我是使用APT的方式,具体参考:
https://docs.openvinotoolkit.org/latest/openvino_docs_install_guides_installing_openvino_apt.html
安装命名如下:
wget https://apt.repos.intel.com/openvino/2021/GPG-PUB-KEY-INTEL-OPENVINO-2021 apt-key add GPG-PUB-KEY-INTEL-OPENVINO-2021 apt-key list
touch /etc/apt/sources.list.d/intel-openvino-2021.list
echo "deb https://apt.repos.intel.com/openvino/2021 all main" >> /etc/apt/sources.list.d/intel-openvino-2021.list apt update
执行完上述命名后,可出现:

然后搜索可下载的包,要注意系统版本:
sudo apt-cache search intel-openvino-dev-ubuntu18

这里安装intel-openvino-dev-ubuntu18-2021.3.394版本
apt install intel-openvino-dev-ubuntu18-2021.3.394
安装成功后,输出内容如下图所示:

4.2.2 OpenVINO™工具套件转换
安装好OpenVINO™工具套件后,我们需要使用OpenVINO™工具套件的模型优化器(Model Optimizer)将ONNX文件转换成IR(Intermediate Representation)文件。
首先设置 OpenVINO™工具套件的环境和变量:
source /opt/intel/openvino_2021/bin/setupvars.sh
然后运行如下脚本,实现ONNX模型到IR文件(.xml和.bin)的转换:
python /opt/intel/openvino_2021/deployment_tools/model_optimizer/mo.py -- input_model runs/exp6/weights/best.onnx --model_name yolov5s_best -s 255 -- reverse_input_channels --output Conv_487,Conv_471,Conv_455
关于命令行的参数用法,更多细节可参考:https://docs.openvinotoolkit.org/cn/latest/openvino_docs_MO_DG_prepare_model_convert_model_Converting_Model_General.html
转换成功后,即可得到yolov5s_best.xml 和 yolov5s_best.bin文件。


使用OpenVINO™工具套件进行推理部署
5.1 安装Python版的OpenVINO工具套件
这里使用Python进行推理测试。因为我上面采用apt的方式安装OpenVINO™工具套件,这样安装后 Python环境中并没有OpenVINO™工具套件,所以我这里需要用pip安装一下OpenVINO™工具套件。
注:如果你是编译源码等方式进行安装的,那么可以跳过这步:
pip install openvino
另外,安装时要保持版本的一致性:

5.2 OpenVINO实测
OpenVINO™工具套件官方提供了YOLOv3版本的Python推理demo,可以参考:
https://github.com/openvinotoolkit/open_model_zoo/blob/master/demos/object_detection_demo/python/object_dete ction_demo.py
我们这里参考这个已经适配好的YOLOv5版本:
https://github.com/violet17/yolov5_demo/blob/main/yolov5_demo.py,该源代码的输入数据是camera或者video,所以我们可以将test数据集中的图像转 换成视频(test.mp4)作为输入,或者可以自行修改成图像处理的代码。
其中YOLOv5版本相对于官方YOLOv3版本的主要修改点:
1. 自定义letterbox函数,预处理输入图像:
def letterbox(img, size=(640, 640), color=(114, 114, 114), auto=True,scaleFill=False, scaleup=True):
  # Resize image to a 32-pixel-multiple rectangle
https://github.com/ultralytics/yolov3/issues/232
  shape = img.shape[:2] # current shape [height, width]
  w, h = size

  # Scale ratio (new / old)
  r = min(h / shape[0], w / shape[1])
  if not scaleup: # only scale down, do not scale up (for better test mAP)
    r = min(r, 1.0)

  # Compute padding
  ratio = r, r # width, height ratios
  new_unpad = int(round(shape[1] * r)), int(round(shape[0] * r))
dw, dh = w - new_unpad[0], h - new_unpad[1] # wh padding
  if auto: # minimum rectangle
    dw, dh = np.mod(dw, 64), np.mod(dh, 64) # wh padding
  elif scaleFill: # stretch
    dw, dh = 0.0, 0.0
    new_unpad = (w, h)
    ratio = w / shape[1], h / shape[0] # width, height ratios

  dw /= 2 # divide padding into 2 sides
  dh /= 2

  if shape[::-1] != new_unpad: # resize
    img = cv2.resize(img, new_unpad,interpolation=cv2.INTER_LINEAR)
  top, bottom = int(round(dh - 0.1)), int(round(dh + 0.1))
  left, right = int(round(dw - 0.1)), int(round(dw + 0.1))
  img = cv2.copyMakeBorder(img, top, bottom, left, right, cv2.BORDER_CONSTANT,
value=color) # add border

  top2, bottom2, left2, right2 = 0, 0, 0, 0
  if img.shape[0] != h:
    top2 = (h - img.shape[0])//2
    bottom2 = top2
    img = cv2.copyMakeBorder(img, top2, bottom2, left2, right2,
cv2.BORDER_CONSTANT, value=color) # add border
  elif img.shape[1] != w:
    left2 = (w - img.shape[1])//2
    right2 = left2
    img = cv2.copyMakeBorder(img, top2, bottom2, left2, right2,
cv2.BORDER_CONSTANT, value=color) # add border
  return img
2. 自定义parse_yolo_region函数, 使用Sigmoid函数的YOLO Region层:
def parse_yolo_region(blob, resized_image_shape, original_im_shape, params,
threshold):
  # ------------------------------------------ Validating output parameters ------------------------------------------
  out_blob_n, out_blob_c, out_blob_h, out_blob_w = blob.shape
  predictions = 1.0/(1.0+np.exp(-blob))

  assert out_blob_w == out_blob_h, "Invalid size of output blob. It sould be in NCHW layout and height should " \\"be equal to width. Current height = {},current width = {}" \\"".format(out_blob_h, out_blob_w)
  # ------------------------------------------ Extracting layer parameters -------------------------------------------
  orig_im_h, orig_im_w = original_im_shape
  resized_image_h, resized_image_w = resized_image_shape
  objects = list()

  side_square = params.side * params.side

# ------------------------------------------- Parsing YOLO Region output -------------------------------------------
  bbox_size = int(out_blob_c/params.num) #4+1+num_classes

  for row, col, n in np.ndindex(params.side, params.side, params.num):
    bbox = predictions[0, n*bbox_size:(n+1)*bbox_size, row, col]

    x, y, width, height, object_probability = bbox[:5]
    class_probabilities = bbox[5:]
    if object_probability < threshold:
      continue
    x = (2*x - 0.5 + col)*(resized_image_w/out_blob_w)
    y = (2*y - 0.5 + row)*(resized_image_h/out_blob_h)
    if int(resized_image_w/out_blob_w) == 8 & int(resized_image_h/out_blob_h) == 8: #80x80,
      idx = 0
    elif int(resized_image_w/out_blob_w) == 16 & int(resized_image_h/out_blob_h) == 16: #40x40
      idx = 1
    elif int(resized_image_w/out_blob_w) == 32 & int(resized_image_h/out_blob_h) == 32: # 20x20
      idx = 2

    width = (2*width)**2* params.anchors[idx * 6 + 2 * n]
    height = (2*height)**2 * params.anchors[idx * 6 + 2 * n + 1]
    class_id = np.argmax(class_probabilities)
    confidence = object_probability
    objects.append(scale_bbox(x=x, y=y, height=height,width=width,class_id=class_id, confidence=confidence,im_h=orig_im_h, im_w=orig_im_w,resized_im_h=resized_image_h, resized_im_w=resized_image_w))
return objects
3. 自定义scale_bbox函数,进行边界框后处理 :
def scale_bbox(x, y, height, width, class_id, confidence, im_h, im_w,resized_im_h=640, resized_im_w=640):
  gain = min(resized_im_w / im_w, resized_im_h / im_h) # gain = old / new
  pad = (resized_im_w - im_w * gain) / 2, (resized_im_h - im_h * gain) / 2 # wh padding
  x = int((x - pad[0])/gain)
  y = int((y - pad[1])/gain)

  w = int(width/gain)
  h = int(height/gain)

  xmin = max(0, int(x - w / 2))
  ymin = max(0, int(y - h / 2))
  xmax = min(im_w, int(xmin + w))
  ymax = min(im_h, int(ymin + h))
  # Method item() used here to convert NumPy types to native types for compatibility with functions, which don't
  # support Numpy types (e.g., cv2.rectangle doesn't support int64 in color parameter)
  return dict(xmin=xmin, xmax=xmax, ymin=ymin, ymax=ymax,class_id=class_id.item(), confidence=confidence.item())
但在实际测试中,会出现:'openvino.inference_engine.ie_api.IENetwork' object has no attribute 'layers' 问题:

经过我调研后才得知,在OpenVINO™ 2021.02及以后版本, 'ie_api.IENetwork.layers' 就被官方删除了:

所以需要将第327、328行的内容:
out_blob = out_blob.reshape(net.layers[layer_name].out_data[0].shape)
layer_params = YoloParams(net.layers[layer_name].params, out_blob.shape[2])
修改为:
out_blob = out_blob.reshape(net.outputs[layer_name].shape)
params = [x._get_attributes() for x in function.get_ordered_ops() if
x.get_friendly_name() == layer_name][0]
layer_params = YoloParams(params, out_blob.shape[2])
并在第322行下面新添加一行代码:
function = ng.function_from_cnn(net)
最终在终端,输入下面命令:
python yolov5_demo.py -m yolov5/yolov5s_best.xml test.mp4
加上后处理,使用OpenVINO™工具套件的推理时间在220ms左右,测试平台为英特尔® 酷睿™ i5- 7300HQ,而使用PyTorch CPU版本的推理时间在1.25s,可见OpenVINO™工具套件加速明显!
最终检测结果如下:

参考:
https://img-bss.csdnimg.cn/202103311747047950.pdf
https://github.com/fb029ed/yolov5_cpp_openvino
https://www.cnblogs.com/shuimuqingyang/p/14260810.html
https://www.fatalerrors.org/a/c-implement-openvino-deployment-for-yolov5.html
https://colab.research.google.com/drive/1xla23daYYbTIfbdHF0nyHzHyoAvVtyaG#scrollTo=PO2uvGWy7oEi
https://github.com/OmniXRI/colab_openvino/blob/master/Colab_OpenVINO_mobilenet_v1.ipynb
https://www.bilibili.com/read/cv11455153/
https://github.com/TNTWEN/OpenVINO-YOLOV4
还想了解更多关于 OpenVINO™工具套件?了解更前沿的 AI 技术?
《大咖来了》第 14 期,邀请到了 Intel(中国)物联网事业部开发者赋能业务高级工程师邱丹和成都云图睿视科技有限公司创始人总经理孟莹,为你解读!
立即点击观看吧:
以上是关于干货 | 当 YOLOv5 遇见 OpenVINO,实现自动检测佩戴口罩的主要内容,如果未能解决你的问题,请参考以下文章