Docker&K8s---跟我一步步部署K8s(二进制安装部署)
Posted 大聪明Smart
tags:
篇首语:本文由小常识网(cha138.com)小编为大家整理,主要介绍了Docker&K8s---跟我一步步部署K8s(二进制安装部署)相关的知识,希望对你有一定的参考价值。
文章目录
Docker&K8s—跟我一步步部署K8s(二进制安装部署)
Docker虽然很强大,但也有缺点:
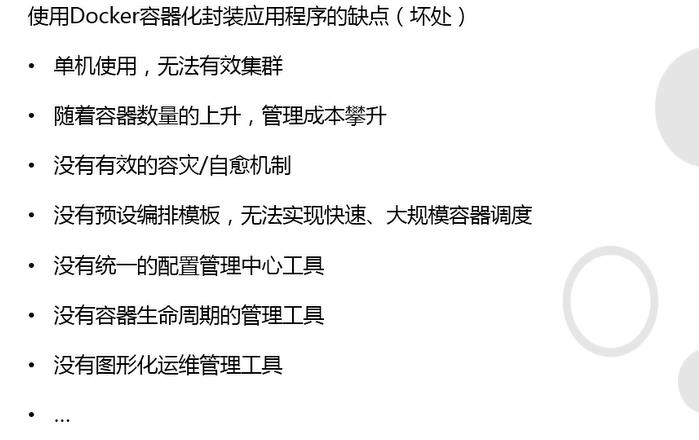
我们需要一套容器编排工具:
- docker compose、docker sarm
- Mesosphere + Marathon
Kubernetes(K8s)
Kubernetes(K8s)概述
- 官网:https://kubernetes.io/zh/
- 由来:谷歌的Borg系统,后经Go语言重写并捐献给CNCF基金会开源
- 作用:开源的容器编排框架工具(生态机器丰富)
- github:https://github.com/kubernetes/kubernetes/releases

Kubernetes快速入门
四组基本概念
-
Pod/Pod控制器
Pod
- Pod是K8s里能够被运行的最小的逻辑单元(原子单元)
- 1个Pod里面可以运行多个容器,他们共享UTS+NET+IPC名称空间
- 可以把Pod理解成豌豆荚,而同一Pod内的每个容器是一颗颗豌豆
- 一个Pod里运行多个容器,又叫:边车(SideCar)模式
Pod控制器
- 是Pod启动的一种模板,用来保证在K8s里启动的Pod应始终按照人们的预期运行
- 众多Pod控制器:Deployment、DaemonSet…
-
Name/Namespace
Name
- 由于K8s内部,使用“资源”来定义每一种逻辑概念(功能),故每种“资源”,都应该有自己的“名称”
- “资源”有api版本、类别、元数据等信息
- “名称”通常定义在“资源”的元数据信息里
Namespace
- 随着项目增多、人员增加、集群规模变大,需要一种能够隔离K8s内各种“资源”的方法,这就是名称空间
- 可以理解为K8s内部的虚拟及群组
- 默认的:default、kube-system\\kube-public
- 查询k8s里特定的“资源”要带上相应的名称空间
-
Label/Label选择器
Label
- 便于分类管理资源对象
- 一个标签可以对于多个资源,一个资源也可以有多个标签,多对多
- 组成:key=value
- 类似的:注解,annotations
Label选择器
- 给资源打赏标签后,可以使用标签选择器过滤指定的标签
- 标签选择器目前有两个:基于等值关系的和基于集合关系
- 许多资源支持内嵌标签选择器字段:matchLabels、matchExpressions
-
Service/Ingress
Service
- 在K8s的世界里,虽然每个Pod都会被分配一个单独的IP地址,但这个IP地址会随着Pod的销毁而消失。
- Service(服务)就是用来解决这个问题的核心概念
- 一个Service可以看作是一组提供相同服务的Pod的对外访问接口
- Service作用于哪些Pod是通过标签选择器来定义的
Ingress
- Ingress是K8s集群的工作在OSI网络参考模型下,第7层的应用,对外暴露的接口
- Service只能进行L4流量调度,表现形式是ip+port
- Ingress则可以调度不同业务域、不同URL访问路径的业务流量
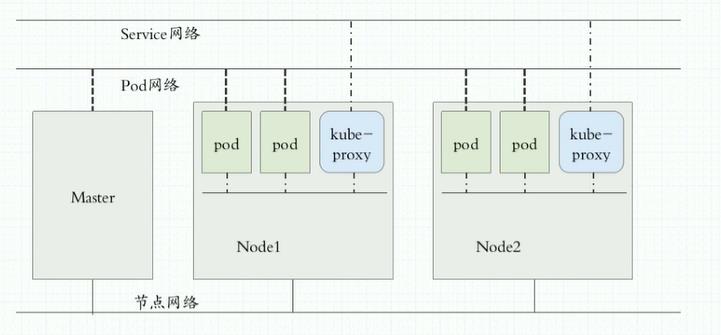
常见的K8s安装部署方式
- Minikube
- 二进制安装部署(生产首选,新手)
- 使用kubeadmin进行部署(相对简单,老手)
准备工作
- 五台虚拟机
- 2c/2G/50g 192.168.12.0/24
- Centos7
安装cnetos7,选择web service安装即可,虚拟机网络模式选nat模式,
windows配置vmnet8的ipv4
# ip
192.168.12.1
# 掩码
255.255.255.0
# 首选DNS
192.168.12.11
虚拟机netvm8设置
# IP
192.168.12.0
# 掩码
255.255.255.0
# 网关
192.168.12.254
Centos8网络ip配置、主机名、epel源、常用工具安装
[root@localhost ~]# vim /etc/sysconfig/network-scripts/ifcfg-eth0
TYPE=Ethernet
IPADDR=192.168.12.200
NETMASK=255.255.255.0
GATEWAY=192.168.12.254
DNS1=192.168.12.254
BOOTPROTO=none
NAME=eth0
DEVICE=eth0
ONBOOT=yes
[root@localhost ~]# nmcli c reload
[root@localhost ~]# reboot
[root@localhost ~]# ping baidu.com
PING baidu.com (39.156.69.79) 56(84) bytes of data.
64 bytes from 39.156.69.79 (39.156.69.79): icmp_seq=1 ttl=128 time=24.1 ms
64 bytes from 39.156.69.79 (39.156.69.79): icmp_seq=2 ttl=128 time=23.8 ms
^Z
[1]+  Stopped                 ping baidu.com

[root@localhost ~]# hostnamectl set-hostname hdss12-200.host.com
[root@hdss12-200 ~]# vi /etc/selinux/config
SELINUX=disabled
[root@hdss12-200 ~]# reboot
[root@hdss12-200 ~]# getenforce
Disabled
[root@hdss12-200 ~]# systemctl stop firewalld
[root@hdss12-200 ~]# wget -O /etc/yum.repos.d/CentOS-Base.repo http://mirrors.aliyun.com/repo/Centos-8.repo
[root@hdss12-200 ~]# yum clean all
[root@hdss12-200 ~]# yum makecache
[root@hdss12-200 ~]# yum install wget net-tools telnet tree nmap sysstat lrzsz dos2unix bind-utils -y
bind9部署dns
hdss12-11上
named
[root@hdss12-11 ~]# yum install bind -y
[root@hdss12-11 ~]# rpm -qa bind
bind-9.11.26-4.el8_4.x86_64
[root@hdss12-11 ~]# vi /etc/named.conf
listen-on port 53 { 192.168.12.11; };
allow-query     { any; };
forwarders      { 192.168.12.254; };
dnssec-enable no;
dnssec-validation no;
[root@hdss12-11 ~]# named-checkconf
区域配置文件
/etc/named.rfc1912.zones
zone "host.com" IN {
	type master;
	file "host.com.zone";
	allow-update { 192.168.12.11; };
};

zone "od.com" IN {
	type master;
	file "od.com.zone";
	allow-update { 192.168.12.11; };
};
/var/named/host.com.zone
$ORIGIN host.com.
$TTL 600         ; 10 minutes
@       IN      SOA     dns.host.com. dnsadmin.host.com. (
                        20210618        ; serial
                          10800         ; refresh (3 hours)
                            900         ; retry (15 minutes)
                         604800         ; expire (1 week)
                          86400         ; minumun (1 day)
                          )
                    NS dns.host.com.
$TTL 60          ; 1 minutes
dns              A    192.168.12.11
HDSS12-11        A    192.168.12.11
HDSS12-12        A    192.168.12.12
HDSS12-21        A    192.168.12.21
HDSS12-22        A    192.168.12.22
HDSS12-200       A    192.168.12.200
/var/named/od.com.zone
$ORIGIN od.com.
$TTL 600         ; 10 minutes
@       IN      SOA     dns.host.com. dnsadmin.host.com. (
                      2021061801        ; serial
                          10800         ; refresh (3 hours)
                            900         ; retry (15 minutes)
                         604800         ; expire (1 week)
                          86400         ; minumun (1 day)
                          )
                    NS dns.od.com.
$TTL 60          ; 1 minutes
dns              A    192.168.12.11
启动
[root@hdss12-11 ~]# systemctl start named
[root@hdss12-11 ~]# netstat -luntp|grep 53
tcp        0      0 192.168.12.11:53        0.0.0.0:*               LISTEN      27874/named
tcp        0      0 127.0.0.1:953           0.0.0.0:*               LISTEN      27874/named
tcp6       0      0 ::1:53                  :::*                    LISTEN      27874/named
tcp6       0      0 ::1:953                 :::*                    LISTEN      27874/named
udp        0      0 192.168.12.11:53        0.0.0.0:*                           27874/named
udp6       0      0 ::1:53
[root@hdss12-11 ~]# dig -t A hdss12-21.host.com @192.168.12.11 +short
最后把所有机器的DNS1改为:192.168.12.11,一定要关闭防火墙,此时用域名全部可以ping通
准备证书签发环境
运维主机HDSS12-200主机上
下载工具
wget https://pkg.cfssl.org/R1.2/cfssl_linux-amd64 -O /usr/bin/cfssl
wget https://pkg.cfssl.org/R1.2/cfssljson_linux-amd64 -O /usr/bin/cfssl-json
wget https://pkg.cfssl.org/R1.2/cfssl-certinfo_linux-amd64 -O /usr/bin/cfssl-certinfo
[root@hdss12-200 ~]# chmod u+x /usr/bin/cfssl*
[root@hdss12-200 ~]# mkdir /opt/certs/ ; cd /opt/certs/
[root@hdss12-200 certs]# vim /opt/certs/ca-csr.json
{
    "CN": "BigSmart",
    "hosts": [
    ],
    "key": {
        "algo": "rsa",
        "size": 2048
    },
    "names": [
        {
            "C": "CN",
            "ST": "beijing",
            "L": "beijing",
            "O": "od",
            "OU": "ops"
        }
    ],
    "ca": {
        "expiry": "175200h"
    }
}
# 签发证书
[root@hdss12-200 certs]# cfssl gencert -initca ca-csr.json | cfssl-json -bare ca
2021/06/19 02:20:23 [INFO] generating a new CA key and certificate from CSR
2021/06/19 02:20:23 [INFO] generate received request
2021/06/19 02:20:23 [INFO] received CSR
2021/06/19 02:20:23 [INFO] generating key: rsa-2048
2021/06/19 02:20:23 [INFO] encoded CSR
2021/06/19 02:20:23 [INFO] signed certificate with serial number 447914809879871710040761543206458018822100175097
[root@hdss12-200 certs]# ls
ca.csr  ca-csr.json  ca-key.pem  ca.pem
[root@hdss12-200 certs]# cat ca.pem
-----BEGIN CERTIFICATE-----
MIIDsjCCApqgAwIBAgIUTnUx2aiYEHRNOjVG9byKAGiRSPkwDQYJKoZIhvcNAQEL
BQAwXzELMAkGA1UEBhMCQ04xEDAOBgNVBAgTB2JlaWppbmcxEDAOBgNVBAcTB2Jl
aWppbmcxCzAJBgNVBAoTAm9kMQwwCgYDVQQLEwNvcHMxETAPBgNVBAMTCEJpZ1Nt
YXJ0MB4XDTIxMDYxOTA2MTUwMFoXDTQxMDYxNDA2MTUwMFowXzELMAkGA1UEBhMC
Q04xEDAOBgNVBAgTB2JlaWppbmcxEDAOBgNVBAcTB2JlaWppbmcxCzAJBgNVBAoT
Am9kMQwwCgYDVQQLEwNvcHMxETAPBgNVBAMTCEJpZ1NtYXJ0MIIBIjANBgkqhkiG
9w0BAQEFAAOCAQ8AMIIBCgKCAQEA0GISRpmhTklTPbtXrcaeEIUChgBG2VrivJCk
uL/5NiEV1L20rC0gIvxGKnv0nch0ksZTl+L7MIDvYDudHSXlzPk1nNEcgXGFwLha
1kOnfB9Q0x7TvYtq+l62mCFUv7dBQw4wLcMrLaBxm/xynRd48JYbtfl/4G8UceoP
f36zDcBcVQvihjPsha5eLLhzy974+KDJWI7yOcU9l9Xrc+TLukRLskBTdz5yLs/J
0ALEAoIwv++M6vBTjfKWsQyA+CBis4gyBiIVXF655YMvDz2IS/KKlndEYf5jI9lw
kmLHU4Z9zmfDkd7+fuHkvIW9tAtw277+0WnBD8rfzQjiX723NQIDAQABo2YwZDAO
BgNVHQ8BAf8EBAMCAQYwEgYDVR0TAQH/BAgwBgEB/wIBAjAdBgNVHQ4EFgQUXM2y
217eb7a/r9WM3Bs2fSCJT/EwHwYDVR0jBBgwFoAUXM2y217eb7a/r9WM3Bs2fSCJ
T/EwDQYJKoZIhvcNAQELBQADggEBAC40LAbpl/Oke8N/Bj5ILNwXPvlrWdvoIRQi
wCzYH2dXqguNePgRwiM1ElsXkLuvTbe05Mj3RdyEUe2hT5d+NsLe4QCZf6eY8fz5
7sGvqZ839OFpEWOEIxSZYKoVAr4zeilQT6dEktml3iCCLOneZn1sJ6uoI674hxiu
GsSOsQwxSh3b9nmBCanZEoFv1srngLbBuiUy0XEWAznVNyiLyhwdze82+QbRIS24
BLq/MqvzIglOd+IxGnAfQiikI51tGGxCmmHht62NIC6xGAX5QvFBc+iAI2puAPRd
EAIQOOLYUvDIsgtQ0i1DxZiapR4nTpKrU3B7+tWdVcXf1ZOckdQ=
-----END CERTIFICATE-----
部署私有镜像仓库harbor
HDSS12-200, HDSS12-21, HDSS12-21上
安装docker
yum erase podman buildah -y
curl -fsSL https://get.docker.com |bash -s docker --mirror Aliyun
daemon.json
{
	"graph": "/data/docker",
	"storage-driver": "overlay2",
	"insecure-registries": ["registry.access.redhat.com", "quay.io"],
	"registry-mirrors": ["https://q2gr04ke.mirror.aliyuncs.com/"],
    "bip": "172.17.22.1/24",  # 对于ip对应一段
	"exec-opts": ["native.cgroupdriver=systemd"],
	"live-restore":true
}
12-200安装harbor
[root@hdss12-200 ~]# cd /opt
[root@hdss12-200 opt]# mkdir src
[root@hdss12-200 opt]# cd src
[root@hdss12-200 src]# wget https://github.com/goharbor/harbor/releases/download/v1.9.4/harbor-offline-installer-v1.9.4.tgz
[root@hdss12-200 src]# ls
harbor-offline-installer-v1.9.4.tgz
[root@hdss12-200 src]# tar xf harbor-offline-installer-v1.9.4.tgz -C /opt/
[root@hdss12-200 src]# cd /opt/
[root@hdss12-200 opt]# ll
total 0
drwxr-xr-x. 2 root root  71 Jun 19 02:20 certs
drwx--x--x. 4 root root  28 Jun 19 02:50 containerd
drwxr-xr-x  2 root root 100 Jun 19 04:26 harbor
drwxr-xr-x  2 root root  49 Jun 19 04:07 src
[root@hdss12-200 opt]# mv harbor /opt/harbor-v1.9.4
# 软连接
[root@hdss12-200 opt]# ln -s /opt/harbor-v1.9.4 /opt/harbor
[root@hdss12-200 opt]# ll
total 0
drwxr-xr-x. 2 root root  71 Jun 19 02:20 certs
drwx--x--x. 4 root root  28 Jun 19 02:50 containerd
lrwxrwxrwx  1 root root  18 Jun 19 04:27 harbor -> /opt/harbor-v1.9.4
drwxr-xr-x  2 root root 100 Jun 19 04:26 harbor-v1.9.4
drwxr-xr-x  2 root root  49 Jun 19 04:07 src
[root@hdss12-200 opt]# vim /opt/harbor/harbor.yml
hostname: harbor.ld.com
http:
  port: 180
data_volume: /data/harbor
location: /data/harbor/logs
[root@hdss12-200 opt]# curl -L https://github.com/docker/compose/releases/download/1.25.0/docker-compose-`uname -s`-`uname -m` -o /usr/local/bin/docker-compose
[root@hdss12-200 opt]# rpm -qa docker-compose
[root@hdss12-200 ~]# cd /opt/harbor/
[root@hdss12-200 ~]# systemctl restart  docker
[root@hdss12-200 harbor]# ./install.sh
[root@hdss12-200 harbor]# docker ps -a
[root@hdss12-200 harbor]# yum install nginx -y
[root@hdss12-200 harbor]# vi /etc/nginx/conf.d/harbor.od.com.conf
server {
    listen       80;
    server_name  harbor.od.com;

    client_max_body_size 1000m;

    location / {
        proxy_pass http://127.0.0.1:180;
    }
}
[root@hdss12-200 harbor]# vim /etc/rc.d/rc.local  # 增加以下内容
# start harbor
cd /opt/harbor
/usr/docker-compose stop
/usr/docker-compose start
12-11上配置DNS解析
[root@hdss12-11 ~]# vim /var/named/od.com.zone
$ORIGIN od.com.
$TTL 600         ; 10 minutes
@       IN      SOA     dns.host.com. dnsadmin.host.com. (
                      2021061805        ; serial
                          10800         ; refresh (3 hours)
                            900         ; retry (15 minutes)
                         604800         ; expire (1 week)
                          86400         ; minumun (1 day)
                          )
                    NS dns.od.com.
$TTL 60          ; 1 minute
dns              A    192.168.12.11
harbor           A    192.168.12.200
[root@hdss12-11 ~]# systemctl start named
[root@hdss12-11 ~]# host harbor.od.com
harbor.od.com has address 192.168.12.200
浏览器访问
harbor.od.com
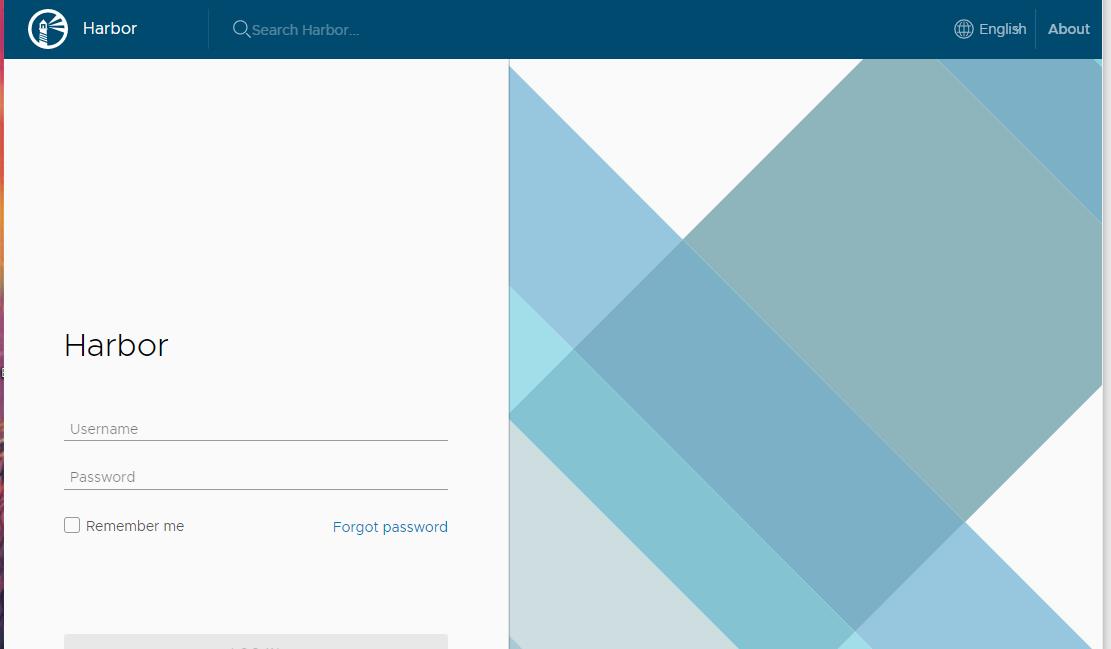
信息在:cat /opt/harbor/harbor.yml
登陆:admin
密码:你修改的密码 harbor_admin_password: xxxxxx
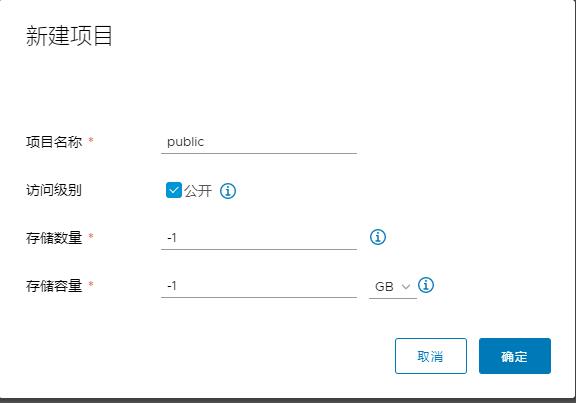
新建一个公开项目
向harbor推送nginx镜像
hdss12-200
 ~]# docker pull nginx:1.7.9
 ~]# docker tag nginx:1.7.9  harbor.od.com/public/nginx:v1.7.9
 ~]# docker login harbor.od.com
 ~]# docker push harbor.od.com/public/nginx:v1.7.9
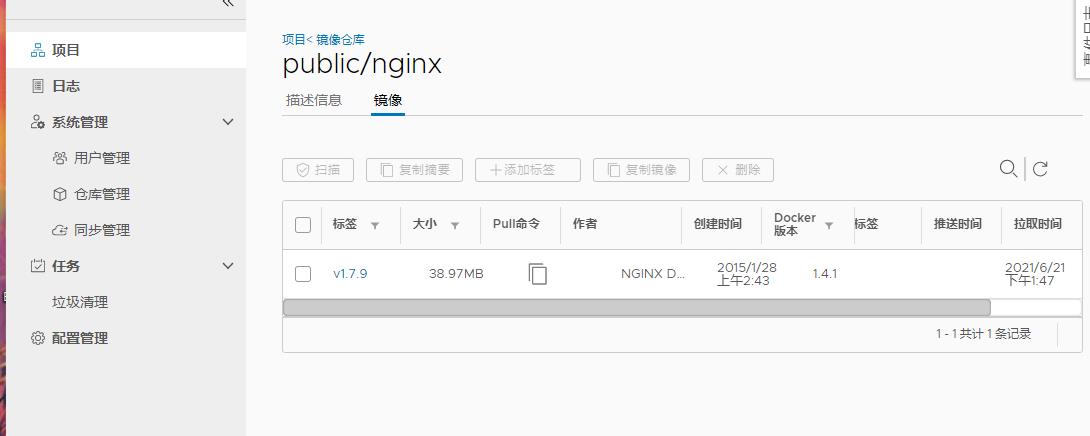
此时查看你的harbor仓库,已经推送过来
K8s部署Master节点服务
部署etcd集群
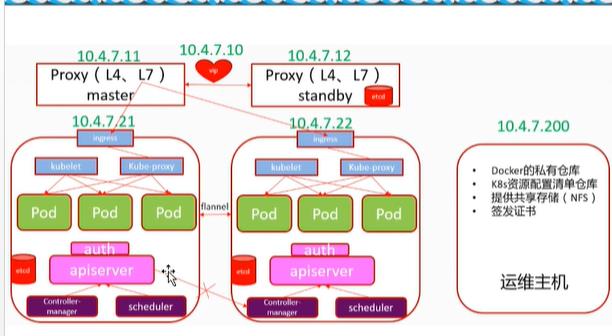
etcd 的leader选举机制,要求至少为3台或以上的奇数台。本次安装涉及:hdss7-12,hdss7-21,hdss7-22
签发etcd证书
证书签发服务器 hdss12-200:
-
创建ca的json配置: /opt/certs/ca-config.json
-
server 表示服务端连接客户端时携带的证书,用于客户端验证服务端身份
-
client 表示客户端连接服务端时携带的证书,用于服务端验证客户端身份
-
peer 表示相互之间连接时使用的证书,如etcd节点之间验证
{
    "signing": {
        "default": {
            "expiry": "175200h"
        },
        "profiles": {
            "server": {
                "expiry": "175200h",
                "usages": [
                    "signing",
                    "key encipherment",
                    "server auth"
                ]
            },
            "client": {
                "expiry": "175200h",
                "usages": [
                    "signing",
                    "key encipherment",
                    "client auth"
                ]
            },
            "peer": {
                "expiry": "175200h",
                "usages": [
                    "signing",
                    "key encipherment",
                    "server auth",
                    "client auth"
                ]
            }
        }
    }
}
- 创建etcd证书配置:/opt/certs/etcd-peer-csr.json
重点在hosts上,将所有可能的etcd服务器添加到host列表,不能使用网段,新增etcd服务器需要重新签发证书
{
    "CN": "k8s-etcd",
    "hosts": [
        "192.168.12.11",
        "192.168.12.12",
        "192.168.12.21",
        "192.168.12.22"
    ],
    "key": {
        "algo": "rsa",
        "size": 2048
    },
    "names": [
        {
            "C": "CN",
            "ST": "beijing",
            "L": "beijing",
            "O": "od",
            "OU": "ops"
        }
    ]
}
- 签发证书
[root@hdss12-200 harbor]# cd /opt/certs/
[root@hdss12-200 certs]# vi ca-config.json
[root@hdss12-200 certs]# vi etcd-peer-csr.json
[root@hdss12-200 certs]# cfssl gencert -ca=ca.pem -ca-key=ca-key.pem -config=ca-config.json -profile=peer etcd-peer-csr.json |cfssl-json -bare etcd-peer
2021/06/21 01:59:38 [INFO] generate received request
2021/06/21 01:59:38 [INFO] received CSR
2021/06/21 01:59:38 [INFO] generating key: rsa-2048
2021/06/21 01:59:38 [INFO] encoded CSR
2021/06/21 01:59:38 [INFO] signed certificate with serial number 3343196185397592834557614861518706185986191828
2021/06/21 01:59:38 [WARNING] This certificate lacks a "hosts" field. This makes it unsuitable for
websites. For more information see the Baseline Requirements for the Issuance and Management
of Publicly-Trusted Certificates, v.1.1.6, from the CA/Browser Forum (https://cabforum.org);
specifically, section 10.2.3 ("Information Requirements").
[root@hdss12-200 certs]# ll
total 36
-rw-r--r--  1 root root  841 Jun 21 01:56 ca-config.json
-rw-r--r--. 1 root root  993 Jun 19 02:20 ca.csr
-rw-r--r--. 1 root root  252 Jun 19 02:20 ca-csr.json
-rw-------. 1 root root 1675 Jun 19 02:20 ca-key.pem
-rw-r--r--. 1 root root 1342 Jun 19 02:20 ca.pem
-rw-r--r--  1 root root 1062 Jun 21 01:59 etcd-peer.csr
-rw-r--r--  1 root root  379 Jun 21 01:58 etcd-peer-csr.json
-rw-------  1 root root 1679 Jun 21 01:59 etcd-peer-key.pem
-rw-r--r--  1 root root 1428 Jun 21 01:59 etcd-peer.pem
安装etcd
12-12,12-21,12-22上
etcd地址:https://github.com/etcd-io/etcd/
实验使用版本: etcd-v3.1.20-linux-amd64.tar.gz
📎etcd-v3.1.20-linux-amd64.tar.gz
- 下载etcd
[root@hdss12-12 ~]# useradd -s /sbin/nologin -M etcd
[root@hdss12-12 ~]# mkdir -p /opt/src
[root@hdss12-12 ~]# cd /opt/src/
[root@hdss12-12 src]# wget https://github.com/etcd-io/etcd/releases/download/v3.1.20/etcd-v3.1.20-linux-amd64.tar.gz
[root@hdss12-12 src]# tar -xf etcd-v3.1.20-linux-amd64.tar.gz
[root@hdss12-12 src]# mv etcd-v3.1.20-linux-amd64 /opt/etcd-v3.1.20
[root@hdss12-12 src]# ln -s /opt/etcd-v3.1.20 /opt/etcd
[root@hdss12-12 src]# ll /opt/etcd
lrwxrwxrwx 1 root root 17 Jun 21 02:06 /opt/etcd -> /opt/etcd-v3.1.20
[root@hdss12-12 src]# mkdir -p /opt/etcd/certs /data/etcd /data/logs/etcd-server
- 下发证书到各个etcd上
[root@hdss12-12 ~]# cd /opt/etcd/certs/
[root@hdss12-12 certs]# scp hdss12-200:/opt/certs/ca.pem .
root@hdss12-200's password:
ca.pem                                                                       100% 1342    80.6KB/s   00:00
[root@hdss12-12 certs]# scp hdss12-200:/opt/certs/etcd-peer.pem .
root@hdss12-200's password:
etcd-peer.pem                                                                100% 1428    88.1KB/s   00:00
[root@hdss12-12 certs]# scp hdss12-200:/opt/certs/etcd-peer-key.pem .
root@hdss12-200's password:
etcd-peer-key.pem                                                            100% 1679   149.3KB/s   00:00
[root@hdss12-12 certs]# ls
ca.pem  etcd-peer-key.pem  etcd-peer.pem
- 创建etcd启动脚本
[root@hdss12-12 certs]# vim /opt/etcd/etcd-server-startup.sh
#!/bin/sh
./etcd/etcd --name etcd-server-12-12 \\
    --data-dir /data/etcd/etcd-server \\
    --listen-peer-urls https://192.168.12.12:2380 \\
    --listen-client-urls https://192.168.12.12:2379,http://127.0.0.1:2379 \\
    --quota-backend-bytes 8000000000 \\
    --initial-advertise-peer-urls https://192.168.12.12:2380 \\
    --advertise-client-urls https://192.168.12.12:2379,http://127.0.0.1:2379 \\
    --initial-cluster  etcd-server-12-12=https://192.168.12.12:2380,etcd-server-12-21=https://192.168.12.21:2380,etcd-server-12-22=https://192.168.12.22:2380 \\
    --ca-file ./certs/ca.pem \\
    --cert-file ./certs/etcd-peer.pem \\
    --key-file ./certs/etcd-peer-key.pem \\
    --client-cert-auth  \\
    --trusted-ca-file ./certs/ca.pem \\
    --peer-ca-file ./certs/ca.pem \\
    --peer-cert-file ./certs/etcd-peer.pem \\
    --peer-key-file ./certs/etcd-peer-key.pem \\
    --peer-client-cert-auth \\
    --peer-trusted-ca-file ./certs/ca.pem \\
    --log-output stdout
[root@hdss12-12 certs]# chmod u+x /opt/etcd/etcd-server-startup.sh
[root@hdss12-12 certs]# chown -R etcd.etcd /opt/etcd/ /data/etcd /data/logs/etcd-server
启动etcd
12-12,12-21,12-22上
# 安装supervisor
[root@hdss12-12 certs]# yum install -y python36
[root@hdss12-12 certs]# pip3 install supervisor
[root@hdss12-12 certs]# echo_supervisord_conf>/etc/supervisord.conf
[root@hdss12-12 certs]# vi /etc/supervisord.conf
[program:etcd-server-12-12]
command=/opt/etcd/etcd-server-startup.sh ; the program (relative uses PATH, can take args)
numprocs=1 ; number of processes copies to start (def 1)
directory=/opt/etcd ; directory to cwd to before exec (def no cwd)
autostart=true ; start at supervisord start (default: true)
autorestart=true ; retstart at unexpected quit (default: true)
startsecs=30 ; number of secs prog must stay running (def. 1)
startretries=3 ; max # of serial start failures (default 3)
exitcodes=0,2 ; 'expected' exit codes for process (default 0,2)
stopsignal=QUIT ; signal used to kill process (default TERM)
stopwaitsecs=10 ; max num secs to wait b4 SIGKILL (default 10)
user=etcd ; setuid to this UNIX account to run the program
redirect_stderr=true ; redirect proc stderr to stdout (default false)
stdout_logfile=/data/logs/etcd-server/etcd.stdout.log ; stdout log path, NONE for none; default AUTO
stdout_logfile_maxbytes=64MB ; max # logfile bytes b4 rotation (default 50MB)
stdout_logfile_backups=5 ; # of stdout logfile backups (default 10)
stdout_capture_maxbytes=1MB ; number of bytes in 'capturemode' (default 0)
stdout_events_enabled=false
[root@hdss12-22 certs