送书啦!Kotlin 从入门到进阶实践看这本就够啦
Posted OSC开源社区
tags:
篇首语:本文由小常识网(cha138.com)小编为大家整理,主要介绍了送书啦!Kotlin 从入门到进阶实践看这本就够啦相关的知识,希望对你有一定的参考价值。
Kotlin 是在七年前由 JetBrains 推出,由于代码变得更简洁了,Kotlin 获得了很多开发者的认可。尽管 Java 仍然是 android 支持的最流行的编程语言,但未来使用 Kotlin 的开发者将会大幅增加。
为帮助大家学习,开源中国联合清华出版社推出《Kotlin 从入门到进阶实践》的书籍赠送活动。
阅读下面的节选内容,写下你对该章节的见解。小编将从所有留言中随机抽选出 5 名送出《Kotlin 从入门到进阶实践》技术书籍。是的,随机抽选,无需积赞,走心的书评才能得到青睐哦!
试读写书评:
第13章节选
Kotlin集成Spring Boot服务端开发
本章介绍Kotlin服务端开发的相关内容。首先简单介绍一下Spring Boot服务端开发框架,快速给出一个 Restful Hello World的示例。然后讲下Kotlin 集成Spring Boot进行服务端开发的步骤,最后给出一个完整的Web应用开发实例。
13.1 用Spring Boot快速开发Restful Hello World
13.1.1 Spring Initializr
工欲善其事必先利其器。我们使用https://start.spring.io/可以直接自动生成 Spring Boot项目脚手架,如图13-1所示。
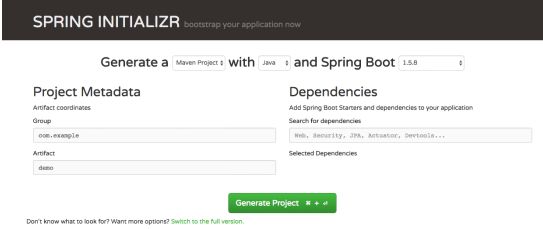
图13-1 使用Spring Initializr 生成项目
单击Switch to the full version链接,可以看到脚手架支持的工具链。我们也可以自己搭建本地的 Spring Initializr服务,步骤如下:
(1)Gitclone 源码到本机 https://github.com/spring-io/initializr。
(2)在源码根目录下执行$./mvnw clean install。
(3)到initializr-service子项目的目录下
cd initializr-service
执行
../mvnw spring-boot:run
即可看到启动日志:
......
s.b.c.e.t.TomcatEmbeddedServletContainer : Tomcat started on port(s): 8080(http)
i.s.i.service.InitializrService : Started InitializrService in 15.192 seconds (JVM running for 15.882)
此时,用本机浏览器访问http://127.0.0.1:8080/,即可看到脚手架initializr页面。
13.1.2 创建Spring Boot项目
下面使用本地搭建的脚手架initializr来创建基于Gradle构建的Kotlin + Spring Boot项目,如图13-2所示。
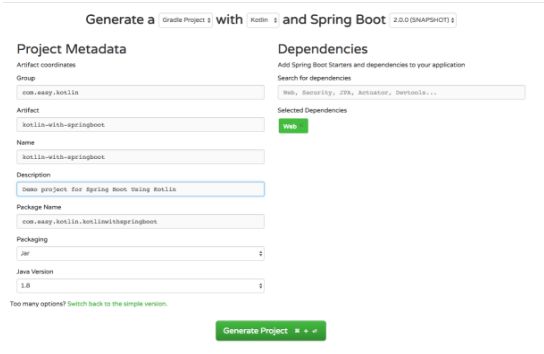
图13-2 创建基于Gradle构建的Kotlin + Spring Boot项目
首先,我们选择生成的是一个使用Gradle构建的Kotlin项目,SpringBoot的版本号这里选择2.0.0(SNAPSHOT)。
在Spring Boot Starters和dependencies选项中,选择Web starter,这个启动器里面包含了基本够用的Spring Web开发需要的东西:Tomcat 和 Spring MVC。
其余的项目元数据(Project Metadata)的配置(Bill Of Materials),可以从图13-2中看到。然后单击Generate Project按钮,会自动下载一个项目的zip压缩包,将其解压导入IDEA中,如图13-3所示。
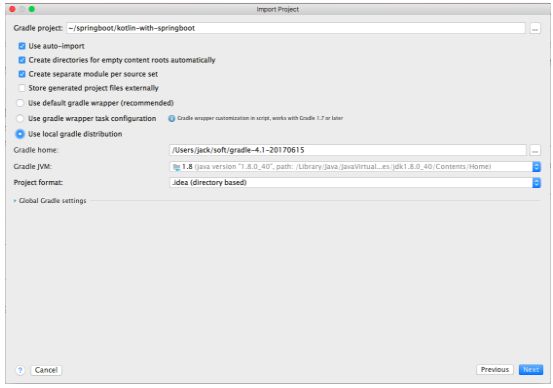
图13-3 解压工程导入IDEA中
因为我们使用的是Gradle构建项目,所以需要配置一下Gradle环境。这里使用的是Local gradle distribution,因此选择对应本地的Gradle软件包目录。
1.工程文件目录树
我们将得到下面的一个样板工程,工程文件目录树如下:
kotlin-with-springboot$ tree
.
├── build
│ └── kotlin-build
│ └── version.txt
├── build.gradle
├── gradle
│ └── wrapper
│ ├── gradle-wrapper.jar
│ └── gradle-wrapper.properties
├── gradlew
├── gradlew.bat
├── kotlin-with-springboot.iml
└── src
├── main
│ ├── java
│ ├── kotlin
│ │ └── com
│ │ └── easy
│ │ └── kotlin
│ │ └── kotlinwithspringboot
│ │ └── KotlinWithSpringbootApplication.kt
│ └── resources
│ ├── application.properties
│ ├── static
│ └── templates
└── test
├── java
├── kotlin
│ └── com
│ └── easy
│ └── kotlin
│ └── kotlinwithspringboot
│ └── KotlinWithSpringbootApplicationTests.kt
└── resources
23 directories, 10 files
其中,srcmainkotlin是Kotlin源码放置目录。srcmain esources目录下面放置工程资源文件。application.properties是工程全局的配置文件,static文件夹下面放置的是静态资源文件,templates目录下面放置的是视图模板文件。
2.build.gradle 配置文件
我们使用Gradle来构建项目。其中,build.gradle 配置文件类似 Maven中的pom.xml配置文件。使用Spring Initializr自动生成的样板项目的默认配置如下:
buildscript {
ext {
kotlinVersion = '1.1.51'
springBootVersion = '2.0.0.BUILD-SNAPSHOT'
}
repositories {
mavenCentral()
maven { url "https://repo.spring.io/snapshot" }
maven { url "https://repo.spring.io/milestone" }
}
dependencies {
classpath("org.springframework.boot:spring-boot-gradle-plugin:$ {springBootVersion}")
classpath("org.jetbrains.kotlin:kotlin-gradle-plugin:${kotlinVersion}")
classpath("org.jetbrains.kotlin:kotlin-allopen:${kotlinVersion}")
}
}
apply plugin: 'kotlin'
apply plugin: 'kotlin-spring'
apply plugin: 'eclipse'
apply plugin: 'org.springframework.boot'
apply plugin: 'io.spring.dependency-management'
group = 'com.easy.kotlin'
version = '0.0.1-SNAPSHOT'
sourceCompatibility = 1.8
compileKotlin {
kotlinOptions.jvmTarget = "1.8"
}
compileTestKotlin {
kotlinOptions.jvmTarget = "1.8"
}
repositories {
mavenCentral()
maven { url "https://repo.spring.io/snapshot" }
maven { url "https://repo.spring.io/milestone" }
}
dependencies {
compile('org.springframework.boot:spring-boot-starter-web')
compile("org.jetbrains.kotlin:kotlin-stdlib-jre8:${kotlinVersion}")
compile("org.jetbrains.kotlin:kotlin-reflect:${kotlinVersion}")
testCompile('org.springframework.boot:spring-boot-starter-test')
}
其中,spring-boot-gradle-plugin是Spring Boot集成Gradle的插件;kotlin-gradle-plugin 是Kotlin集成Gradle的插件;kotlin-allopen是Kotlin集成Spring框架把类全部设置为open的插件。
因为Kotlin的所有类及其成员默认情况下都是final(不可继承)的,也就是说你想要继承一个类,就要不断地写各种修饰符来打开类为可继承的。而使用Java写的Spring框架中大量使用了继承和覆写,这个时候使用kotlin-allopen插件结合kotlin-spring插件,可以自动把Spring相关的所有注解的类都设置为open。
spring-boot-starter-web就是Spring Boot中提供的使用Spring框架进行Web应用开发的启动器。
kotlin-stdlib-jre8是Kotlin使用Java 8的库,kotlin-reflect是Kotlin 的反射库。
Spring Boot项目的整体依赖情况如图13-4所示。
可以看出,spring-boot-starter-web 中已经引入了我们所需要的JSON、Tomcat、Validator、Web MVC(其中引入了Spring框架的核心Web、Context、AOP、Beans、Expressions、Core)等框架。
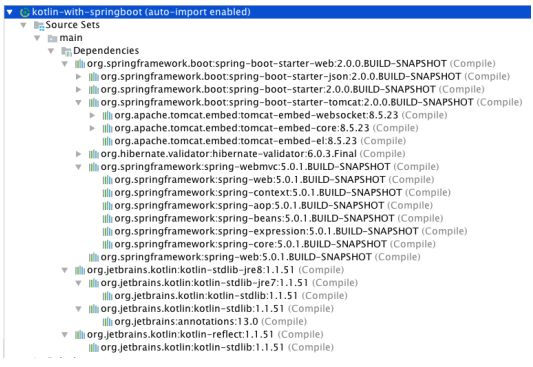
图13-4 Spring Boot项目的整体依赖情况
3.Spring Boot项目的入口类 KotlinWithSpringbootApplication
自动生成的 Spring Boot项目的入口类KotlinWithSpringbootApplication如下:
package com.easy.kotlin.kotlinwithspringboot
importorg.springframework.boot.SpringApplication
import org.springframework.boot.autoconfigure.SpringBootApplication
@SpringBootApplication
class KotlinWithSpringbootApplication
fun main(args: Array<String>) {
SpringApplication.run(KotlinWithSpringbootApplication::class.java, *args)
}
其中,@SpringBootApplication注解是3个注解的组合,分别是@SpringBootConfiguration后台使用的@Configuration、@EnableAutoConfiguration和@ComponentScan。
由于这些注解一般都是一起使用,因此Spring Boot提供了这个@SpringBootApplication 统一的注解。该注解的定义源码如下:
@Target({ElementType.TYPE})
@Retention(RetentionPolicy.RUNTIME)
@Documented
@Inherited
@SpringBootConfiguration
@EnableAutoConfiguration
@ComponentScan(
excludeFilters = {@Filter(
type = FilterType.CUSTOM,
classes = {TypeExcludeFilter.class}
), @Filter(
type = FilterType.CUSTOM,
classes = {AutoConfigurationExcludeFilter.class}
)}
)
public @interface SpringBootApplication {
...
}
main()函数中的 KotlinWithSpringbootApplication::class.java 是一个使用反射获取KotlinWithSpringbootApplication类的Java Class引用。这也正是我们在依赖中引入kotlin-reflect 包的用途所在。
4.写Hello World控制器
下面我们来实现一个简单的Hello World控制器。首先新建 HelloWorldController Kotlin类,代码实现如下:
package com.easy.kotlin.kotlinwithspringboot
import org.springframework.stereotype.Controller
import org.springframework.web.bind.annotation.RequestMapping
import org.springframework.web.bind.annotation.ResponseBody
@Controller
class HelloWorldController {
@RequestMapping("/")
@ResponseBody
fun home(): String {
return "Hello World!"
}
}
5.启动运行
系统默认端口号是8080,我们在application.properties中添加一行服务端口号的配置。
server.port=8000
然后直接启动入口类KotlinWithSpringbootApplication,可以看到启动日志。
...o.s.b.w.embedded.tomcat.TomcatWebServer : Tomcat started on port(s): 8000 (http)
.e.k.k.KotlinWithSpringbootApplicationKt : Started KotlinWithSpringboot- ApplicationKt in 7.944
seconds (JVM running for 9.049)
也可以选择IDEA的Gradle工具栏里的Tasks|application|bootRun命令来启动程序,如图13-5所示。
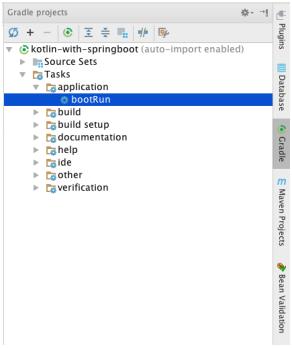
图13-5 选择Gradle的bootRun
启动完毕后,直接在浏览器中打开http://127.0.0.1:8000/,可以看到浏览器中输出了Hello World!,如图13-6所示。
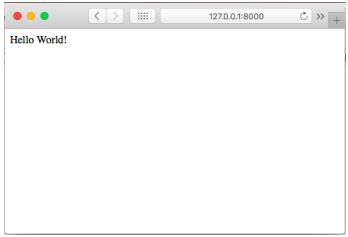
图13-6 在浏览器中输出Hello World!
下面将使用 Kotlin + Spring Boot框架实现一个简单的图片爬虫的Web应用实例。上面我们已经看到了使用Kotlin 集成Spring Boot框架开发的基本步骤。下面将给出一个Kotlin 集成Spring Boot开发框架,使用mysql数据库、Spring Data JPA框架、Freemarker模板引擎的完整Web项目的实例。首先我们来简单介绍一下系统的技术栈。
13.5 数据持久层开发
下面我们从数据持久层开始构建应用。首先来设计数据库的表结构。
13.5.1 数据库表结构
首先设计数据库的表结构如下:
CREATE TABLE 'picture' (
'id' bigint(20) NOT NULL AUTO_INCREMENT,
'category' varchar(255) DEFAULT NULL,
'deleted_date' datetime DEFAULT NULL,
'gmt_created' datetime DEFAULT NULL,
'gmt_modified' datetime DEFAULT NULL,
'is_deleted' int(11) NOT NULL,
'url' varchar(500) NOT NULL,
'version' int(11) NOT NULL,
'is_favorite' int(11) NOT NULL,
PRIMARY KEY ('id','url'),
KEY 'url' ('id','url') USING BTREE
) ENGINE=InnoDB DEFAULT CHARSET=utf8;
因为我们使用的是JPA,所以只需要写好实体类代码,启动应用即可在MySQL数据库中自动创建表结构。实体类代码如下:
package com.easy.kotlin.picturecrawler.entity
import java.util.*
import javax.persistence.*
@Entity
class Image {
@Id
@GeneratedValue(strategy = GenerationType.IDENTITY)
var id: Long = -1
@Version
var version: Int = 0
var category: String = ""
var isFavorite: Int = 0
var url: String = ""
var gmtCreated: Date = Date()
var gmtModified: Date = Date()
var isDeleted: Int = 0 //1 Yes,0 No
var deletedDate: Date = Date()
override fun toString(): String {
return "Image(id=$id, version=$version, category='$category', isFavorite= $isFavorite,url='$url',gmtCreated=$gmtCreated,gmtModified=$gmtModified, isDeleted=$isDeleted,deletedDate=$deletedDate)"
}
}
13.5.2 配置JPA
下面再配置一下JPA的一些行为:
spring.jpa.database=MYSQL
spring.jpa.show-sql=true
# Hibernate ddl auto (create, create-drop, update)
spring.jpa.hibernate.ddl-auto=update
# Naming strategy
spring.jpa.hibernate.naming-strategy=org.hibernate.cfg.ImprovedNamingStrategy
spring.jpa.properties.hibernate.dialect=org.hibernate.dialect.MySQL5Dialect
1.ddl-auto的值
其中,spring.jpa.hibernate.ddl-auto的值有:create、create-drop、update、validate、none,如表13-1中分别进行了简单的说明。
表13-1 ddl-auto 的值说明
值 |
说 明 |
create |
每次加载hibernate会自动创建表,以后启动会覆盖之前的表。所以这个值基本不用,因为严重的情况下会导致数据丢失 |
create-drop |
每次加载hibernate时根据model类生成表,但是sessionFactory一关闭表就自动删除,下一次启动会重新创建 |
update |
加载hibernate时根据实体类model创建数据库表,这时表名的依据是@Entity注解的值或者@Table注解的值。sessionFactory关闭表不会删除,且下一次启动会根据实体model更新结构或者有新的实体类时创建新的表 |
续表
值 |
说 明 |
validate |
启动时验证表的结构,不会创建表 |
none |
启动时不做任何操作 |
一般在开发项目的过程中,通常会选用update选项。
再次启动应用,启动完毕后可以看到数据库中已经自动创建了image表,如图13-9 所示。

图13-9 数据库中已经自动创建的image表
2.声明数据表的索引
为了达到更高的性能,我们建立类别category字段和url索引,其中url是唯一索引。
ALTER TABLE 'sotu'.'image'
ADD INDEX 'idx_category' ('category' ASC),
ADD UNIQUE INDEX 'uk_url' ('url' ASC);
而实际上不需要手工写上面的SQL代码然后再去数据库中执行,只需要写下面的实 体类:
package com.easy.kotlin.picturecrawler.entity
import java.util.*
import javax.persistence.*
@Entity
@Table(indexes = arrayOf(
Index(name = "idx_url", unique = true, columnList = "url"),
Index(name = "idx_category", unique = false, columnList = "category")))
class Image {
@Id
@GeneratedValue(strategy = GenerationType.IDENTITY)
var id: Long = -1
@Version
var version: Int = 0
@Column(length = 255, unique = true, nullable = false)
var category: String = ""
var isFavorite: Int = 0
@Column(length = 255, unique = true, nullable = false)
var url: String = ""
var gmtCreated: Date = Date()
var gmtModified: Date = Date()
var isDeleted: Int = 0 //1 Yes, 0 No
var deletedDate: Date = Date()
override fun toString(): String {
return "Image(id=$id, version=$version, category='$category', isFavorite= $isFavorite, url='$url', gmtCreated=$gmtCreated, gmtModified= $gmtModified, isDeleted=$isDeleted, deletedDate=$deletedDate)"
}
}
然后在@Table注解里指定为url、category建立索引,以及设定url唯一性约束unique=true。
@Table(indexes = arrayOf(
Index(name = "idx_url", unique = true, columnList = "url"),
Index(name = "idx_category", unique = false, columnList = "category")))
启动应用的时候,JPA 会去解析我们的注解生成对应的 SQL,并且自动去执行相应的SQL。例如,字段url 的唯一索引约束,我们可以在启动日志中看到如下输出:
Hibernate: alter table image drop index idx_url
Hibernate: alter table image add constraint idx_url unique (url)
其中,Index 是@Index 注解,作为参数使用的时候不需要加@。我们再举个例子,实体类代码如下:
package com.easy.kotlin.picturecrawler.entity
import java.util.*
import javax.persistence.*
@Entity
@Table(indexes = arrayOf(Index(name = "idx_key_word", columnList = "keyWord", unique = true)))
class SearchKeyWord {
@Id
@GeneratedValue(strategy = GenerationType.IDENTITY)
var id: Long = -1
@Column(length = 50, unique = true, nullable = false)
var keyWord: String = ""
var gmtCreated: Date = Date()
var gmtModified: Date = Date()
var isDeleted: Int = 0 //1 Yes, 0 No
var deletedDate: Date = Date()
}
重启应用,可以看到Hibernate日志如下:
Hibernate: create table search_key_word (id bigint not null auto_increment, deleted_date datetime, gmt_created datetime, gmt_modified datetime, is_deleted integer not null, key_word varchar(50) not null, primary key (id)) engine=MyISAM
Hibernate: alter table search_key_word drop index UK_lvmjkr0dkesio7a33ejre5c26
Hibernate: alter table search_key_word add constraint UK_lvmjkr0dkesio7a33ej- re5c26 unique (key_word)
自动生成的表结构如图13-10所示。

图13-10 自动生成的表结构
其中,@Column(length=50,unique=true, nullable=false)这一句指定了keyWord字段的长度是50,有唯一约束,不可空。对应生成的数据库表字段 key_word信息中:Type 是varchar(50),Null是NO,Key是唯一键UNI。
......
......
开源中国征稿开始啦!
开源中国 www.oschina.net 是目前备受关注、具有强大影响力的开源技术社区,拥有超过 200 万的开源技术精英。我们传播开源的理念,推广开源项目,为 IT 开发者提供一个发现、使用、并交流开源技术的平台。
现在我们开始对外征稿啦!如果你有优秀的技术文章想要分享,热点的行业资讯需要报道等等,欢迎联系开源中国进行投稿。投稿详情及联系方式请参见:
以上是关于送书啦!Kotlin 从入门到进阶实践看这本就够啦的主要内容,如果未能解决你的问题,请参考以下文章