Nginx服务
Posted 还行少年
tags:
篇首语:本文由小常识网(cha138.com)小编为大家整理,主要介绍了Nginx服务相关的知识,希望对你有一定的参考价值。
文章目录
一、nginx服务基础
1.Nginx服务安装及运行控制
1.1 编译安装 Nginx
1.1.1 安装支持软件
[root@localhost ~]# yum -y install gcc gcc-c++ pcre-devel zlib-devel make
已加载插件:fastestmirror, langpacks
Loading mirror speeds from cached hostfile
 * base: mirrors.cn99.com
 * extras: mirrors.cn99.com
 * updates: mirrors.cn99.com
软件包 gcc-4.8.5-44.el7.x86_64 已安装并且是最新版本
软件包 gcc-c++-4.8.5-44.el7.x86_64 已安装并且是最新版本
软件包 pcre-devel-8.32-17.el7.x86_64 已安装并且是最新版本
软件包 zlib-devel-1.2.7-19.el7_9.x86_64 已安装并且是最新版本
软件包 1:make-3.82-24.el7.x86_64 已安装并且是最新版本
无须任何处理
[root@localhost ~]#
1.1.2 创建运行用户
[root@localhost ~]# useradd -M -s /sbin/nologin nginx //降低风险,不建立宿主文件夹,不允许登录到shell环境
1.1.3 编译安装Nginx
[root@localhost ~]# cd /opt/
[root@localhost opt]# ls
nginx-1.12.2  nginx-1.12.2.tar.gz  rh
[root@localhost opt]# cd nginx-1.12.2/
[root@localhost nginx-1.12.2]# ./configure --prefix=/usr/local/nginx --user=nginx --group=nginx --with-http_stub_status_module    //指定安装目录和开启模块
[root@localhost nginx-1.12.2]# make &&  make install   //编译安装
1.2 Nginx的运行控制
1.2.1 检查配置文件
[root@localhost nginx-1.12.2]# ln -s /usr/local/nginx/sbin/nginx /usr/local/sbin/    //建立软连接,之后直接可以执行nginx
[root@localhost nginx-1.12.2]# nginx -t   //检查配置文件
nginx: the configuration file /usr/local/nginx/conf/nginx.conf syntax is ok
nginx: configuration file /usr/local/nginx/conf/nginx.conf test is successful
1.2.2 启动、停止服务
[root@localhost ~]# nginx  //已经做了软连接,直接启动
[root@localhost ~]# netstat -antp | grep 80   //观察端口
tcp        0      0 0.0.0.0:80              0.0.0.0:*               LISTEN      75507/nginx: master
[root@localhost ~]# killall -s QUIT nginx   //退出进程
[root@localhost ~]# netstat -antp | grep 80    //观察端口,nginx已停止
[root@localhost ~]# killall -s HUP nginx
nginx: no process found
[root@localhost ~]# nginx   //启动nginx
[root@localhost ~]# killall -s HUP nginx   //重载nginx
[root@localhost ~]# netstat -antp | grep 80
tcp        0      0 0.0.0.0:80              0.0.0.0:*               LISTEN      75574/nginx: master
[root@localhost ~]#
1.2.3 使用 Nginx 服务脚本
[root@localhost init.d]# pwd
/etc/init.d
[root@localhost init.d]# cat nginx
#!/bin/bash
# chkconfig: - 99 20							# chkcofig - “-” 表示不启用开机启动管理 (同时 若不加“#”, chkconfig add nginx 会加载不到配置)
# description: Nginx Service Control Script
COM="/usr/local/nginx/sbin/nginx"				#命令程序文件位置(nginx)
PID="/usr/local/nginx/logs/nginx.pid"			#pid文件
case "$1" in
start)
   $COM
   ;;
stop)
   kill -s QUIT $(cat $PID)
   ;;
restart)
   $0 stop
   $0 start
   ;;
reload)
   kill -s HUP $(cat $PID)
   ;;
*)
       echo "Usage: $0 {start|stop|restart|reload}"
       exit 1
esac
exit 0
[root@localhost init.d]# chmod +x nginx   //赋予执行权限
[root@localhost init.d]# chkconfig --add nginx   //添加为系统服务
1.2.4 查看效果
[root@localhost ~]# systemctl start nginx   //开启服务
[root@localhost ~]# systemctl status nginx   //查看状态
● nginx.service - nginx
   Loaded: loaded (/usr/lib/systemd/system/nginx.service; disabled; vendor preset: disabled)
   Active: active (running) since 一 2021-06-21 19:48:55 CST; 3s ago
  Process: 76060 ExecStart=/usr/local/nginx/sbin/nginx (code=exited, status=0/SUCCESS)
 Main PID: 76061 (nginx)
    Tasks: 2
   CGroup: /system.slice/nginx.service
           ├─76061 nginx: master process /usr/local/nginx/sbin/nginx
           └─76062 nginx: worker process

6月 21 19:48:55 localhost.localdomain systemd[1]: Starting nginx...
6月 21 19:48:55 localhost.localdomain systemd[1]: Started nginx.
[root@localhost ~]# systemctl stop nginx   //关闭服务
[root@localhost ~]# systemctl status nginx   //查看状态
● nginx.service - nginx
   Loaded: loaded (/usr/lib/systemd/system/nginx.service; disabled; vendor preset: disabled)
   Active: inactive (dead)

6月 21 19:47:45 localhost.localdomain systemd[1]: Stopped nginx.
6月 21 19:48:05 localhost.localdomain systemd[1]: Starting nginx...
6月 21 19:48:05 localhost.localdomain systemd[1]: PID file /usr/local/nginx/logs/nginx.pid not readable (yet?) after start.
6月 21 19:48:05 localhost.localdomain systemd[1]: Started nginx.
6月 21 19:48:20 localhost.localdomain systemd[1]: Stopping nginx...
6月 21 19:48:20 localhost.localdomain systemd[1]: Stopped nginx.
6月 21 19:48:55 localhost.localdomain systemd[1]: Starting nginx...
6月 21 19:48:55 localhost.localdomain systemd[1]: Started nginx.
6月 21 19:49:02 localhost.localdomain systemd[1]: Stopping nginx...
6月 21 19:49:02 localhost.localdomain systemd[1]: Stopped nginx.
Hint: Some lines were ellipsized, use -l to show in full.
[root@localhost ~]#
2.配置文件nginx.conf
[root@localhost ~]# cat /usr/local/nginx/conf/nginx.conf //源码安装的配置文件路径
2.1 全局配置
#user  nobody;    //运行用户
worker_processes  1;    //工作进程数量
#error_log  logs/error.log;   //错误日志文件的相对路径
#error_log  logs/error.log  notice;
#error_log  logs/error.log  info;
#pid        logs/nginx.pid;    //PID文件的路径
2.2 I/O事件配置
events {
    worker_connections  1024;   //每个进程最多处理1024个连接
}

[root@localhost ~]# ulimit -n 65535  //临时修改每个进程打开的最大文件数
2.3 HTTP配置
http {
    include       mime.types;
    default_type  application/octet-stream;

    #log_format  main  '$remote_addr - $remote_user [$time_local] "$request" '
    #                  '$status $body_bytes_sent "$http_referer" '
    #                  '"$http_user_agent" "$http_x_forwarded_for"';

    #access_log  logs/access.log  main;   //访问日志范围
    sendfile        on;      //支持文件发送(发送)
    #tcp_nopush     on;

    #keepalive_timeout  0;
    keepalive_timeout  65;   //连接保持超时

    #gzip  on;  //压缩模块

    server {            //Web服务的监听配置
        listen       80;   //默认监听端口
        server_name  localhost;  //网站名称

        #charset koi8-r;    //网页的默认字符集
        #access_log  logs/host.access.log  main;

        location / {       //根目录配置
            root   html;     //网站根目录的路径
            index  index.html index.htm;  //默认首页
        }
		 error_page   500 502 503 504  /50x.html;     //内部错误的反馈页面
         location = /50x.html {   //错误页面配置
            root   html;
        }

    }

}
3.访问状态统计
        #access_log  logs/host.access.log  main;

        location / {
            root   html;
            index  index.html index.htm;
        }

        location /status {
            stub_status on;     //打开状态统计功能
            access_log off;     //关闭日志
        }

二、Nginx访问控制
1.基于授权的访问控制
[root@localhost nginx]# htpasswd -c /usr/local/nginx/passwd.db   zhangsan  //生成用户和密码
New password:
Re-type new password:
Adding password for user zhangsan
[root@localhost nginx]#
[root@localhost nginx]# chmod 400 passwd.db   //修改权限
[root@localhost nginx]# chown nginx passwd.db   //更改属主
[root@localhost nginx]# ll -d passwd.db
-r-------- 1 nginx root 47 6月  22 09:03 passwd.db
[root@localhost nginx]#
        location /status {
            auth_basic "secret";   //添加认证配置
            auth_basic_user_file /usr/local/nginx/passwd.db;
            stub_status on;
            access_log off;
        }


2.基于客户端的访问控制
        location / {
            root   html;
            index  index.html index.htm;
                deny 192.168.30.254;    //禁止192.168.30.254
                allow all;              //允许其他所有
        }

三、Nginx虚拟主机
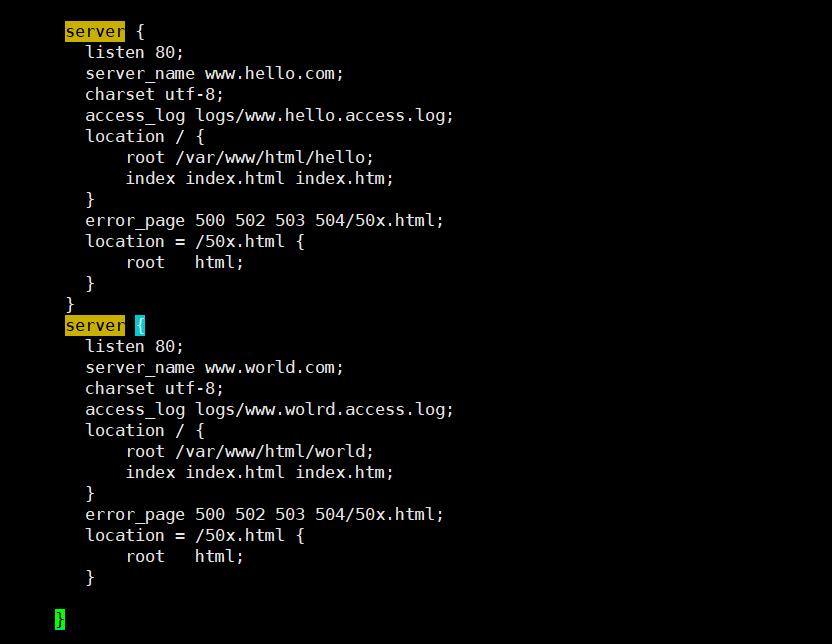
1.基于域名的虚拟主机
[root@localhost ~]# tail -n 2 /etc/hosts    //测试,添加hosts文件
192.168.30.5 www.hello.com
192.168.30.5 www.world.com
[root@localhost ~]#
[root@localhost ~]# mkdir -p /var/www/html/hello    //创建网页根目录与主页
[root@localhost ~]# mkdir -p /var/www/html/world
[root@localhost ~]# echo "www.hello.com" >> /var/www/html/hello/index.html
[root@localhost ~]# echo "www.world.com" >> /var/www/html/world/index.html

2.基于IP的虚拟主机
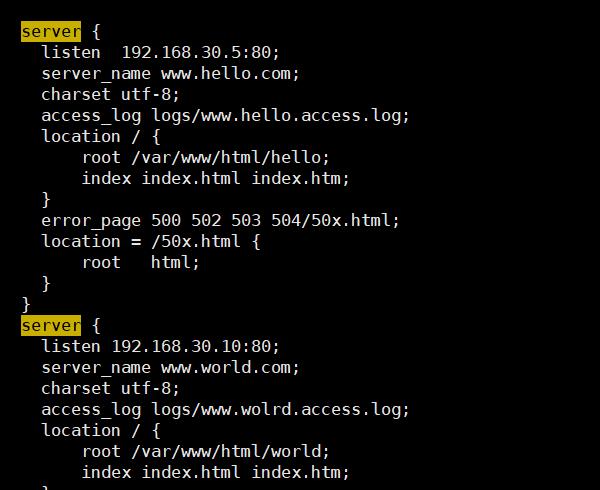
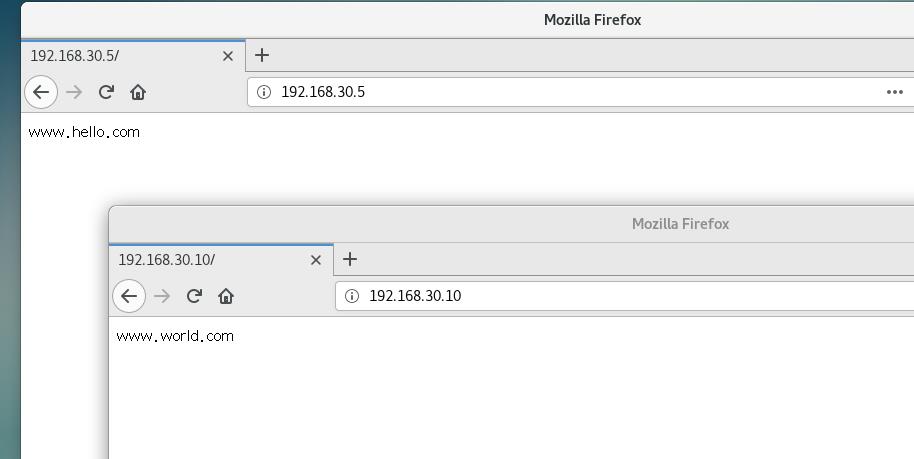
[root@localhost ~]# netstat -anpt | grep nginx
tcp        0      0 192.168.30.10:80        0.0.0.0:*               LISTEN      20344/nginx: master
tcp        0      0 192.168.30.5:80         0.0.0.0:*               LISTEN      20344/nginx: master
[root@localhost ~]#
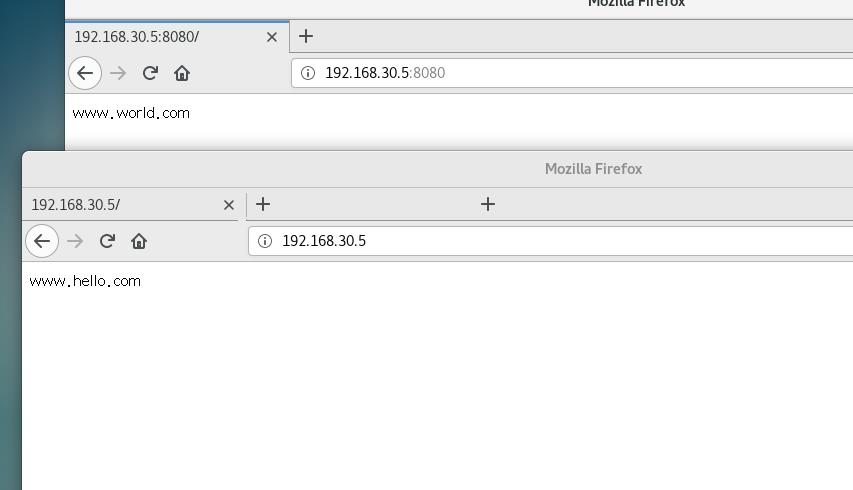
3.基于端口的虚拟主机
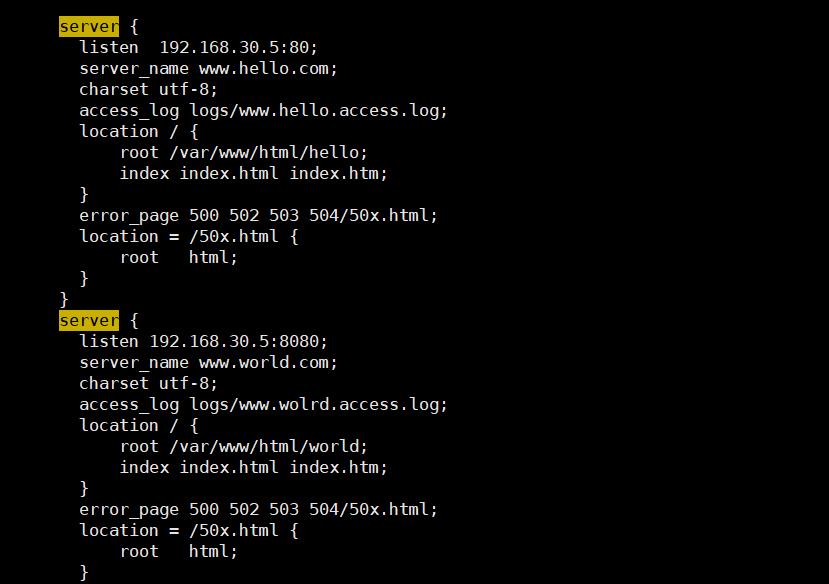
[root@localhost ~]# systemctl stop nginx
[root@localhost ~]# systemctl start nginx
[root@localhost ~]# netstat -anpt | grep nginx
tcp        0      0 192.168.30.5:8080       0.0.0.0:*               LISTEN      20886/nginx: master
tcp        0      0 192.168.30.5:80         0.0.0.0:*               LISTEN      20886/nginx: master
[root@localhost ~]#
以上是关于Nginx服务的主要内容,如果未能解决你的问题,请参考以下文章