laravel5.6 基于redis,使用消息队列(邮件推送)
Posted willem_chen
tags:
篇首语:本文由小常识网(cha138.com)小编为大家整理,主要介绍了laravel5.6 基于redis,使用消息队列(邮件推送)相关的知识,希望对你有一定的参考价值。
laravel5.6 基于redis,使用消息队列(邮件推送)
邮件发送如何配置参考:https://www.cnblogs.com/clubs/p/10640682.html
用户表
CREATE TABLE `recruit_users` (
  `id` int(10) unsigned NOT NULL AUTO_INCREMENT,
  `name` varchar(255) COLLATE utf8mb4_unicode_ci NOT NULL,
  `phone` varchar(50) CHARACTER SET utf8 DEFAULT NULL COMMENT '手机号码',
  `email` varchar(255) COLLATE utf8mb4_unicode_ci NOT NULL,
  `password` varchar(255) COLLATE utf8mb4_unicode_ci NOT NULL,
  `remember_token` varchar(100) COLLATE utf8mb4_unicode_ci DEFAULT NULL,
  `status` tinyint(4) DEFAULT '1' COMMENT '帐户状态(0失效 1正常)',
  `created_at` timestamp NULL DEFAULT NULL,
  `updated_at` timestamp NULL DEFAULT NULL,
  `lastlogintime` timestamp NULL DEFAULT NULL COMMENT '最后登陆时间',
  PRIMARY KEY (`id`)
) ENGINE=InnoDB AUTO_INCREMENT=3 DEFAULT CHARSET=utf8mb4 COLLATE=utf8mb4_unicode_ci;
1、在 Laravel 中使用 Redis 你需用通过 Composer 来安装 predis/predis 包文件,不然会报错Class ‘Predis\\Client’ not found
composer require predis/predis ^1.1
2、laravel队列配置(配置文件 .env 和 config/queue.php)
QUEUE_DRIVER=redis
REDIS_HOST=127.0.0.1
REDIS_PASSWORD=******
REDIS_PORT=6379
当.env 文件没有配置 或者 设置变量为空时,会按照 config/queue.php 文件的配置信息运行laravel,一般只配置.env文件,不修改queue.php文件
config/queue.php 文件如下
return [
    'default' => env('QUEUE_DRIVER', 'redis'),//修改队列驱动,使用redis

    'connections' => [
        'sync' => [
            'driver' => 'sync',
        ],

        'database' => [
            'driver' => 'database',
            'table' => 'jobs',
            'queue' => 'default',
            'retry_after' => 90,
        ],

        'beanstalkd' => [
            'driver' => 'beanstalkd',
            'host' => 'localhost',
            'queue' => 'default',
            'retry_after' => 90,
        ],

        'sqs' => [
            'driver' => 'sqs',
            'key' => env('SQS_KEY', 'your-public-key'),
            'secret' => env('SQS_SECRET', 'your-secret-key'),
            'prefix' => env('SQS_PREFIX', 'https://sqs.us-east-1.amazonaws.com/your-account-id'),
            'queue' => env('SQS_QUEUE', 'your-queue-name'),
            'region' => env('SQS_REGION', 'us-east-1'),
        ],

        'redis' => [
            'driver' => 'redis',
            'connection' => 'default',
            'queue' => 'default',
            'retry_after' => 90,
            'block_for' => null,
        ],
    ],

    'failed' => [
        'database' => env('DB_CONNECTION', 'mysql'),//队列执行失败 存放的数据库
        'table' => 'failed_jobs',//队列执行失败 存放的表
    ],
];
config/database.php
Redis 在应用中的配置文件存储在 config/database.php,在这个文件中,你可以看到一个包含了 Redis 服务信息的 redis 数组:
'redis' => [
    'client' => 'predis',
    'default' => [
        'host' => env('REDIS_HOST', '127.0.0.1'),
        'password' => env('REDIS_PASSWORD', null),
        'port' => env('REDIS_PORT', 6379),
        'database' => 0,//选择使用的redis库
    ],
],
创建队列任务类(app/Jobs/xxx.php)
使用artisan命令 在app/Jobs 目录下创建执行队列任务的类:
php artisan make:job SendEmail
app/Jobs/SendEmail.php 代码如下:
<?php

namespace App\\Jobs;

use Illuminate\\Bus\\Queueable;
use Illuminate\\Queue\\SerializesModels;
use Illuminate\\Queue\\InteractsWithQueue;
use Illuminate\\Contracts\\Queue\\ShouldQueue;
use Illuminate\\Foundation\\Bus\\Dispatchable;
use Illuminate\\Support\\Facades\\Mail;
use App\\Models\\RecruitUser as User;

class SendEmail implements ShouldQueue
{
    use Dispatchable, InteractsWithQueue, Queueable, SerializesModels;

    protected $user;

    /**
     * Create a new job instance.
     *
     * @return void
     */
    public function __construct(User $user)
    {
        $this->user = $user;
    }

    /**
     * Execute the job.
     *
     * @return void
     */
    public function handle()
    {
        $user = $this->user;
        Mail::raw('这里填写邮件的内容', function ($message) {
            // 收件人的邮箱地址
            $message->to($this->user->email);
            // 邮件主题
            $message->subject('队列发送邮件');
        });
    }
}
控制器将数据添加到队列中
<?php

namespace App\\Http\\Controllers\\Home;

use App\\Jobs\\SendEmail;
use App\\Http\\Controllers\\Controller;
use Illuminate\\Http\\Request;
use App\\Models\\RecruitUser as User;

class MessageController extends Controller
{
    public function index()
    {
        $user = User::find(2);
        $res = $this->dispatch(new SendEmail($user));
        dd($res);
    }
}
启动、监听队列
指定启动sendEmail队列
php artisan queue:work —queue=sendEmail
重启队列
php artisan queue:work —queue=sendEmail
队列进程 queue:work 可以设定超时 —timeout 项。该 —timeout 控制队列进程执行每个任务的最长时间,如果超时,该进程将被关闭。
注:
参数项 —timeout 的值应该始终小于配置项 retry_after 的值,这是为了确保队列进程总在任务重试以前关闭。如果 —timeout 比retry_after 大,那么你的任务可能被执行两次。
php artisan queue:work —timeout=60
休眠时间,每执行一个任务后休眠3秒
php artisan queue:work —sleep=3
监听三种情况:
queue:work 默认只执行一次队列请求, 当请求执行完成后就终止;
queue:listen 监听队列请求,只要运行着,就能一直接受请求,除非手动终止;
queue:work --daemon 同listen一样,不同的是work不需要再次加载框架,直接运行任务,一般推荐使用这个来处理队列监听。
注意:
使用 queue:work —daemon , 当更新代码的时候, 需要停止, 然后重新启动, 这样才能把修改的代码应用上。
设置API路由,执行请求,执行队列任务
Route::post('messageindex', ['uses' => $namespaces . 'MessageController@index', 'as' => 'messageIndex']);
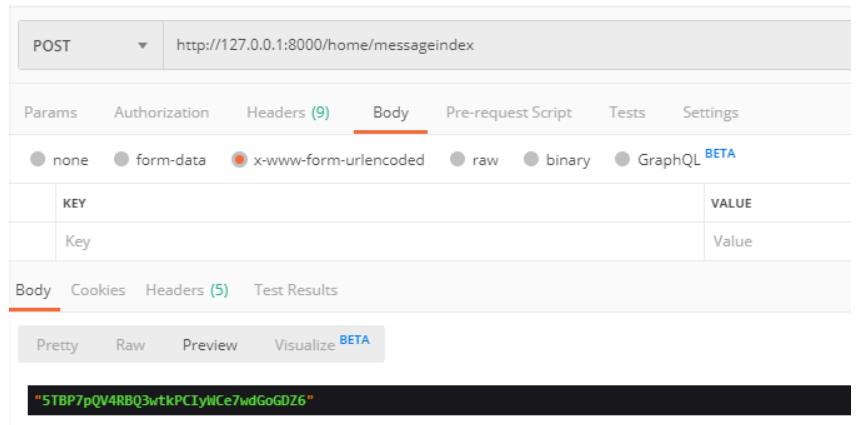
使用postman发送post请求即可以测试发送邮件队列

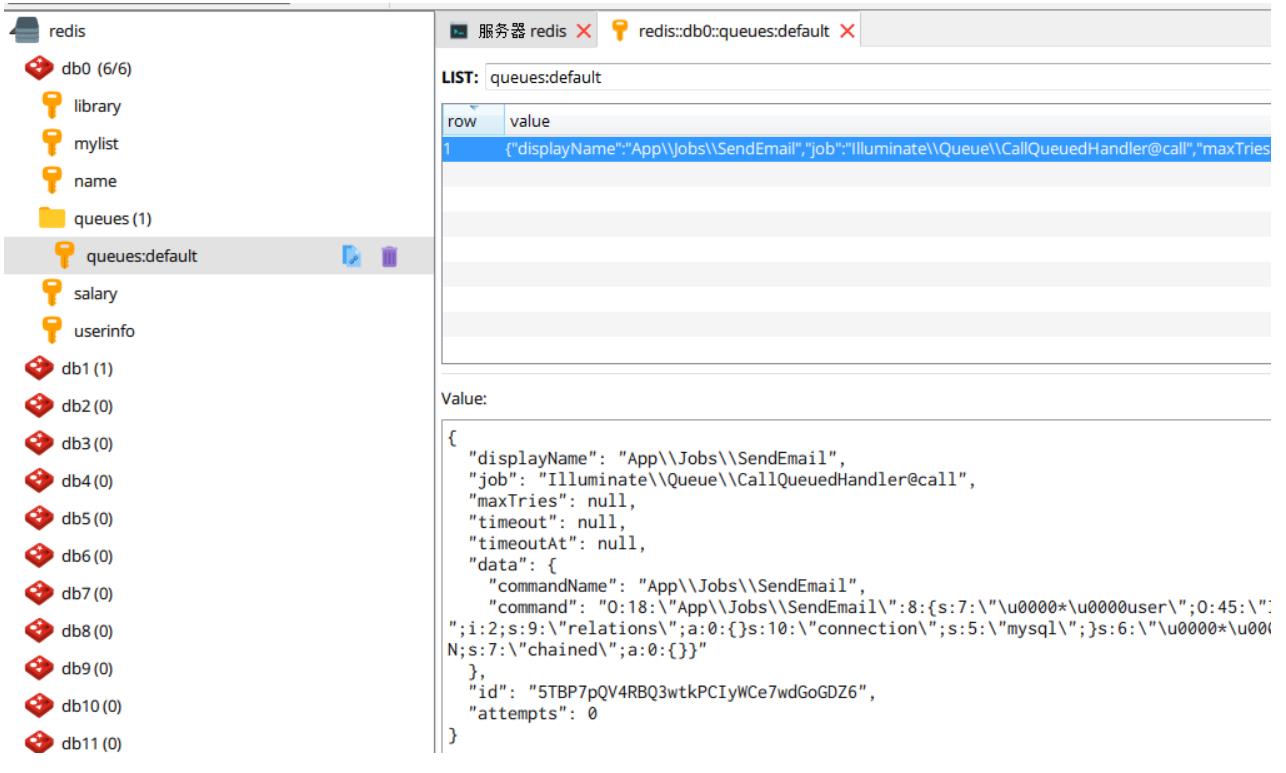
查看redis是否有队列数据

命令行监听界面

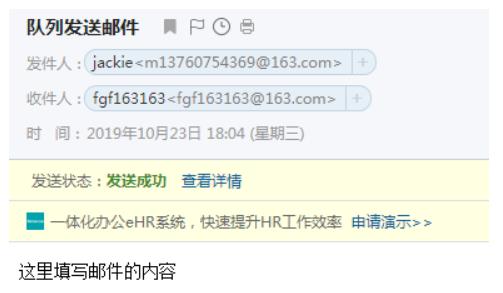
查看邮箱发件箱,邮件已发出

使用Supervisor将队列任务启动 添加到守护进程中
推荐安装Supervisor,将 php artisan queue:work —queue sendEmail 等一系列队列进程,添加到进程保护中,防止中途崩溃时候,可以自救,哈哈~😄
总结
1、引入 predis/predis 包
2、laravel队列配置(配置文件 .env 和 config/queue.php)
3、创建队列任务类(app/Jobs/xxx.php)
4、控制器将数据添加到队列中
5、启动、监听队列
6、设置API路由,执行请求,执行队列任务
7、使用Supervisor将队列任务启动 添加到守护进程中
以上是关于laravel5.6 基于redis,使用消息队列(邮件推送)的主要内容,如果未能解决你的问题,请参考以下文章