[C++11]shared_ptr共享智能指针的初始化与使用
Posted Wecccccccc
tags:
篇首语:本文由小常识网(cha138.com)小编为大家整理,主要介绍了[C++11]shared_ptr共享智能指针的初始化与使用相关的知识,希望对你有一定的参考价值。
使用智能指针需要添加头文件:
代码如下:
#include <memory>
shared_ptr使用的注意事项:
1.不能使用一个原始地址初始化多个共享智能指针
2.函数不能返回管理了this的共享智能指针对象
3.共享智能指针不能循环引用
初始化:
1.通过构造函数初始化
代码如下:
std::shared_ptr<T> 智能指针名字(创建堆内存)
2.通过拷贝和移动构造函数初始化
代码如下:
#include <iostream>
#include <memory>
using namespace std;

int main()
{
    // 使用智能指针管理一块 int 型的堆内存, 内部引用计数为 1
    shared_ptr<int> ptr1(new int(520));
    cout << "ptr1管理的内存引用计数: " << ptr1.use_count() << endl;
    //调用拷贝构造函数
    shared_ptr<int> ptr2(ptr1);
    cout << "ptr2管理的内存引用计数: " << ptr2.use_count() << endl;
    shared_ptr<int> ptr3 = ptr1;
    cout << "ptr3管理的内存引用计数: " << ptr3.use_count() << endl;
    //调用移动构造函数
    shared_ptr<int> ptr4(std::move(ptr1));
    cout << "ptr4管理的内存引用计数: " << ptr4.use_count() << endl;
    std::shared_ptr<int> ptr5 = std::move(ptr2);
    cout << "ptr5管理的内存引用计数: " << ptr5.use_count() << endl;

    return 0;
}


/*作者: 苏丙榅
链接: https://subingwen.cn/cpp/shared_ptr/#1-2-%E9%80%9A%E8%BF%87%E6%8B%B7%E8%B4%9D%E5%92%8C%E7%A7%BB%E5%8A%A8%E6%9E%84%E9%80%A0%E5%87%BD%E6%95%B0%E5%88%9D%E5%A7%8B%E5%8C%96
来源: 爱编程的大丙*/
3.通过std::make_shared初始化
代码如下:
通过 C++ 提供的 std::make_shared() 就可以完成内存对象的创建并将其初始化给智能指针,函数原型如下:
template<typename T,typename ...Args>
shared_ptr<T>make_shared(Args&&...args);
- T:模板参数的数据类型
- Args&&… args :要初始化的数据,如果是通过 make_shared 创建对象,需按照构造函数的参数列表指定
4.通过reset方法初始化
共享智能指针类提供的 std::shared_ptr::reset 方法函数原型如下:
void reset() noexcept;

template< class Y >
void reset( Y* ptr );

template< class Y, class Deleter >
void reset( Y* ptr, Deleter d );

template< class Y, class Deleter, class Alloc >
void reset( Y* ptr, Deleter d, Alloc alloc );


/*作者: 苏丙榅
链接: https://subingwen.cn/cpp/shared_ptr/#1-3-%E9%80%9A%E8%BF%87std-make-shared%E5%88%9D%E5%A7%8B%E5%8C%96
来源: 爱编程的大丙*/
- ptr:指向要取得所有权的对象的指针
- d:指向要取得所有权的对象的指针
- aloc:内部存储所用的分配器
reset两个功能:
1.让指向某块内存的智能指针解除对这片内存的管理
2.通过reset调用,让一个指向某块内存的智能指针指向另块一块内存,也就是让它去管理另外一块内存。
两个函数:
如果想要查看当前有多少个智能指针同时管理着这块内存可以使用共享智能指针提供的一个成员函数 use_count,函数原型如下:
// 管理当前对象的 shared_ptr 实例数量,或若无被管理对象则为 0。
long use_count() const noexcept;
获取原始指针
对应基础数据类型来说,通过操作智能指针和操作智能指针管理的内存效果是一样的,可以直接完成数据的读写。但是如果共享智能指针管理的是一个对象,那么就需要取出原始内存的地址再操作,可以调用共享智能指针类提供的 get () 方法得到原始地址,其函数原型如下:
T* get() const noexcept;
代码如下:
#include <iostream>
#include <memory>
#include <string>
using namespace std;

class Test
{
public:
	Test()
	{
		cout << "construct" << endl;
	}
	Test(int x) :m_num(x)
	{
		cout << "construct x = " << x << endl;
	}
	Test(string str)
	{
		cout << "construct str = " << str << endl;
	}

	~Test()
	{
		cout << "destruct" << endl;
	}

	void setValue(int v)
	{
		m_num = v;
	}

	void print()
	{
		cout << "m_num = " << m_num << endl;
	}

private:
	int m_num;
};


int main()
{
	//通过构造函数初始化
	shared_ptr<int>ptr1(new int(3));
	cout << "ptr1 use_count = " << ptr1.use_count() << endl;
	//通过移动构造和拷贝构造函数初始化
	shared_ptr<int>ptr2 = move(ptr1);
	cout << "ptr1 use_count = " << ptr1.use_count() << endl;
	cout << "ptr2 use_count = " << ptr2.use_count() << endl;

	shared_ptr<int>ptr3 = ptr2;
	cout << "ptr3 use_count = " << ptr3.use_count() << endl;
	cout << "ptr2 use_count = " << ptr2.use_count() << endl;

	//通过std::make_shared初始化
	shared_ptr<int>ptr4 = make_shared<int>(8);
	shared_ptr<Test>ptr5 = make_shared<Test>(8);
	cout << "ptr5 use_count = " << ptr5.use_count() << endl;
	shared_ptr<Test>ptr6 = make_shared<Test>("hello");
	cout << "ptr6 use_count = " << ptr6.use_count() << endl;
	//通过reset初始化
	ptr6.reset();
	cout << "ptr6 use_count = " << ptr6.use_count() << endl;
	ptr5.reset(new Test("world"));
	cout << "ptr5 use_count = " << ptr5.use_count() << endl;
	return 0;
}
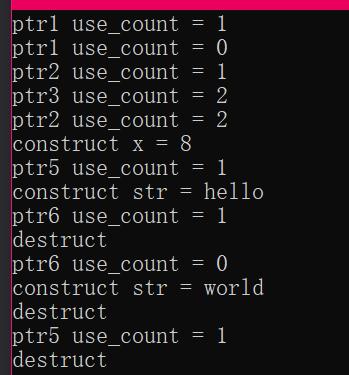
测试结果:

shared_ptr的使用:
代码如下:
#include <iostream>
#include <memory>
#include <string>
using namespace std;

class Test
{
public:
	Test()
	{
		cout << "construct" << endl;
	}
	Test(int x) :m_num(x)
	{
		cout << "construct x = " << x << endl;
	}
	Test(string str)
	{
		cout << "construct str = " << str << endl;
	}

	~Test()
	{
		cout << "destruct" << endl;
	}

	void setValue(int v)
	{
		m_num = v;
	}

	void print()
	{
		cout << "m_num = " << m_num << endl;
	}

private:
	int m_num;
};


int main()
{
	//通过构造函数初始化
	shared_ptr<int>ptr1(new int(3));
	cout << "ptr1 use_count = " << ptr1.use_count() << endl;
	//通过移动构造和拷贝构造函数初始化
	shared_ptr<int>ptr2 = move(ptr1);
	cout << "ptr1 use_count = " << ptr1.use_count() << endl;
	cout << "ptr2 use_count = " << ptr2.use_count() << endl;

	shared_ptr<int>ptr3 = ptr2;
	cout << "ptr3 use_count = " << ptr3.use_count() << endl;
	cout << "ptr2 use_count = " << ptr2.use_count() << endl;

	//通过std::make_shared初始化
	shared_ptr<int>ptr4 = make_shared<int>(8);
	shared_ptr<Test>ptr5 = make_shared<Test>(8);
	cout << "ptr5 use_count = " << ptr5.use_count() << endl;
	shared_ptr<Test>ptr6 = make_shared<Test>("hello");
	cout << "ptr6 use_count = " << ptr6.use_count() << endl;
	//通过reset初始化
	ptr6.reset();
	cout << "ptr6 use_count = " << ptr6.use_count() << endl;
	ptr5.reset(new Test("world"));
	cout << "ptr5 use_count = " << ptr5.use_count() << endl;


	//获取原始指针
	Test *t = ptr5.get();
	t->setValue(1000);
	t->print();

	//直接使用
	ptr5->setValue(999);
	ptr5->print();

	return 0;
}
以上是关于[C++11]shared_ptr共享智能指针的初始化与使用的主要内容,如果未能解决你的问题,请参考以下文章