Spring声明式事务管理
Posted nuist__NJUPT
tags:
篇首语:本文由小常识网(cha138.com)小编为大家整理,主要介绍了Spring声明式事务管理相关的知识,希望对你有一定的参考价值。
Spring声明式事务管理
Spring的声明式事务管理是通过AOP技术实现的事务管理,其本质是对方法前后进行拦截,然后在目标方法开始之前创建或者加入一个事务,在执行目标方法之后根据执行情况提交或者回滚事务。
声明式事务管理的最大优点是不需要通过编程的方式管理事务,因而不需要在业务逻辑代码中掺杂事务处理代码,只需要相关的事务规则声明便可以将事务规则应用到业务逻辑中,在通常情况下,在开发中使用声明式事务管理不仅因为简单,更主要因为纯业务代码不会被污染,极大地方便代码的后期维护。
Spring声明式事务管理可以通过2种方式实现:
1-基于XML的方式
2-基于@Transactional注解的方式
基于XML方式的声明式事务管理式通过在配置文件中配置事务规则的相关声明来实现的。Spring框架提供了tx命名空间来配置事务,提供tx:advice来配置事务的通知。在配置tx:advice元素时一般需要指定id和transaction-manager属性,其中id属性是配置文件的唯一标识,transaction-manager属性是指事务管理器,另外还需要tx:attributes子元素,该子元素可以配置多个tx:method子元素执行事务的细节。
在tx:advice元素配置了事务的增强处理后就可以通过编写AOP配置让Spring自动对目标对象生成代理。
开发环境:IDEA+mysql
下面通过一个例子演示如何通过XML方式来实现Spring的声明式事务管理。
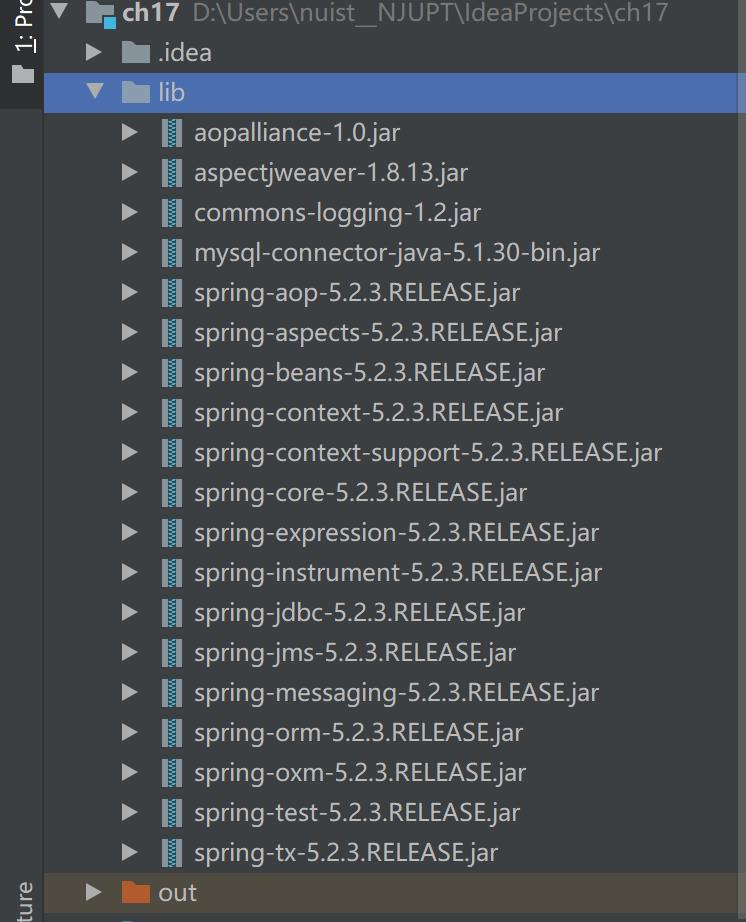
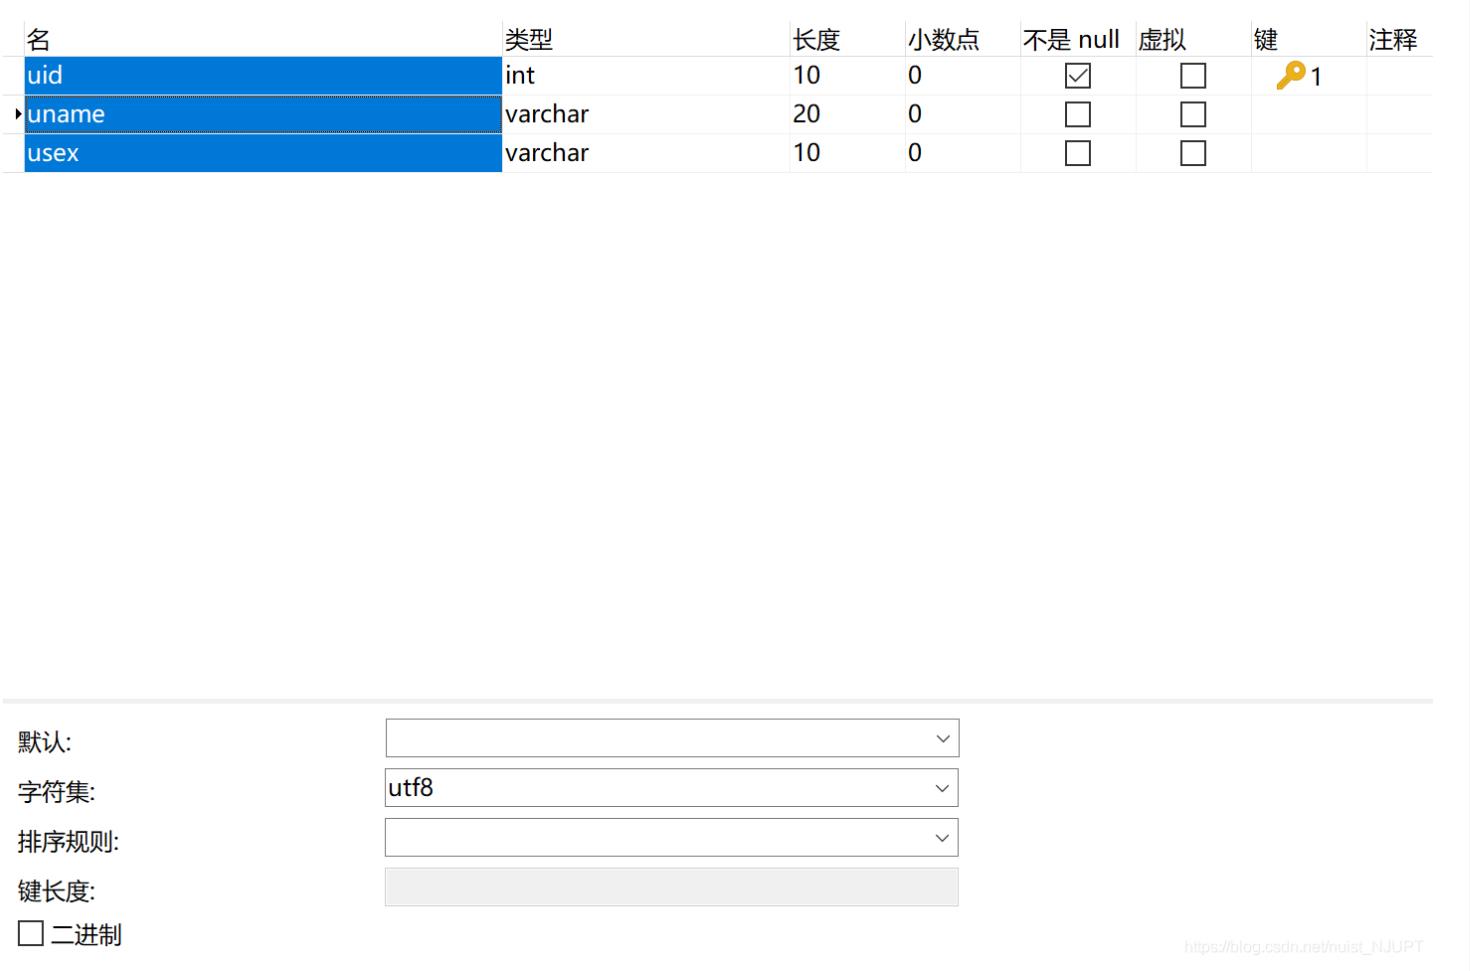
1-创建Spring项目ch17,并导入相关Jar包,在MySQL创建数据库spring,并在数据库中创建表user,字符串编码方式采用utf8,如下所示


2-在ch17目录下创建com.statement.dao包,并在该包中创建TestDao接口和TestDaoImpl实现类,数据访问层有两个数据操作方法,即save和delete
public interface TestDao {
    //数据访问层有两个数据操作方法
    public int save(String sql, Object [] param) ;
    public int delete(String sql, Object [] param) ;
}
import org.springframework.beans.factory.annotation.Autowired;
import org.springframework.jdbc.core.JdbcTemplate;
import org.springframework.stereotype.Repository;
//标志为数据访问层,使得注解有效
@Repository("testDao")
public class TestDaoImpl implements TestDao {
    //使用JDBC模板
    @Autowired
    private JdbcTemplate jdbcTemplate ;
    @Override
    public int save(String sql, Object[] param) {
        return jdbcTemplate.update(sql,param);
    }

    @Override
    public int delete(String sql, Object [] param) {
        return jdbcTemplate.update(sql,param);
    }
}
3-创建Service层,在ch17目录下创建com.statement.service包,并在该包中创建TestService接口和TestServiceImpl实现类,在Service层依赖注入数据访问层
public interface TestService {
    public void test() ;
}
import com.statement.dao.TestDao;
import org.springframework.beans.factory.annotation.Autowired;
import org.springframework.stereotype.Service;

@Service("testService")
public class TestServiceImpl implements TestService {
    @Autowired
    private TestDao testDao ;
    @Override
    public void test() {
        String deleteSql = "delete from user" ;
        String saveSql = "insert into user value(?,?,?)" ;
        Object [] param1 = {1,"赵四","男"} ;
        Object [] param2 = {2,"王五", "女"} ;
        Object [] param3 = {3,"刘能","男"} ;
        testDao.delete(deleteSql,null) ;
        testDao.save(saveSql,param1) ;
        testDao.save(saveSql,param2) ;
        testDao.save(saveSql,param3) ;
    }
}
4-创建Controller层,在ch17目录下创建com.statement,controller包,并在该包中StatementController控制器类,在控制层依赖注入Service层。
import com.statement.service.TestService;
import org.springframework.beans.factory.annotation.Autowired;
import org.springframework.stereotype.Controller;

@Controller
public class StatementController {
    @Autowired
    private TestService testService ;
    public void test(){
        testService.test() ;
        System.out.println("没有事务回滚,执行成功!") ;
    }
}
5-创建配置文件,在ch17目录下创建com.statement.xml包,并在该包中创建配置文件XMLstatementapplicationContext.xml,在配置文件中使用tx:advice编写声明事务,使用aop:config编写AOP让Spring自动对目标对象生成代理。
<?xml version="1.0" encoding="UTF-8"?>
<beans xmlns="http://www.springframework.org/schema/beans"
       xmlns:xsi="http://www.w3.org/2001/XMLSchema-instance"
       xmlns:context="http://www.springframework.org/schema/context" xmlns:tx="http://www.springframework.org/schema/tx"
       xmlns:aop="http://www.springframework.org/schema/aop"
       xsi:schemaLocation="http://www.springframework.org/schema/beans
       http://www.springframework.org/schema/beans/spring-beans.xsd
       http://www.springframework.org/schema/context
       https://www.springframework.org/schema/context/spring-context.xsd http://www.springframework.org/schema/tx http://www.springframework.org/schema/tx/spring-tx.xsd http://www.springframework.org/schema/aop https://www.springframework.org/schema/aop/spring-aop.xsd">
    <!--指定需要扫描的包,使得注解生效-->
    <context:component-scan base-package="com.statement"/>
    <!--配置数据源-->
    <bean id = "dataSource" class = "org.springframework.jdbc.datasource.DriverManagerDataSource">
        <!--配置MySQL的驱动-->
        <property name = "driverClassName" value = "com.mysql.jdbc.Driver"/>
        <!--连接数据库的url-->
        <property name = "url" value = "jdbc:mysql://localhost/spring?characterEncoding=utf8"/>
        <!--连接数据库的用户名-->
        <property name = "username" value = "root"/>
        <!--连接数据库的密码-->
        <property name = "password" value = "123456"/>
    </bean>

    <!--配置JDBC模板-->
    <bean id = "jdbcTemplate" class = "org.springframework.jdbc.core.JdbcTemplate">
        <property name = "dataSource" ref = "dataSource"/>
    </bean>

    <!--为数据源添加事务管理器-->
    <bean id = "txManager" class = "org.springframework.jdbc.datasource.DataSourceTransactionManager">
        <property name = "dataSource" ref = "dataSource"/>
    </bean>

    <!--编写通知声明事务-->
    <tx:advice id = "myAdvice" transaction-manager="txManager">
        <tx:attributes>
            <!--*表示任意方法-->
            <tx:method name="*"/>
        </tx:attributes>
    </tx:advice>
    <!--编写AOP,让Spring自动生成目标对象代理,需要使用AspectJ的表达式-->
    <aop:config>
        <!--定义切入点-->
        <aop:pointcut id="txPointCut" expression="execution(* com.statement.service.*.*())"/>
        <!--切面:将切入点与通知关联-->
        <aop:advisor advice-ref = "myAdvice" pointcut-ref = "txPointCut"/>
    </aop:config>
</beans>
6-创建测试类,在ch17的目录下创建com.statement.test包,并在该包中创建测试类XMLTest,在测试类中通过访问Controller测试基于XML方式声明式事务管理
import com.statement.controller.StatementController;
import org.springframework.context.ApplicationContext;
import org.springframework.context.support.ClassPathXmlApplicationContext;

public class XMLTest {
    public static void main(String[] args){
        //初始化Spring容器,加载配置文件
        ApplicationContext appCon = new ClassPathXmlApplicationContext("/com/statement/xml/XMLstatementapplicationContext.xml") ;
        //获取目标对象的实例
        StatementController sc = (StatementController) appCon.getBean("statementController");
        sc.test() ;
    }
}
7-运行结果

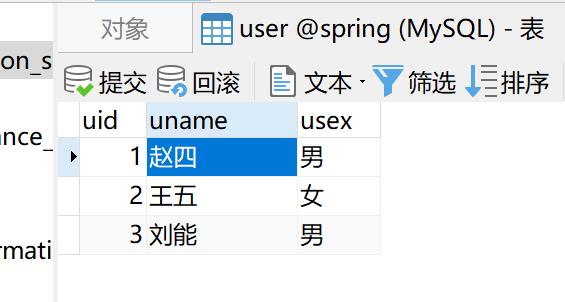
8-数据表的结果

基于@Transactional注解的方式的声明式事务管理,@Transactional注解可以用作于接口,接口方法,类以及类的方法上,该类的所有 public方法都将具有该类型的事务属性,
同时也可以在方法级别使用该注解来覆盖类级别的定义。虽然@Transactional注解可以作用于接口,接口方法,类以及类的方法上,一般不建议在接口或者接口方法上使用该注解,在类上使用注解更好。
下面通过实例演示@Transactonal注解进行事务管理的过程。
注意:该实例的Dao,Service,Controller三层和基于XML的声明式事务管理基本相同,仅在TestServiceImpl实现类加上@Transactional注解
1-在com.statement.xml包中创建配置文件annotationstatementapplicationContext.xml,在配置文件中使用tx:annotation-driven元素为事务管理器注解驱动器
<?xml version="1.0" encoding="UTF-8"?>
<beans xmlns="http://www.springframework.org/schema/beans"
       xmlns:xsi="http://www.w3.org/2001/XMLSchema-instance"
       xmlns:context="http://www.springframework.org/schema/context"
       xmlns:tx="http://www.springframework.org/schema/tx"
       xsi:schemaLocation="http://www.springframework.org/schema/beans
       http://www.springframework.org/schema/beans/spring-beans.xsd http://www.springframework.org/schema/context https://www.springframework.org/schema/context/spring-context.xsd http://www.springframework.org/schema/tx http://www.springframework.org/schema/tx/spring-tx.xsd">
<!--指定需要扫描的包,使得注解生效-->
    <context:component-scan base-package="com.statement"/>
    <!--配置数据源-->
    <bean id = "dataSource" class = "org.springframework.jdbc.datasource.DriverManagerDataSource">
        <!--MySQL的数据驱动-->
        <property name = "driverClassName" value = "com.mysql.jdbc.Driver"/>
        <!--连接数据库的url-->
        <property name = "url" value = "jdbc:mysql://localhost:3306/spring?characterEncoding=utf8"/>
        <!--连接数据库的用户名-->
        <property name = "username" value = "root"/>
        <!--连接数据库的密码-->
        <property name = "password" value = "123456"/>
    </bean>
    <!--配置JDBC模板-->
    <bean id = "jdbcTemplate" class = "org.springframework.jdbc.core.JdbcTemplate">
        <property name = "dataSource" ref = "dataSource"/>
    </bean>
    <!--为数据源添加数据管理器-->
    <bean id = "txManager" class = "org.springframework.jdbc.datasource.DataSourceTransactionManager">
        <property name = "dataSource" ref = "dataSource"/>
    </bean>
    <!--为事务管理器注册注解驱动器-->
    <tx:annotation-driven transaction-manager="txManager"/>

</beans>
2.为Service层添加@Transactional注解,加上注解,就可以指定这个类需要受Spring事务管理。
import com.statement.dao.TestDao;
import org.springframework.beans.factory.annotation.Autowired;
import org.springframework.stereotype.Service;
import org.springframework.transaction.annotation.Transactional;

@Service("testService")
@Transactional
//加上注解@Transactinal就可以指定这个类需要受Spring的事务管理
//该注解只能针对public属性范围内的方法添加
public class TestServiceImpl implements TestService {
    @Autowired
    private TestDao testDao ;
    @Override
    public void test() {
        String deleteSql = "delete from user" ;
        String saveSql = "insert into user value(?,?,?)" ;
        Object [] param1 = {1,"赵四","男"} ;
        Object [] param2 = {2,"王五", "女"} ;
        Object [] param3 = {3,"刘能","男"} ;
        testDao.delete(deleteSql,null) ;
        testDao.save(saveSql,param1) ;
        testDao.save(saveSql,param2) ;
        testDao.save(saveSql,param3) ;
    }
}
3.创建测试类annotationTest
import com.statement.controller.StatementController;
import org.springframework.context.ApplicationContext;
import org.springframework.context.support.ClassPathXmlApplicationContext;

public class annotationTest {
    public static void main(String[] args){
        //初始化Spring容器,加载配置文件
        ApplicationContext appCon = new ClassPathXmlApplicationContext("/com/statement/xml/annotationstatementapplicationContext.xml") ;
        //获取目标对象的实例
        StatementController sc = (StatementController) appCon.getBean("statementController");
         sc.test() ;

    }
}
4.测试类的结果入下

以上是关于Spring声明式事务管理的主要内容,如果未能解决你的问题,请参考以下文章