Android Studio入门:Android应用界面详解(上)(View布局管理器)
Posted Lora青蛙
tags:
篇首语:本文由小常识网(cha138.com)小编为大家整理,主要介绍了Android Studio入门:Android应用界面详解(上)(View布局管理器)相关的知识,希望对你有一定的参考价值。
本章学习目标:
熟悉android的View及ViewGroup类
掌握常用的布局
掌握Android开发当中常用的UI组件
掌握Adapter和ListView的使用
Android 四大组件
Activity 活动
Service 服务
BroadcastReceiver 广播接收器
ContentProvider 内容提供器
Activity简介
Activity通俗地讲就是用户界面。
—一个应用程序通常包含多个Activity,它们可以互相切换。
— Activity的使用需要在manifest文件中进行声明。
—Android系统通过任务栈来管理Activity的。
Service简介
Service:可以在后台执行长时间运行操作而没有用户界面的应用组件。
—主要用于在后台处理一些耗时的逻辑,或执行需要长期运行的任务。
例如,服务可以处理网络事务、播放音乐,执行文件 I/O 或与内容提供程序交互,而所有这一切均可在后台进行。
BroadCastReceiver简介
系统在产生某个事件时发送广播,应用程序使用广播接收器接收广播,从而知道系统产生了什么事件。
Android系统在运行的过程中会产生很多事件:
开机 电量改变 收发短信 拨打电话 屏幕解锁
ContentProvider简介
ContentProvider机制可支持在多个应用中存储和读取数据,这也是跨应用共享数据的唯一方式。
系统提供了一些主要类型的ContentProvider,比如音频、视频、图片和私人通讯录等。
View概念
View是Android中所有控件的基类
不管是简单的TextView,Button,还是复杂LinearLayout和ListView,它们的共同基类都是View;
View是界面层的控件的一种抽象
它代表了一个控件,除了View还有ViewGroup
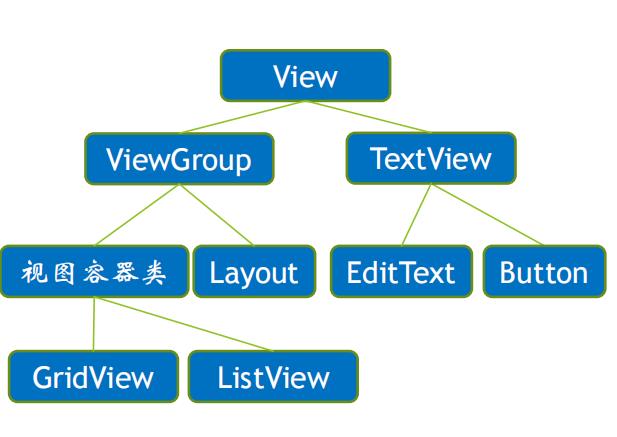

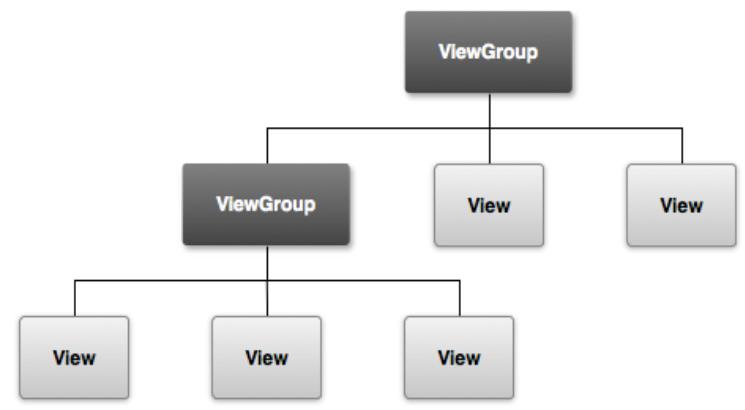
多个视图组件(View)可以存放在一个视图容器(ViewGroup)中,该容器可以与其他视图组件共同存放在另一个视图容器当中,但是一个界面文件必须有且仅有一个容器作为根节点。
Android应用的界面都是由View和ViewGroup对象构建的,ViewGroup继承了View类,也可以当成普通的View来使用,但主要还是当成容器来使用。
图形用户界面层次图:
Android推荐使用XML布局文件(Layout)来定义用户界面,因此所有组件都提供了两种方式来控制组件的行为:
—在XML布局文件中通过XML属性进行控制。
—在JAVA程序代码中通过调用方法进行控制。
实际上不管使用哪种方式,它们控制Android用户界面行为的本质是一样的。
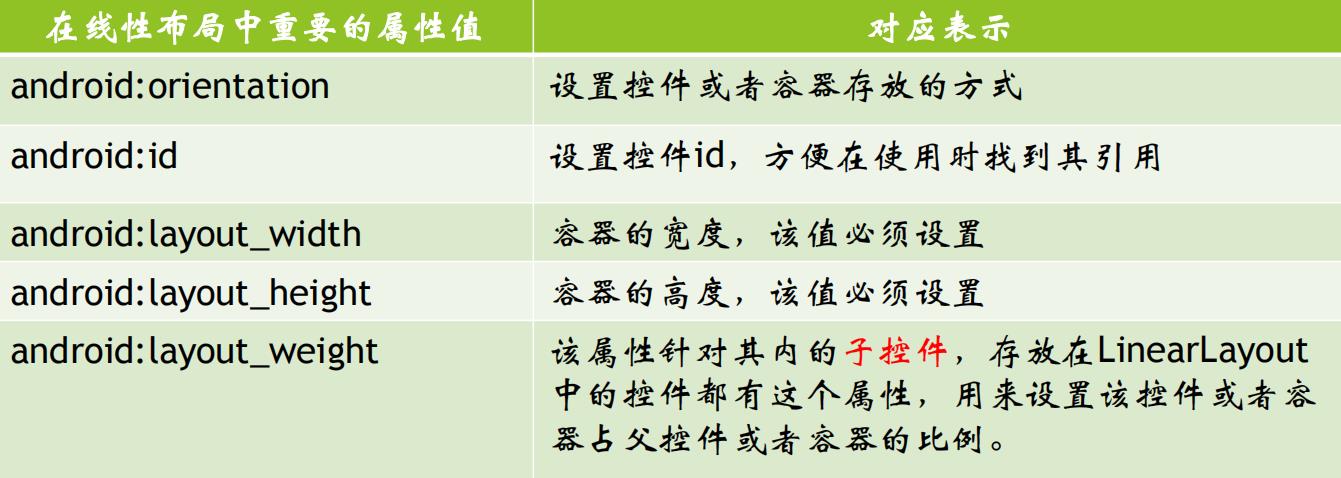
View类常用的XML属性、相关方法及简要说明:
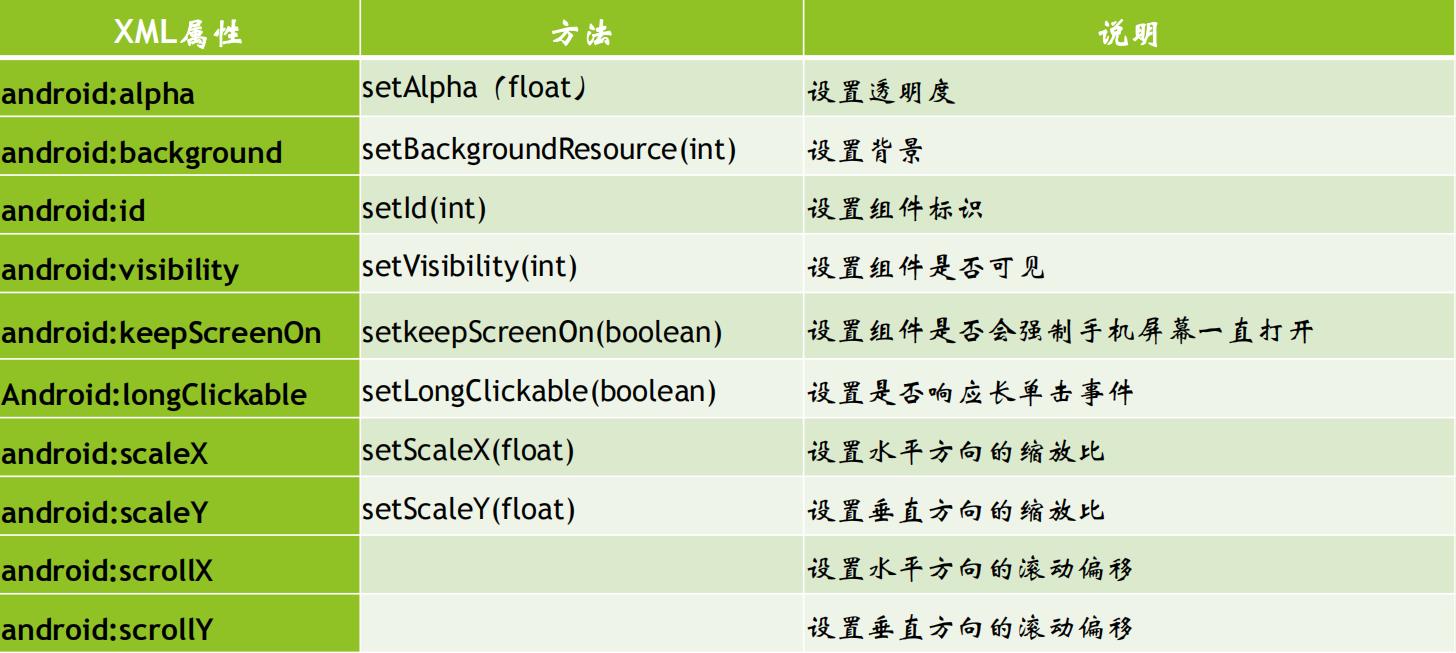
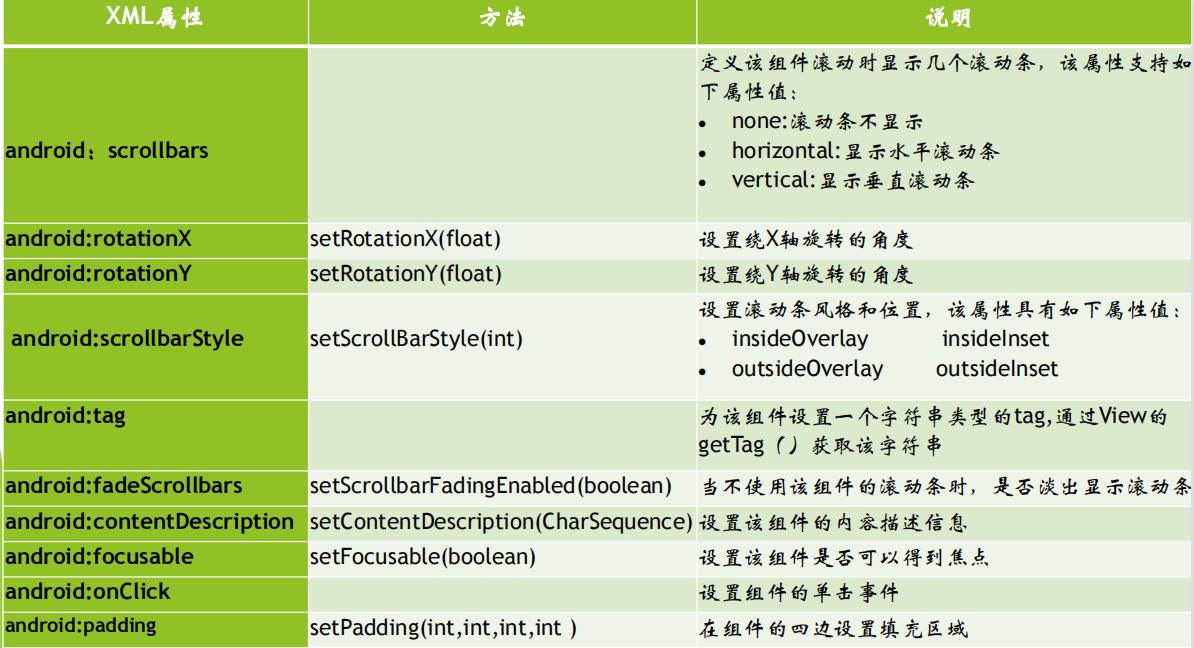
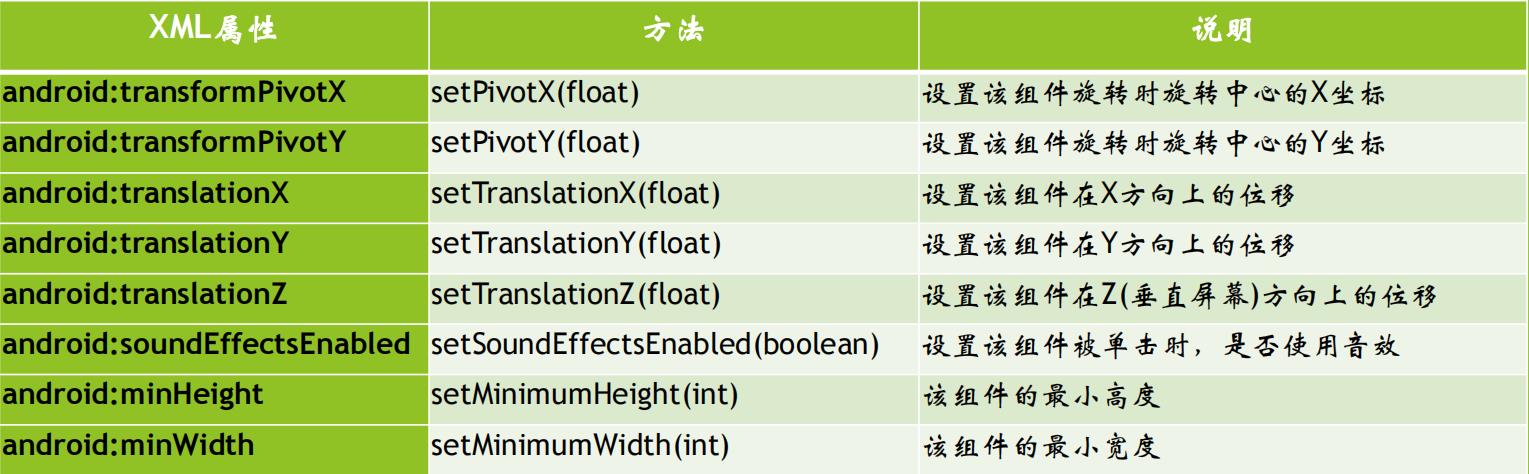
对于View类而言,它是所有UI组件的父类,因此它包含的XML属性和方法是所有组件都可以使用的。
布局管理器
组件的宽高单位
几个常用的宽高单位:
• px:代表像素,即在屏幕中可以显示的最小元素单元。例如分辨率720×1280,表示此屏幕在宽度方向有720个像素点,在高度方向有1280个像素点。分辨率越高的手机,屏幕的像素点就越多。如果使用px来设置控件的大小,在分辨率不同的手机上控件显示出来的大小也不一样。
• pt:代表磅数,一般pt都会作为字体的单位来显示。pt和px的情况相似,在不同分辨率的手机上,用pt作为字体单位显示的大小也不一样。
• dp:代表密度无关像素,又称dip,使用dp的好处是在无论屏幕的分辨率如何总能显示相同的大小,一般使用dp作为控件与布局的宽高单位。
• sp:代表可伸缩像素,采用与dp相同的设计理念,设置字体大小时使用。
• dpi:屏幕密度,就是每英寸的像素点数,数值越高显示越清晰, “低”密度屏幕在给定物理区域的像素较少。
六种通用的密度:
ldpi(低)~120dpi mdpi(中)~160dpi
hdpi(高)~240dpi xhdpi(超高)~320dpi
xxhdpi(超超高)~480dpi xxxhdpi(超超超高)~640dpi
dp、dpi与px的换算

布局管理器:
在Android开发当中,界面的设计是通过布局文件实现的,布局文件采用XML的格式,每个应用程序默认会创建一个activity_main.xml布局文件,它是应用启动的界面。
<?xml version="1.0" encoding="utf-8"?>
<android.support.constraint.ConstraintLayout
xmlns:android="http://schemas.android.com/apk/res/android"
xmlns:app="http://schemas.android.com/apk/res-auto"
xmlns:tools="http://schemas.android.com/tools"
android:layout_width="match_parent"
android:layout_height="match_parent"
tools:context=".MainActivity">
<TextView
android:layout_width="wrap_content"
android:layout_height="wrap_content"
android:text="Hello World!"
app:layout_constraintBottom_toBottomOf="parent"
app:layout_constraintLeft_toLeftOf="parent"
app:layout_constraintRight_toRightOf="parent"
app:layout_constraintTop_toTopOf="parent" />
</android.support.constraint.ConstraintLayout>
创建和使用布局文件
1 . 打开项目,找到layout文件夹,右键点击new — XML—Layout Xml File,然后就会创建一个新的布局文件。
2.添加组件,新创建的布局文件可以通过在xml文件中添加组件,也可以通过在图形用户界面上进行直接的拖拉操作,然后再次通过代码进行调整,这种方式减少了用户的代码编写量。
<?xml version="1.0" encoding="utf-8"?>
<LinearLayout
xmlns:android="http://schemas.android.com/apk/res/android"
android:layout_width="match_parent"
android:layout_height="match_parent">
</LinearLayout>
布局的类型
一个优秀的布局设计对UI界面起到重要的作用,在Android中常用布局
主要有7种,分别是:
• 线性布局(LinearLayout)
• 相对布局(RelativeLayout)
• 表格布局(TableLayout)
• 网格布局(GridLayout)
• 绝对布局(AbsoluteLayout)
• 帧布局(FrameLayout)
• 扁平化布局(ConstraintLayout)–约束布局
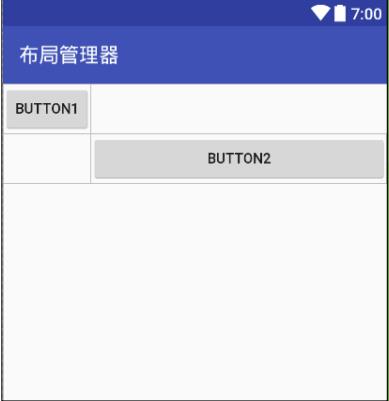
(1)线性布局(LinearLayout)
线性布局是Android中较为常用的布局方式,它使用< LinearLayout >标签,主要分为水平线性布局和垂直线性布局。
第一种:垂直放置(VERTICAL)
放置的控件或者容器只能在该列中的某个位置
两个控件之间只存在上下方向的关系
一列放满后,再添加的控件在屏幕之外,无法看见
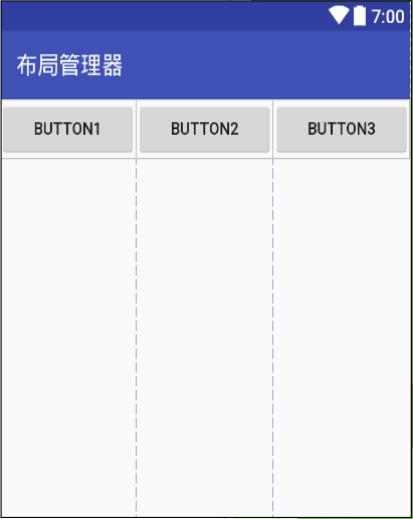
第二种:水平放置(HORIZONTAL)
容器里面存放的控件或者容器只能以一行的形式出现
当放置水平方向满屏时不会自动换行,再放置的控件将在屏幕之外存在,无法看见
<LinearLayout
xmlns:android="http://schemas.android.com/apk/res/android"
android:layout_width="match_parent"
android:layout_height="match_parent"
android:orientation="horizontal">
<Button
android:id="@+id/button1"
android:layout_width="wrap_content"
android:layout_height="wrap_content"
android:text="Button1" />
<Button
android:id="@+id/button2"
android:layout_width="wrap_content"
android:layout_height="wrap_content"
android:text="Button2" />
<Button …./>
</LinearLayout>
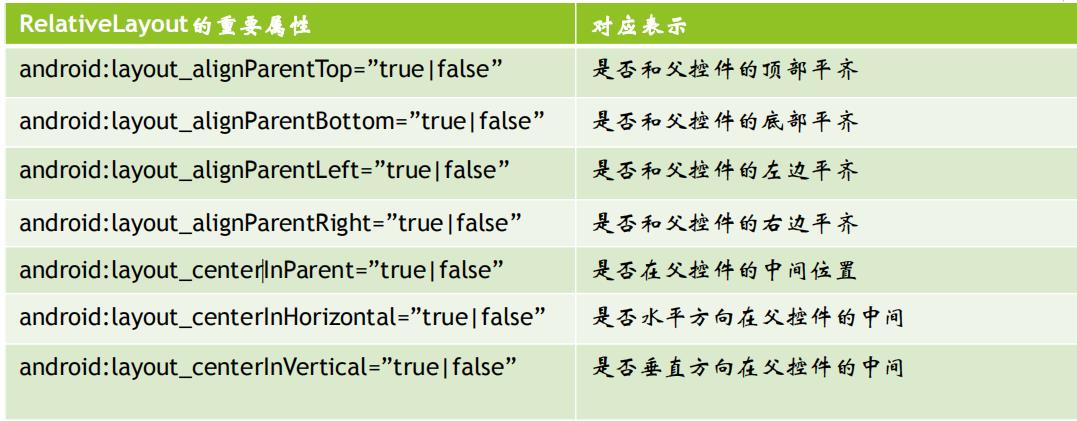
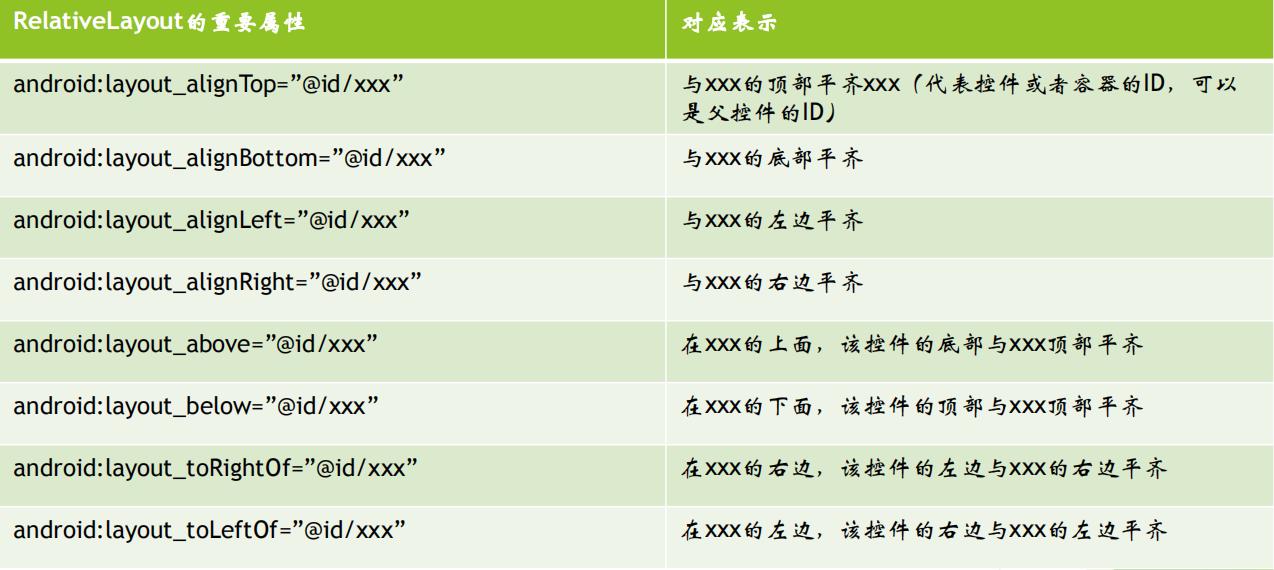
(2)相对布局(RelativeLayout)
相对布局,是指利用控件之间的相对位置关系来对布局进行放置。换句话说,在该容器中的控件与其他任何一个控件或者容器(包括父控件)有相对关系。
<?xml version="1.0" encoding="utf-8"?>
<RelativeLayout
xmlns:android="http://schemas.android.com/apk/res/android"
xmlns:tools="http://schemas.android.com/tools"
android:layout_width="match_parent"
android:layout_height="match_parent"
tools:context="com.jxust.cn.relativelayout.MainActivity">
<Button
android:id="@+id/button"
android:layout_width="wrap_content"
android:layout_height="wrap_content"
android:layout_alignParentTop="true"
android:layout_marginTop="100dp"
android:layout_marginLeft="50dp"
android:text="Button1" />
<Button
android:id="@+id/button2"
android:layout_width="wrap_content"
android:layout_height="wrap_content"
android:layout_toRightOf="@+id/button"
android:layout_below="@+id/button"
android:layout_marginTop="15dp"
android:text="Button2"/>
</RelativeLayout>
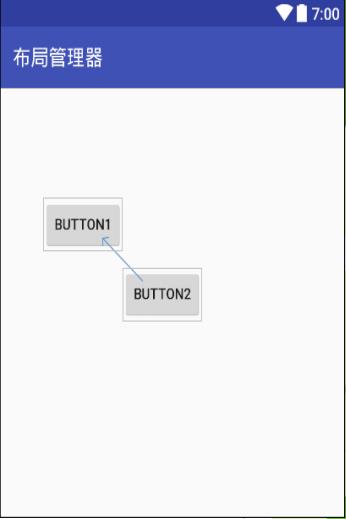
RelativeLayout上下左右关系

LinearLayout布局
RelativeLayout布局
(3)表格布局(TableLayout)
表格布局的方式不同于前面两种,表格布局就是让控件以表格的形式来排列控件,只要将控件放在单元格中,控件就可以整齐地排列。
表格布局使用< TableLayout >标签,行数由TableRow对象控制,每行可以放多个控件,列数由最宽的单元格决定,假设第一行有两个控件,第二行有3个控件,那么这个表格布局就有3列。在控件中使用layout_column属性指定具体的列数,该属性的值从0开始,代表第一列。
<TableLayout xmlns:android="http://schemas.android.com/apk/res/android"
android:layout_width="match_parent"
android:layout_height="match_parent"
android:stretchColumns="1">
<TableRow
android:layout_width="match_parent"
android:layout_height="match_parent">
<Button
android:id="@+id/button1"
android:layout_width="wrap_content"
android:layout_height="wrap_content"
android:layout_column="0"
android:text="Button1" />
</TableRow>
 <TableRow
android:layout_width="match_parent"
android:layout_height="match_parent">
<Button
android:id="@+id/button2"
android:layout_width="wrap_content"
android:layout_height="wrap_content"
android:layout_column="1"/>
</TableRow>
</TableLayout>
表格布局设计了两行,每行一个按钮的布局,使用android:stretchColumns= “ 1 ” , 属性拉伸第二列 ,android:layout_column=“0”属性表示显示在第一列中。需要注意的是,TableRow不需要设置宽度和高度,其宽度一定是自动填充容器,高度根据内容改变。但对于TableRow的其他控件来说,是可以设置宽度和高度的。
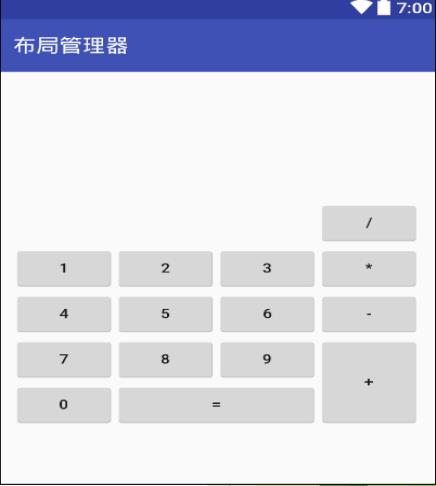
(4)网格布局(GridLayout)
网格布局是由Gridlayout所代表,它是Android4.0新增的布局管理器,因此需要在4.0之后的版本才能使用。它的作用类似与table,它把整个容器划分为rows×columns个网格,每个网格可以放置一个组件。GridLayout提供了setRowCount(int)和setColumnCount(int)方法来控制该网格的行数量和列数量。
<?xml version="1.0" encoding="utf-8"?>
<GridLayout
xmlns:android="http://schemas.android.com/apk/res/android"
android:layout_width="wrap_content"
android:layout_height="wrap_content"
android:layout_gravity="center"
android:columnCount="4"
android:rowCount="4"
android:orientation="horizontal">
<Button android:text="/"
android:layout_column="3"/>
<Button android:text="1"/>
<Button android:text="2"/>
<Button android:text="3"/>
<Button android:text="*"/>
<Button android:text="4"/>
<Button android:text="5"/>
<Button android:text="6"/>
<Button android:text="-"/>
<Button android:text="7"/>
<Button android:text="8"/>
<Button android:text="9"/>
<Button android:text="+"
android:layout_gravity="fill"
android:layout_rowSpan="2"/>
<Button android:text="0"/>
<Button android:text="="
android:layout_gravity="fill"
android:layout_columnSpan="2" />
</GridLayout>
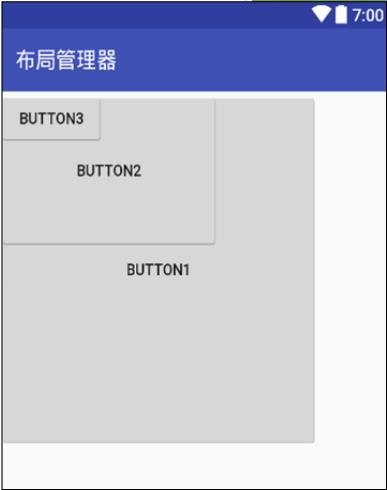
(5)帧布局(FrameLayout)
帧布局是Android布局中最简单的一种,帧布局为每个加入其中的控件创建了一块空白区域。采用帧布局的方式设计界面时,只能在屏幕左上角显示一个控件,如果添加多个控件,这些会依次重叠在屏幕左上角显示,且会透明显示之前的文本。
<FrameLayout
xmlns:android="http://schemas.android.com/apk/res/android"
android:layout_width="match_parent"
android:layout_height="match_parent">
<Button
android:id="@+id/button10"
android:layout_width="314dp"
android:layout_height="315dp"
android:text="Button1" />
<Button
android:id="@+id/button11"
android:layout_width="216dp"
android:layout_height="140dp"
android:text="Button2" />
<Button
android:id="@+id/button12"
android:layout_width="103dp"
android:layout_height="wrap_content"
android:text="Button3" />
</FrameLayout>
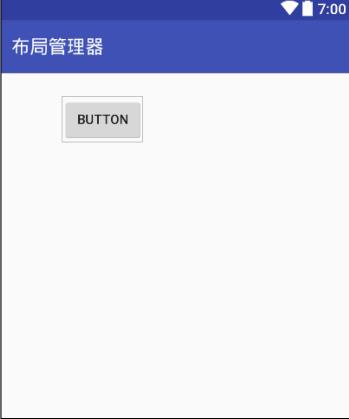
(6)绝对布局(AbsoluteLayout)
绝对布局是通过指定x、y坐标来控制每一个控件的位置,放入该布局的控件需要通过android:layout_x和android:layout_y两个属性指定其在屏幕上确切的位置。把屏幕看作一个坐标轴,左上角为(0,0),往屏幕下方为y正半轴,右方为x正半轴。
在开发过程中很少使用,原因是屏幕兼容性不好,不便控制两个控件之间的位置。
<AbsoluteLayout
xmlns:android="http://schemas.android.com/apk/res/android"
android:layout_width="match_parent"
android:layout_height="match_parent">
<Button
android:id="@+id/button3"
android:layout_width="wrap_content"
android:layout_height="wrap_content"
android:layout_x="71dp"
android:layout_y="25dp"
android:text="Button" />
</AbsoluteLayout>
(7)扁平化布局(ConstraintLayout) (约束布局)
ConstraintLayout是Android Studio2.2中主要的新增功能之一。在传统的Android开发当中,界面基本都是靠编写XML代码完成的,虽然Android Studio也支持可视化的方式来编写界面,但是操作起来并不方便,而ConstraintLayout就是为了解决这一现状而出现的。它和传统编写界面的方式恰恰相反,ConstraintLayout非常适合使用可视化的方式来编写界面,但并不太适合使用XML的方式来进行编写。当然,可视化操作的背后仍然还是使用的XML代码来实现的,只不过这些代码是由Android Studio根据用户的操作自动生成的。
<?xml version="1.0" encoding="utf-8"?>
<android.support.constraint.ConstraintLayout
xmlns:android="http://schemas.android.com/apk/res/android"
xmlns:app="http://schemas.android.com/apk/res-auto"
android:id="@+id/lay_root"
android:layout_width="match_parent"
android:layout_height="match_parent">
<TextView
android:id="@+id/text1"
android:layout_width="wrap_content"
android:layout_height="wrap_content"
android:text="test" />
</android.support.constraint.ConstraintLayout>
以上是关于Android Studio入门:Android应用界面详解(上)(View布局管理器)的主要内容,如果未能解决你的问题,请参考以下文章