大一期末作孽(python实现图片修改器)
Posted HUTEROX
tags:
篇首语:本文由小常识网(cha138.com)小编为大家整理,主要介绍了大一期末作孽(python实现图片修改器)相关的知识,希望对你有一定的参考价值。
目录
前言
本次提交的是期末作孽,一个图片修改器。
没办法规定用Python写,其他工具语言不香嘛。
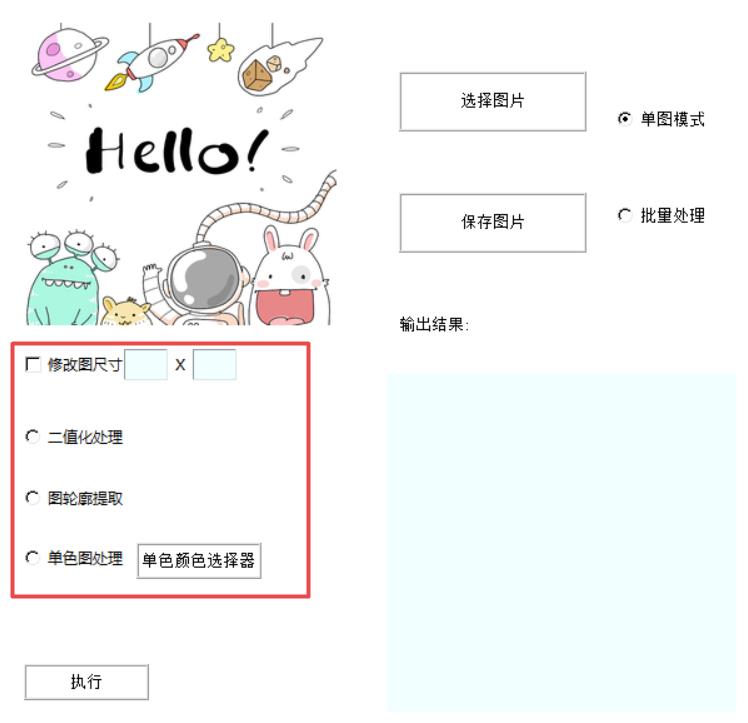
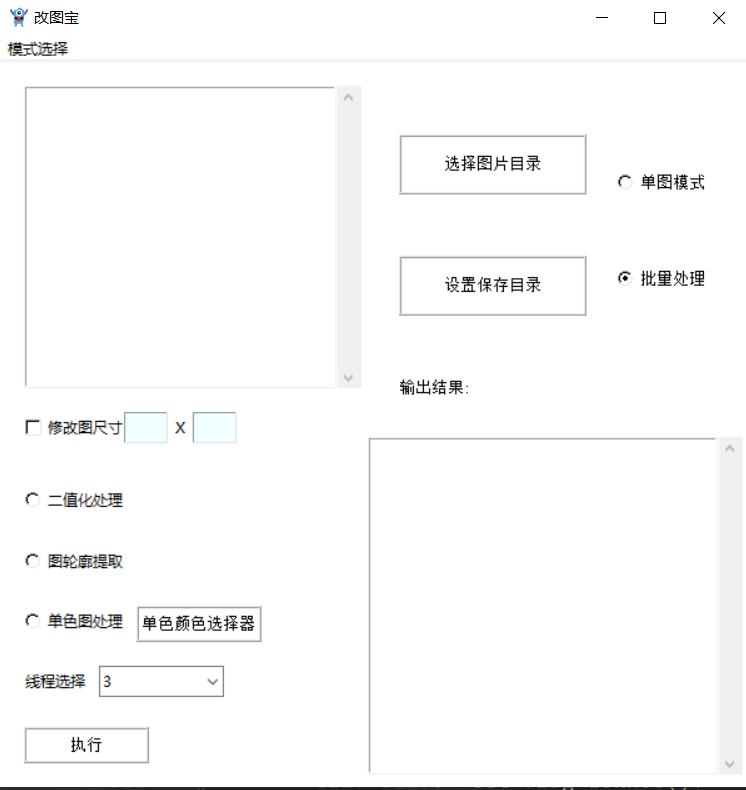
效果预览
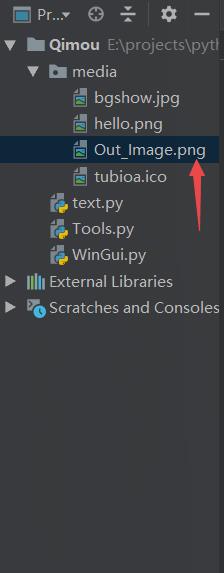
项目结构

text.py只是用来做测试的没啥用
屏幕适应
这个老问题了,也就是你电脑的缩放的问题
这里的话还是使用了一个类来实现我们的一个缩放转换的问题,不处理的话,对我们后面的功能会有很大的影响
class ChangeRealSize(object):
    '''

    该类主要对屏幕进行像素适配,按照缩放比对像素进行换算为100%显示
    示例:
    RealSize = ChangeRealSize()
    x=RealSize.getreal_xy(500)
    此时就可以换算为当前屏幕的像素

    '''


    def get_real_resolution(self):
        """获取真实的分辨率"""
        hDC = win32gui.GetDC(0)
        w = win32print.GetDeviceCaps(hDC, win32con.DESKTOPHORZRES)
        h = win32print.GetDeviceCaps(hDC, win32con.DESKTOPVERTRES)
        return w, h


    def get_screen_size(self):
        """获取缩放后的分辨率"""
        w = GetSystemMetrics (0)
        h = GetSystemMetrics (1)


        return w, h


    def getreal_xy(self,x):
        '''返回按照100%来算的真实的像素值'''
        real_resolution = self.get_real_resolution()
        screen_size = self.get_screen_size()
        screen_scale_rate = round(real_resolution[0] / screen_size[0], 2)
        try:
            x = x/screen_scale_rate
        except:
            #对笔记本进行适配,一般而言在100%比的机器上x不会出错
            x=1.25
        return int(x)
控件随窗口变化
我们这里使用的是place布局
但是呢使用的是相对的位置,这个换算呢就是 x/当前窗口大小


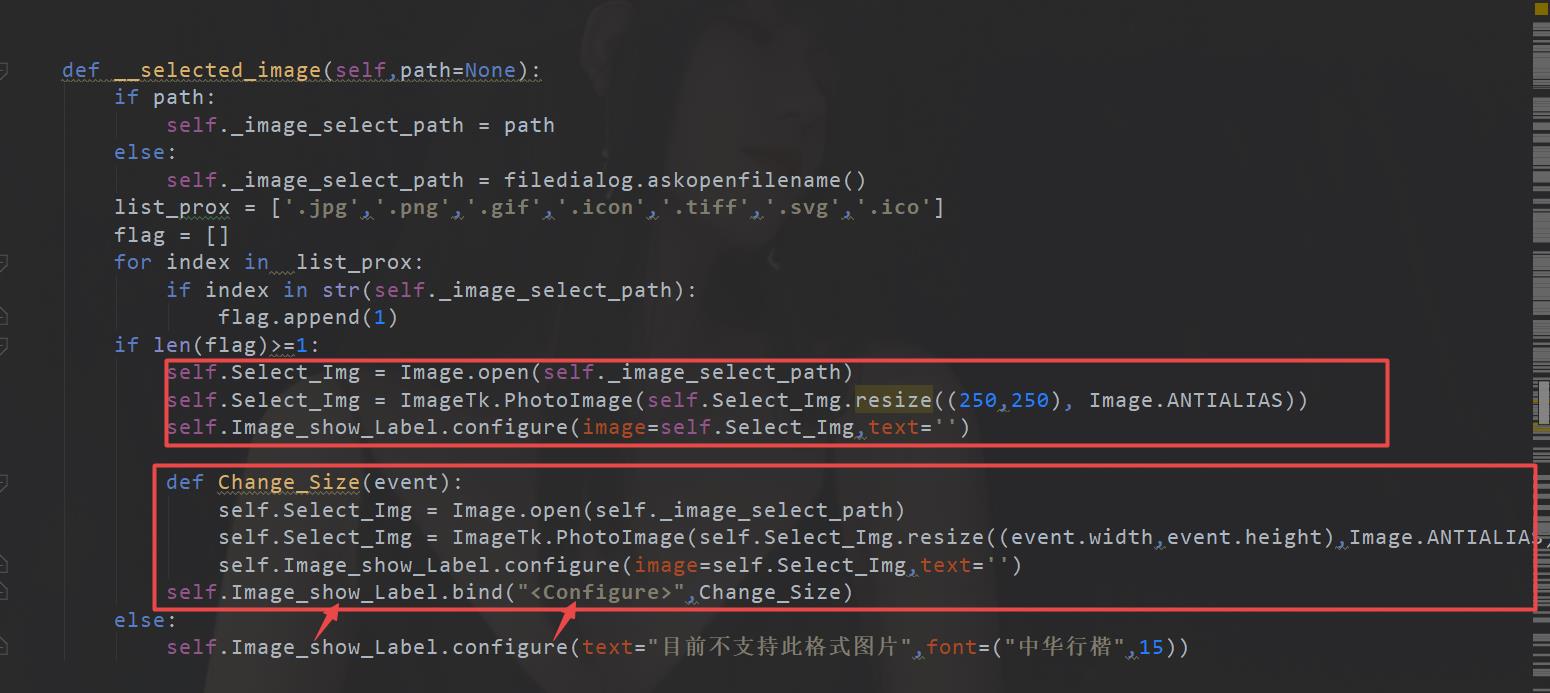
之后是图片随之变化
这个也简单其实就是实时获取控件大小,然后修改图片大小
图片处理的工具类
这个工具类的话,主要就是对图片进行处理的方法
具体的话就是实现这四个功能
图片处理的工具类的功能改变
由于我们的软件有两个模式,一个是单图模式,一个是批量模式
顾名思义,一个就是只对单个图片进行修改,另一个是批量处理,那么对应的方法自然有些区别(或者说是执行过程)。
那么具体是这么实现的呢大致如下:
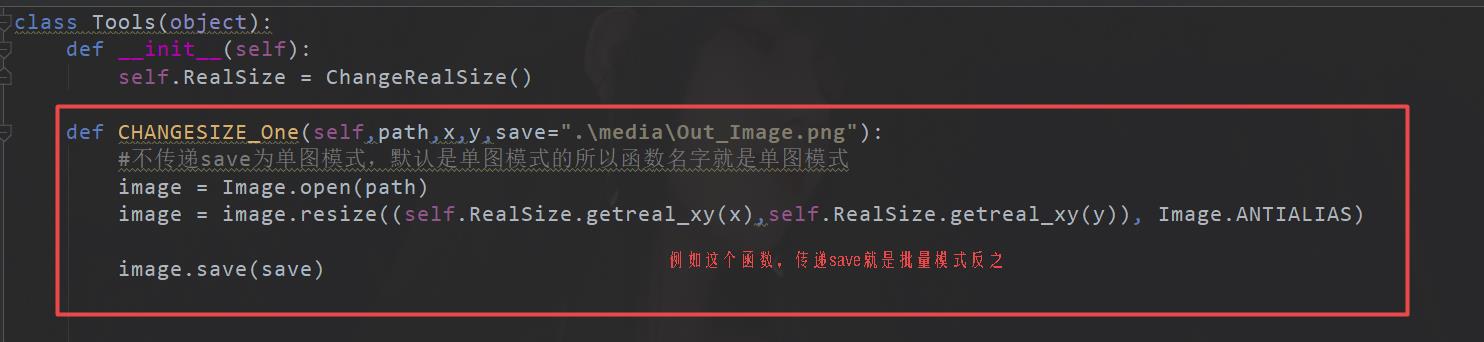
工具类代码如下
class Tools(object):
def __init__(self):
self.RealSize = ChangeRealSize()
def CHANGESIZE_One(self,path,x,y,save=".\\media\\Out_Image.png"):
#不传递save为单图模式,默认是单图模式的所以函数名字就是单图模式
image = Image.open(path)
image = image.resize((self.RealSize.getreal_xy(x),self.RealSize.getreal_xy(y)), Image.ANTIALIAS)
image.save(save)
pass
def ERZHIHUA_One(self,path,save=".\\media\\Out_Image.png"):
image = Image.open(path)
image = image.convert('L')
t = []
for i in range(256):
# 杂质越多,值越大(轮廓越黑越明显)
if i < 120: # 160
t.append(0)
else:
t.append(1)
image = image.point(t, '1')
image.save(save)
def DANSHANGSE_One(self,path,RGB,save=".\\media\\Out_Image.png"):
if save==".\\media\\Out_Image.png":
self.ERZHIHUA_One(path) # 执行二值化
path = r'{}'.format(os.path.dirname((os.path.abspath(__file__)))) + '\\media\\Out_Image.png'
image = Image.open(path)
image = image.convert("RGB")
width = image.size[0]
height = image.size[1]
new_image = Image.new("RGB", (width, height))
for x in range(width):
for y in range(height):
r, g, b = image.getpixel((x, y))
rgb = (r, g, b)
if rgb == (0, 0, 0):
rgb = RGB
new_image.putpixel((x, y), (int(rgb[0]), int(rgb[1]), int(rgb[2]))) # 画图
new_image.save(path)
else:
self.ERZHIHUA_One(path,save) # 执行二值化
path = save
image = Image.open(path)
image = image.convert("RGB")
width = image.size[0]
height = image.size[1]
new_image = Image.new("RGB", (width, height))
for x in range(width):
for y in range(height):
r, g, b = image.getpixel((x, y))
rgb = (r, g, b)
if rgb == (0, 0, 0):
rgb = RGB
new_image.putpixel((x, y), (int(rgb[0]), int(rgb[1]), int(rgb[2]))) # 画图
new_image.save(path)
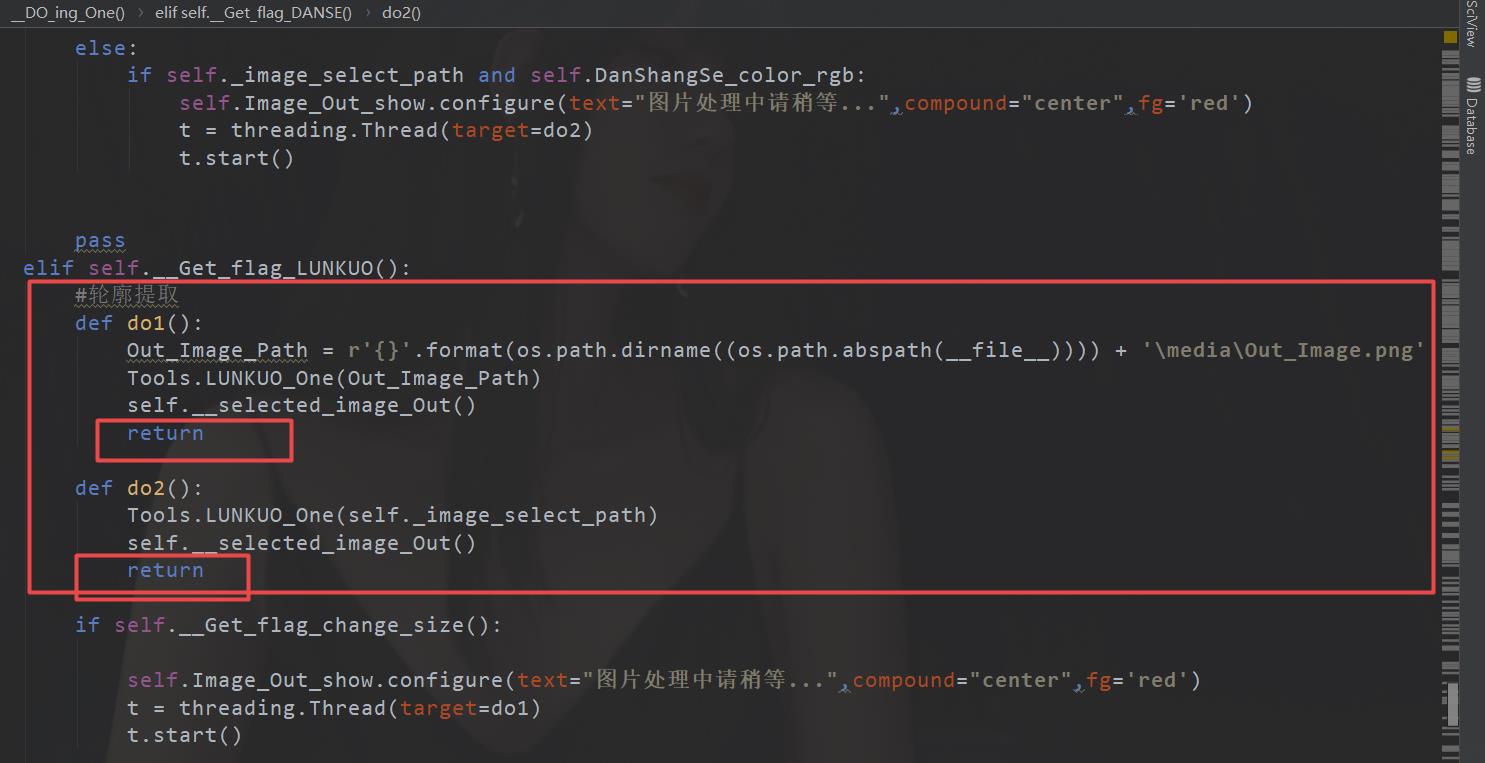
def LUNKUO_One(self,path,save=".\\media\\Out_Image.png"):
if save==".\\media\\Out_Image.png":
self.ERZHIHUA_One(path)#执行二值化
path = r'{}'.format(os.path.dirname((os.path.abspath(__file__))))+'\\media\\Out_Image.png'
image = Image.open(path)
image = image.convert("RGB")
new_img = Image.new("RGB", (image.size[0], image.size[1]))
for x in range(image.size[0]):
for y in range(image.size[1]):
r, g, b = image.getpixel((x, y))
rgb = (r, g, b)
if rgb != (255, 255, 255):
if y > 2 and y < image.size[1] - 3:
r1, g1, b1 = image.getpixel((x, y - 3))
rgb1 = (r1, g1, b1)
r2, g2, b2 = image.getpixel((x, y + 3))
rgb2 = (r2, g2, b2)
if rgb1 == (255, 255, 255) and rgb == (0,0,0) and rgb2 == (0,0,0):
rgb = (0,0,0)
elif rgb1 == (0,0,0) and rgb == (0,0,0) and rgb2 == (255, 255, 255):
rgb = (0,0,0)
if rgb1 == (0,0,0) and rgb == (0,0,0) and rgb2 == (0,0,0):
rgb = (255, 255, 255)
new_img.putpixel((x, y), (int(rgb[0]), int(rgb[1]), int(rgb[2])))
new_img.save(path)
else:
self.ERZHIHUA_One(path,save) # 执行二值化
path = save
image = Image.open(path)
image = image.convert("RGB")
new_img = Image.new("RGB", (image.size[0], image.size[1]))
for x in range(image.size[0]):
for y in range(image.size[1]):
r, g, b = image.getpixel((x, y))
rgb = (r, g, b)
if rgb != (255, 255, 255):
if y > 2 and y < image.size[1] - 3:
r1, g1, b1 = image.getpixel((x, y - 3))
rgb1 = (r1, g1, b1)
r2, g2, b2 = image.getpixel((x, y + 3))
rgb2 = (r2, g2, b2)
if rgb1 == (255, 255, 255) and rgb == (0, 0, 0) and rgb2 == (0, 0, 0):
rgb = (0, 0, 0)
elif rgb1 == (0, 0, 0) and rgb == (0, 0, 0) and rgb2 == (255, 255, 255):
rgb = (0, 0, 0)
if rgb1 == (0, 0, 0) and rgb == (0, 0, 0) and rgb2 == (0, 0, 0):
rgb = (255, 255, 255)
new_img.putpixel((x, y), (int(rgb[0]), int(rgb[1]), int(rgb[2])))
new_img.save(path)
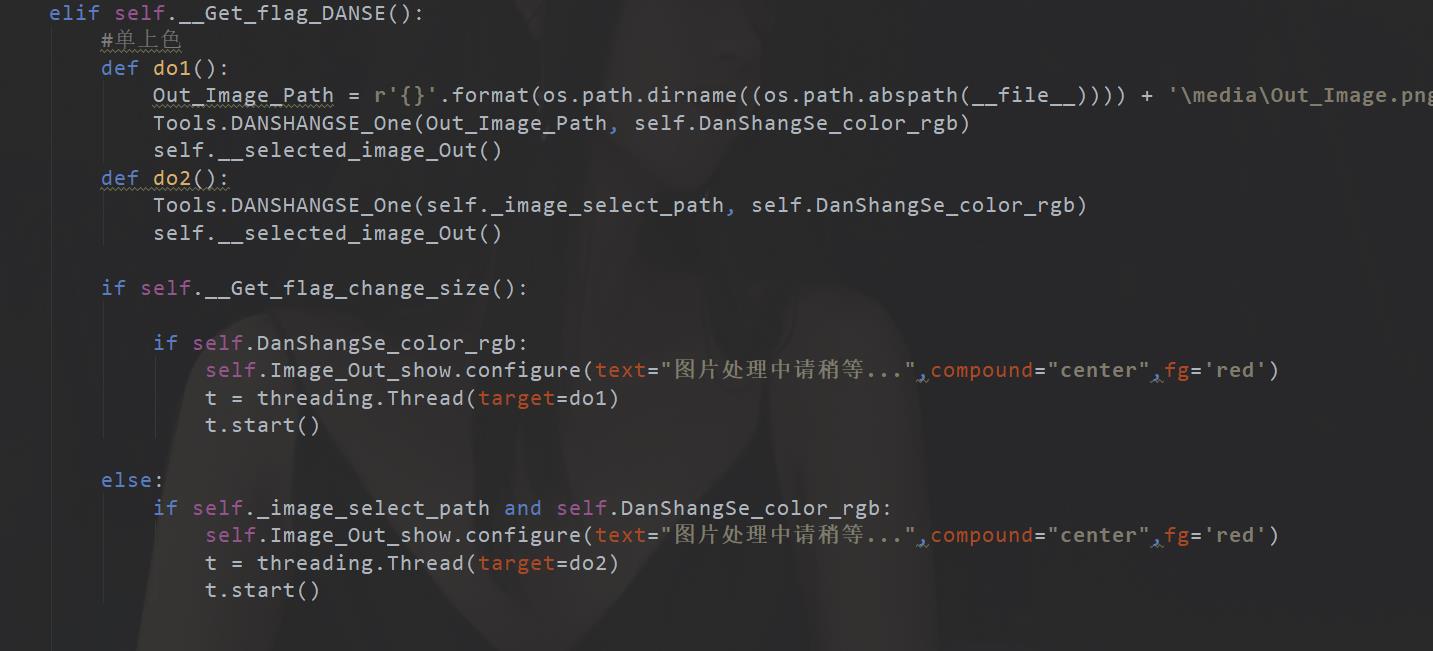
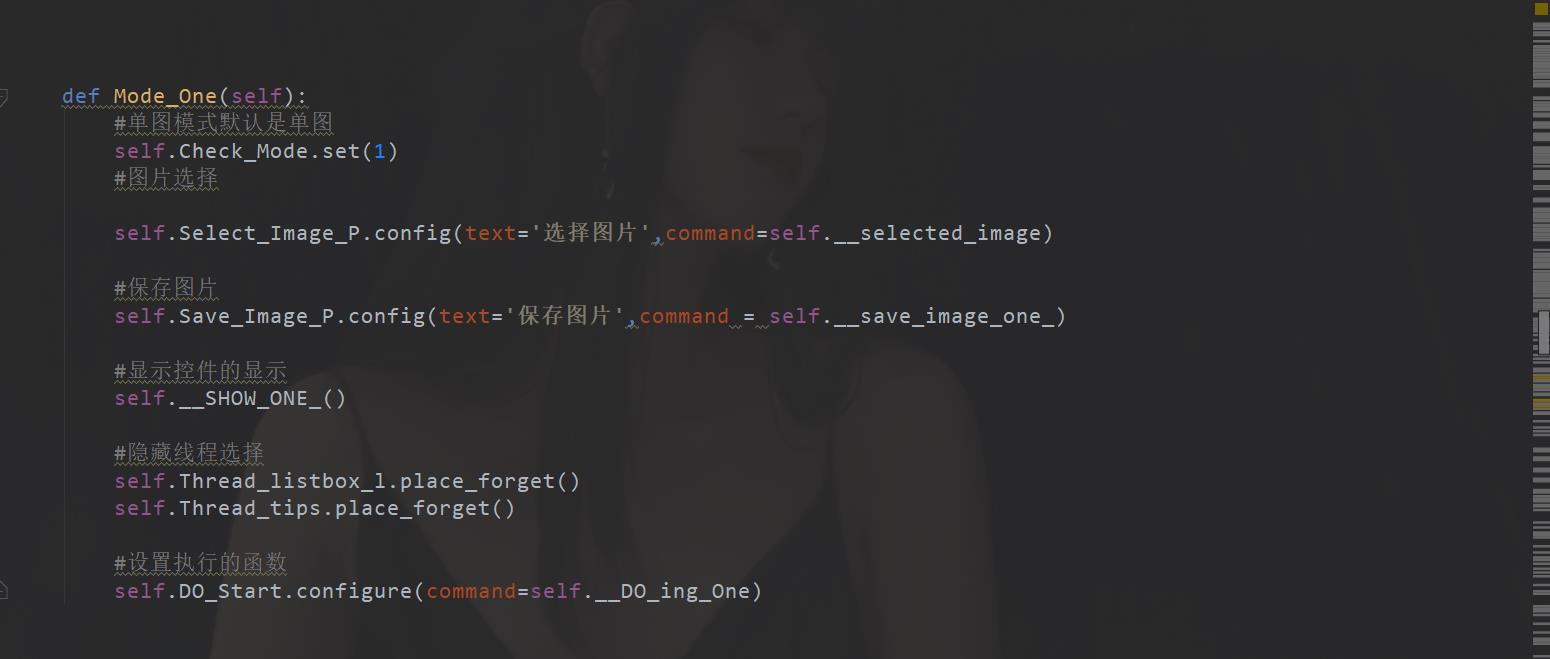
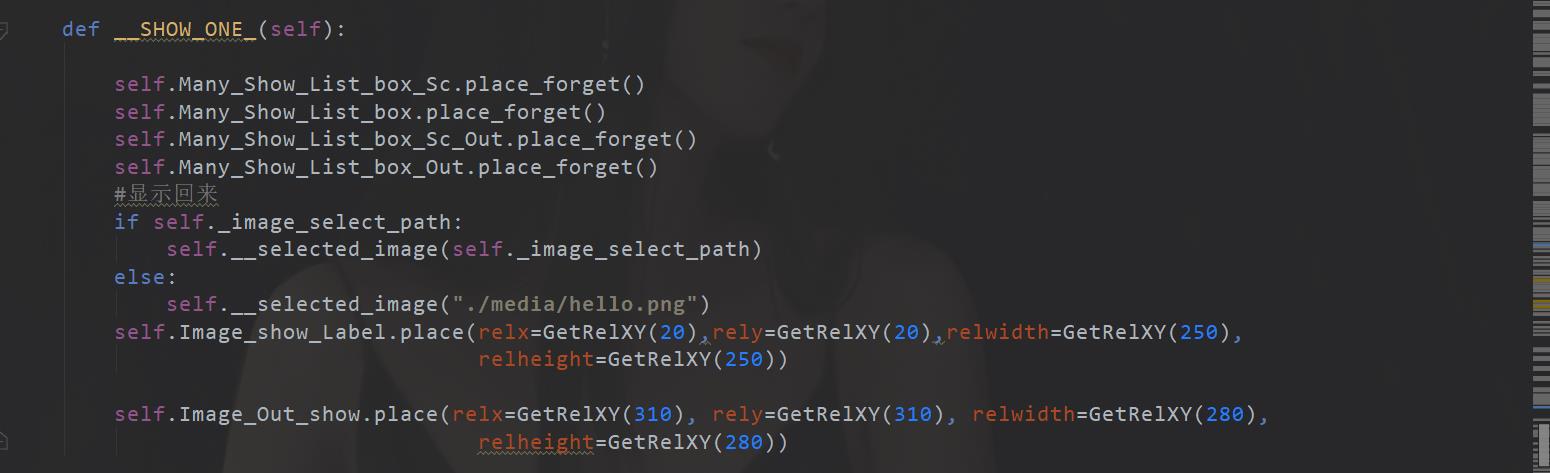
单图模式下的图片处理
这个其实就是说明一点,那就是在单图模式下,由于只是针对一张图片处理
所以的话我们的工具类会默认把处理好的图片存放为一张图片
之后,我们再对图片进行转移
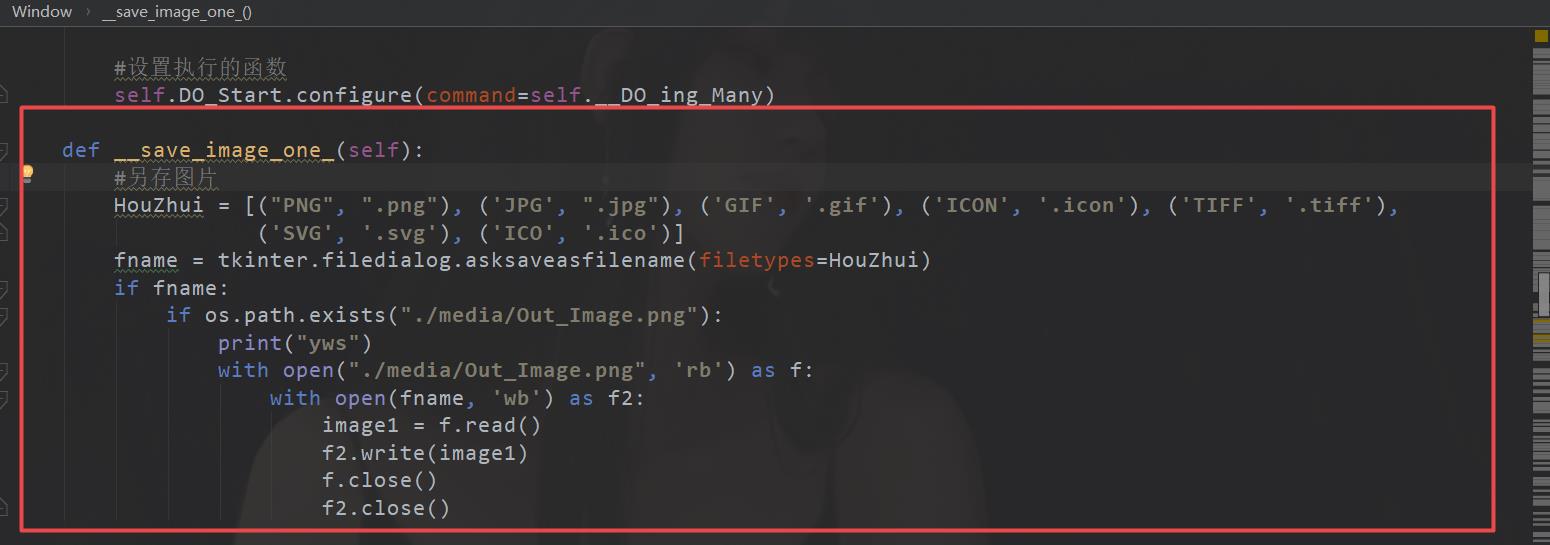
单图模式下的子线程方案
这个主要是由于有时候图片处理实在太慢,没有办法必须开一个子线程,这样防止页面卡顿。具体的实现见下:

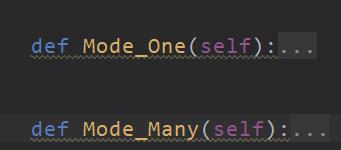
当然还有一处
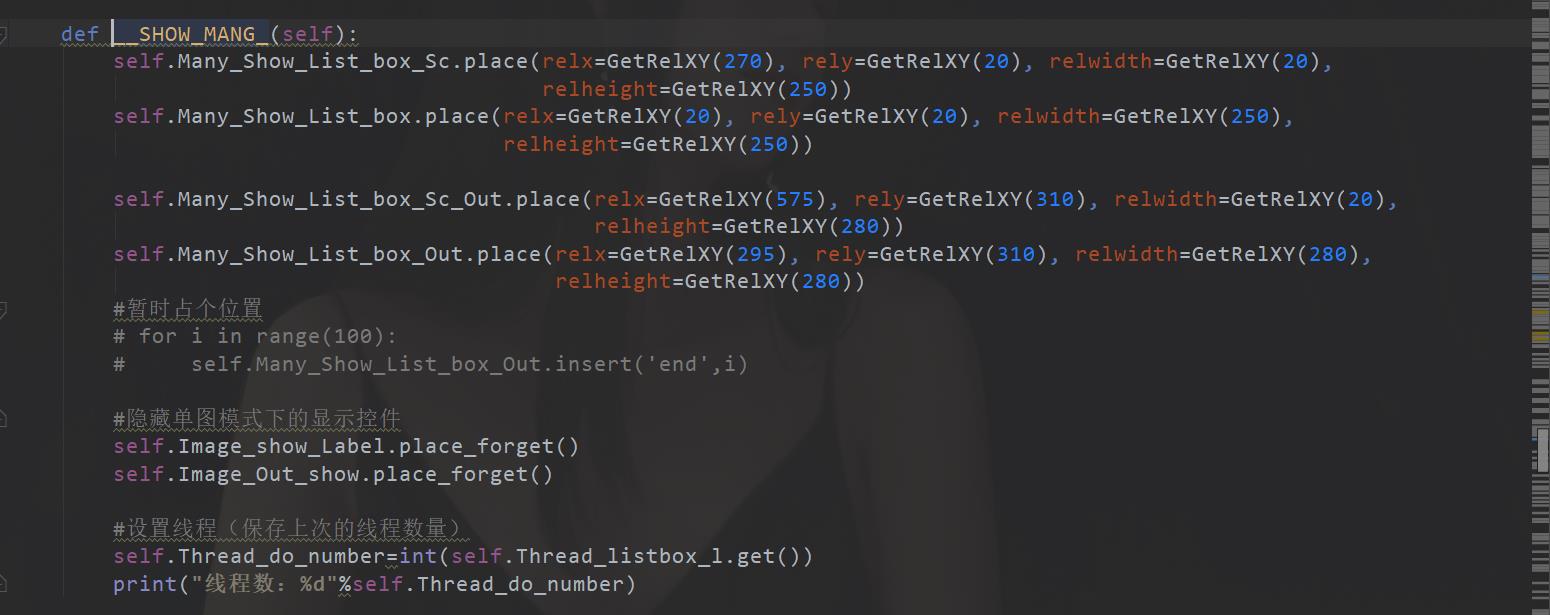
模式的切换
这个模式切换体现在两个方面
一个是控件变化
另一个自然是里面的函数发生了变化
我们通过这两个函数实现切换(在主类Window中)

这是控件显示与消失函数
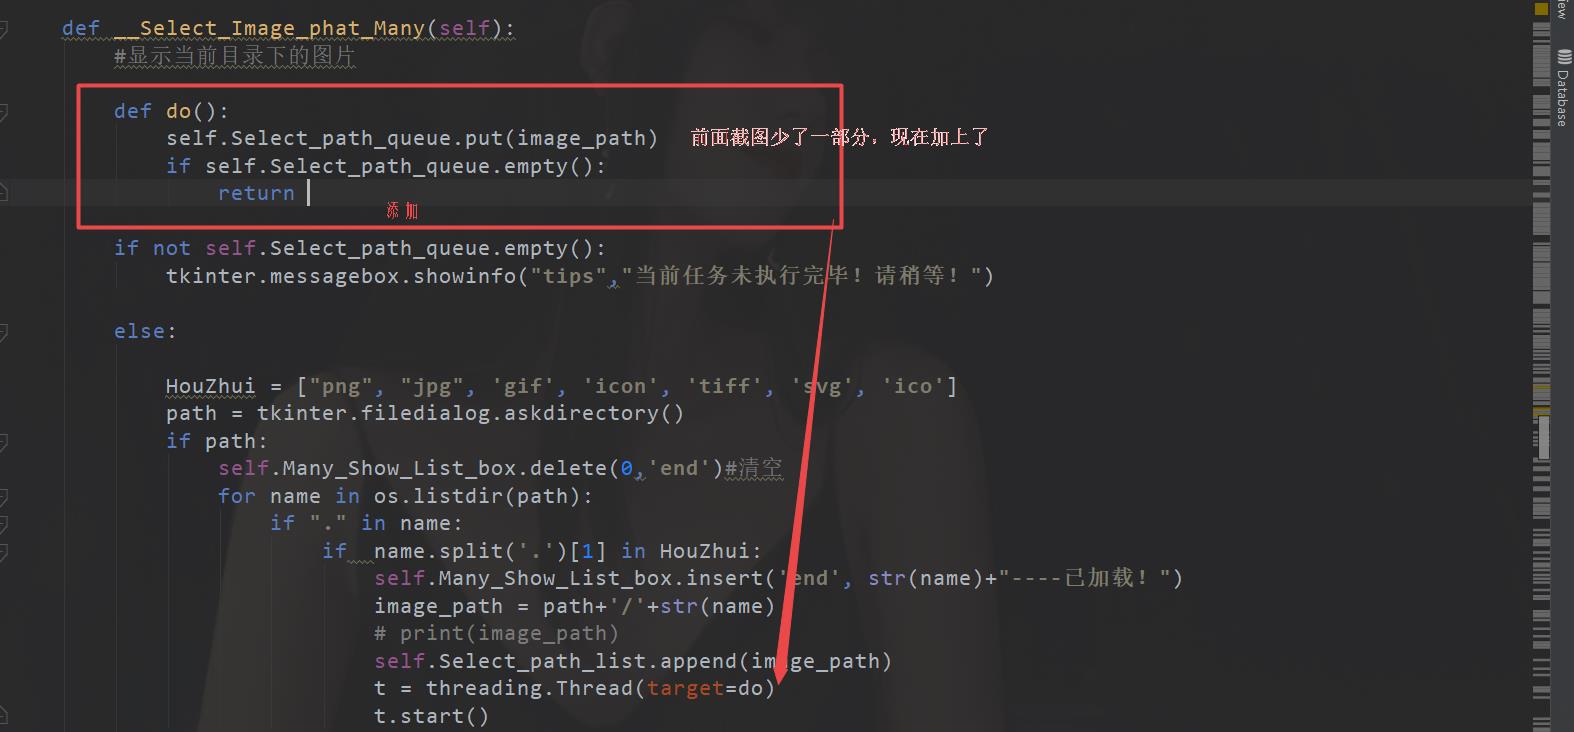
批量模式下的路径读取(路径队列)(生产者)
这个毫无意外的是,批量模式下,多线程不可避免。
这里主要注意两点
一。路径获取与显示到窗口
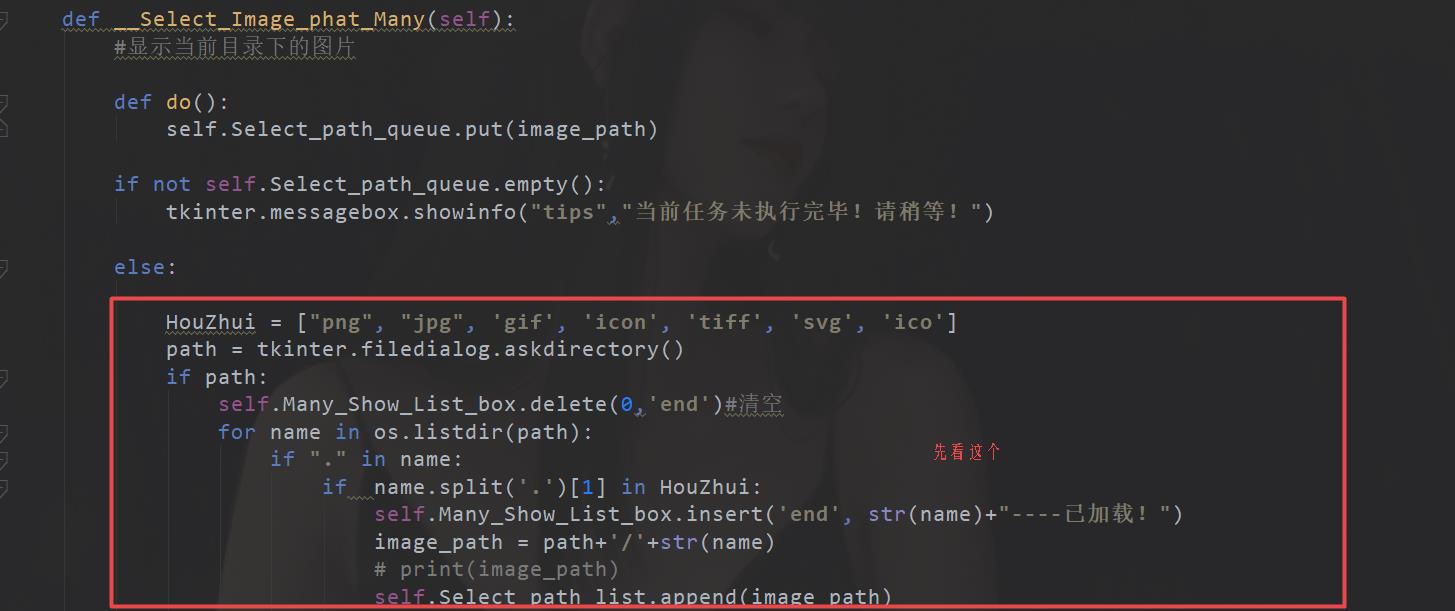
二。队列加载
默认下队列大小为1000但是之后就会堵塞,所以只能去开个线程去添加队列
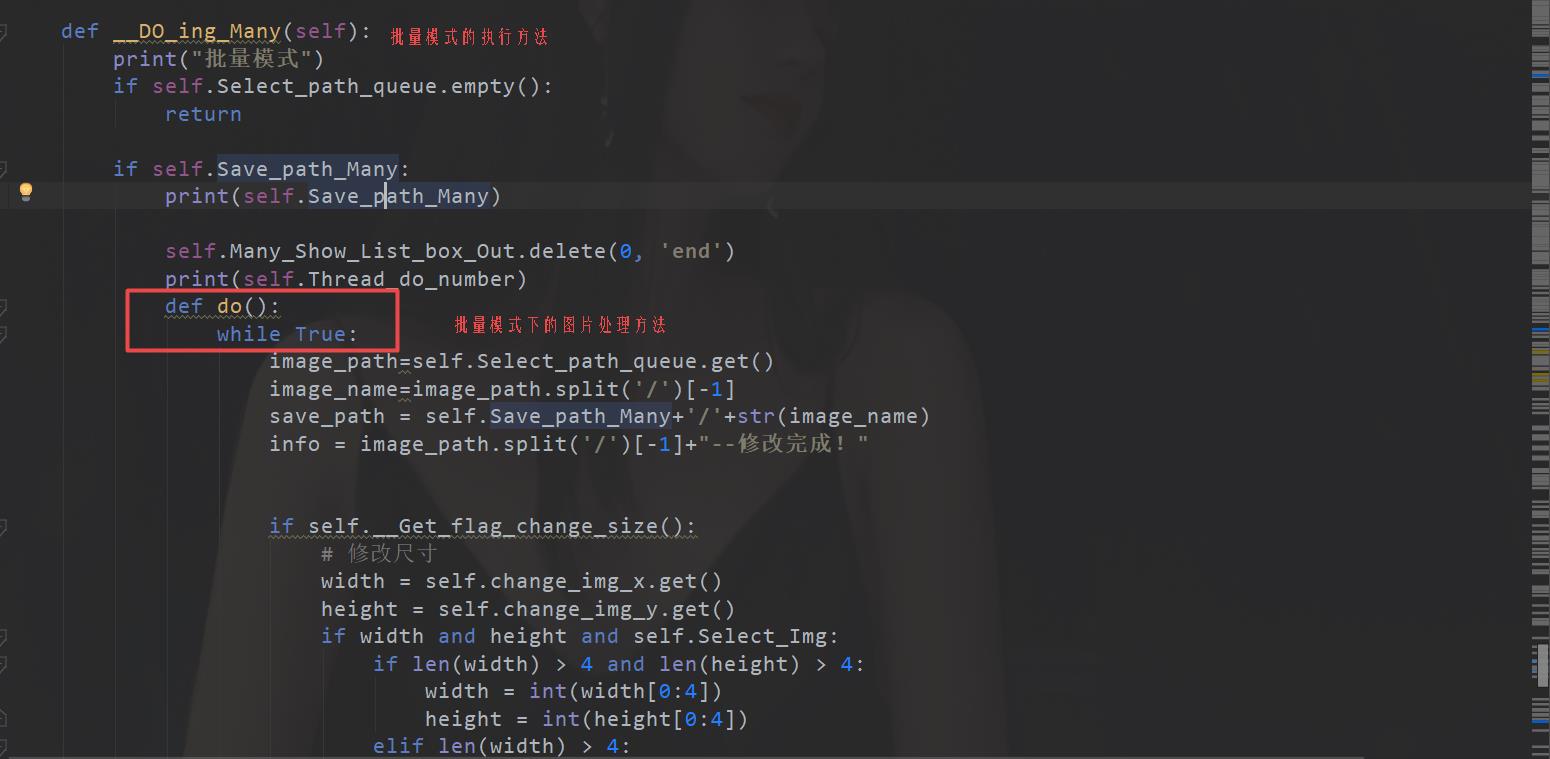
批量模式下的线程执行(消费者)
先看看执行函数

注意点
由于本程序使用了大量的子线程,所以对于每一个子线程,必须能够自己关闭,而不是一种运行或者处于堵塞状态,否者会带来大量的内存占用。

窗口类代码
GetRelXY = lambda x:x/600#相对布局换算默认600x600开始换算
Tools = Tools()
class Window():
def __init__(self):
self.win = tk.Tk()
self.win.title("改图宝")
self.win.geometry("600x600")
self.win.iconbitmap(r".\\media\\tubioa.ico")
self.win['background']='white'
self.Top_menu = tk.Menu(self.win)
self.Top_menu_G = tk.Menu(self.win,tearoff=0,activebackground="Aqua",font=("宋体",10))
self.Top_menu_G.add_command(label="单图模式",command=self.Mode_One)
self.Top_menu_G.add_separator()
self.Top_menu_G.add_command(label="批量处理",command=self.Mode_Many)
self.Top_menu_G.add_separator()
self.Top_menu_G.add_command(label="退出",command=self.win.quit)
self.Top_menu.add_cascade(label="模式选择",menu=self.Top_menu_G)
self.win.config(menu=self.Top_menu)#顶栏字体不能改
self.Select_Img=None #在单图模式下被选中的图片
self._image_select_path=None
self.Out_Image_Path =None#单图模式下的输出图片路径
self.Select_Path=None #在批量模式下被选择的路径
self.Check_Mode=tk.IntVar(value=1)
#修改图片的复选框的变量,这个应该和线程在一块,其他的是radiobutton才对
self.Check_Change_size=tk.IntVar()
#图片提取处理
self.Check_Radio_change=tk.IntVar()
self.DanShangSe_color_rgb=(50,205,50) #单上色的颜色,默认绿色
#线程数和线程的设置
self.Thread_do_number=3#默认3个线程
#相关设置
self.Thread_number = tk.IntVar()
self.Thread_listbox_l = ttk.Combobox(self.win, textvariable=self.Thread_number)
self.Thread_listbox_l["values"] = (1, 2, 3, 4, 5)
self.Thread_listbox_l.current(0)
self.Thread_listbox_l.bind("<<ComboboxSelected>>", self.__set_thread_number)
self.Thread_number.set(3)
self.Thread_do_number = int(self.Thread_number.get())
#2相关设置
self.Thread_tips = tk.Label(self.win,bg='white',text="线程选择")
#批量模式下的listbox
self.Image_many_show_path_list=[]#显示的路径(图片)
self.Many_Show_List_box_Sc