今日头条Android岗面试题:说说Android动态换肤实现原理
Posted 小陈乱敲代码
tags:
篇首语:本文由小常识网(cha138.com)小编为大家整理,主要介绍了今日头条Android岗面试题:说说Android动态换肤实现原理相关的知识,希望对你有一定的参考价值。

首先,换肤分为动态换肤和静态换肤
静态换肤
这种换肤的方式,也就是我们所说的内置换肤,就是在APP内部放置多套相同的资源。进行资源的切换。
这种换肤的方式有很多缺点,比如, 灵活性差,只能更换内置的资源、apk体积太大,在我们的应用Apk中等一般图片文件能占到apk大小的一半左右。
当然了,这种方式也并不是一无是处, 比如我们的应用内,只是普通的 日夜间模式 的切换,并不需要图片等的更换,只是更换颜色,那这样的方式就很实用。
动态换肤
适用于大量皮肤,用户选择下载,像QQ、网易云音乐这种。它是将皮肤包下载到本地,皮肤包其实是个APK。
换肤包括替换图片资源、布局颜色、字体、文字颜色、状态栏和导航栏颜色。
动态换肤步骤包括:
- 采集需要换肤的控件
- 加载皮肤包
- 替换资源
实现原理
首先Activity的onCreate()方法里面我们都要去调用setContentView(int id) 来指定当前Activity的布局文件:
    @Override
    protected void onCreate(Bundle savedInstanceState) {
        super.onCreate(savedInstanceState);
        setContentView(R.layout.activity_main);
    }
再往里看:
    @Override
    public void setContentView(int resId) {
        ensureSubDecor();
        ViewGroup contentParent = (ViewGroup) mSubDecor.findViewById(android.R.id.content);
        contentParent.removeAllViews();
        LayoutInflater.from(mContext).inflate(resId, contentParent);//这里实现view布局的加载
        mOriginalWindowCallback.onContentChanged();
    }
    public View inflate(@LayoutRes int resource, @Nullable ViewGroup root) {
        return inflate(resource, root, root != null);
    }
    public View inflate(@LayoutRes int resource, @Nullable ViewGroup root, boolean attachToRoot) {
        final Resources res = getContext().getResources();
        if (DEBUG) {
            Log.d(TAG, "INFLATING from resource: \\"" + res.getResourceName(resource) + "\\" ("
                    + Integer.toHexString(resource) + ")");
        }

        final XmlResourceParser parser = res.getLayout(resource);
        try {
            return inflate(parser, root, attachToRoot);
        } finally {
            parser.close();
        }
    }
 public View inflate(XmlPullParser parser, @Nullable ViewGroup root, boolean attachToRoot) {
 			...
            final String name = parser.getName();
            final View temp = createViewFromTag(root, name, inflaterContext, attrs);
            ...
            return temp;
    }
可以看到inflate会返回具体的View对象出去,那么我们的关注焦点就放在createViewFromTag中了
    /**
     * Creates a view from a tag name using the supplied attribute set.
     * <p>
     * <strong>Note:</strong> Default visibility so the BridgeInflater can
     * override it.
     *
     * @param parent the parent view, used to inflate layout params
     * @param name the name of the XML tag used to define the view
     * @param context the inflation context for the view, typically the
     *                {@code parent} or base layout inflater context
     * @param attrs the attribute set for the XML tag used to define the view
     * @param ignoreThemeAttr {@code true} to ignore the {@code android:theme}
     *                        attribute (if set) for the view being inflated,
     *                        {@code false} otherwise
     */
    View createViewFromTag(View parent, String name, Context context, AttributeSet attrs,
            boolean ignoreThemeAttr) {
        try {
            View view;
            if (mFactory2 != null) {
                view = mFactory2.onCreateView(parent, name, context, attrs);
            } else if (mFactory != null) {
                view = mFactory.onCreateView(name, context, attrs);
            } else {
                view = null;
            }
            return view;
        } catch (Exception e) {
        }
    }
inflate最终调用了createViewFromTag方法来创建View,在这之中用到了factory,如果factory存在就用factory创建对象,如果不存在就由系统自己去创建。我们只需要实现我们的Factory然后设置给mFactory2就可以采集到所有的View了,这里是一个Hook点。
当我们采集完了需要换肤的view,下一步就是加载皮肤包资源。当我们拿到当前View的资源名称时就会先去皮肤插件中的资源文件里找
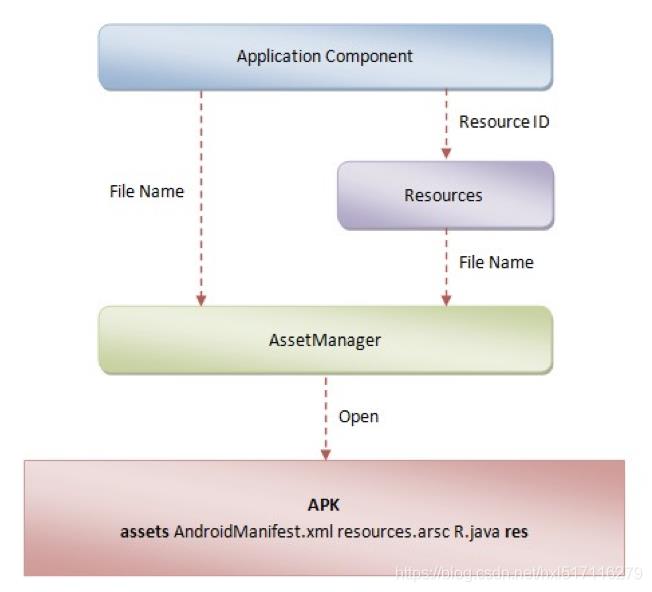
Android加载资源的流程图:

1.采集换肤控件
android解析xml创建view的步骤:
- setContentView -> window.setContentView()(实现类是PhoneWindow)->mLayoutInflater.inflate() -> inflate … ->createViewFromTag().
所以我们复写了Factory的onCreateView之后,就可以不通过系统层而是自己截获从xml映射的View进行相关View创建的操作,包括对View的属性进行设置(比如背景色,字体大小,颜色等)以实现换肤的效果。如果onCreateView返回null的话,会将创建View的操作交给Activity默认实现的Factory的onCreateView处理。
1.使用ActivityLifecycleCallbacks,尽可能少的去侵入代码,在onActivityCreated中监听每个activity的创建。
@Override
public void onActivityCreated(Activity activity, Bundle savedInstanceState) {
       LayoutInflater layoutInflater = LayoutInflater.from(activity);
       try {
           //系统默认 LayoutInflater只能设置一次factory,所以利用反射解除限制
           Field mFactorySet = LayoutInflater.class.getDeclaredField("mFactorySet");
           mFactorySet.setAccessible(true);
           mFactorySet.setBoolean(layoutInflater, false);
       } catch (Exception e) {
           e.printStackTrace();
       }

       //添加自定义创建View 工厂
       SkinLayoutFactory factory = new SkinLayoutFactory(activity, skinTypeface);
       layoutInflater.setFactory2(factory);
}
2.在 SkinLayoutFactory中将每个创建的view进行筛选采集
  //根据tag反射获取view
    @Override
    public View onCreateView(View parent, String name, Context context, AttributeSet attrs) {
        // 反射 classLoader
        View view = createViewFromTag(name, context, attrs);
        // 自定义View
        if(null ==  view){
            view = createView(name, context, attrs);
        }

        //筛选符合属性View
        skinAttribute.load(view, attrs);

        return view;
    }
3.将view封装成对象
    //view的参数对象
    static class SkinPain {
        String attributeName;
        int resId;

        public SkinPain(String attributeName, int resId) {
            this.attributeName = attributeName;
            this.resId = resId;
        }
    }

    //view对象
     static class SkinView {
        View view;
        List<SkinPain> skinPains;

        public SkinView(View view, List<SkinPain> skinPains) {
            this.view = view;
            this.skinPains = skinPains;
        }
     }
将属性符合的view保存起来
public class SkinAttribute {
    private static final List<String> mAttributes = new ArrayList<>();

    static {
        mAttributes.add("background");
        mAttributes.add("src");

        mAttributes.add("textColor");
        mAttributes.add("drawableLeft");
        mAttributes.add("drawableTop");
        mAttributes.add("drawableRight");
        mAttributes.add("drawableBottom");

        mAttributes.add("skinTypeface");
    }

    private List<SkinView> skinViews = new ArrayList<>();

    public void load(View view, AttributeSet attrs) {
        List<SkinPain> skinPains = new ArrayList<>();
        for (int i = 0; i < attrs.getAttributeCount(); i++) {
            //获取属性名字
            String attributeName = attrs.getAttributeName(i);
            if (mAttributes.contains(attributeName)) {
                //获取属性对应的值
                String attributeValue = attrs.getAttributeValue(i);
                if (attributeValue.startsWith("#")) {
                    continue;
                }
                int resId;
                //判断前缀字符串 是否是"?"
                //attributeValue  = "?2130903043"
                if (attributeValue.startsWith("?")) {  //系统属性值
                    //字符串的子字符串  从下标 1 位置开始
                    int attrId = Integer.parseInt(attributeValue.substring(1));
                    resId = SkinThemeUtils.getResId(view.getContext(), new int[]{attrId})[0];
                } else {
                    //@1234564
                    resId = Integer.parseInt(attributeValue.substring(1));
                }
                if (resId != 0) {
                    SkinPain skinPain = new SkinPain(attributeName, resId);
                    skinPains.add(skinPain);
                }
            }
        }
        //SkinViewSupport是自定义view实现的接口,用来区分是否需要换肤
        if (!skinPains.isEmpty() || view instanceof TextView || view instanceof SkinViewSupport) {
            SkinView skinView = new SkinView(view, skinPains);
            skinView.applySkin(mTypeface);
            skinViews.add(skinView);
        }
    }

    ...

    }
2.加载皮肤包
加载皮肤包需要我们动态获取网络下载的皮肤包资源,问题是我们如何加载皮肤包中的资源
Android访问资源使用的是Resources这个类,但是程序里面通过getContext获取到的Resources实例实际上是对应程序本来的资源的实例,也就是说这个实例只能加载app里面的资源,想要加载皮肤包里面的就不行了
自己构造一个Resources(这个Resources指向的资源就是我们的皮肤包)
看看Resources的构造方法,可以看到主要是需要一个AssetManager
public Resources(AssetManager assets, DisplayMetrics metrics, Configuration config) {
        this(null);
        mResourcesImpl = new ResourcesImpl(assets, metrics, config, new DisplayAdjustments());
    }
构造一个指向皮肤包的AssetManager,但是这个AssetManager是不能直接new出来的,这里就使用反射来实例化了
AssetManager assetManager = AssetManager.class.newInstance();
AssetManager有一个addAssetPath方法可以指定资源的位置,可惜这个也只能用反射来调用
Method addAssetPath = assetManager.getClass().getMethod("addAssetPath", String.class);
        addAssetPath.invoke(assetManager, filePath);
再来看看Resources的其他两个参数,一个是DisplayMetrics,一个是Configuration,这两的就可以直接使用app原来的Resources里面的就可以。
具体代码如下:
    public void loadSkin(String path) {
        if(TextUtils.isEmpty(path)){
            // 记录使用默认皮肤
            SkinPreference.getInstance().setSkin("");
            //清空资源管理器, 皮肤资源属性等
            SkinResources.getInstance().reset();
        } else {
            try {
                //反射创建AssetManager
                AssetManager manager = AssetManager.class.newInstance();
                // 资料路径设置
                Method addAssetPath = manager.getClass().getMethod("addAssetPath", String.class);
                addAssetPath.invoke(manager, path);

                Resources appResources = this.application.getResources();
                Resources skinResources = new Resources(manager,
                        appResources.getDisplayMetrics(), appResources.getConfiguration());

                //记录当前皮肤包
                SkinPreference.getInstance().setSkin(path);
                //获取外部Apk(皮肤薄) 包名
                PackageManager packageManager = this.application.getPackageManager();
                PackageInfo packageArchiveInfo = packageManager.getPackageArchiveInfo(path, PackageManager.GET_ACTIVITIES);
                String packageName = packageArchiveInfo.packageName;

                SkinResources.getInstance().applySkin(skinResources,packageName);
            } catch (Exception e) {
                e.printStackTrace();
            }
        }

        setChanged();
        //通知观者者,进行替换资源
        notifyObservers();
    }
3.替换资源
换肤的核心操作就是替换资源,这里采用观察者模式,被观察者是我们的换肤管理类SkinManager,观察者是我们之前缓存的每个页面的LayoutInflater.Factory2
    @Override
    public void update(Observable o, Object arg) {
        //状态栏
        SkinThemeUtils.updataStatusBarColor(activity);
        //字体
        Typeface skinTypeface = SkinThemeUtils.getSkinTypeface(activity);
        skinAttribute.setTypeface(skinTypeface);
        //更换皮肤
        skinAttribute.applySkin();
    }
applySkin()在去遍历每个factory缓存的需要换肤的view,调用他们的换肤方法
    public void applySkin() {
        for (SkinView mSkinView : skinViews) {
            mSkinView.applySkin(mTypeface);
        }
    }
applySkin方法如下:
        public void applySkin(Typeface typeface) {
            //换字体
            if(view instanceof TextView){
                ((TextView) view).setTypeface(typeface);
            }
            //自定义view换肤
            if(view instanceof SkinViewSupport){
                ((SkinViewSupport)view).applySkin();
            }

            for (SkinPain skinPair : skinPains) {
                Drawable left = null, top = null, right = null, bottom = null;
                switch (skinPair.attributeName) {
                    case "background":
                        Object background = SkinResources.getInstance().getBackground(
                                skinPair.resId);
                        //Color
                        if (background instanceof Integer) {
                            view.setBackgroundColor((Integer) background);
                        } else {
                            ViewCompat.setBackground(view, (Drawable) background);
                        }
                        break;
                    case "src":
                        background = SkinResources.getInstance().getBackground(skinPair
                                .resId);
                        if (background instanceof Integer) {
                            ((ImageView) view).setImageDrawable(new ColorDrawable((Integer)
                                    background));
                        } else {
                            ((ImageView) view).setImageDrawable((Drawable) background);
                        }
                        break;
                    case "textColor":
                        ((TextView) view).setTextColor(SkinResources.getInstance().getColorStateList
                                (skinPair.resId));
                        break;
                    case "drawableLeft":
                        left = SkinResources.getInstance().getDrawable(skinPair.resId);
                        break;
                    case "drawableTop":
                        top = SkinResources.getInstance().getDrawable(skinPair.resId);
                        break;
                    case "drawableRight":
                        right = SkinResources.getInstance().getDrawable(skinPair.resId);
                        break;
                    case "drawableBottom":
                        bottom = SkinResources.getInstance().getDrawable(skinPair.resId);
                        break;
                    case "skinTypeface" :
                        applyTypeface(SkinResources.getInstance().getTypeface(skinPair.resId));
                        break;
                    default:
                        break;
                }
                if (null != left || null != right || null != top || null != bottom) {
                    ((TextView) view).setCompoundDrawablesWithIntrinsicBounds(left, top, right,
                            bottom);
                }
            }
        }
这里能看到换肤的实现方式就是根据原始资源Id来获取皮肤包的资源Id,从而加载资源。因此我们要保证app和皮肤包的资源名称一致
    public Drawable getDrawable(int resId) {
        //如果有皮肤  isDefaultSkin false 没有就是true
        if (isDefaultSkin) {
            return mAppResources.getDrawable(resId);
        }
        int skinId = getIdentifier(resId);//查找对应的资源id
        if (skinId == 0) {
            return mAppResources.getDrawable(resId);
        }
        return mSkinResources.getDrawable(skinId);
    }

    //获取皮肤包中对应资源的id
    public int getIdentifier(int resId) {
        if (isDefaultSkin) {
            return resId;
        }
        //在皮肤包中的资源id不一定就是 当前程序的 id
        //获取对应id 在当前的名称 例如colorPrimary
        String resName = mAppResources.getResourceEntryName(resId);//ic_launcher   /colorPrimaryDark
        String resType = mAppResources.getResourceTypeName(resId);//drawable
        int skinId = mSkinResources.getIdentifier(resName, resType, mSkinPkgName);//使用皮肤包的Resource
        return skinId;
    }
4.皮肤包的生成
其实很简单,就是我们重新建立一个项目(这个项目里面的资源名字和需要换肤的项目的资源名字是对应的就可以),记住我们是通过名字去获取资源,不是id
- 新建工程project
- 将换肤的资源文件添加到res文件下,无java文件
- 直接运行build.gradle,生成apk文件(注意,运行时Run/Redebug configurations 中Launch Options选择launch nothing),否则build 会报 no default Activty的错误。
- 将apk文件重命名,如black.apk重命名为black.skin防止用户点击安装
好了,今天的文章就到这里,感谢阅读,喜欢的话不要忘了三连。大家的支持和认可,是我分享的最大动力。
Android高级开发系统进阶笔记、最新面试复习笔记PDF,我的GitHub
以上是关于今日头条Android岗面试题:说说Android动态换肤实现原理的主要内容,如果未能解决你的问题,请参考以下文章