《Boosting Monocular Depth Estimation Models to High-Resolution ...》论文笔记
Posted m_buddy
tags:
篇首语:本文由小常识网(cha138.com)小编为大家整理,主要介绍了《Boosting Monocular Depth Estimation Models to High-Resolution ...》论文笔记相关的知识,希望对你有一定的参考价值。
参考代码:BoostingMonocularDepth
论文:Boosting Monocular Depth Estimation Models to High-Resolution via Content-Adaptive Multi-Resolution Merging
1. 概述
导读:这篇文章提出了一种使用现有深度估计模型(MiDas)生成具有更高分辨率/更多细节表现深度图的方法(同时保持高分辨率和深度一致性是现存的挑战)。文章探究了输入的图像分辨率/图像中的结构信息是如何影响最后的深度估计的,也就是输入图像分辨率对模型带来的影响,以及通过图像中的结构信息进行细粒度深度细节优化。文章通过选择合适的策略在保持场景预测连续性和高频信息表达能力上取折中,生成了具有更多细节表现能力的深度估计方法。文章的策略主要归纳为两点:
1)探究分辨率和模型生成深度图的关系,提出一种高低分辨率结果融合机制,提升深度估计的细节表达;
2)在一些细节上使用patch采样的方式对细节信息进行补全,进一步提升细节上的表达,同时也提出一种path和原图的融合策略,用以消除融合问题(path和原图预测出来的深度不一致)。
1.1 对于深度估计模型的观察
输入分辨率与深度估计结果:
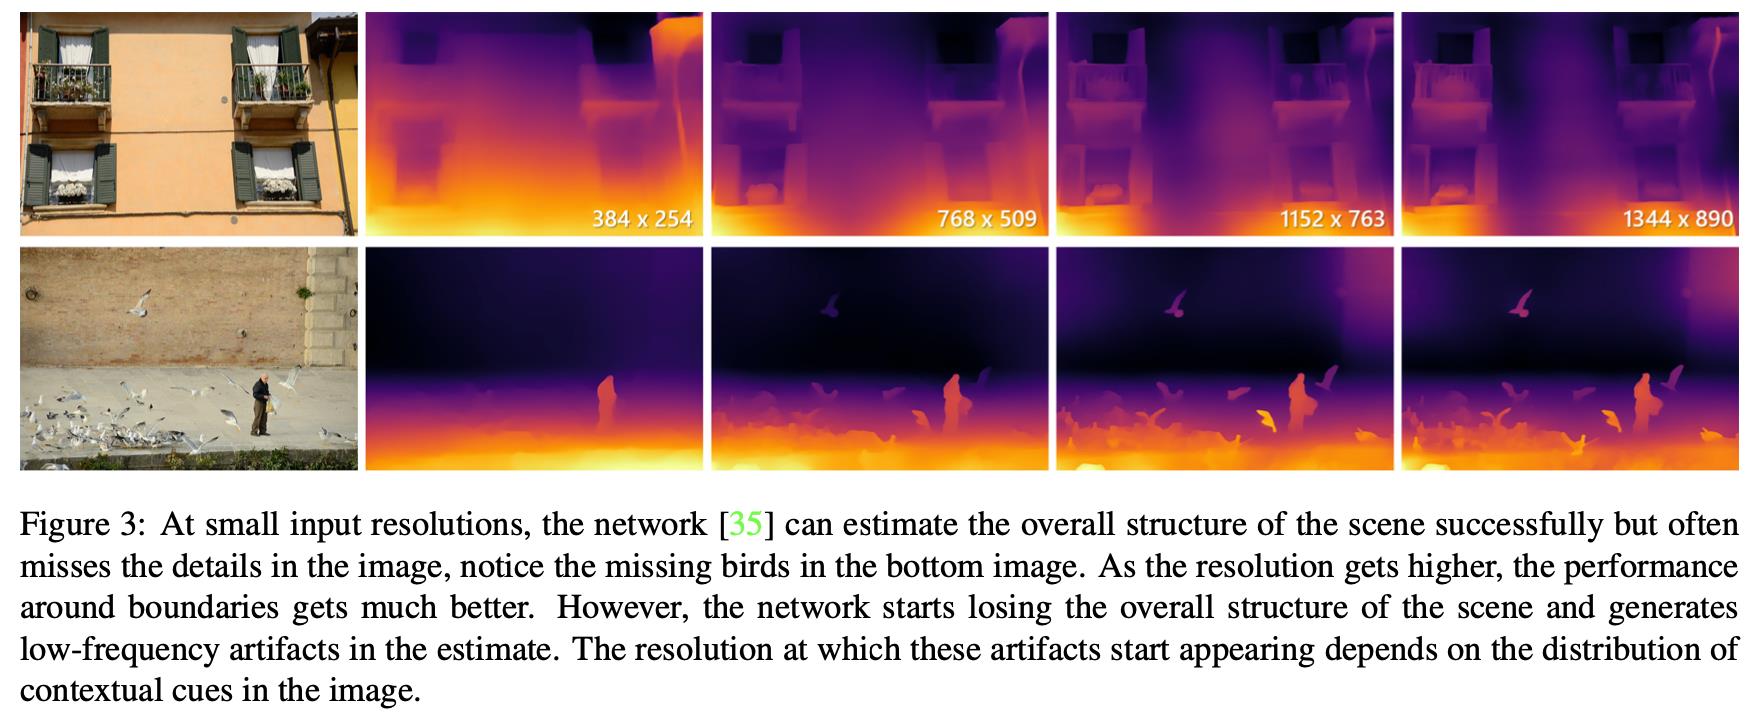
在低分辨率(也就是训练使用的分辨率)下,生成的深度预测结果具有较好的深度一致性,但是当把分辨率加大的时候,在出现更多深度细节的同时,深度的一致性预测也被破坏。可以参见下图所示:
细节分布与深度估计结果:
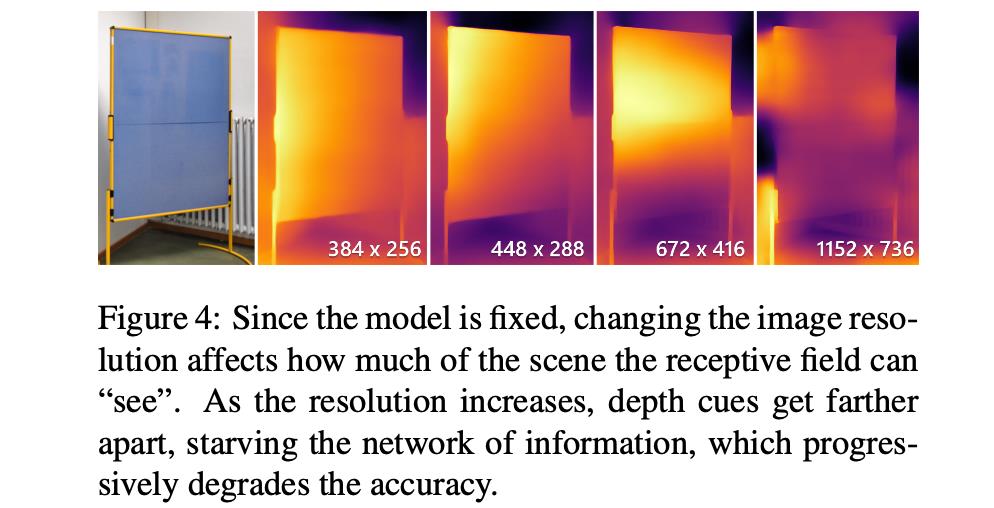
在大尺寸的深度图预测中,出于CNN网络感受野的原因,在深度细节比CNN网络的感受野相差较远的时候那么就会出现深度预测的不一致性,也就是图像中不同区域的适宜分辨率是各异的。对此文章中通过图像进行采样的方式,为每个采样选择合适的输入分辨率,从而得到更好的深度预测结果。
对与上面的两点文章对其进行分析,将出现这些问题的原因归纳为如下的两点:
- 1)CNN网络感受野,由于CNN网络自身的设计的原因,需要感知的信息与感受野相差很大的时候会存在感知信息不全的问题,从而出现预测的不一致性,下图就是很好的例子:
- 2)CNN网络固有的表达能力上线,越深越宽的网络其能编码的信息越强,但是这个值也是有一定的范围的。对此文章做了一个实验首先输入
192
∗
192
192*192
192∗192分辨率的图像,得到一个深度预测结果。之后,将这个图像上采样到
500
∗
500
500*500
500∗500(看作是感受野一致),得到一个深度预测结果,见下图所示:
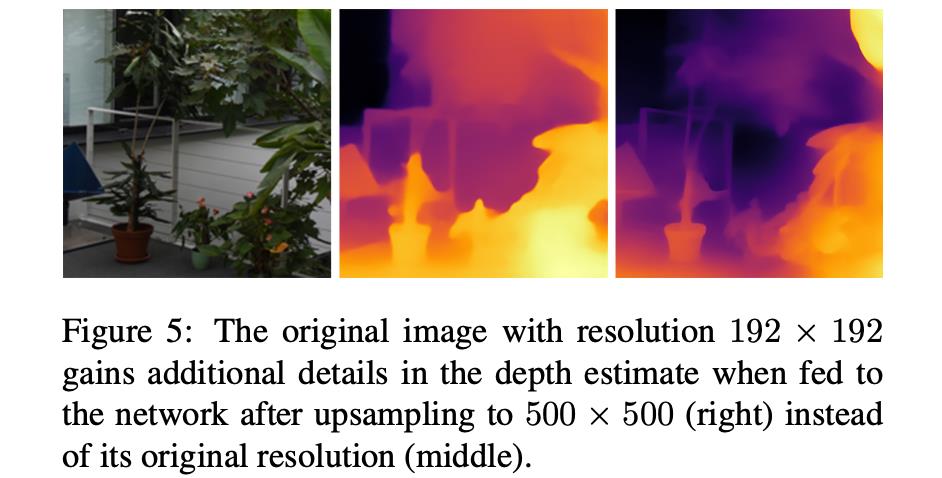
在上面可以看到在一些细节上有所好转,这表明该参与实验的网络是存在一定的表达能力上限的,缺少对更多细节的表达能力。
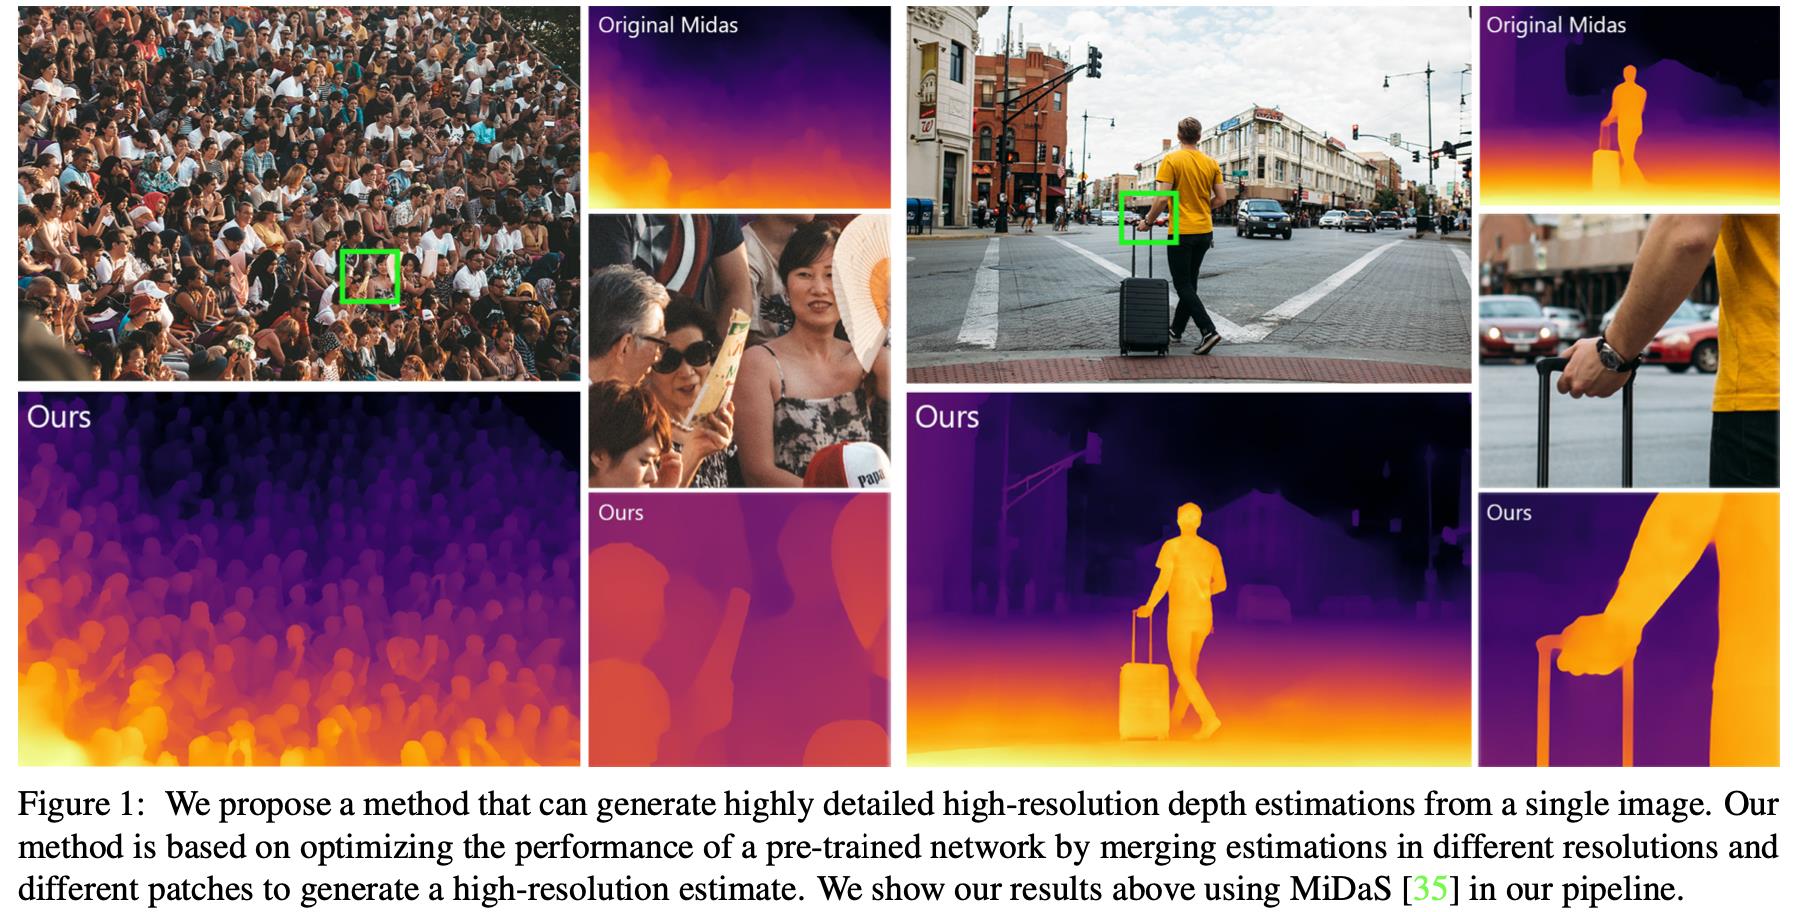
对此,文章通过上述中提到的不同分辨率深度结果融合/patch选择优化之后融合,从而得到高分辨率且细节表现丰富的深度预测结果。其效果可以参考下图所示:
2. 方法设计
2.1 整体pipline

文章整体的pipeline流程可以划分为如下的几个步骤:
- 1)使用两种分辨率的图像作为输入得到上图(b)中上面的两个结果,之后通过pixel2pixel的方法进行融合得到(b)图下面的结果;
- 2)之后按照设定的梯度规则选择不同的采样patch,之后对这些path进行预测,也就是上推(c)的过程;
- 3)之后再将(b)和(c)的结果融合起来得到最后高分辨率的深度预测结果;
2.2 Double Estimation策略
这里首先是输入两个不同分辨率的图像作为输入(也就是训练分辨率和最大无一致性问题的输入分辨率)得到两个深度预测。那么对于这个最大无问题的分辨率(也就是文章中提到的 R 20 R_{20} R20)是怎么确定的呢?文章是通过原模型感受野作为边界,按照一定的规则进行选择的,其过程参考:
# utils.py:70
def calculateprocessingres(img, basesize, confidence=0.1, scale_threshold=3, whole_size_threshold=3000):
    # Returns the R_x resolution described in section 5 of the main paper.

    # Parameters:
    #    img :input rgb image
    #    basesize : size the dilation kernel which is equal to receptive field of the network.
    #    confidence: value of x in R_x; allowed percentage of pixels that are not getting any contextual cue.
    #    scale_threshold: maximum allowed upscaling on the input image ; it has been set to 3.
    #    whole_size_threshold: maximum allowed resolution. (R_max from section 6 of the main paper)

    # Returns:
    #    outputsize_scale*speed_scale :The computed R_x resolution
    #    patch_scale: K parameter from section 6 of the paper

    # speed scale parameter is to process every image in a smaller size to accelerate the R_x resolution search
    speed_scale = 32  # 加快R_x的计算
    image_dim = int(min(img.shape[0:2]))

    gray = rgb2gray(img)  # 计算梯度
    grad = np.abs(cv2.Sobel(gray, cv2.CV_64F, 0, 1, ksize=3)) + np.abs(cv2.Sobel(gray, cv2.CV_64F, 1, 0, ksize=3))
    grad = cv2.resize(grad, (image_dim, image_dim), cv2.INTER_AREA)

    # thresholding the gradient map to generate the edge-map as a proxy of the contextual cues
    m = grad.min()
    M = grad.max()
    middle = m + (0.4 * (M - m))
    grad[grad < middle] = 0
    grad[grad >= middle] = 1

    # dilation kernel with size of the receptive field
    kernel = np.ones((int(basesize/speed_scale), int(basesize/speed_scale)), np.float)
    # dilation kernel with size of the a quarter of receptive field used to compute k
    # as described in section 6 of main paper
    kernel2 = np.ones((int(basesize / (4*speed_scale)), int(basesize / (4*speed_scale))), np.float)

    # Output resolution limit set by the whole_size_threshold and scale_threshold.
    threshold = min(whole_size_threshold, scale_threshold * max(img.shape[:2]))

    outputsize_scale = basesize / speed_scale
    for p_size in range(int(basesize/speed_scale), int(threshold/speed_scale), int(basesize / (2*speed_scale))):
        grad_resized = resizewithpool(grad, p_size)
        grad_resized = cv2.resize(grad_resized, (p_size, p_size), cv2.INTER_NEAREST)
        grad_resized[grad_resized >= 0.5] = 1
        grad_resized[grad_resized < 0.5] = 0

        dilated = cv2.dilate(grad_resized, kernel, iterations=1)  # 按照感受野进行膨胀
        meanvalue = (1-dilated).mean()  # 随着尺寸的变大,计算不在感受野中像素占据的比例
        if meanvalue > confidence:  # 图像中存在太多的不在感受野中的像素
            break
        else:
            outputsize_scale = p_size

    grad_region = cv2.dilate(grad_resized, kernel2, iterations=1)
    patch_scale = (1-grad_region).mean()  # 后面patch确定用到的scale

    return int(outputsize_scale*speed_scale), patch_scale
从上面的过程中确定下来最大的分辨率(也就是文章中提到的 R 20 R_{20} R20),之后就是对这两个分辨率的图像进行深度估计并融合,参考:
# run.py:342
# Generate a double-input depth estimation
def doubleestimate(img, size1, size2, pix2pixsize, net_type):
    # Generate the low resolution estimation
    estimate1 = singleestimate(img, size1, net_type)
    # Resize to the inference size of merge network.
    estimate1 = cv2.resize(estimate1, (pix2pixsize, pix2pixsize), interpolation=cv2.INTER_CUBIC)

    # Generate the high resolution estimation
    estimate2 = singleestimate(img, size2, net_type)
    # Resize to the inference size of merge network.
    estimate2 = cv2.resize(estimate2, (pix2pixsize, pix2pixsize), interpolation=cv2.INTER_CUBIC)

    # Inference on the merge model
    pix2pixmodel.set_input(estimate1, estimate2)
    pix2pixmodel.test()
    visuals = pix2pixmodel.get_current_visuals()
    prediction_mapped = visuals['fake_B']
    prediction_mapped = (prediction_mapped+1)/2
    prediction_mapped = (prediction_mapped - torch.min(prediction_mapped)) / (
                torch.max(prediction_mapped) - torch.min(prediction_mapped))
    prediction_mapped = prediction_mapped.squeeze().cpu().numpy()

    return prediction_mapped
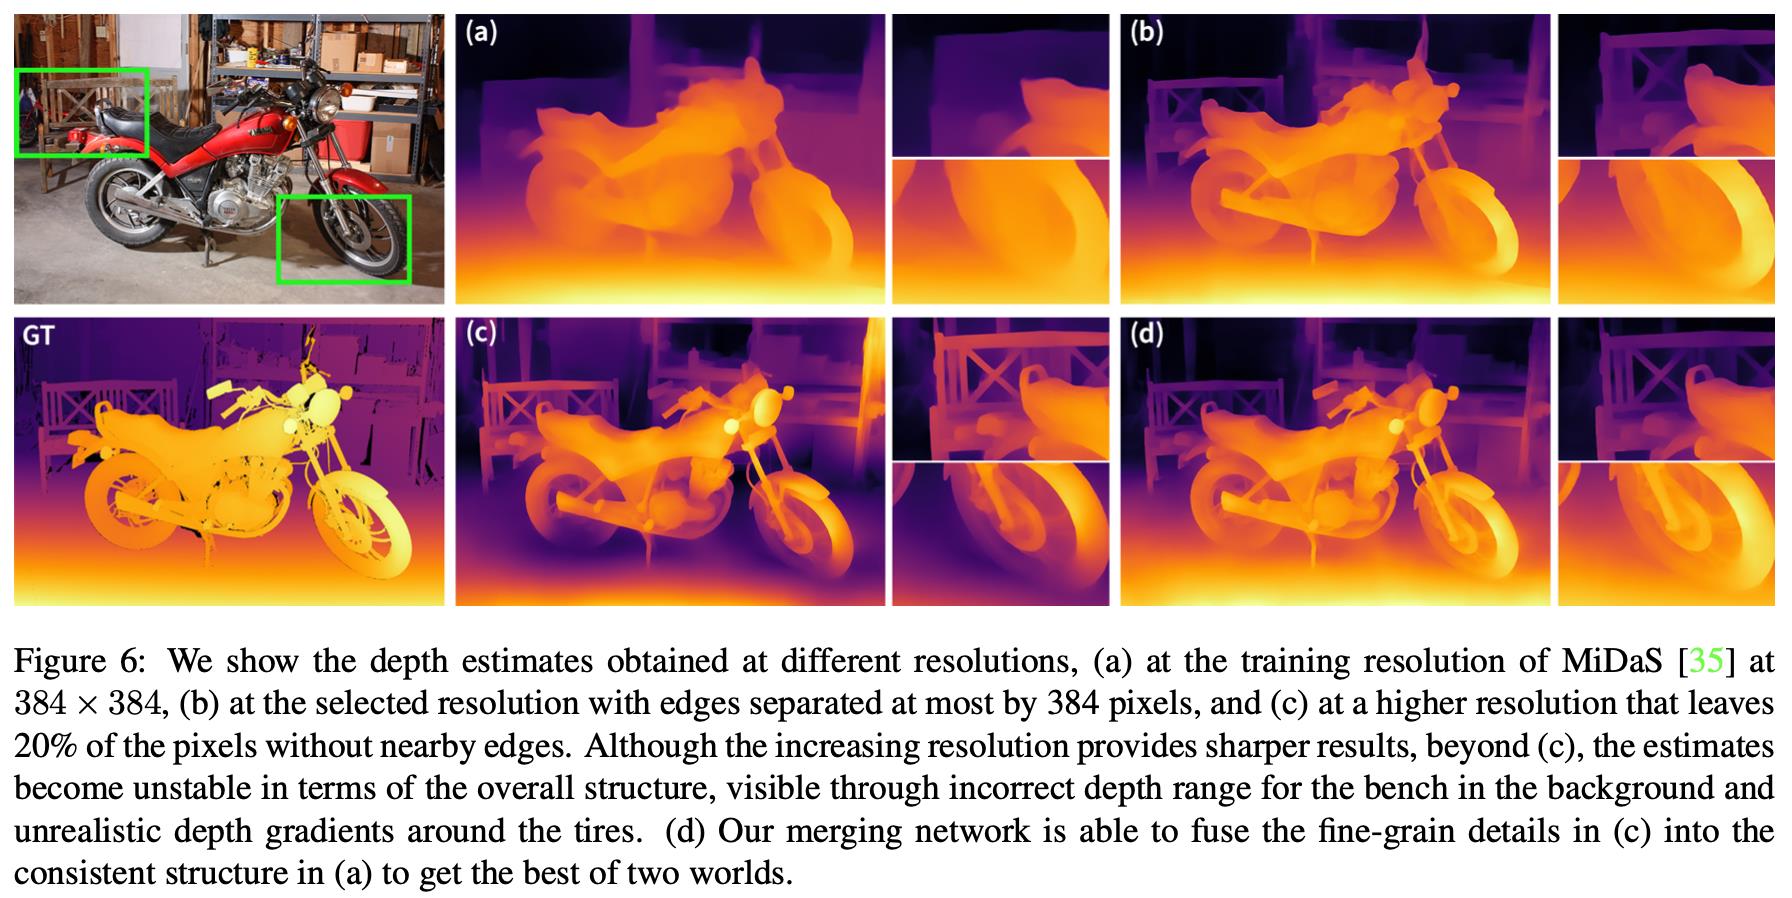
在上图中(a)是原分辨率预测的结果,(c)是按照文章最大分辨率预测得到的结果,(d)是融合的结果。
2.3 Patch Estimates策略
在完成上述的double estimates之后,文章还通过patch选择的方式进行细节优化,其中对于patch的选择与上述内容中 R 20 R_{20} R20的确定过程类似,只不过是多了一些patch排除策略。首先计算宽度上的梯度均值和梯度积分图:
# run.py:267
# We use the integral image to speed-up the evaluation of the amount of gradients for each patch.
gf = whole_grad.sum()/len(whole_grad.reshape(-1))
grad_integral_image = cv2.integral(whole_grad)
之后按照策略进行无效patch排除:
# run.py:303
# Compute the amount of gradients present in the patch from the integral image.
cgf = getGF_fromintegral(integral_grad, bbox)/(bbox[2]*bbox[3])

# Check if patching is beneficial by comparing the gradient density of the patch to
# the gradient density of the whole image
if cgf >= gf:
	# patch确定与校验
	....
在得到patch之后按照上述内容中的double estimates进行预测,得到深度结果,之后再与原来的深度预测结果进行融合。若不融合的话会出现下面的深度不统一的问题。
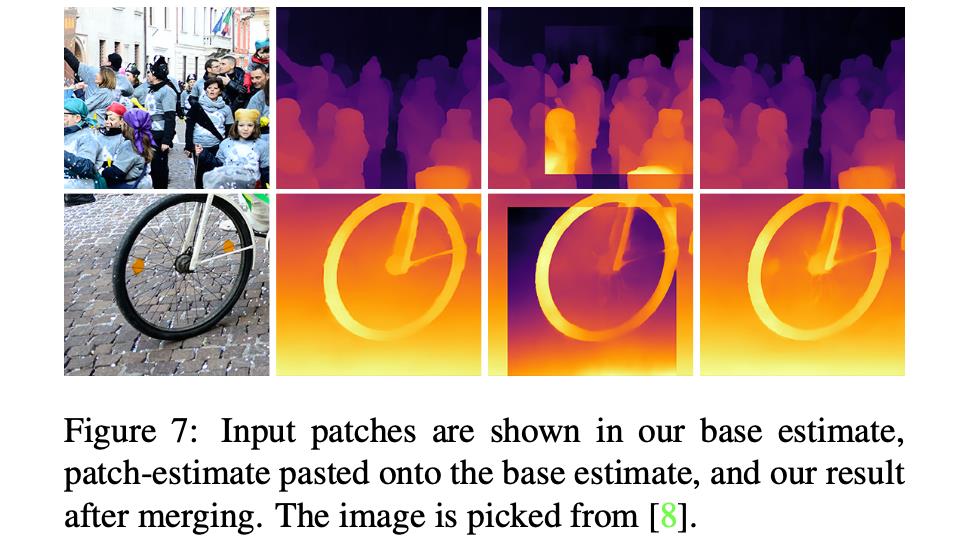
这里的话文章是采取的比较简单的线性融合策略(要理解下面的代码还需要往上再看几行):
# run.py:237
# Update the whole estimation:
# We use a simple Gaussian mask to blend the merged patch region with the base estimate to ensure seamless
# blending at the boundaries of the patch region.
tobemergedto[h1:h2, w1:w2] = np.multiply(tobemergedto[h1:h2, w1:w2], 1 - mask) + np.multiply(merged, mask)
3. 实验结果

以上是关于《Boosting Monocular Depth Estimation Models to High-Resolution ...》论文笔记的主要内容,如果未能解决你的问题,请参考以下文章