面试突击spring,看这一篇就够了,给你总结的清新脱俗!
Posted Javachichi
tags:
篇首语:本文由小常识网(cha138.com)小编为大家整理,主要介绍了面试突击spring,看这一篇就够了,给你总结的清新脱俗!相关的知识,希望对你有一定的参考价值。
Spring及IOC介绍
Spring简介
Rod Johnson,Spring Framework创始人,著名作者。很难想象Rod Johnson的学历,真的让好多人大吃一惊,他是悉尼大学的博士,然而他的专业不是计算机,而是音乐学。
Spring理念:使现有的技术更加容易使用,本身是一个大杂烩,整合了现有的技术框架!
SSH:Struct2 + Spring + Hibernate!
SSM:SpringMVC + Spring + Mybatis!
依赖导入:
 <dependency>
        <groupId>org.springframework</groupId>
        <artifactId>spring-webmvc</artifactId>
        <version>5.3.5</version>
    </dependency>
总结:Spring就是一个轻量级的控制反转(IOC)和面向切面编程(AOP)的框架
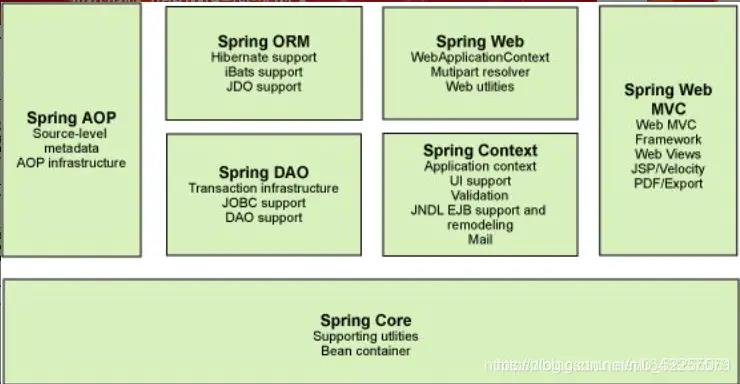
缺点:“配置繁琐,配置地狱” 所以SpringBoot就出来了
IOC:以前程序主动权在程序员手中,用户需求得通过程序员修改,IOC就是改变这种手段,将控制权交到用户手中:控制反转。大大解除了程序的耦合性,这样程序员就可以更加专注于业务层开发
IOC创建及重点配置
新建Maven项目,导入依赖,编写实体类
@Data
public class Student {
    private String name;
    private int id;
编写xml文件
<?xml version="1.0" encoding="UTF-8"?>
<beans xmlns="http://www.springframework.org/schema/beans"
       xmlns:xsi="http://www.w3.org/2001/XMLSchema-instance"
       xsi:schemaLocation="http://www.springframework.org/schema/beans
        https://www.springframework.org/schema/beans/spring-beans.xsd">
<!--    实体类映射-->
<!--    默认使用无参构造函数创建对象,-->
<!--    若要使用有参,需要用<constructor-arg-->
    <bean id="student" class="com.song.pojo.Student">
        <constructor-arg name="name" value="mike"/>
        <constructor-arg name="id" value="2"/>
        <property name="name" value="hehe"/>
    </bean>

<!--    <bean id="..." class="...">-->

</beans>
测试
public class myTest {
    @Test
    public void test(){
        ApplicationContext applicationContext = new ClassPathXmlApplicationContext("beans.xml");
        Student student = (Student) applicationContext.getBean("student");
        System.out.println(student.toString());
    }
}
思考:对象是如何创建的?
Spring自动创建对象,由Spring容器给对象属性赋值
这个过程就称为控制反转
控制:谁来控制对象的创建,传统应用程序的对象是由程序本身控制创建的,使用Spring后,对象是由Spring来创建的。
反转:程序本身不创建对象,变成被动的接受Spring容器创建的对象
容器通过set方法进行属性值的注入
对象由Spring来创建,管理,装配!
#Spring重点配置!
<!--
   id:bean的唯一标识符,也就是相当于我们学的对象名
   class:bean对象所对应的全限定名:包名+类名
   name:也是别名,而且name可以同时取多个别名
       -->
   <bean id="userT" class="com.kuang.pojo.UserT" name="user2 u2,u3;u4">
       <property name="name" value="吴亦凡"/>
   </bean>
   <import resource=baen.xml/>
依赖注入以及自动装Bean
当实体类出现复杂属性时如下:
@Data
public class Person {
    private String name;//名字
    private Cat cat;//宠物
    private String[] books;//书籍
    private List<String> hobbies;//爱好
    private Map<String,String> card;//卡
    private Set<String> games;//游戏
    private String wife;//妻子
    private Properties info;//配置信息
    private Dog dog;
}
#引用注入 cat
<!--        引用 ref-->
        <property name="cat" ref="cat"/>
        <bean id="cat" class="com.pojo.Cat"/>
数组 books
<!--        数组 arry-->
        <property name="books">
            <array>
                <value>java核心技术</value>
                <value>jvm入门</value>
                <value>数据库入门到入土</value>
                <value>西游记</value>
            </array>
        </property>
#list、set集合 hobbies games
<!--        list集合 List-->
        <property name="hobbies">
            <list>
                <value>唱</value>
                <value>跳</value>
                <value>rap</value>
            </list>
        </property>
set时换一下关键字即可
map集合 card
<!--        Map集合 map-->
        <property name="card">
            <map>
                <entry key="身份证" value="5206565656565"/>
                <entry key="银行卡" value="111111111111111"/>
            </map>
        </property>
null wife
<!--        null-->
        <property name="wife">
            <null/>
        </property>
properties info
<property name="info">
           <props>
               <prop key="url">https//www.baidu.com</prop>
               <prop key="driver">https//www.baidu.com</prop>
           </props>
       </property>
自动装配Bean
缘由:当一个实体类中有其他类的引用属性时我们通常在xml中采用ref的方式指向另一个Bean,这种方式很繁琐,如下:
 <bean id="student" class="com.song.Student">
        <property name="name" value="mike"/>
        <property name="sex" value="男"/>
        <property name="dog" ref="dog"/>
        <property name="cat" ref="cat"/>
    </bean>
    <bean id="dog" class="com.song.Dog"/>
    <bean id="cat" class="com.song.Cat"/>
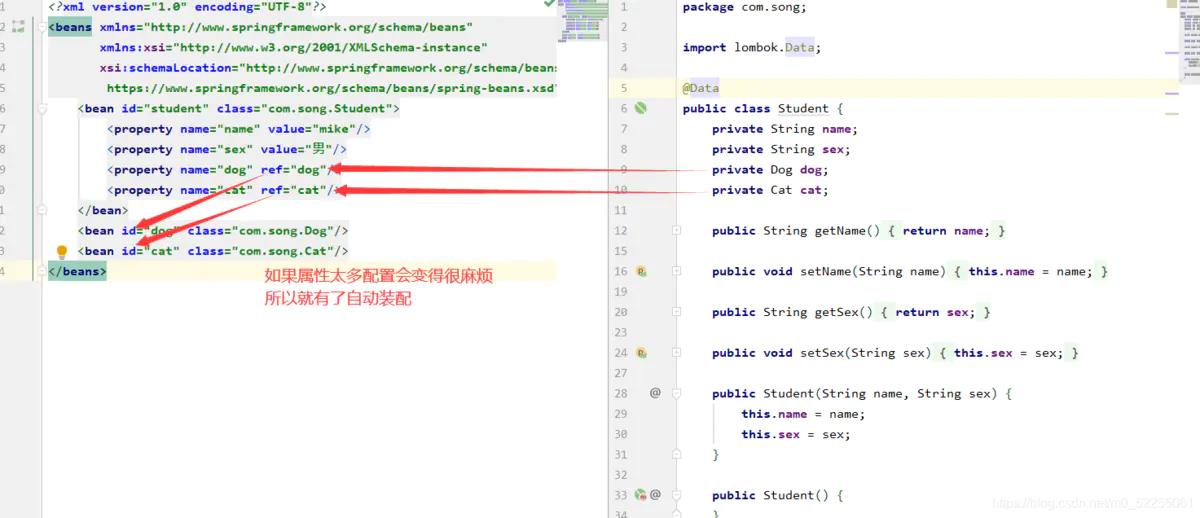
而自动装配有主要两种方式:xml中autowire自动装配和注解自动装配

xml
在bean标签中加入autowire标签即可
小结:
ByName的时候,需要保证所有bean的id唯一,并且这个bean需要和自动注入的属性的set方法的值一致!
ByType的时候,需要保证所有bean的class唯一,并且这个bean需要和自动注入的属性的类型一致!
使用注解实现自动装配
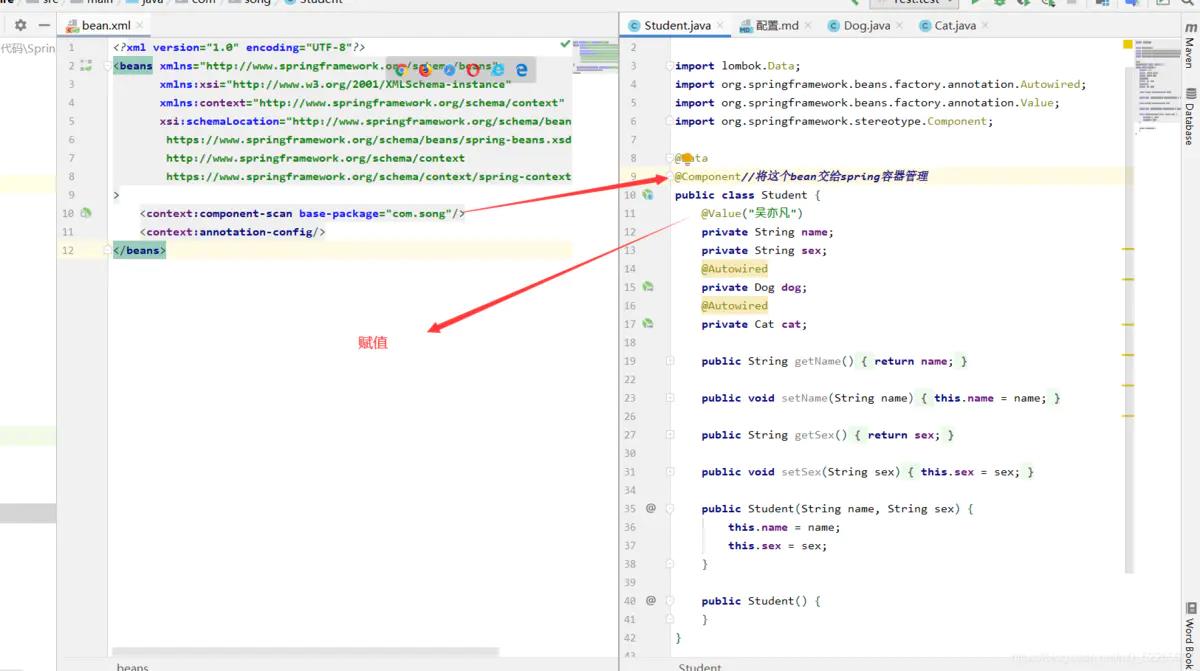
特别简单 导入注解约束——》配置注解的支持——》使用@Autowire注解
xml约束和注解支持:
<?xml version="1.0" encoding="UTF-8"?>
<beans xmlns="http://www.springframework.org/schema/beans"
       xmlns:xsi="http://www.w3.org/2001/XMLSchema-instance"
       xmlns:context="http://www.springframework.org/schema/context"
       xsi:schemaLocation="http://www.springframework.org/schema/beans
        https://www.springframework.org/schema/beans/spring-beans.xsd
        http://www.springframework.org/schema/context
        https://www.springframework.org/schema/context/spring-context.xsd"
>
使用注解
   @Value("吴亦凡")
    private String name;
    private String sex;
    @Autowired
    private Dog dog;
    @Autowired
    private Cat cat;
使用@Resource(java内置),用法和上面一样,
区别:@Autowired优先byType,@Resource优先byName然后byType
使用注解开发(improtant)
1、导入AOP包和约束
aop包在导入Springwebmvc时候就一起导入进来了
<?xml version="1.0" encoding="UTF-8"?>
<beans xmlns="http://www.springframework.org/schema/beans"
       xmlns:xsi="http://www.w3.org/2001/XMLSchema-instance"
       xmlns:context="http://www.springframework.org/schema/context"
       xsi:schemaLocation="http://www.springframework.org/schema/beans
        https://www.springframework.org/schema/beans/spring-beans.xsd
        http://www.springframework.org/schema/context
        https://www.springframework.org/schema/context/spring-context.xsd"
>
    //扫描包下的注解
    <context:component-scan base-package="com.song"/>
    <context:annotation-config/>
</beans>
AOP
Aop:Aspect Oriented Programming的缩写,意思是面向切面编程,动态的在程序运行期间找个切点将一段程序执行插入进去,实现了在不改动源程序的基础下增加功能;
优点:有了 AOP,我们可以定义交叉的关系,并将这些关系应用于跨模块的、彼此不同的对象模型。AOP 同时还可以让我们层次化功能性而不是嵌入功能性,从而使得代码有更好的可读性和易于维护。它会和面向对象编程合作得很好。
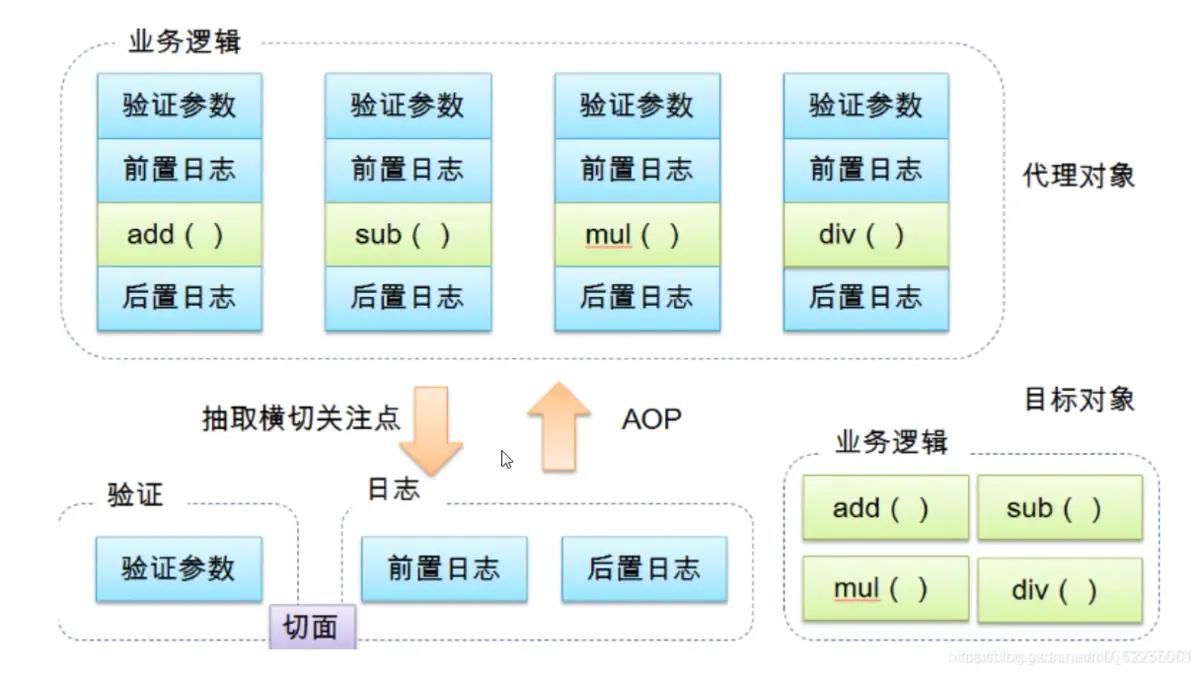
Spring中的Aop:
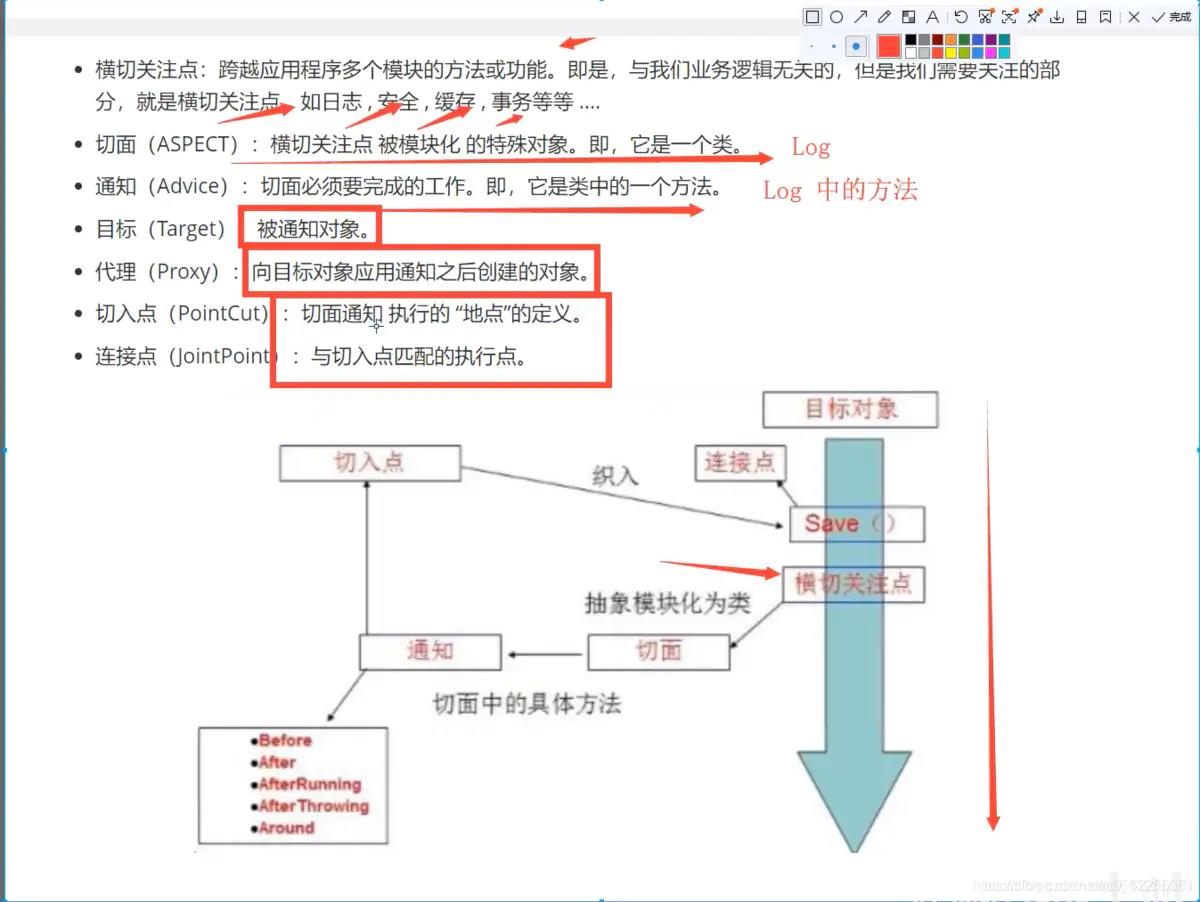
第一种方式:spring中Api接口实现AOP:
接口方法:
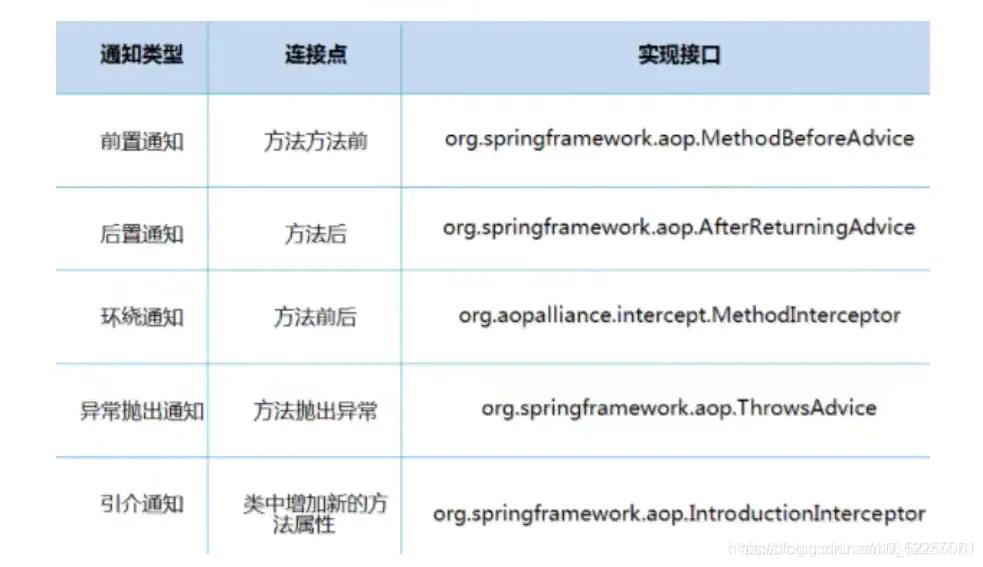
1、导入aspectjweaver依赖
    <dependency>
        <groupId>org.aspectj</groupId>
        <artifactId>aspectjweaver</artifactId>
        <version>1.9.6</version>
    </dependency>
2、编写接口和实现类
public interface BookDao {
    //增删查改
    public void addBook();
    public void deleteBook();
    public void selectBook();
    public void updateBook();
}
public class BookDaoImpl implements BookDao {
    public void addBook() {
        System.out.println("增加了一本书");
    }

    public void deleteBook() {
        System.out.println("删除了一本书");
    }

    public void selectBook() {
        System.out.println("查找了一本书");
    }

    public void updateBook() {
        System.out.println("更新了一本书");
    }
}
要向切口插入的功能
public class Log implements MethodBeforeAdvice {
    //method: 要执行的目标对象的方法
    //args:参数
    //target:目标对象
    public void before(Method method, Object[] objects, Object o) throws Throwable {
        System.out.println(o.getClass().getName()+"的"+method.getName()+"方法执行了");
    }
}
3、编写xml文件
<?xml version="1.0" encoding="UTF-8"?>
<beans xmlns="http://www.springframework.org/schema/beans"
       xmlns:xsi="http://www.w3.org/2001/XMLSchema-instance"
       xmlns:aop="http://www.springframework.org/schema/aop"
       xsi:schemaLocation="http://www.springframework.org/schema/beans
        https://www.springframework.org/schema/beans/spring-beans.xsd
        http://www.springframework.org/schema/aop
        https://www.springframework.org/schema/aop/spring-aop.xsd
">
    <bean id="bookDaoImpl" class="com.song.service.BookDaoImpl">

    </bean>
    <bean id="log" class="com.song.log.Log"/>
<!--    配置aop-->
    <aop:config>
<!--        切入点-->
        <aop:pointcut id="pointcut" expression="execution(* com.song.service.BookDaoImpl.*(..))"/>
<!--要切入的方法-->
        <aop:advisor advice-ref="log" pointcut-ref="pointcut"/>
    </aop:config>
</beans>
4、测试:
    public static void main(String[] args) {
           ApplicationContext context = new ClassPathXmlApplicationContext("bean.xml");
           //代理类代理的是一个接口而不是实现类
        BookDao bookDaoImpl = (BookDao) context.getBean("bookDaoImpl");
        bookDaoImpl.addBook();
    }
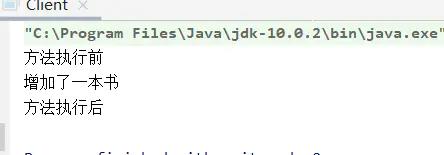
结果:

第二种方式:自定义切面类
1、自定义通知类
//自定义通知方法
public class Aspect {
    public void before(){
        System.out.println("方法执行前");
    }
    public void after(){
        System.out.println("方法执行后");
    }
}
2、xml
<aop:config>
    <aop:aspect ref="aspect">
        <aop:pointcut id="point" expression="execution(* com.song.service.BookDaoImpl.*(..))"/>
<!--        要实现的通知方法-->
        <aop:before method="before" pointcut-ref="point"/>
        <aop:after method="after" pointcut-ref="point"/>
    </aop:aspect>
</aop:config>
3、测试
第三种方式:注解方式!
很简单;标志切面类–》标志通知–》配置xml开启注解支持
@Aspect
public class AspectAnoation {
    @Before("execution(* com.song.service.BookDaoImpl.*(..))")
    public void before(){
        System.out.println("方法执行前");
    }
    @After("execution(* com.song.service.BookDaoImpl.*(..))")
    public void after(){
        System.out.println("方法执行后");
    }
}
    <bean id="AspectAnoation" class="com.song.diy.AspectAnoation"/>
<!--    开起注解支持-->
    <aop:aspectj-autoproxy/>
整合Mybatis
mybatis简单复习
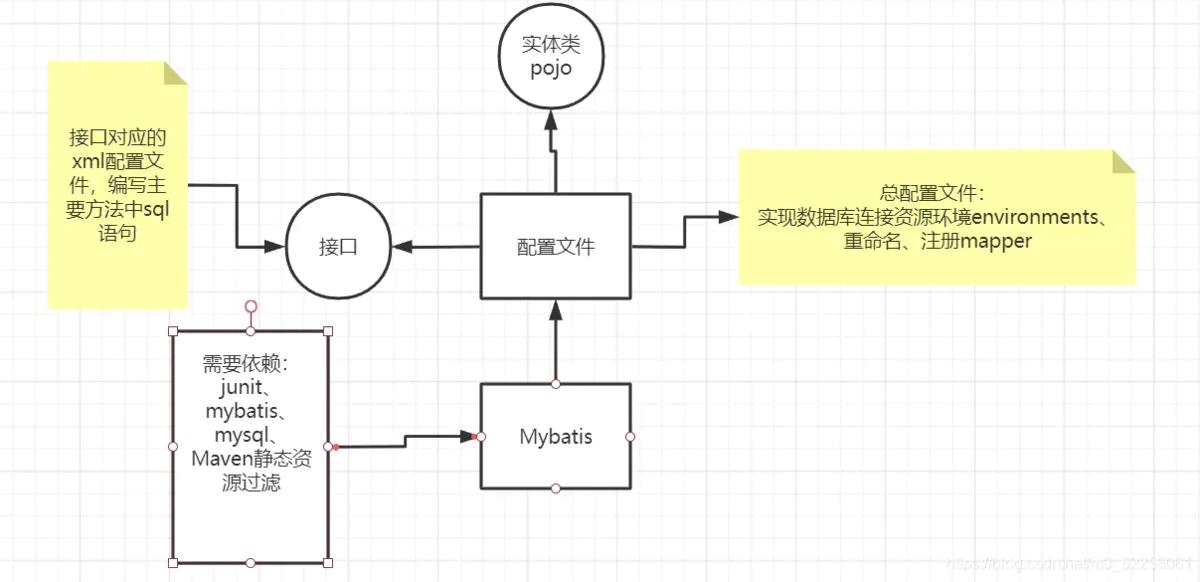
总配置文件——>编写实体类——>编写接口——>编写接口对应xml文件——>测试
1、导入所有依赖:
junit
mybatis
mysql数据库
spring相关
aop织入器
mybatis-spring整合包【重点】在此还导入了lombok包。
配置Maven静态资源过滤问题!
<?xml version="1.0" encoding="UTF-8"?>
<project xmlns="http://maven.apache.org/POM/4.0.0"
         xmlns:xsi="http://www.w3.org/2001/XMLSchema-instance"
         xsi:schemaLocation="http://maven.apache.org/POM/4.0.0 http://maven.apache.org/xsd/maven-4.0.0.xsd">
    <dependencies>
        <!-- https://mvnrepository.com/artifact/org.mybatis/mybatis -->
        <dependency>
            <groupId>org.mybatis</groupId>
            <artifactId>mybatis</artifactId>
            <version>3.5.6</version>
        </dependency>
        <dependency>
            <groupId>mysql</groupId>
            <artifactId>mysql-connector-java</artifactId>
            <version>8.0.24</version>
        </dependency>
        <!-- https://mvnrepository.com/artifact/org.springframework/spring-jdbc -->
        <dependency>
            <groupId>org.springframework</groupId>
            <artifactId>spring-jdbc</artifactId>
            <version>5.3.5</version>
        </dependency>
        <!-- https://mvnrepository.com/artifact/org.aspectj/aspectjweaver -->
        <dependency>
            <groupId>org.aspectj</groupId>
            <artifactId>aspectjweaver</artifactId>
            <version>1.9.6</version>
        </dependency>
        <!-- https://mvnrepository.com/artifact/org.mybatis/mybatis-spring -->
        <dependency>
            <groupId>org.mybatis</groupId>
            <artifactId>mybatis-spring</artifactId>
            <version>2.0.6</version>
        </dependency>


    </dependencies>
    <build>
        <resources>
        <resource>
            <directory>src/main/java</directory>
            <includes>
                <include>**/*.properties</include>
                <include>**/*.xml</include>
            </includes>
            <filtering>true</filtering>
        </resource>
        </resources>
    </build>
</project>
2、实体类
@Data
public class User {
    private int userId;
    private String userName;
    private String password;
    private String sex;
    private String email;
}
3、接口及对应的配置文件
public interface UserMapper {
    List<User> getUser();
}


<?xml version="1.0" encoding="UTF-8" ?>
<!DOCTYPE mapper
        PUBLIC "-//mybatis.org//DTD Mapper 3.0//EN"
        "http://mybatis.org/dtd/mybatis-3-mapper.dtd">
<mapper namespace="com.song.mapper.UserMapper">
    <select id="getUser" resultType="com.song.pojo.User">
    select * from users
  </select>
</mapper>
4、mybatisconfig配置文件
<?xml version="1.0" encoding="UTF-8" ?>
<!DOCTYPE configuration
PUBLIC "-//mybatis.org//DTD Config 3.0//EN"
"http://mybatis.org/dtd/mybatis-3-config.dtd">
<configuration>
<settings>
<setting name="logImpl" value="STDOUT_LOGGING"/>
</settings>
<environments default="development">
<environment id="development">
<transactionManager type="JDBC"/>
<dataSource type="POOLED">
超详细的Spring框架总结,学spring,看这一篇就够了!
一起刷完了这份1307页的Java面试宝典吧,看这一篇就够了