教你使用TensorFlow2判断细胞图像是否感染
Posted 刘润森!
tags:
篇首语:本文由小常识网(cha138.com)小编为大家整理,主要介绍了教你使用TensorFlow2判断细胞图像是否感染相关的知识,希望对你有一定的参考价值。
@Author:Runsen
在本教程中,我们将使用 TensorFlow (Keras API) 实现一个用于二进制分类任务的深度学习模型,该任务包括将细胞的图像标记为感染或未感染疟疾。
数据集来源:https://www.kaggle.com/iarunava/cell-images-for-detecting-malaria
数据集包含2个文件夹
- 感染::13780张图片
- 未感染: 13780张图片
总共27558张图片。
此数据集取自NIH官方网站:https://ceb.nlm.nih.gov/repositories/malaria-datasets/
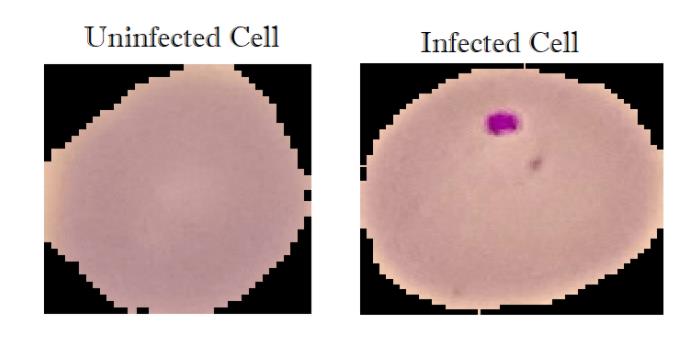
对于图片数据存在形状不一样的情况,因此需要使用 OpenCV 进行图像预处理。
将图片变成 numpy 数组(数字格式)的形式转换为灰度,并将其调整为一个(70x70)形状。
环境:kaggle,天池实验室或者gogole colab都可以。
导入相关模块
import cv2
import tensorflow as tf
from tensorflow.keras.models import Sequential
from tensorflow.keras.layers import Dense, Conv2D, MaxPool2D, Flatten, Activation
from sklearn.model_selection import train_test_split
import numpy as np
import matplotlib.pyplot as plt
import glob
import os
img_dir="../input/cell-images-for-detecting-malaria/cell_images"
img_size=70
def load_img_data(path):
    # 打乱数据
    image_files = glob.glob(os.path.join(path, "Parasitized/*.png")) + \\
                  glob.glob(os.path.join(path, "Uninfected/*.png"))
    X, y = [], []
    for image_file in image_files:
        # 命名标签  0 for uninfected and 1 for infected
        label = 0 if "Uninfected" in image_file else 1
        # load the image in gray scale 变成灰度图片
        img_arr = cv2.imread(image_file, cv2.IMREAD_GRAYSCALE)
        # resize the image to (70x70)  调整图片大小
        img_resized = cv2.resize(img_arr, (img_size, img_size))
        X.append(img_resized)
        y.append(label)
    return X, y
X, y = load_img_data(img_dir)
查看X的shape。
print(X.shape)
X的shape为(27558, 70, 70, 1),27558表示图片的数据,70*70表示图片的长和宽像素。
另外,为了帮助网络更快收敛,我们应该进行数据归一化。在sklearn 中有一些缩放方法,例如:
- StandardScaler: x n o r m = ( X − 平 均 值 ) / S T D x_norm =(X -平均值)/ STD xnorm=(X−平均值)/STD (其中 std 是 标准偏差)
- MinMaxScaler: x n o r m = ( x − x m i n ) / ( x m a x − x m i n ) x_norm = (x - x_{min}) / (x_{max} - x_{min}) xnorm=(x−xmin)/(xmax−xmin)这导致 x_norm 介于0 和 1之间
在这里我们将除以255,因为像素可以达到的最大值是255,这将导致应用缩放后像素范围在 0 和 1 之间。
X, y = load_img_data(img_dir)
# reshape to (n_samples, 70, 70, 1) (to fit the NN)
X = np.array(X).reshape(-1, img_size, img_size, 1)
#从[0,255]到[0,1]缩放像素 帮助神经网络更快地训练
X = X / 255

# shuffle & split the dataset
X_train, X_test, y_train, y_test = train_test_split(X, y, test_size=0.1, stratify=y)
print("Total training samples:", X_train.shape)
print("Total validation samples:", X_test.shape[0])
使用sklearn的train_test_split()方法将数据集划分为训练集和测试集,我们使用总数据的 10% 稍后对其进行验证。
在建立的模型中,我们将添加 3 个卷积层,然后Flatten是由层组成的全连接Dense层。

model = Sequential()
model.add(Conv2D(64, (3, 3), input_shape=X_train.shape[1:]))
model.add(Activation("relu"))
model.add(MaxPool2D(pool_size=(2, 2)))

model.add(Conv2D(64, (3, 3)))
model.add(Activation("relu"))
model.add(MaxPool2D(pool_size=(2, 2)))

model.add(Conv2D(64, (3, 3)))
model.add(Activation("relu"))
model.add(MaxPool2D(pool_size=(2, 2)))

model.add(Flatten())

model.add(Dense(64))
model.add(Activation("relu"))

model.add(Dense(64))
model.add(Activation("relu"))

model.add(Dense(1))
model.add(Activation("sigmoid"))

model.compile(loss="binary_crossentropy", optimizer="adam", metrics=["accuracy"])
print(model.summary())
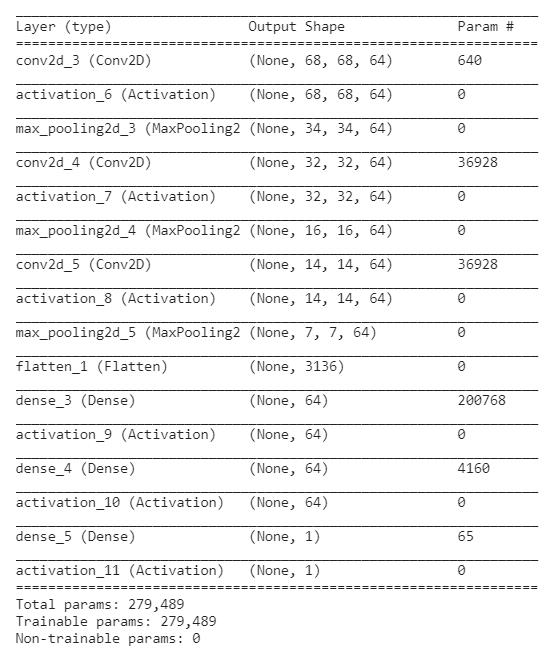
由于输出是二进制的(感染或未感染),我们使用Sigmoid 函数作为输出层的激活函数。
# train the model with 10 epochs, 64 batch size
model.fit(X_train, np.array(y_train), batch_size=64, epochs=10, validation_split=0.2)

在训练数据集及其验证拆分上实现了94%的准确率。
现在使用evaluate() 来评估测试数据集上的模型
loss, accuracy = model.evaluate(X_test, np.array(y_test), verbose=0)
print(f"Testing on {len(X_test)} images, the results are\\n Accuracy: {accuracy} | Loss: {loss}")
输出如下
Testing on 2756 images, the results are
Accuracy: 0.9404934644699097 | Loss: 0.1666732281446457
该模型在测试数据中也表现OK,准确率达到94%
最后,我们将通过保存我们的模型来结束所有这个过程。
model.save("model.h5")
以上是关于教你使用TensorFlow2判断细胞图像是否感染的主要内容,如果未能解决你的问题,请参考以下文章