重读Spring系列-一些配置注解的使用与源码解析
Posted _微风轻起
tags:
篇首语:本文由小常识网(cha138.com)小编为大家整理,主要介绍了重读Spring系列-一些配置注解的使用与源码解析相关的知识,希望对你有一定的参考价值。
最开始的Spring系列我主要着重的是整个代码逻辑的实力,到现在有些都快一年了,或者也有几个月了,自己现在去看也有些看不下去了,毕竟代码逻辑有些复杂。并且自己以前也是刚开始了解Spring的源码,也是主要想了解Spring的代码到底是怎样的处理的。现在准备重新梳理下Spring我想了解的内容,这次我们不陷入代码的具体的实现,我们主要梳理Spring的一些结构、逻辑实现,同时也整理梳理过程中的一些Spring的组件用法。
我们这次主要是梳理下Spring中的一些引入直接:@Component、ComponentScans、ComponentScan、@Bean、@PropertySources、@PropertySource,以及与@Import以及配套的ImportSelector、ImportBeanDefinitionRegistrar。
一、使用&结构分析
1、@Component
1)、结构、子类关系
@Target(ElementType.TYPE)
@Retention(RetentionPolicy.RUNTIME)
@Documented
@Indexed
public @interface Component {

   String value() default "";

}
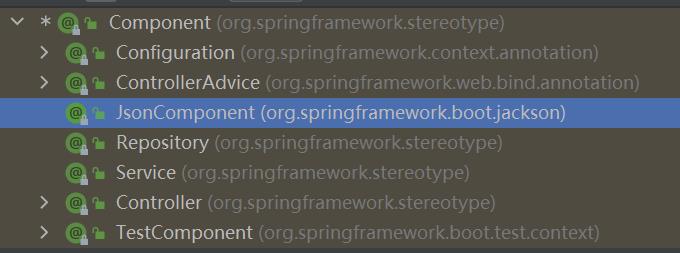
这个接口是用来引入组件的(各种类型的组件),其的属性value是用来指定这个组件的名称的。这个注解的功能也是注入一个Bean,类似于@Bean的功能,只是这个直接有更多的用法,并且我们一般并不自动使用这个注解,而是使用引用它的组件注解:Service、Configuration、Repository、Controller这些。我们可以看下有引用它的注解:

@Target({ElementType.TYPE})
@Retention(RetentionPolicy.RUNTIME)
@Documented
@Component
public @interface Service {

	@AliasFor(annotation = Component.class)
	String value() default "";

}
@Target({ElementType.TYPE})
@Retention(RetentionPolicy.RUNTIME)
@Documented
@Component
public @interface Controller {

   @AliasFor(annotation = Component.class)
   String value() default "";

}
而这些注解的用法我们都已经知道了,比较简单,我们就不再看其的用法了,所以我们使用的@Service、@Controller这些注解,Spring在底层扫描都是看有没有@Component。
2、@ComponentScan & @Import的使用
这两个都是用来扫描组件的,其中@Component是用来扫描指定包下面的组件,@Import是用来加载指定的类资源。
1)、结构
@Target(ElementType.TYPE)
@Retention(RetentionPolicy.RUNTIME)
@Documented
public @interface Import {

   Class<?>[] value();

}
这个是用来导入指定的类,可以为@Configuration、ImportSelector这样的配置加载组件,也可以为一般的组件例如注入简单的Bean对象。
@Retention(RetentionPolicy.RUNTIME)
@Target(ElementType.TYPE)
@Documented
@Repeatable(ComponentScans.class)
public @interface ComponentScan {

	@AliasFor("basePackages")
	String[] value() default {};
这个是用来注入扫描包的,但其实这个注解还可以有一些其他的参数,这个就先不研究了,一般是使用这个简单的用法。
然后@ComponentScans是用来指定多个@ComponentScan的我们就不再额外说明了:
@Retention(RetentionPolicy.RUNTIME)
@Target(ElementType.TYPE)
@Documented
public @interface ComponentScans {

   ComponentScan[] value();

}
2)、demo使用
这里我们使用官方的简单demo测试用例。
@Test
public void componentScanOverlapsWithImport() {
   AnnotationConfigApplicationContext ctx = new AnnotationConfigApplicationContext();
   ctx.register(Config1.class);
   ctx.register(Config2.class);
   ctx.refresh(); // no conflicts found trying to register SimpleComponent
   ctx.getBean(SimpleComponent.class); // succeeds -> there is only one bean of type SimpleComponent
}
@Test
public void componentScanViaImport() {
   AnnotationConfigApplicationContext ctx = new AnnotationConfigApplicationContext();
   ctx.register(Config3.class);
   ctx.refresh();
   ctx.getBean(SimpleComponent.class);
}
@ComponentScan("org.springframework.context.annotation.componentscan.simple")
static final class Config1 {
}


@Import(org.springframework.context.annotation.componentscan.simple.SimpleComponent.class)
static final class Config2 {
}


@Import(ImportedConfig.class)
static final class Config3 {
}

@ComponentScan("org.springframework.context.annotation.componentscan.simple")
@ComponentScan("org.springframework.context.annotation.componentscan.importing")
public static final class ImportedConfig {
}
package org.springframework.context.annotation.componentscan.simple;

import org.springframework.context.annotation.Bean;
import org.springframework.stereotype.Component;

@Component
public class SimpleComponent {

   @Bean
   public String exampleBean() {
      return "example";
   }

}
package org.springframework.context.annotation.componentscan.simple;

import org.springframework.stereotype.Component;

public class ClassWithNestedComponents {

   @Component
   public static class NestedComponent extends ClassWithNestedComponents {
   }

   @Component
   public static class OtherNestedComponent extends ClassWithNestedComponents {
   }

}
这个就是官方的简单测试用例,其中Config1是使用的@ComponentScan来扫描包的,Config2是使用的@Import扫描具体的Bean资源,然后Config3是通过@Import再去引入其他配置组件,这里是@ComponentScan。这上面3个都能加载到SimpleComponent类。
同时在componentScanOverlapsWithImport()方法中是有将SimpleComponent加载两次的,同时并没有什么一次,这说明Spring内部是有重复判断的。这里问题1,到时候源码的时候我能看其是怎样处理的。
3、@ImportResource
1)、结构
@Retention(RetentionPolicy.RUNTIME)
@Target(ElementType.TYPE)
@Documented
public @interface ImportResource {

   @AliasFor("locations")
   String[] value() default {};

   @AliasFor("value")
   String[] locations() default {};

   Class<? extends BeanDefinitionReader> reader() default BeanDefinitionReader.class;

}
这个就是用来加载资源的,当我们有些不想用注解,或者注解不能满足,还是想用配置文件的时候我们就可以使用这个注解来加载资源。这里的reader()是用来指定读取解析器的,就是使用指定的BeanDefinitionReader来读取这个加载的资源。
2)、demo1使用
@Configuration
@ImportResource("classpath:org/springframework/context/annotation/configuration/ImportXmlConfig-context.xml")
static class ImportXmlAutowiredConfig {
   @Autowired TestBean xmlDeclaredBean;

   public @Bean String xmlBeanName() {
      return xmlDeclaredBean.getName();
   }
}
@Test
public void importXmlWithAutowiredConfig() {
   AnnotationConfigApplicationContext ctx = new AnnotationConfigApplicationContext(ImportXmlAutowiredConfig.class);
   String name = ctx.getBean("xmlBeanName", String.class);
   assertThat(name, equalTo("xml.declared"));
   ctx.close();
}
<?xml version="1.0" encoding="UTF-8"?>
<beans xmlns="http://www.springframework.org/schema/beans"
   xmlns:xsi="http://www.w3.org/2001/XMLSchema-instance"
   xsi:schemaLocation="http://www.springframework.org/schema/beans https://www.springframework.org/schema/beans/spring-beans.xsd">

   <bean id="xmlDeclaredBean" class="org.springframework.tests.sample.beans.TestBean">
      <constructor-arg value="xml.declared"/>
   </bean>

   <bean class="org.springframework.beans.factory.config.PropertyPlaceholderConfigurer">
      <property name="properties">
         <map>
            <entry key="name" value="myName"/>
         </map>
      </property>
   </bean>

   <!-- should not cause infinite loop (SPR-11858) but rather simply be ignored -->
   <bean class="org.springframework.context.annotation.ConfigurationClassPostProcessor"/>

</beans>
通过这个demo我们了解,当我们不想使用@Configuration注解去加载内容的,时候就可以使用这个@ImportResource注解去加载xml配置。同时我们可以看到在ImportXmlAutowiredConfig类上面是有一个@Configuration注解的,但其实在这里这个注解更多的是一个象征其是配置类的意义,可以不加这个注解,Spring也可以扫描到这个@ImportResource。
3)、demo2使用
我们上面是使用@ImportSource来加载xml,但其实我们还可以其来加载properties文件。
@Configuration
@ImportResource(locations = "classpath:org/springframework/context/annotation/configuration/ImportNonXmlResourceConfig-context.properties", reader = PropertiesBeanDefinitionReader.class)
static class ImportNonXmlResourceConfig {
}
propertiesDeclaredBean.(class)=org.springframework.tests.sample.beans.TestBean
@Test
public void importNonXmlResource() {
   AnnotationConfigApplicationContext ctx = new AnnotationConfigApplicationContext(ImportNonXmlResourceConfig.class);
   assertTrue(ctx.containsBean("propertiesDeclaredBean"));
   ctx.close();
}
我们可以看这个demo其是用指定PropertiesBeanDefinitionReader来读取加载的资源。不过使用这个PropertiesBeanDefinitionReader我们可以看到其需要写一些特殊的标记,例如这里的.(class),我们再看这个类的内部定义
public static final String CLASS_KEY = "(class)";

public static final String PARENT_KEY = "(parent)";

public static final String SCOPE_KEY = "(scope)";

public static final String SINGLETON_KEY = "(singleton)";

public static final String ABSTRACT_KEY = "(abstract)";

public static final String LAZY_INIT_KEY = "(lazy-init)";
还可以指定这些去配置含义。不过这种方式一般应该很少用。
4、@PropertySource
1)、结构
@Target(ElementType.TYPE)
@Retention(RetentionPolicy.RUNTIME)
@Documented
@Repeatable(PropertySources.class)
public @interface PropertySource {

   String name() default "";

   String[] value();
同样@PropertySources也是用来加载多个@PropertySource的,我们也不重复讲@PropertySources了。
2)、demo使用
@Configuration
@PropertySource("classpath:org/springframework/context/annotation/p1.properties")
static class ConfigWithImplicitName {

   @Inject Environment env;

   @Bean
   public TestBean testBean() {
      return new TestBean(env.getProperty("testbean.name"));
   }
}
testbean.name=p1TestBean
from.p1=p1Value
base.package=org/springframework/context/annotation
spring.profiles.active=test
@Test
public void withImplicitName() {
   AnnotationConfigApplicationContext ctx = new AnnotationConfigApplicationContext();
   ctx.register(ConfigWithImplicitName.class);
   ctx.refresh();
   assertTrue("property source p1 was not added",
         ctx.getEnvironment().getPropertySources().contains("class path resource [org/springframework/context/annotation/p1.properties]"));
   assertThat(ctx.getBean(TestBean.class).getName(), equalTo("p1TestBean"));
}
public TestBean(String name) {
   this.name = name;
}
这个demo我们看withImplicitName()方法。这个就是将p1.properties中的内容加载到Environment环境变量中,然后这里还注入了一个Bean对象即TestBean,然后其初始化的时候将p1.properties中设置的testbean.name对应的值设置为其的name。
5、@Import以及配套的类
1)、结构
@Target(ElementType.TYPE)
@Retention(RetentionPolicy.RUNTIME)
@Documented
public @interface Import {

   /**
    * {@link Configuration}, {@link ImportSelector}, {@link ImportBeanDefinitionRegistrar}
    * or regular component classes to import.
    */
   Class<?>[] value();

}
通过这个注释我们了解到,其实用来犹如@Configuration,或配套的ImportSelector、ImportBeanDefinitionRegistrar的,又或者一般的组件。
public interface ImportSelector {

   String[] selectImports(AnnotationMetadata importingClassMetadata);

}
这个用来返回扫描筛选的类全路径名。
public interface ImportBeanDefinitionRegistrar {

   void registerBeanDefinitions(AnnotationMetadata importingClassMetadata, BeanDefinitionRegistry registry);

}
这个入参有BeanDefinitionRegistry,就表示其可以注入BeanDefinition。也就是我们可以通过importingClassMetadata从这个入参获取到我们需要的信息,然后动态筛选注册到BeanDefinitionRegistry中。
2)、demo1使用ImportSelector
@Test
public void testWithImporter() {
   ApplicationContext context = new AnnotationConfigApplicationContext(Wrapper.class);
   assertEquals("foo", context.getBean("value"));
}
@Configuration
@Import(Selector.class)
protected static class Wrapper {
}
protected static class Selector implements ImportSelector {
   @Override
   public String[] selectImports(AnnotationMetadata importingClassMetadata) {
      return new String[] {Config.class.getName()};
   }
}

@Configuration
protected static class Config {
   @Bean
   public FooFactoryBean foo() {
      return new FooFactoryBean();
   }
   @Bean
   public String value() throws Exception {
      String name = foo().getObject().getName();
      Assert.state(name != null, "Name cannot be null");
      return name;
   }
   @Bean
   @Conditional(NoBarCondition.class)
   public String bar() throws Exception {
      return "bar";
   }
}
这个demo 就是能通过扫描Config导入其中定义的Bean,然后借由Selector返回这个Config全路径,再由@Import导入到Spring容器中去解析。最后通过上面的方式我们就能获取到foo(FooFactoryBean foo())这个Bean实例了。
3)、demo2使用ImportBeanDefinitionRegistrar
@Test
public void importRegistrar() throws Exception {
   ImportedRegistrar.called = false;
   AnnotationConfigApplicationContext ctx = new AnnotationConfigApplicationContext();
   ctx.register(ImportingRegistrarConfig.class);
   ctx.refresh();
   assertNotNull(ctx.getBean("registrarImportedBean"));
   assertNotNull(ctx.getBean("otherImportedConfigBean"));
}
@Configuration
@EnableImportRegistrar
static class ImportingRegistrarConfig {
}
@Target(ElementType.TYPE)
@Retention(RetentionPolicy.RUNTIME)
@Import(ImportedRegistrar.class)
public @interface EnableImportRegistrar {
}


static class ImportedRegistrar implements ImportBeanDefinitionRegistrar {

   static boolean called;

   @Override
   public void registerBeanDefinitions(AnnotationMetadata importingClassMetadata, BeanDefinitionRegistry registry) {
      GenericBeanDefinition beanDefinition = new Gene以上是关于重读Spring系列-一些配置注解的使用与源码解析的主要内容,如果未能解决你的问题,请参考以下文章