快速学完OpenCV+python计算机视觉图像处理
Posted 满目星辰wwq
tags:
篇首语:本文由小常识网(cha138.com)小编为大家整理,主要介绍了快速学完OpenCV+python计算机视觉图像处理相关的知识,希望对你有一定的参考价值。
5 图像美化效果
5-1 美化效果章节介绍
图像特效分为以下几个,分别是:
- 案例1:直方图
- 案例2:直方图均衡化
- 案例3:亮度增强
- 案例4:磨皮美白
- 案例5:图片滤波
- 案例6:高斯滤波
5-2 彩色图片直方图
直方图用的是OpenCV里面的calcHist函数,其定义如下:
cv2.calcHist(images, channels, mask, histSize, ranges[, hist[, accumulate ]])
calcHist函数具体参数定义如下:
- imaes:输入的图像;
- channels:选择图像的通道
- mask:掩膜,是一个大小和image一样的np数组,其中把需要处理的部分指定为1,不需要处理的部分指定为0,一般设置为None,表示处理整幅图像
- histSize:使用多少个bin(柱子),一般为256
- ranges:像素值的范围,一般为[0,255]表示0~255
- [, hist[, accumulate ]]这两个参数基本不用管。
- 注:除了mask,其他四个参数都要带[]号。
代码如下:
# 彩色图片直方图
import cv2
import numpy as np


def ImageHist(image, channel):
    color = (0, 0, 0)  # 初始化一个color
    window_name = 'Gray'  # 初始化一个窗口名
    if channel == 0:  # 第一个通道为蓝色B
        color = (255, 0, 0)
        window_name = 'B Hist'
    elif channel == 1:  # 第二个通道为绿色G
        color = (0, 255, 0)
        window_name = 'G Hist'
    elif channel == 2:  # 第三个通道为红色R
        color = (0, 0, 255)
        window_name = 'R Hist'
    # hist是一个shape为(256,1)的数组,表示0-255每个像素值对应的像素个数,下标即为相应的像素值
    hist = cv2.calcHist([image], [0], None, [256], [0.0, 255.0])
    # 获取hist的最小最大值和最小最大值的索引
    min_value, max_value, min_index, max_index = cv2.minMaxLoc(hist)
    # 创建一个模板
    hist_img = np.zeros([256, 256, 3], np.uint8)
    for h in range(256):
        inten_normal = int(hist[h] * 256 / max_value)
        cv2.line(hist_img, (h, 256), (h, 256 - inten_normal), color)
    cv2.imshow(window_name, hist_img)
    return hist_img


img = cv2.imread('00.jpg', 1)
cv2.imshow('img', img)
channels = cv2.split(img)  # 使用split将彩色图像拆分成三个通道
for i in range(0, 3):
    ImageHist(channels[i], i)  # 调用ImageHist函数,第一个参数为B、G、R三原色图片,第二个参数为通道索引
cv2.waitKey(0)
运行结果如下:

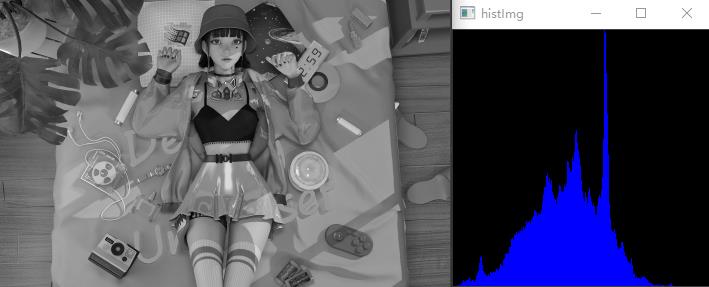
将代码稍微改一改,就可以显示灰度图像直方图啦,代码如下:
# 灰色图像直方图
import cv2
import numpy as np


def ImageHist(image):
    # hist是一个shape为(256,1)的数组,表示0-255每个像素值对应的像素个数,下标即为相应的像素值
    hist = cv2.calcHist([image], [0], None, [256], [0.0, 255.0])
    # 获取hist的最小最大值和最小最大值的索引
    min_value, max_value, min_index, max_index = cv2.minMaxLoc(hist)
    # 创建一个模板
    hist_img = np.zeros([256, 256, 3], np.uint8)
    for h in range(256):
        inten_normal = int(hist[h] * 256 / max_value)
        cv2.line(hist_img, (h, 256), (h, 256 - inten_normal), 255)
    cv2.imshow('histImg', hist_img)
    return hist_img


img = cv2.imread('01.jpg', 1)
gray = cv2.cvtColor(img, cv2.COLOR_BGR2GRAY)
cv2.imshow('gray', gray)
ImageHist(gray)
cv2.waitKey(0)
运行结果如下:

5-3 直方图均衡化
直方图均衡化要用到的函数是cv2.equalizeHist()。
- 灰度图像直方图均衡化可以直接使用
cv2.equalizeHist()。 - 彩色图像直方图均衡化需要将原图像进行拆分,使用
cv2.split函数可以将图像拆分,拆分之后对单通道直方图进行均衡化,最后需要将均衡化后的图像合并,使用的是cv2.merge函数。 - YUV图像直方图均衡化也需要拆分再合并才行。
具体代码如下:
import cv2

img = cv2.imread('02.jpg', 1)
# 灰色图像 直方图均衡化
gray = cv2.cvtColor(img, cv2.COLOR_BGR2GRAY)
cv2.imshow('gray', gray)  # 灰色图像
gray_dst = cv2.equalizeHist(gray)
cv2.imshow('gray_dst', gray_dst)  # 灰色图像均衡化

# 彩色图像 直方图均衡化
cv2.imshow('img', img)  # 彩色图像
(b, g, r) = cv2.split(img)  # 通道拆分
b_hist = cv2.equalizeHist(b)
g_hist = cv2.equalizeHist(g)
r_hist = cv2.equalizeHist(r)
img_dst = cv2.merge((b_hist, g_hist, r_hist))  # 通道合并
cv2.imshow('img_dst', img_dst)  # 彩色图像均衡化

# YUV图像 直方图均衡化
imgYUV = cv2.cvtColor(img, cv2.COLOR_BGR2YCrCb)
cv2.imshow('imgYUV', imgYUV)  # YUV图像
channelYUV = cv2.split(imgYUV)  # 通道拆分
channelYUV[0] = cv2.equalizeHist(channelYUV[0])
channels = cv2.merge(channelYUV)  # 通道合并
yuv_dst = cv2.cvtColor(channels, cv2.COLOR_YCrCb2BGR)
cv2.imshow('yuv_dst', yuv_dst)

cv2.waitKey(0)
运行结果如下:

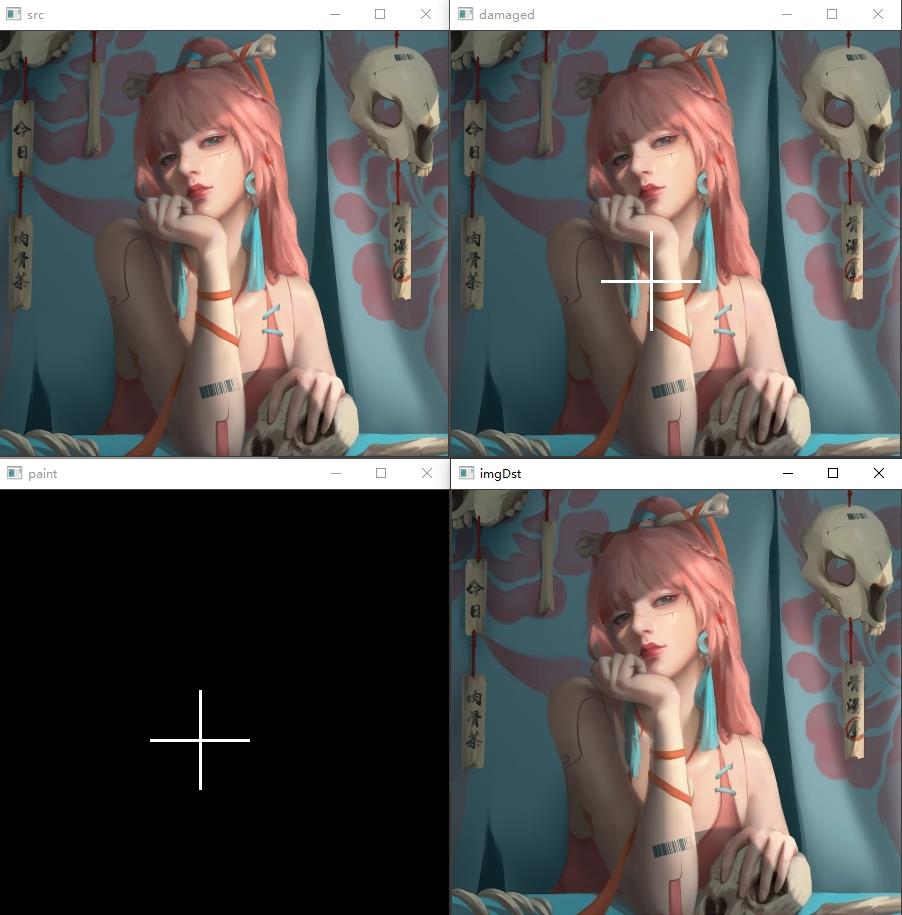
5-4 图片修补
运行代码如下:
import cv2
import numpy as np

img = cv2.imread('03.jpg', 1)
cv2.imshow('src', img)
print(img.shape)
for i in range(200, 300):
    img[i, 200] = (255, 255, 255)
    img[i, 200 + 1] = (255, 255, 255)
    img[i, 200 - 1] = (255, 255, 255)
for i in range(150, 250):
    img[250, i] = (255, 255, 255)
    img[250 + 1, i] = (255, 255, 255)
    img[250 - 1, i] = (255, 255, 255)
cv2.imwrite('03damaged.jpg', img)

damaged = cv2.imread('03damaged.jpg', 1)
cv2.imshow('damaged', damaged)
damagedInfo = damaged.shape
height = damagedInfo[0]
width = damagedInfo[1]
paint = np.zeros((height, width, 1), np.uint8)
for i in range(200, 300):
    paint[i, 200] = 255
    paint[i, 200 + 1] = 255
    paint[i, 200 - 1] = 255
for i in range(150, 250):
    paint[250, i] = 255
    paint[250 + 1, i] = 255
    paint[250 - 1, i] = 255
cv2.imshow('paint', paint)
# 1.src 2.mask
imgDst = cv2.inpaint(damaged, paint, 3, cv2.INPAINT_TELEA)
cv2.imshow('imgDst', imgDst)
cv2.waitKey(0)
运行结果如下:

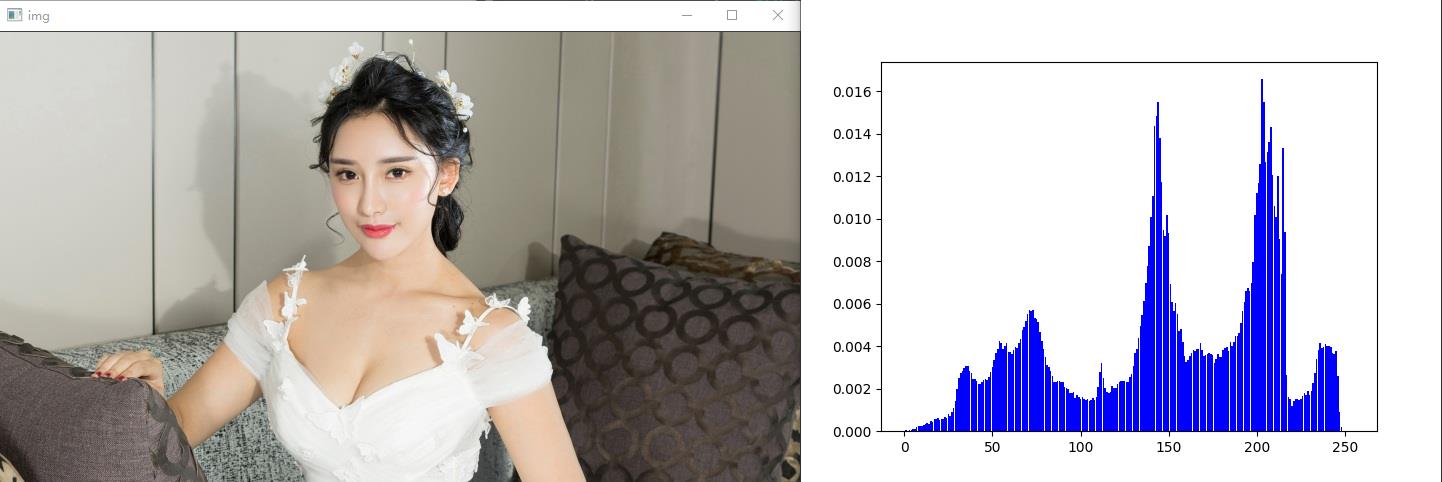
5-5 灰度直方图源码
代码如下:
# 1 0-255 2 概率
# 本质:统计每个像素灰度出现的概率,横坐标为0-255(256个数),纵坐标是出现的概率p
import cv2
import numpy as np
import matplotlib.pyplot as plt

img = cv2.imread('15.jpg', 1)
imgInfo = img.shape
height = imgInfo[0]
width = imgInfo[1]
gray = cv2.cvtColor(img, cv2.COLOR_BGR2GRAY)
count = np.zeros(256, np.float)

for i in range(0, height):
    for j in range(0, width):
        pixel = gray[i, j]  # 获取每一个灰度等级的像素
        index = int(pixel)
        count[index] = count[index] + 1

for i in range(0, 255):
    count[i] = count[i] / (height * width)

x = np.linspace(0, 255, 256)
y = count
plt.bar(x, y, 0.9, alpha=1, color='b')
plt.show()
cv2.waitKey(0)
运行结果如下:

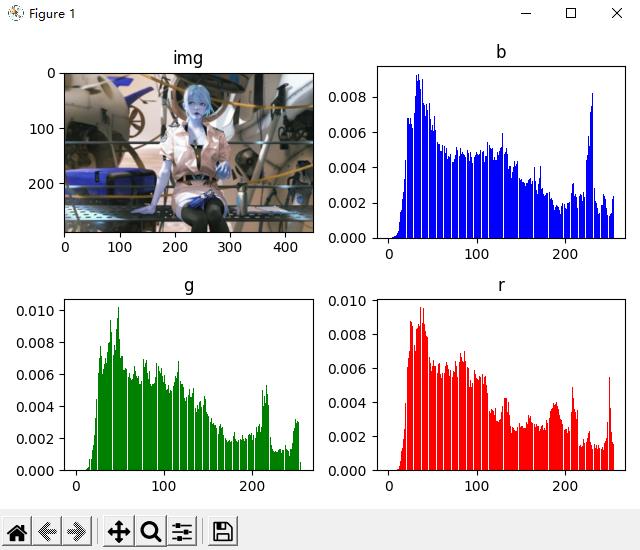
5-6 彩色直方图源码
代码如下:
# 本质:统计每个像素灰度 出现的概率 0-255 p
import cv2
import numpy as np
import matplotlib.pyplot as plt

img = cv2.imread('04.jpg', 1)
imgInfo = img.shape
height = imgInfo[0]
width = imgInfo[1]

count_b = np.zeros(256, np.float)
count_g = np.zeros(256, np.float)
count_r = np.zeros(256, np.float)

for i in range(0, height):
    for j in range(0, width):
        (b, g, r) = img[i, j]
        index_b = int(b)
        index_g = int(g)
        index_r = int(r)
        count_b[index_b] = count_b[index_b] + 1
        count_g[index_g] = count_g[index_g] + 1
        count_r[index_r] = count_r[index_r] + 1

for i in range(0, 256):
    count_b[i] = count_b[i] / (height * width)
    count_g[i] = count_g[i] / (height * width)
    count_r[i] = count_r[i] / (height * width)

x = np.linspace(0, 255, 256)  # 将0-255按照等分成256份

plt.subplot(221)
plt.imshow(img)
plt.title('img')

yb = count_b
plt.subplot(222)
plt.title('b')
plt.bar(x, yb, 0.9, alpha=1, color='b')

yg = count_g
plt.subplot(223)
plt.title('g')
plt.bar(x, yg, 0.9, alpha=1, color='g')

yr = count_r
plt.subplot(224)
plt.title('r')
plt.bar(x, yr, 0.9, alpha=1, color='r')

plt.tight_layout()
plt.show()
cv2.waitKey(0)
运行结果如下:

5-7 灰度直方图均衡化
代码如下:
# 本质:统计每个像素灰度 出现的概率 0-255 p
# 累计概率
# 1 0.2  0.2
# 2 0.3  0.5
# 3 0.1  0.6
# 256
# 100 0.5 255*0.5 = new
import cv2
import numpy as np

img = cv2.imread('05.jpg', 1)
cv2.imshow('src', img)

imgInfo = img.shape
height = imgInfo[0]
width = imgInfo[1]
gray = cv2.cvtColor(img, cv2.COLOR_BGR2GRAY)
cv2.imshow('gray', gray)
count = np.zeros(256, np.float)
for i in range(0, height):
    for j in range(0, width):
        pixel = gray[i, j]
        index = int(pixel)
        count[index] = count[index] + 1

for i in range(0, 255):
    count[i] = count[i] / (height * width)

# 计算累计概率
sum1 = float(0)
for i in range(0, 256):
    sum1 = sum1 + count[i]
    count[i] = sum1

# 计算映射表
map1 = np.zeros(256, np.uint16)
for i in range(0, 256):
    map1[i] = np.uint16(count[i] * 255)

# 映射
for i in range(0, height):
    for j in range(0, width):
        pixel = gray[i, j]
        gray[i, j] = map1[pixel]
cv2.imshow('dst', gray)
cv2.waitKey(0)
运行结果如下:

5-8 彩色直方图均衡化
代码如下:
# 本质:统计每个像素灰度 出现的概率 0-255 p
# 累计概率
# 1 0.2  0.2
# 2 0.3  0.5
# 3 0.1  0.6
# 256
# 100 0.5 255*0.5 = new
# 1 统计每个颜色出现的概率 2 累计概率 1 3 0-255 255*p
# 4 pixel
import cv2
import numpy as np

img = cv2.imread('06.jpg', 1)
cv2.imshow('src', img)

imgInfo = img.shape
height = imgInfo[0]
width = imgInfo[1]

count_b = np.zeros(256, np.float)
count_g = np.zeros(256, np.float)
count_r = np.zeros(256, np.float)
for i in range(0, height):
    for j in range(0, width):
        (b, g, r) = img[i, j]
        index_b = int(b)
        index_g = int(g)
        index_r = int(r)
        count_b[index_b] = count_b[index_b] + 1
        count_g[index_g] = count_g[index_g] + 1
        count_r[index_r] = count_r[index_r] + 1
for i in range(0, 255):
    count_b[i] = count_b[i] / (height * width)
    count_g[i] = count_g[i] / (height * width)
    count_r[i] = count_r[i] / (height * width)
# 计算累计概率
sum_b = float(0)
sum_g 以上是关于快速学完OpenCV+python计算机视觉图像处理的主要内容,如果未能解决你的问题,请参考以下文章