鸿蒙App开发---Button组件
Posted 一天一篇Python库
tags:
篇首语:本文由小常识网(cha138.com)小编为大家整理,主要介绍了鸿蒙App开发---Button组件相关的知识,希望对你有一定的参考价值。
鸿蒙App开发之Button
按钮是我们开发中最常见的组件之一,如果读者已经打开鸿蒙开发工具DevEco Studio,按住Ctrl添加Button类,会发现其继承自Text组件。
public class Button extends Text
所以,其在鸿蒙中是没有自有的XML属性的,其所有属性都继承自Text组件。
创建一个Button
这里,我们和Text组件一样,首先通过XML布局文件进行Button组件的创建。示例代码如下所示:
<Button
    ohos:id="$+id:test_button"
    ohos:height="match_content"
    ohos:width="match_content"
    ohos:element_left="$media:icon"
    ohos:layout_alignment="horizontal_center"
    ohos:top_margin="30vp"
    ohos:background_element="$graphic:background_ability_main"
    ohos:text="$string:test_button"
    ohos:text_size="40vp"
/>
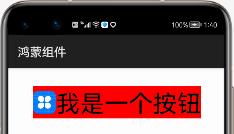
这里,我们创建了一个长方形的按钮。graphic资源文件如下,仅仅设置了其背景的颜色为红色。
<shape xmlns:ohos="http://schemas.huawei.com/res/ohos"
       ohos:shape="rectangle">
    <solid
        ohos:color="#FF0000"/>
</shape>
运行之后,效果如下:
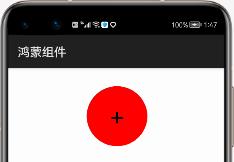
圆形按钮
通过graphic资源文件的设置,我们还可以将按钮变换为圆形头像类似的圆形按钮。示例代码如下:
<?xml version="1.0" encoding="UTF-8" ?>
<shape xmlns:ohos="http://schemas.huawei.com/res/ohos"
       ohos:shape="oval">
    <solid
        ohos:color="#FF0000"/>
</shape>
不过,需要注意的是,这里我们设置的按钮为oval椭圆形,而圆形也是椭圆形的一种,但圆形的宽高相等。所以,我们还需要将Button按钮宽高设置成一样。
<Button
    ohos:id="$+id:test_button"
    ohos:height="100vp"
    ohos:width="100vp"
    ohos:layout_alignment="horizontal_center"
    ohos:top_margin="30vp"
    ohos:background_element="$graphic:background_ability_main"
    ohos:text="+"
    ohos:text_size="40vp"
/>
运行之后,效果如下:
至于椭圆,只要保证宽高不相等即是椭圆按钮。
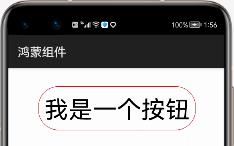
无背景有边框的圆角按钮
这里,我们还是实现一个长方形的按钮,但其4个角是圆角过渡,且没有背景。示例代码如下:
<shape
    xmlns:ohos="http://schemas.huawei.com/res/ohos"
    ohos:shape="rectangle">
    <stroke
        ohos:width="2"
        ohos:color="#FF0000"/>
    <corners
        ohos:radius="100"/>
</shape>
这里,我们设置了边框的宽度为2,且为红色,同时设置圆角为100。而XML布局中的按钮代码如下所示:
<Button
    ohos:id="$+id:test_button"
    ohos:height="match_content"
    ohos:width="match_content"
    ohos:layout_alignment="horizontal_center"
    ohos:top_margin="30vp"
    ohos:padding="10vp"
    ohos:background_element="$graphic:background_ability_main"
    ohos:text="$string:test_button"
    ohos:text_size="40vp"
/>
运行之后,效果如下:
按钮的点击事件(实战通话界面)
众所周知,我们很多手机的通话界面就是12个圆形按钮组成的按键。当我们点击按钮的时候,对应的数字就会输入到上面的文本框中形成电话号码。
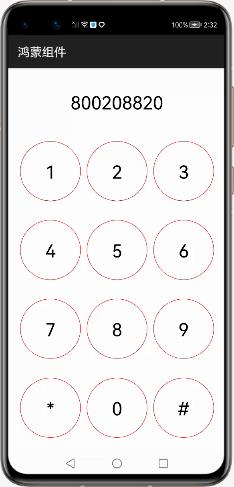
下面,我们通过这个项目来实战按钮是否完全掌握。代码如下:
package com.liyuanjing.idacommunity.slice;
import com.liyuanjing.idacommunity.ResourceTable;
import ohos.aafwk.ability.AbilitySlice;
import ohos.aafwk.content.Intent;
import ohos.agp.components.Button;
import ohos.agp.components.Component;
import ohos.agp.components.Text;

public class MainAbilitySlice extends AbilitySlice implements Component.ClickedListener {
    private Button button0;
    private Button button1;
    private Button button2;
    private Button button3;
    private Button button4;
    private Button button5;
    private Button button6;
    private Button button7;
    private Button button8;
    private Button button9;
    private Button button10;
    private Button button11;
    private Text phone_text;
    @Override
    public void onStart(Intent intent) {
        super.onStart(intent);
        super.setUIContent(ResourceTable.Layout_ability_main);
        this.button0=(Button)findComponentById(ResourceTable.Id_button_0);
        this.button1=(Button)findComponentById(ResourceTable.Id_button_1);
        this.button2=(Button)findComponentById(ResourceTable.Id_button_2);
        this.button3=(Button)findComponentById(ResourceTable.Id_button_3);
        this.button4=(Button)findComponentById(ResourceTable.Id_button_4);
        this.button5=(Button)findComponentById(ResourceTable.Id_button_5);
        this.button6=(Button)findComponentById(ResourceTable.Id_button_6);
        this.button7=(Button)findComponentById(ResourceTable.Id_button_7);
        this.button8=(Button)findComponentById(ResourceTable.Id_button_8);
        this.button9=(Button)findComponentById(ResourceTable.Id_button_9);
        this.button10=(Button)findComponentById(ResourceTable.Id_button_10);
        this.button11=(Button)findComponentById(ResourceTable.Id_button_11);
        this.phone_text=(Text)findComponentById(ResourceTable.Id_phone_number_text);

        this.phone_text.setClickedListener(this);
        this.button0.setClickedListener(this);
        this.button1.setClickedListener(this);
        this.button2.setClickedListener(this);
        this.button3.setClickedListener(this);
        this.button4.setClickedListener(this);
        this.button5.setClickedListener(this);
        this.button6.setClickedListener(this);
        this.button7.setClickedListener(this);
        this.button8.setClickedListener(this);
        this.button9.setClickedListener(this);
        this.button10.setClickedListener(this);
        this.button11.setClickedListener(this);
    }
    @Override
    public void onClick(Component component) {
        switch (component.getId()){
            case ResourceTable.Id_button_0:
                this.phone_text.setText(this.phone_text.getText()+"0");
                break;
            case ResourceTable.Id_button_1:
                this.phone_text.setText(this.phone_text.getText()+"1");
                break;
            case ResourceTable.Id_button_2:
                this.phone_text.setText(this.phone_text.getText()+"2");
                break;
            case ResourceTable.Id_button_3:
                this.phone_text.setText(this.phone_text.getText()+"3");
                break;
            case ResourceTable.Id_button_4:
                this.phone_text.setText(this.phone_text.getText()+"4");
                break;
            case ResourceTable.Id_button_5:
                this.phone_text.setText(this.phone_text.getText()+"5");
                break;
            case ResourceTable.Id_button_6:
                this.phone_text.setText(this.phone_text.getText()+"6");
                break;
            case ResourceTable.Id_button_7:
                this.phone_text.setText(this.phone_text.getText()+"7");
                break;
            case ResourceTable.Id_button_8:
                this.phone_text.setText(this.phone_text.getText()+"8");
                break;
            case ResourceTable.Id_button_9:
                this.phone_text.setText(this.phone_text.getText()+"9");
                break;
            case ResourceTable.Id_button_10:
                this.phone_text.setText(this.phone_text.getText()+"*");
                break;
            case ResourceTable.Id_button_11:
                this.phone_text.setText(this.phone_text.getText()+"#");
                break;
            case ResourceTable.Id_phone_number_text:
                this.phone_text.setText("");
        }
    }
    @Override
    public void onActive() {
        super.onActive();
    }
    @Override
    public void onForeground(Intent intent) {
        super.onForeground(intent);
    }
}
这里我们使用最基本获取控件的方式,后面讲解ResourceTable时,教大家如何使用循环体获取名称相近的组件。
XML布局文件代码:
<?xml version="1.0" encoding="utf-8"?>
<DirectionalLayout
xmlns:ohos="http://schemas.huawei.com/res/ohos"
ohos:height="match_parent"
ohos:width="match_parent"
ohos:orientation="vertical">
<Text
ohos:id="$+id:phone_number_text"
ohos:height="match_content"
ohos:weight="1"
ohos:text_size="30vp"
ohos:layout_alignment="horizontal_center"
ohos:width="match_content"/>
<!--第1排按钮 -->
<DirectionalLayout
ohos:height="match_content"
ohos:width="match_parent"
ohos:weight="1"
ohos:margin="10vp"
ohos:orientation="horizontal">
<Button
ohos:id="$+id:button_1"
ohos:height="100vp"
ohos:width="100vp"
ohos:text="1"
ohos:text_size="30vp"
ohos:left_margin="10vp"
ohos:background_element="$graphic:background_ability_main"/>
<Button
ohos:id="$+id:button_2"
ohos:height="100vp"
ohos:width="100vp"
ohos:text="2"
ohos:text_size="30vp"
ohos:left_margin="10vp"
ohos:background_element="$graphic:background_ability_main"/>
<Button
ohos:id="$+id:button_3"
ohos:height="100vp"
ohos:width="100vp"
ohos:text="3"
ohos:text_size="30vp"
ohos:left_margin="10vp"
ohos:background_element="$graphic:background_ability_main"/>
</DirectionalLayout>
<!--第2排按钮 -->
<DirectionalLayout
ohos:height="match_content"
ohos:width="match_parent"
ohos:weight="1"
ohos:margin="10vp"
ohos:orientation="horizontal">
<Button
ohos:id="$+id:button_4"
ohos:height="100vp"
ohos:width="100vp"
ohos:text="4"
ohos:text_size="30vp"
ohos:left_margin="10vp"
ohos:background_element="$graphic:background_ability_main"/>
<Button
ohos:id="$+id:button_5"
ohos:height="100vp"
ohos:width="100vp"
ohos:text="5"
ohos:text_size="30vp"
ohos:left_margin="10vp"
ohos:background_element="$graphic:background_ability_main"