性能监控之 JMX 监控 Docker 容器中的 Java 应用
Posted zuozewei
tags:
篇首语:本文由小常识网(cha138.com)小编为大家整理,主要介绍了性能监控之 JMX 监控 Docker 容器中的 Java 应用相关的知识,希望对你有一定的参考价值。
一、前言
今天在配置 docker 和 JMX 监控的时候,看到有一个细节和非容器环境中的 JMX 配置不太一样。所以在这里写一下,以备其他人查阅。
二、遇到的问题
1、问题现象
一般情况下,我们配置 JMX 只要写上下面这些参数就可以了。
以下是无密码监控时的 JMX 配置参数(有密码监控的配置和常规监控无异)
-Dcom.sun.management.jmxremote
-Dcom.sun.management.jmxremote.port=9998
-Djava.rmi.server.hostname=<serverip>
-Dcom.sun.management.jmxremote.ssl=false
-Dcom.sun.management.jmxremote.authenticate=false
但是在 docker 容器中这样配置的时候,会出现这个错误。

2、问题分析
这里就要说明一下逻辑了。为什么会这样呢?
先看 docker 环境的网络结构。
容器使用默认的网络模型,就是 bridge 模式。在这种模式下是 docker run 时做的 DNAT 规则,实现数据转发的能力。所以我们看到的网络信息是以下这样的:
docker 中的网卡信息:
[root@f627e4cb0dbc /]# ifconfig
eth0: flags=4163<UP,BROADCAST,RUNNING,MULTICAST>  mtu 1500
        inet 172.18.0.3  netmask 255.255.0.0  broadcast 0.0.0.0
        inet6 fe80::42:acff:fe12:3  prefixlen 64  scopeid 0x20<link>
        ether 02:42:ac:12:00:03  txqueuelen 0  (Ethernet)
        RX packets 366  bytes 350743 (342.5 KiB)
        RX errors 0  dropped 0  overruns 0  frame 0
        TX packets 358  bytes 32370 (31.6 KiB)
        TX errors 0  dropped 0 overruns 0  carrier 0  collisions 0
docker 中的路由信息:
[root@a2a7679f8642 /]# netstat -r
Kernel IP routing table
Destination     Gateway         Genmask         Flags   MSS Window  irtt Iface
default         gateway         0.0.0.0         UG        0 0          0 eth0
172.18.0.0      0.0.0.0         255.255.0.0     U         0 0          0 eth0
[root@a2a7679f8642 /]#
宿主机上的对应网卡信息:
docker0: flags=4163<UP,BROADCAST,RUNNING,MULTICAST>  mtu 1500
		inet 172.18.0.1  netmask 255.255.0.0  broadcast 0.0.0.0
		ether 02:42:44:5a:12:8f  txqueuelen 0  (Ethernet)
		RX packets 6691477  bytes 498130
		RX errors 0  dropped 0  overruns 0  frame 0
		TX packets 6751310  bytes 3508684363 (3.2 GiB)
		TX errors 0  dropped 0 overruns 0  carrier 0  collisions 0
宿主机上的路由信息:
[root@7dgroup ~]# netstat -r
Kernel IP routing table
Destination     Gateway         Genmask         Flags   MSS Window  irtt Iface
default         gateway         0.0.0.0         UG        0 0          0 eth0
link-local      0.0.0.0         255.255.0.0     U         0 0          0 eth0
172.17.208.0    0.0.0.0         255.255.240.0   U         0 0          0 eth0
172.18.0.0      0.0.0.0         255.255.0.0     U         0 0          0 docker0
192.168.16.0    0.0.0.0         255.255.240.0   U         0 0          0 br-676bae33ff92
所以宿主机和容器是可以直接通信的,即便端口没有映射出来。如下所示:
[root@7dgroup ~]# telnet 172.18.0.3 8080
Trying 172.18.0.3...
Connected to 172.18.0.3.
Escape character is '^]'.
另外,因为是桥接的,宿主机上还有类似 veth0b5a080 的虚拟网卡设备信息,如:
eth0b5a080: flags=4163<UP,BROADCAST,RUNNING,MULTICAST>  mtu 1500
        ether 42:c3:45:be:88:1a  txqueuelen 0  (Ethernet)
        RX packets 2715512  bytes 2462280742 (2.2 GiB)
        RX errors 0  dropped 0  overruns 0  frame 0
        TX packets 2380143  bytes 2437360499 (2.2 GiB)
        TX errors 0  dropped 0 overruns 0  carrier 0  collisions 0
这就是虚拟网卡对 veth pair,docker 容器里一个,宿主机一个。 在这种模式下,有几个容器,主机上就会有几个 veth 开头的虚拟网卡设备。
但是如果不是宿主机访问的话,肯定是不通的。如下图所示:
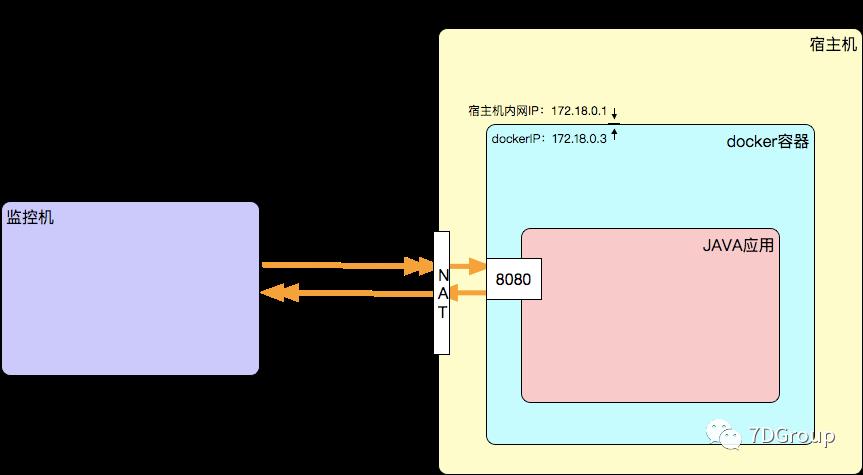
当我们用监控机 访问的时候,会是这样的结果:
Zees-Air-2:~ Zee$ telnet <serverip> 8080
Trying <serverip>...
telnet: connect to address <serverip>: Connection refused
telnet: Unable to connect to remote host
Zees-Air-2:~ Zee$
因为 8080 是容器开的端口,并不是宿主机开的端口,其他机器是访问不了的。 这就是为什么要把端口映射出来给远程访问的原因,映射之后的端口,就会有 NAT 规则来保证数据包可达。
查看下 NAT 规则,就知道。如下:
[root@7dgroup ~]# iptables -t nat -vnL
Chain PREROUTING (policy ACCEPT 171 packets, 9832 bytes)
	pkts bytes target     prot opt in     out     source               destination
	553K   33M DOCKER     all  --  *      *       0.0.0.0/0            0.0.0.0/0            ADDRTYPE match dst-type LOCAL

Chain INPUT (policy ACCEPT 171 packets, 9832 bytes)
	pkts bytes target     prot opt in     out     source               destination

Chain OUTPUT (policy ACCEPT 2586 packets, 156K bytes)
	pkts bytes target     prot opt in     out     source               destination
	205K   12M DOCKER     all  --  *      *       0.0.0.0/0           !60.205.104.0/22      ADDRTYPE match dst-type LOCAL
	0     	0 DOCKER      all  --  *      *       0.0.0.0/0           !127.0.0.0/8          ADDRTYPE match dst-type LOCAL

Chain POSTROUTING (policy ACCEPT 2602 packets, 157K bytes)
 pkts bytes target     prot opt in     out     source               destination
 265K   16M MASQUERADE  all  --  *      !docker0  172.18.0.0/16        0.0.0.0/0
	0     0 MASQUERADE  all  --  *      !br-676bae33ff92  192.168.16.0/20      0.0.0.0/0
	0     0 MASQUERADE  tcp  --  *      *       192.168.0.4          192.168.0.4          tcp dpt:7001
	0     0 MASQUERADE  tcp  --  *      *       192.168.0.4          192.168.0.4          tcp dpt:4001
	0     0 MASQUERADE  tcp  --  *      *       192.168.0.5          192.168.0.5          tcp dpt:2375
	0     0 MASQUERADE  tcp  --  *      *       192.168.0.8          192.168.0.8          tcp dpt:8080
	0     0 MASQUERADE  tcp  --  *      *       172.18.0.4           172.18.0.4           tcp dpt:3306
	0     0 MASQUERADE  tcp  --  *      *       172.18.0.5           172.18.0.5           tcp dpt:6379
	0     0 MASQUERADE  tcp  --  *      *       172.18.0.2           172.18.0.2           tcp dpt:80
	0     0 MASQUERADE  tcp  --  *      *       172.18.0.6           172.18.0.6           tcp dpt:9997
	0     0 MASQUERADE  tcp  --  *      *       172.18.0.6           172.18.0.6           tcp dpt:9996
	0     0 MASQUERADE  tcp  --  *      *       172.18.0.6           172.18.0.6           tcp dpt:8080
	0     0 MASQUERADE  tcp  --  *      *       172.18.0.3           172.18.0.3           tcp dpt:9995
	0     0 MASQUERADE  tcp  --  *      *       172.18.0.3           172.18.0.3           tcp dpt:8080

Chain DOCKER (3 references)
	pkts bytes target  prot opt   in     out     source               destination
	159K 9544K RETURN  all  --  docker0 *       0.0.0.0/0            0.0.0.0/0
	0    0 RETURN      all  --  br-676bae33ff92 *  0.0.0.0/0            0.0.0.0/0
	1    40 DNAT       tcp  --  !docker0 *       0.0.0.0/0            0.0.0.0/0            tcp dpt:3307 to:172.18.0.4:3306
	28  1486 DNAT      tcp  --  !docker0 *       0.0.0.0/0            0.0.0.0/0            tcp dpt:6379 to:172.18.0.5:6379
    228 137K  DNAT     tcp  --  !docker0 *       0.0.0.0/0            0.0.0.0/0            tcp dpt:91 to:172.18.0.2:80
	3   192 DNAT       tcp  --  !docker0 *       0.0.0.0/0            0.0.0.0/0            tcp dpt:9997 to:172.18.0.6:9997
	0     0 DNAT       tcp  --  !docker0 *       0.0.0.0/0            0.0.0.0/0            tcp dpt:9996 to:172.18.0.6:9996
	0     0 DNAT       tcp  --  !docker0 *       0.0.0.0/0            0.0.0.0/0            tcp dpt:9002 to:172.18.0.6:8080
	12   768 DNAT      tcp  --  !docker0 *       0.0.0.0/0            0.0.0.0/0            tcp dpt:9995 to:172.18.0.3:9995
	4   256 DNAT       tcp  --  !docker0 *       0.0.0.0/0            0.0.0.0/0            tcp dpt:9004 to:172.18.0.3:8080

[root@7dgroup ~]#
我们看到了宿主机的 91 端口的数据会传给 172.18.0.2 的 80 端口。宿主机的 3307 端口会传给 172.18.0.4 的3306 端口。
啰啰嗦嗦说到这里,那和 JMX 有啥关系。苦就苦在,JMX 是这样的:
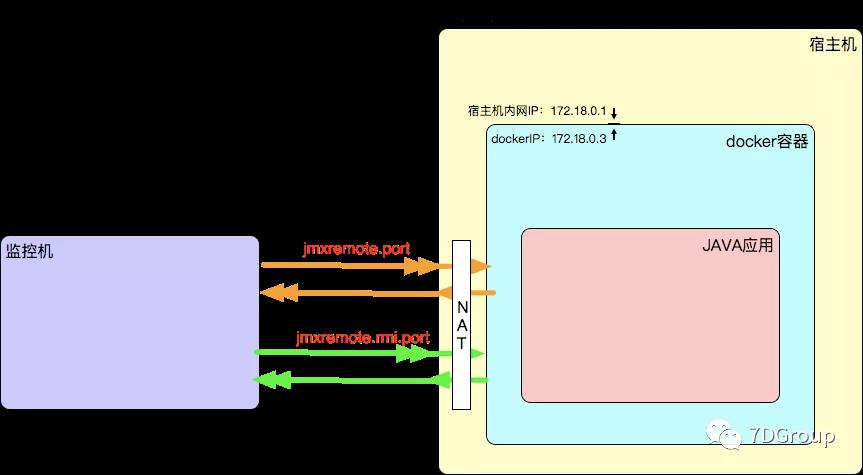
在注册时使用的是参数 jmxremote.port,然后返回一个新的端口 jmxremote.rmi.port。
在调用服务时使用是参数 jmxremote.rmi.port。 前面提到了,因为 docker 在 bridge 模式下端口是要用 -p 显式指定的,不然没 NAT 规则,数据包不可达。所以在这种情况下,只能把 jmxremote.rmi.port 也暴露出去。所以必须显式指定。因为不指定的话,这个端口会随机开。随机开的端口又没 NAT 规则,所以是不通的了。
三、解决方案
所以,这种以上情况只能指定 jmxremote.rmi.port 为固定值,并暴露出去。 配置如下:
-Dcom.sun.management.jmxremote
-Dcom.sun.management.jmxremote.port=9995
-Djava.rmi.server.hostname=<serverip>
-Dcom.sun.management.jmxremote.ssl=false
-Dcom.sun.management.jmxremote.authenticate=false
-Dcom.sun.management.jmxremote.rmi.port=9995
像上面的设置就是两个都是 9995,这样是允许的,这种情况下注册和调用的端口就合并了。
再启动 docker 容器的时候,就需要这样了。
docker run -d -p 9003:8080 -p 9995:9995 --name 7dgroup-tomcat5
-e CATALINA_OPTS="-Dcom.sun.management.jmxremote \\
-Dcom.sun.management.jmxremote.port=9995 \\
-Djava.rmi.server.hostname=<serverip> \\
-Dcom.sun.management.jmxremote.ssl=false \\
-Dcom.sun.management.jmxremote.authenticate=false \\
-Dcom.sun.management.jmxremote.rmi.port=9995" c375edce8dfd
然后就可以连接上 JMX 的工具了。
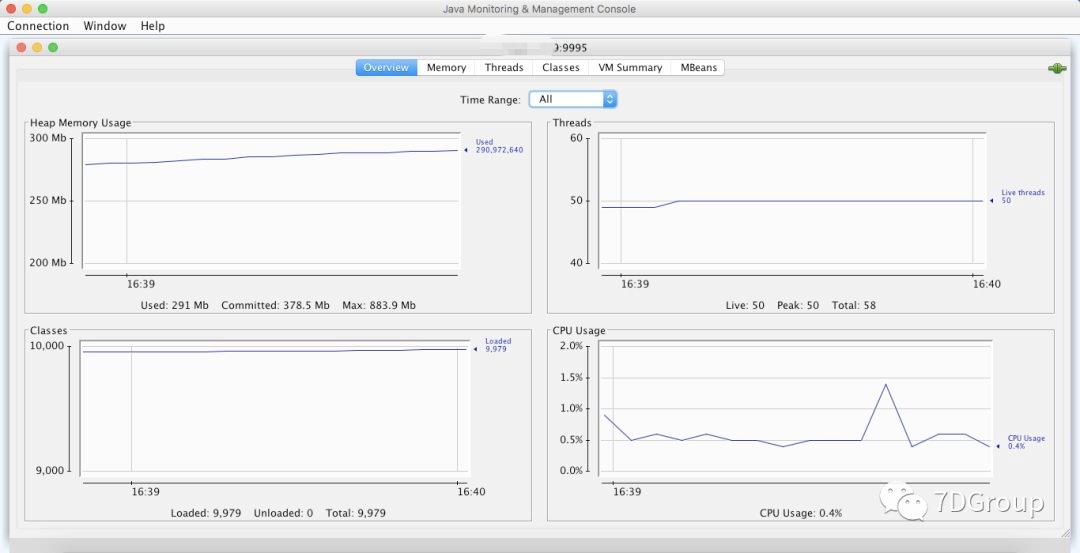
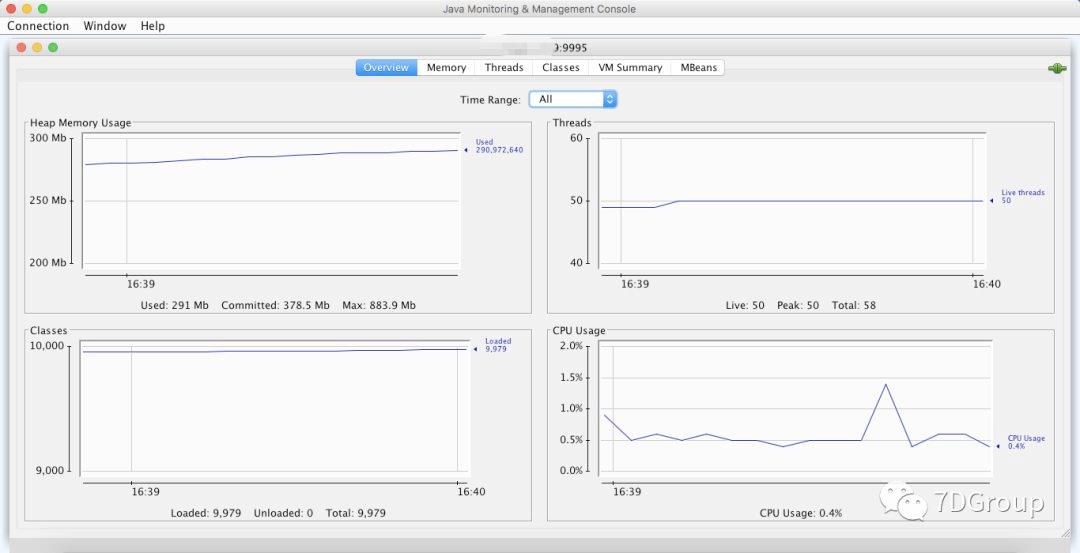
在有防火墙和其他的设备的网络环境中,也有可能出同样的问题。明白了JMX 的注册调用逻辑之后,就可以解决各种类似的问题了。
网络链路是做性能分析的人必须想明白的技术点,所以前面说了那么多内容。
四、总结
这里对于 JMX 工具的选择啰嗦两句。有人喜欢花哨的,有人喜欢简单的,有人喜欢黑窗口的。我觉得工具选择的时候,要看适用情况,在性能分析的时候,一定要选择合适的工具,而不是选择体现技术高超的工具。
最后留个作业:
-
如果
docker run中如果指定-p 19995:9995,也就是换个端口暴露出去,其他配置都不变。JMX 工具还能连得上吗? -
如果
jmxremote.rmi.port和jmxremote.port不合并,并且同时把两个端口都暴露出去,其他配置都不变。JMX 工具还能连得上吗?
有兴趣的可以自己尝试下哦。
以上是关于性能监控之 JMX 监控 Docker 容器中的 Java 应用的主要内容,如果未能解决你的问题,请参考以下文章