Terraform入门教程,示例展示管理Docker和Kubernetes资源
Posted java构架师
tags:
篇首语:本文由小常识网(cha138.com)小编为大家整理,主要介绍了Terraform入门教程,示例展示管理Docker和Kubernetes资源相关的知识,希望对你有一定的参考价值。
1 简介
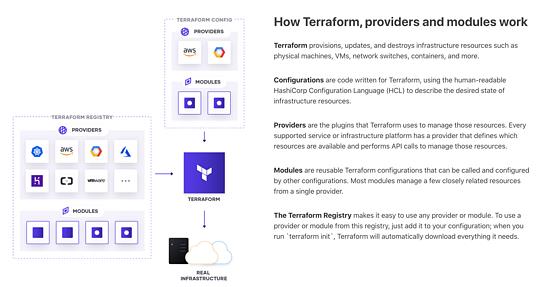
Terraform 是一个可快速部署、方便管理IT基础架构配置的工具,它的理念是 Infrastructure as Code ,一切资源都是代码。如虚拟机、网络、DNS等,这些都通过代码来管理部署,而不是人工手动的去创建、删除等。它能大大减少人为操作的风险,能快速部署多套环境,适应多种硬件资源,特别适合云环境:AWS、GCP、Azure、阿里云等。
它通过丰富的 Providers 来管理多种类型的资源,就像是插件一样,如GCP、Docker、Kubernetes等。
本文将通过演示讲解如何部署Docker/Kubernetes资源。
2 安装
到官方 下载界面 对应的二进制文件,我通过命令操作,我选择的是Mac的版本:
# 创建目录
$ mkdir terraform
$ cd terraform/
# 下载安装包
$ wget https://releases.hashicorp.com/terraform/0.15.4/terraform_0.15.4_darwin_amd64.zip
# 解压
$ unzip terraform_0.15.4_darwin_amd64.zip
# 查看版本,显示安装成功
$ ./terraform --version
Terraform v0.15.4
on darwin_amd64
成功显示了版本,我们把它添加到环境变量中去即可。
3 部署Docker资源
创建个目录:
$ mkdir terraform-docker-demo && cd $_
创建一个 main.tf 文件,写入以下内容:
terraform {
  required_providers {
    docker = {
      source = "kreuzwerker/docker"
    }
  }
}

provider "docker" {}

resource "docker_image" "nginx" {
  name         = "nginx:latest"
  keep_locally = false
}

resource "docker_container" "nginx" {
  image = docker_image.nginx.latest
  name  = "tutorial"
  ports {
    internal = 80
    external = 8000
  }
}
根据 main.tf 初始化项目:
$ terraform init

Initializing the backend...

Initializing provider plugins...
- Finding latest version of kreuzwerker/docker...
- Installing kreuzwerker/docker v2.12.2...
- Installed kreuzwerker/docker v2.12.2 (self-signed, key ID 24E54F214569A8A5)

Partner and community providers are signed by their developers.
If you'd like to know more about provider signing, you can read about it here:
https://www.terraform.io/docs/cli/plugins/signing.html

Terraform has created a lock file .terraform.lock.hcl to record the provider
selections it made above. Include this file in your version control repository
so that Terraform can guarantee to make the same selections by default when
you run "terraform init" in the future.

Terraform has been successfully initialized!

You may now begin working with Terraform. Try running "terraform plan" to see
any changes that are required for your infrastructure. All Terraform commands
should now work.

If you ever set or change modules or backend configuration for Terraform,
rerun this command to reinitialize your working directory. If you forget, other
commands will detect it and remind you to do so if necessary.
我们先执行plan来看看它将会有什么变更:
$ terraform plan

Terraform used the selected providers to generate the following execution plan. Resource actions are indicated with the following symbols:
  + create

Terraform will perform the following actions:

  # docker_container.nginx will be created
  + resource "docker_container" "nginx" {
      + attach           = false
      + bridge           = (known after apply)
      + command          = (known after apply)
      + container_logs   = (known after apply)
      + entrypoint       = (known after apply)
      + env              = (known after apply)
      + exit_code        = (known after apply)
      + gateway          = (known after apply)
      + hostname         = (known after apply)
      + id               = (known after apply)
      + image            = (known after apply)
      + init             = (known after apply)
      + ip_address       = (known after apply)
      + ip_prefix_length = (known after apply)
      + ipc_mode         = (known after apply)
      + log_driver       = "json-file"
      + logs             = false
      + must_run         = true
      + name             = "tutorial"
      + network_data     = (known after apply)
      + read_only        = false
      + remove_volumes   = true
      + restart          = "no"
      + rm               = false
      + security_opts    = (known after apply)
      + shm_size         = (known after apply)
      + start            = true
      + stdin_open       = false
      + tty              = false

      + healthcheck {
          + interval     = (known after apply)
          + retries      = (known after apply)
          + start_period = (known after apply)
          + test         = (known after apply)
          + timeout      = (known after apply)
        }

      + labels {
          + label = (known after apply)
          + value = (known after apply)
        }

      + ports {
          + external = 8000
          + internal = 80
          + ip       = "0.0.0.0"
          + protocol = "tcp"
        }
    }

  # docker_image.nginx will be created
  + resource "docker_image" "nginx" {
      + id           = (known after apply)
      + keep_locally = false
      + latest       = (known after apply)
      + name         = "nginx:latest"
      + output       = (known after apply)
    }

Plan: 2 to add, 0 to change, 0 to destroy.
执行变更:
$ terraform apply
docker_image.nginx: Creating...
docker_image.nginx: Still creating... [10s elapsed]
docker_image.nginx: Still creating... [20s elapsed]
docker_image.nginx: Creation complete after 28s [id=sha256:d1a364dc548d5357f0da3268c888e1971bbdb957ee3f028fe7194f1d61c6fdeenginx:latest]
docker_container.nginx: Creating...
docker_container.nginx: Creation complete after 1s [id=0dac86e383366959bd976cc843c88395a17c5734d729f62f07106caf604b466f]
它自动帮我们下载了镜像和启动了容器。通过以下命令查看nginx的主页:
$ curl http://localhost:8000
现在我不想要这些资源了,通过以下命令删除:
$ terraform destroy
docker_container.nginx: Destroying... [id=0dac86e383366959bd976cc843c88395a17c5734d729f62f07106caf604b466f]
docker_container.nginx: Destruction complete after 0s
docker_image.nginx: Destroying... [id=sha256:d1a364dc548d5357f0da3268c888e1971bbdb957ee3f028fe7194f1d61c6fdeenginx:latest]
docker_image.nginx: Destruction complete after 1s
4 部署Kubernetes资源
创建目录:
$ mkdir terraform-kubernetes-demo && cd $_
创建 main.tf 文件:
terraform {
  required_providers {
    kubernetes = {
      source  = "hashicorp/kubernetes"
      version = ">= 2.0.0"
    }
  }
}
provider "kubernetes" {
  config_path = "~/.kube/config"
}
resource "kubernetes_namespace" "test" {
  metadata {
    name = "nginx"
  }
}
resource "kubernetes_deployment" "test" {
  metadata {
    name      = "nginx"
    namespace = kubernetes_namespace.test.metadata.0.name
  }
  spec {
    replicas = 2
    selector {
      match_labels = {
        app = "MyTestApp"
      }
    }
    template {
      metadata {
        labels = {
          app = "MyTestApp"
        }
      }
      spec {
        container {
          image = "nginx"
          name  = "nginx-container"
          port {
            container_port = 80
          }
        }
      }
    }
  }
}
resource "kubernetes_service" "test" {
  metadata {
    name      = "nginx"
    namespace = kubernetes_namespace.test.metadata.0.name
  }
  spec {
    selector = {
      app = kubernetes_deployment.test.spec.0.template.0.metadata.0.labels.app
    }
    type = "NodePort"
    port {
      node_port   = 30201
      port        = 80
      target_port = 80
    }
  }
}
直接执行:
terraform init
terraform apply
检查结果:
$ kubectl -n nginx get deployment
NAME    READY   UP-TO-DATE   AVAILABLE   AGE
nginx   2/2     2            2           2m

$ kubectl -n nginx get service
NAME    TYPE       CLUSTER-IP      EXTERNAL-IP   PORT(S)        AGE
nginx   NodePort   10.98.213.164   <none>        80:30201/TCP   71s

$ curl http://localhost:30201
测试完成,删除:
terraform destroy
5 总结
Terraform 在云计算领域还是有自己的一席之地的,值得了解学习。
以上是关于Terraform入门教程,示例展示管理Docker和Kubernetes资源的主要内容,如果未能解决你的问题,请参考以下文章
我可以为 Terraform for GCP 赋予管理员角色吗? (Cloud Run 域映射示例)